Table of Contents
Advertisement
Quick Links
User Manual
COMMAX LOBBY PHONE DRC-700S
• Thank you for purchasing COMMAX products.
• Thank you for purchasing COMMAX products.
• Please carefully read this User's Guide (in particular, precautions for safety) before using a product and follow
• Please carefully read this User's Guide (in particular, precautions for safety) before using a product and follow
instructions to use a product exactly.
instructions to use a product exactly.
• The company is not responsible for any safety accidents caused by abnormal operation of the product.
• The company is not responsible for any safety accidents caused by abnormal operation of the product.
Advertisement
Table of Contents

Subscribe to Our Youtube Channel
Related Manuals for Commax DRC-700S


Summary of Contents for Commax DRC-700S
- Page 1 User Manual COMMAX LOBBY PHONE DRC-700S • Thank you for purchasing COMMAX products. • Thank you for purchasing COMMAX products. • Please carefully read this User’s Guide (in particular, precautions for safety) before using a product and follow • Please carefully read this User’s Guide (in particular, precautions for safety) before using a product and follow instructions to use a product exactly.
-
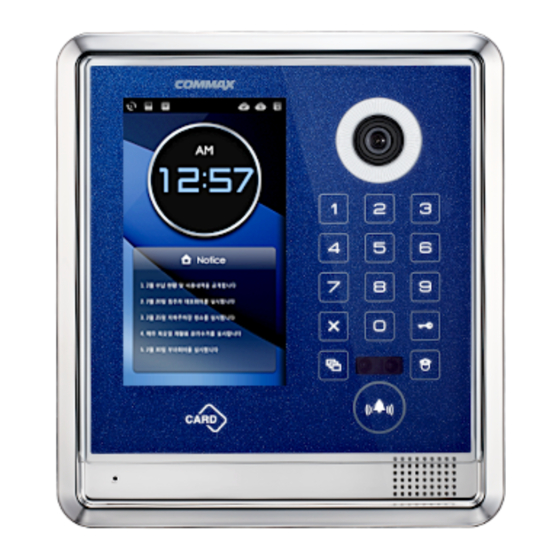
Page 2: Part Names
Part names TFT-LCD Screen ⑦ Security Button ① Mike ⑧ Call Button ② RF CARD Receiver ⑨ Program Button ③ Camera ⑩ Speaker ④ Dial Button ⑪ ⑤ Electric Key Button ⑥... -
Page 3: Main Screen Setting
1. Main Screen Setting 1.1. Main Screen Skin Theme Flip Clock Red Clock Green Clock Black Clock 1.2. Status Icon Description Icon Description Lan Connection Registered server status Display out post lobby Not Registered server status phone Display building lobby RF-Card Data save status phone... -
Page 4: Security Call
2. Security Call ① Push (Security Guard Post) Button ② Push (Call) button ③ Call sound is ringing and call Security Guard Post. ④ Call Security Guard Post when guard answer call. (Time: 1 min.) ⑤ Press “X” button when terminate call. ⑥... -
Page 5: Call House
3. Call house 3.1. Communication call between residence When building number is set in advance: When building No. already registered to Call Prefix Picture2. Screen for registering house No. ① Input unit No. to key board. Ex) Unit 101 input ‘101’ ②... - Page 6 When building number is NOT set in advance: When building number hasn’t been registered Call Prefix yet. Picture3. Building house No. register screen ① Input Building No. to key board. Ex) Building 101 input ‘101’ ② Input unit No. to key board. Ex) Unit 101 ...
-
Page 7: Access Authorization
4. Access authorization 4.1 Opening the entrance with RF card. ① Tag RF card to ‘Card tagging window’. ② The common entrance get be opened with a vocal message, “door opens” when the access is successful. ③ The entrance does not be opened when the access fails with sound. - Page 8 Building Number is not designated case: Building Number is not designated in Call Prefix ① Input Building No. through key board. EX) Building 101 Input 101 ② Push (call) button. ③ Input unit No. through key board. Ex) Unit 101 Input 101 ④...
- Page 9 4.3. Use password for accessing when system is OFF-Line (No connection with Local server) ① Push (Key) button. ② Input PIN number. ③ Push (call) button. ※ This function is not activate when it is On-Line (possible to interface with local server status). ※...
- Page 10 5. Set up Set up ① Push button. ② Input PIN number. ③ Push (call) button. ※ We recommend user change initial password (0000) then use products for security. ※ Initialize password: + “0000” + button map ※ ” “is DOT (.) for IP address typing.
- Page 11 0: Server address (Input Local server address) 1: Update address (Input update server address) 2: System ID (Input DRC-700S serial No.) 3: Call Prefix (Set building) * If there is no building information in set up, automatically pop up for building information when call house.
- Page 12 3: Audio/Video+ 0: Audio+ 0: Guard Spe. Vol. (Control speaker volume when communicate with house) 1: Guard Mic Vol. (Control Mic. volume when communicate with house) 2: Guard Spe. Vol. (Control speaker volume when communicate with guard) 3: Guard Mic Vol. (Control Mic. volume when communicate with guard) 4: Key Sound (Select button sound) 5: Ring Sound (Select call sound) 6.
- Page 13 4: Extra Config+ 0: Language (Select language) 1: Skin Theme 0: Auto * Automatically change Skin Theme once a day or after booting. 1: Flip Clock * Set up Skin Theme to Flip Clock Type. 2: Red Clock * Set up Skin Theme to Red Clock Typ. 3: Green Clock * Set up Skin Theme to Green Clock Type.
- Page 14 5: Off-Line Password (In put Off-Line password) * Push button for deleting previous password. * Initial Off-Line password is “123456”. 6: Reboot: (System rebooting) 7: System Reset (Initialize all setting and back to factory setting) * Do not initialize IP after changing IP address. 5: Database+ 0: Password Down.
-
Page 15: Wiring Diagram
6. Wiring Diagram ※ Pay attention to check polarity when install lobby panel. - Page 16 Memo...
- Page 17 Memo...
- Page 18 513-11, Sangdaewon-dong, Jungwon-gu, Seongnam-si, Gyeonggi-do, Korea Int’l Business Dept. Tel. : +82-31-7393-540~550 Fax. : +82-31-745-2133 Web site : www.commax.com PM10700S0010 Printed In Korea / 2013.08.104...
Need help?
Do you have a question about the DRC-700S and is the answer not in the manual?
Questions and answers