
Related Manuals for Charder MS4980


Summary of Contents for Charder MS4980
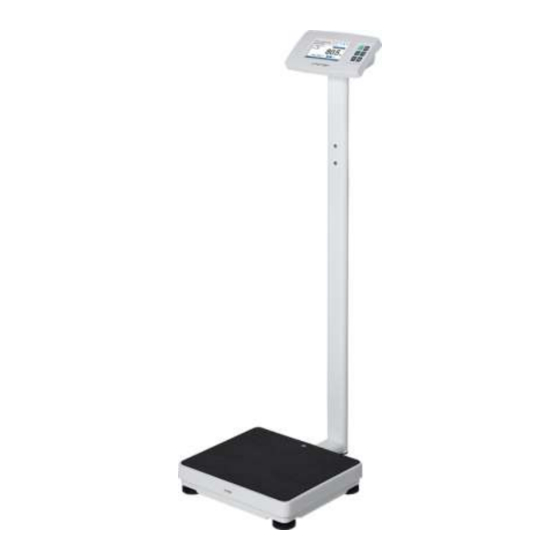
- Page 1 USER MANUAL MS4980 Stand-on Floor Scale Please keep the instruction manual at hand all the time for future reference.
- Page 2 Explanation of Text/Symbols on Device Label/Packaging Text/Symbol Meaning Caution, consult accompanying documents before use Separate collection for waste of electrical and electronic equipment, in accordance with Directive 2002/96/EC. Do not dispose of device with everyday waste Name and address of device manufacturer, and year/country of manufacture Carefully read user manual before installation and usage, and follow instructions for use.
- Page 3 Copyright© Charder Electronic Co., Ltd. All rights reserved. This user manual is protected by international copyright law. All content is licensed, and usage is subject to written authorization from Charder Electronic Co., Ltd. (hereinafter Charder) Charder is not liable for any damage caused by a failure to adhere to requirements stated in this manual.
-
Page 4: Table Of Contents
CONTENTS I. Safety Notes ................5 A. General Information ............5 B. EMC Guidance and Manufacturer's Declaration ......8 II. Assembly ................12 A. Column ................12 B. Using adapter and charging battery ........12 C. Replacing Rechargeable Battery Pack ........13 D. Optional Accessories ............14 III. -
Page 5: Safety Notes
I. Safety Notes A. General Information Thank you for choosing this Charder Medical device. It is designed to be easy and straightforward to operate, but if you encounter any problems not addressed in this manual, please contact your local Charder service partner. - Page 6 All maintenance, technical inspections, and repairs should be ◼ conducted by an authorized Charder service partner, using original Charder accessories and spare parts. Charder is not liable for any damages arising from improper maintenance or usage. Disposal This product is not to be treated as regular household waste, but ◼...
- Page 7 Charder may cause malfunction. ◼ Do not touch the power supply with wet hands. ◼ Do not crimp the power cable, and avoid sharp edges. ◼ Do not overload extension cables connected to the device.
-
Page 8: Emc Guidance And Manufacturer's Declaration
B. EMC Guidance and Manufacturer's Declaration Guidance and manufacturer’s declaration-electromagnetic emissions The MS4980 Stand-on Floor Scale is intended for use in the electromagnetic environment specified below. The customer or the user of the device should assure that it is used in such an environment. - Page 9 NOTE UT is the a.c. mains voltage prior to application of the test level. Guidance and manufacturer’s declaration-electromagnetic immunity The MS4980 Stand-on Floor Scale is intended for use in the electromagnetic environment specified below. The customer or the user of the device should assure that is used in such an environment.
- Page 10 80MHz to 2,7 GHz the frequency of the transmitter. 3 V/m 80MHz to 2,7 Recommended separation distance: d = 1,2 √P d = 1,2 √P 80MHz to 800 MHz d = 2,3 √P 800MHz to 2,5 GHz Where P is the maximum output power rating of the transmitter in watts (W) according to the transmitter manufacturer and d...
- Page 11 Recommended separation distance between portable and mobile RF communications equipment and the MS4980 Stand-on Floor Scale The device is intended for use in an electromagnetic environment in which radiated RF disturbances are controlled. The customer or the user of the device can help prevent...
-
Page 12: Assembly
II. Assembly A. Column Fasten and tighten four screws at the bottom of the base. Ensure four adjustable feet and stability foot are at same level before using device. Four screws B. Using adapter and charging battery The rechargeable battery should be recharged at least once every 3 months, regardless of if the device has been used. -
Page 13: Replacing Rechargeable Battery Pack
C. Replacing Rechargeable Battery Pack 1. Open battery housing cover 2. Remove battery pack housing from indicator 3. Place new battery pack into housing, and insert into indicator... -
Page 14: Optional Accessories
6. Close battery housing compartment cover. Turn on power to confirm that battery is correctly installed. D. Optional Accessories This device is compatible with a variety of accessories. Please consult their respective user manuals for assembly instructions: a. Height Stadiometer HM130D Digital Height Stadiometer ◼... -
Page 15: Indicator
III. Indicator A. Indicator and Key Functions Key Function POWER: Power on or power off. 2. TARE/ZERO: Reset display to 0.0 kg display. Press and hold for 6 seconds to enter device settings. 3. HOLD: Determine stable weighing value - used when weight is unstable. -
Page 16: Display Layout
B. Display layout Quantity of Patient ID data Information PRE-TARE awaiting Nurse ID Wi-Fi transfer Battery status Transfer HOLD Scanner Stable Weight Zero Unit Height Capacit Graduation Definitions Quantity of data awaiting transfer: If device is not connected wirelessly, measurement results will be temporarily stored in device. Once device is connected, operator can press Transfer to send results wirelessly. -
Page 17: Basic Operation
IV. Basic Operation 1. Switch on the device using key. The device will automatically perform self-calibration 2. Once "0.0" appears on indicator, device is ready for use NOTE: If "0.0" does not display on indicator, press [TARE/ZERO] key to zero the device. A. -
Page 18: Weight Measurement
3. After the phone/tablet/PC is connected to the device, the wireless symbol will change from 4. Device is now ready to send results wirelessly to phone/tablet/PC. 5. Before or after measurement, press the [HOLD] key. "HOLD" will be displayed on the indicator. If HOLD is not active, results cannot be transferred. -
Page 19: Tare
'Awaiting transfer'). After transfer is complete, number will revert to "0" With attached Height Stadiometer 1. Ensure compatible Charder digital height stadiometer is plugged into indicator. If stadiometer is plugged in, manual height input will be disabled. -
Page 20: Pre-Tare
E. Pre-Tare The Pre-Tare function is used to subtract the known weight of a substance prior to weighing. The device can store 10 sets of pre-tare values in memory. Once pre-tare weights have been stored, they can be recalled by pressing the [MEMORY] key. Input Pre-Tare Value DESCRIPTION EXAMPLE... - Page 21 Device will return to measurement mode. Indicator will display minus sign to the left of pre-tare weight value. Save a Pre-Tare value DESCRIPTION EXAMPLE Press and hold [MEMORY] key for 3 seconds. Input the number for this pre-tare setting (between 01-10).
- Page 22 PRE-TARE ID will show Pre-Tare memory set 3 as active, and deduct the pre-tare value (13.5 kg, in this example) from the displayed weight result. Recall Pre-Tare Value DESCRIPTION EXAMPLE Press [MEMORY] key to toggle between Pre-Tare settings saved in device (between 01-10).
-
Page 23: Device Setup
V. Device Setup Press and hold [TARE/ZERO] key for 6 seconds to enter General Setting mode. Press menu options on the touchscreen to adjust settings. Auto Off Time: Instruct device to shut off automatically after a certain period of time. Auto off options: 120 sec / 180 sec / 240 sec / 300 sec / off Backlight: adjust backlight brightness. -
Page 24: Connecting Scale To Receiving Device
Data Transfer: If enabled, all data fields (patient ID, weight, height) need to be completed to transfer data. If fields are incomplete (ex: only weight, no height or ID), data will not be transferred. Options: Enable / Disable Date/Time: Set device time. (Format: YYYY/MM/DD HH:M) Wifi Setting: Send results via direct transfer or via network (set Access Point if selected) G-Compensation: Authorized distributor can adjust gravity... -
Page 25: Troubleshooting
VII. Troubleshooting Before contacting your local Charder distributor for repair service, we recommend considering the following troubleshooting procedures: Self-inspection 1. Device will not power on If battery power is depleted, replace with new batteries ◼ If batteries are not used, check if the power adapter is plugged into ◼... - Page 26 Error Messages Error Message Action Please charge battery using adapter, or replace battery Maximum weight exceeded. Reduce weight on platform before attempting measurement If problem persists, please contact distributor Re-calibration may be required. If problem persists, please contact distributor Re-calibration may be required. If problem persists, please contact distributor If problem persists, please contact...
-
Page 27: Product Specifications
USB transfer cable*1, M6*20 Screws*4 Optional Accessories Height Stadiometer, Barcode Scanner. Warning Only the original adapter should be used with the device. Using an adapter other than the one provided by Charder may cause malfunction. Amp Voltage: 5V/2A Drawing No: CD-AD-00023... -
Page 28: Declaration Of Conformity
RoHS Directive 2011/65/EU and Delegated Directive (EU) 2015/863 Radio equipment and telecommunications terminal equipment Directive 2014/53/EU (applicable if wireless module is used) Manufactured by: Charder Electronic Co., Ltd. No.103, Guozhong Rd., Dali Dist., Taichung City, 41262 Taiwan CD-IN-00417 REV 005 2022/07...
Need help?
Do you have a question about the MS4980 and is the answer not in the manual?
Questions and answers