Advertisement
General Information
PLEASE READ THROUGH BEFORE BEGINNING ASSEMBLY.
IMPORTANT: Check boxes for Contents Listed
Check inside of parts as some parts are packaged
inside of others
In the event of missing, damaged or defective parts
please call our customer service dept. at 1-877-258-6020
When assembling components, place on a clean, flat
non-abrasive surface to avoid scratches
Tools Required
... Battery or Electric Drill
... Two 7/16" wrenches or sockets
... File
with #2 phillips bit, ⅛" drill bit
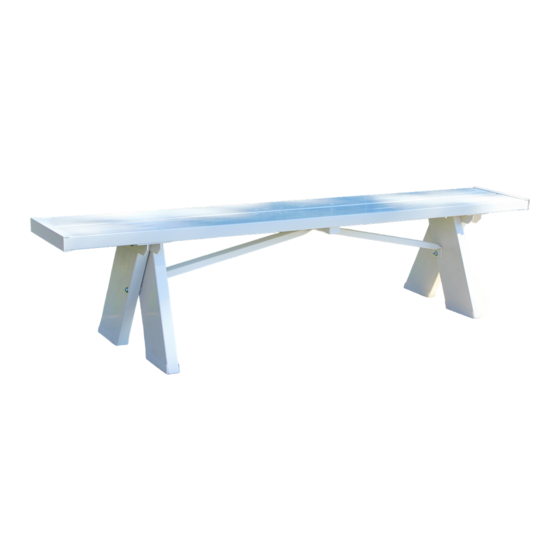
6' Bench
11125
Model#
Part #
1
1½ x 5½ x 72" Seat Rail
2
1½ x 5½ x 15¾" Leg
3
10¾" Seat Bracket
4
⅞ x 1½ x 10 ⅛" Center Brace
5
⅞ x 1½ x 24¾" Diagonal Brace
6
11 ⅛" Seat End Cap
7
6" Leg End Cap
8
Hardware Bag
⅞ x 1½" End Cap
2" Painted Screw
¾" Painted Screw
¼ x 4" Bolt
¼" Nylock Nut
¼" Flat Washer
Super Glue Tube
150 Birch Road
P.O. Box 122
Sheboygan Falls, WI 53085
Assembly Instructions
Description
(with wood)
(includes:)
1-877-258-6020
www.dura-trel.com
sales@dura-trel.com
Qty
2
4
2
1
2
2
4
1
2
6
16
6
6
16
1
1
Advertisement
Table of Contents

Subscribe to Our Youtube Channel
Related Manuals for Dura Trel 11125


Summary of Contents for Dura Trel 11125
- Page 1 6' Bench 11125 Model# Assembly Instructions Part # Description 1½ x 5½ x 72" Seat Rail (with wood) 1½ x 5½ x 15¾" Leg 10¾" Seat Bracket ⅞ x 1½ x 10 ⅛" Center Brace ⅞ x 1½ x 24¾" Diagonal Brace 11 ⅛"...
- Page 2 Warranty Statement 20 Year Guarantee Please call manufacturer direct with questions concerning missing or defective parts at Toll Free: 877-258-6020. Dura-trel, Inc. products are warranted to be free from manufacturing defects resulting in delaminating, peeling, flaking, corroding, cracking, crazing, or extreme amounts of fading or bleaching causing the PVC to change to its natural color for a period of 20 years from the date of purchase.
- Page 3 Lay out two 72" seat rails (part 1) with pilot holes facing up. Be sure wood inserts are flush with vinyl. Set two 10¾" seat brackets (part 3) over pilot holes at each end of seat rail, leaving ⅛" gap between rails. Using eight ¾"...
- Page 4 Insert one 15¾" leg (part 2) into bracket. Place second 15¾" leg (part 2) on inside of bracket and loosely fasten with 4" bolts, washers and nuts. Set 24¾" diagonal brace on inside of legs with ¼" drilled hole against legs. Using one 4"...
- Page 5 6' Bench 11125 1½ x 5½ x 72" Bench Rail 2.00 1½ x 5½ x 15¾" Bench Leg 4.00 10¾" Bench Bracket 2.00 ⅞ x 1½ x 10 ⅛" Ctr Brace 1.00 ⅞ x 1½ x 24¾" Bench Diago 2.00 11 ⅛"...
Need help?
Do you have a question about the 11125 and is the answer not in the manual?
Questions and answers