
Related Manuals for Reed Instruments R9930


Summary of Contents for Reed Instruments R9930
- Page 1 R9930 Air Particle Counter 1 YEAR 1 AN 1 AN 1 YEAR Instruction Manual www.REEDInstruments.com 1.888.610.7664 www.calcert.com sales@calcert.com...
-
Page 2: Table Of Contents
Table of Contents Introduction ....................4 Product Quality ................... 4 Safety ......................4 Features ..................... 4 Included ..................... 5 Specifications ..................5-6 Instrument Description ................7 Display Description ..................8 Software Installation ................... 8 Operation Instructions ................9-13 Power ON/OFF ..................9 Taking Measurements ................ - Page 3 Setting the Language ................16 Adjusting Display Brightness ..............16 Enable/Disable the Auto Power Off Function ........17 Adjusting Display Timeout ..............17 Enabling/Disabling Audible Alarm ............17 Viewing Memory Status ................. 17 Restoring Default System Settings ............18 Selecting the Temperature Unit of Measure .......... 18 Updating the Firmware using the Micro SD Card ........
-
Page 4: Introduction
Introduction Thank you for purchasing your REED R9930 Air Particle Counter. Please read the following instructions carefully before using your instrument. By following the steps outlined in this manual your meter will provide years of reliable service. Product Quality This product has been manufactured in an ISO9001 facility and has been calibrated during the manufacturing process to meet the stated product specifications. -
Page 5: Included
Included • AC Adapter • USB Cable • Zero Count Filter • 7.4V Lithium-ion Battery • 8GB Micro SD Memory Card and Adapter • Protective Cap • Factory Calibration Certificate • Hard Carrying Case Specifications Particle Counter Channels: 0.3, 0.5, 1.0, 2.5, 5.0, 10µm Flow Rate: 0.1ft (2.83L/min) - Page 6 General Specifications Display: 2.8" 320 x 240 pixel TFT Color LCD Real-Time Clock and Date Stamp: External Memory: Yes, expandable up to 8GB with Micro SD Card (optional) Alarms: Yes (audible) Auto Shut-off: Yes (adjustable) Tripod Mountable: PC Interface: Power Supply: Universal AC Adapter/Charger;...
-
Page 7: Instrument Description
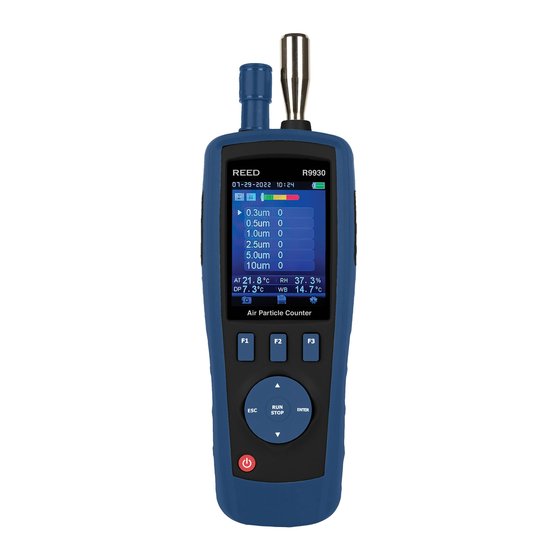
Instrument Description 1. Particle Sensor 10. UP Arrow Button 2. Temperature/Humidity Sensor 11. F3 Function Button 3. Color TFT LCD Display 12. F2 Function Button 4. F1 Function Button 13. Camera Sensor 5. ESC Button 14. Tripod Mounting Screw 6. DOWN Arrow Button 15. -
Page 8: Display Description
Alarm Scale Software Installation Please visit www.REEDInstruments.com/software to download the latest R9930 software. Full specifications and Operating System compatibility can be found on the product page at www.REEDInstruments.com. If you have specific questions related to your application and/or questions related to software setup and functionality please contact the nearest authorized distributor or Customer Service at info@reedinstruments.com... -
Page 9: Operation Instructions
If the test is run with the cap in place it will damage the pump and other internal components. Electrical noise, sensor leakage, or other interference may cause the R9930 to show incorrect particle count data. Perform a Zero calibration of the Particle count sensor. (See the Zeroing Particle Count Sensor section for additional details.) -
Page 10: Capturing Images
Capturing Images While in the Particle Measurement Screen, press the F1 button to enter camera mode. Press the F1 button again to take a picture. Press the F1 button a third time to the save the image or the F3 button to delete the image. -
Page 11: Adjust Test Sample Time
Parameter Description Sample Time Modify test duration (3 to 60 seconds) Start Delay Set a delayed test start time (3 to 100 seconds) Channel Display Select/Deselect particle channel sizes displayed during test Ambient Temp / % RH Enable/Disable air temp and % RH on-screen values Sample Cycle Modify number of test cycles during test (1 to 100) Sample Mode... -
Page 12: Select/Deselect Channel Display
Select/Deselect Channel Display Follow steps 1 through 3 once the parameter has been selected. Use the UP and DOWN arrow buttons to select the desired channel. Press the ENTER button to enable/disable the channel from appearing during a test. Press the ESC button to save your selections and return to the setup menu. -
Page 13: Set Time Between Test Cycles
Concentration Mode – Used to take a quick sample of airborne particulates, performed especially in areas where particulate levels are unknown and may exceed the operating levels of this counter. Follow steps 1 and 2 once the parameter has been selected. Use the UP and DOWN arrow buttons to select between Cumulative, Differential and Concentration sampling mode. -
Page 14: Media Gallery
Media Gallery The media gallery mode allows a user to view saved images, videos or particle logs. While in the main menu, press the F1 button to enter the saved media gallery. This screen can also be accessed by pressing the F2 button while in the Particle Measurement Screen. -
Page 15: Viewing Particle Logs
Viewing Particle Logs Press the ENTER button when "Particle Logs" is highlighted to enter the saved logs gallery. Press the UP and DOWN arrow buttons to scroll through the log files, if applicable. Press the ENTER button to view the selected particle log. To delete a selected particle log, press the F1 button twice. -
Page 16: Setting The Date & Time
Setting the Date & Time While in this mode, press the ENTER button to toggle through the adjustable parameters. When a desired parameter has been selected, press the UP and DOWN arrow buttons to adjust the value (i.e. Month/Day/Year/12 or 24 clock/Hour/Minute). Press the ENTER button to confirm your selection and move on to the next adjustable parameter. -
Page 17: Enable/Disable The Auto Power Off Function
Enable/Disable the Auto Power Off Function Press the ENTER button when "Auto Power Off" is highlighted to enter the appropriate function. Press the UP and DOWN arrow buttons to select an auto power off time from the list or disable the feature. Press the ESC button to confirm your selection and return to the System Settings menu. -
Page 18: Restoring Default System Settings
Restoring Default System Settings Press the ENTER button when "Factory Setting" is highlighted to enter the appropriate function. Press the UP and DOWN arrow buttons to select Yes or No. Press the ESC button to confirm your selection and return to the System Settings menu. -
Page 19: Zeroing The Particle Count Sensor
Zeroing the Particle Count Sensor Particles must be purged (removed) from the sensor before and after each use in a high sample count environment. Unscrew and remove the particle sensor cap. Attach the Zero count filter. Turn on the meter and enter Setup mode. Set the Sample mode to Cumulative. -
Page 20: Battery Charging
Battery Charging When the low battery icon appears on the LCD display, the battery must be recharged. Connect the power adapter to the input jack located on the meter's left side compartment and then connect the other end of the cable to a receptacle. -
Page 21: Applications
• Particle counting • Cleanrooms • Operating rooms • Pharmaceuticals Accessories and Replacement Parts • R9930-ADP Power Supply, 110V • R9930-7.4V Replacement Battery • CA-05A Soft Carrying Case • R8890 Large Hard Carrying Case • R1500 Tripod Don't see your part listed here? For a complete list of all accessories and replacement parts visit your product page on www.REEDinstruments.com. -
Page 22: Appendix A: Particle Counter Considerations
Refer to the ISO Clean Room Class chart (ISO 14644-1:1999) for values. The R9930 is equipped with a still/video camera to directly see the areas under test. Data, images, and video can be stored on up to an 8GB Micro SD card (not included) or in the meter's internal 74MB memory. -
Page 23: Product Warranty
REED Instruments guarantees this instrument to be free of defects in material or workmanship for a period of one (1) year from date of shipment. During the warranty period, REED Instruments will repair or replace, at no charge, products or parts of a product that proves to be defective because of improper material or workmanship, under normal use and maintenance. - Page 24 TEST & MEASURE WITH CONFIDENCE Access our Product Catalog Over 200 portable test and measurement instruments www.REEDInstruments.com 1.888.610.7664 www.calcert.com sales@calcert.com...
Need help?
Do you have a question about the R9930 and is the answer not in the manual?
Questions and answers