
Related Manuals for QSFPTEK S7300-24X2C


Summary of Contents for QSFPTEK S7300-24X2C
- Page 1 S7300-24X2C Quick Start Guide 24-Port 10G Ethernet L3+ Switch 24x 10G SFP, with 2x 100G QSFP28 Uplinks, Support Stacking V1.0 www.qsfptek.com V1.0 1/11...
- Page 2 Introduction The S7300-24X2C is a high-performance full-10GE ToR switches. The product position is to meet the requirements of next-generation Enterprise, Data Center, Metro, and HCI (Hyper-Converged Infrastructure) networks. The S7300 series switches provide a range of services, such as IPv6, VPN, network security, flow analysis, and virtualization, to offer high-performance L2/L3/L4 wire-speed switching capacity.
-
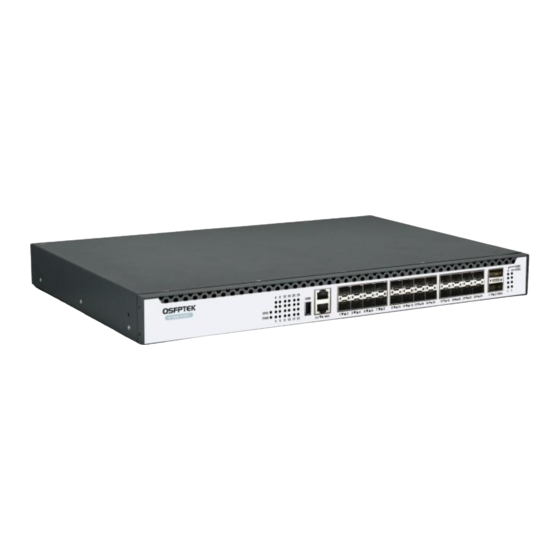
Page 3: Hardware Overview
Hardware Overview Front Panel Template S7300-24X2C Abbr Name Description If the indicator flickers, the system works well. System LED Indicator If the indicator is off or on, the system malfunctions. If the power supply of the switch is powered on, the... - Page 4 If the indicator flickers, there is data transmission. port USB interface Back Panel Ports Abbrev. Name Description Grounding The grounding must be fine. column PWR2 Power Slot Hot-plug Dual power backup PWR1 Power Slot Hot-plug Dual power backup www.qsfptek.com V1.0 4/11...
-
Page 5: Installation Requirements
The location of the machine box, cabinet planning and indoor cabling are very important for normal system’s function. Short distance between devices, bad ventilation and untouchable control plate will cause maintenance problems, systematic faulty and breakdown. Temperature/Humidity Requirements: Temperature Humidity 0~45°C 10%~95% www.qsfptek.com V1.0 5/11... -
Page 6: Mounting The Switch
2. Connect the other end of the power cord to an AC power source. Connecting the SFP+/QSFP28 Ports 1. Plug a compatible SFP+/QSFP28 transceiver into the SFP+/QSFP28 port. 2. Connect a fiber optic cable to the fiber transceiver. Then connect the other end of the cable to another fiber device. www.qsfptek.com V1.0 6/11... -
Page 7: Connecting The Management Ports
2. Connect the other end of the console cable to the RS-232 serial port on the computer. Connecting the ETH Port 1. Connect one end of a standard RJ45 Ethernet cable to a computer. 2. Connect the other end of the cable to the ETH port on the front of the switch. www.qsfptek.com V1.0 7/11... -
Page 8: Configuring The Switch
Configuring the Switch Using the Web-based Interface Step1: Connect the computer to the Management port of the switch using the network cable. Step 2: Set the IP address of the computer to 192.168.0.2. Set the subnet mask of the computer to 255.255.255.0. www.qsfptek.com V1.0 8/11... - Page 9 Step 2: Start the terminal simulation software such as HyperTerminal on the computer. Step 3: Set the parameters of the HyperTerminal: 9600 bits per second, 8 data bits, no parity, 1 stopbit and no flow control. Step 4: Enter the default username and password, admin/admin. www.qsfptek.com V1.0 9/11...
-
Page 10: Troubleshooting
2. Confirm that the console cable is the appropriate type for the device being connected. 3. Ensure that the control cable driver is appropriately installed on the computer. 4. Verify that the settings of the HyperTerminal, such as baud rate, data bits, stop bits, and parity, are correctly configured. www.qsfptek.com V1.0 10/11... -
Page 11: Support And Other Resources
Customer Success Product Warranty S7300 series switches are backed by a 5-year limited warranty supported by QSFPTEK. And you are eligible to apply for a return or exchange of your items within 14 days of receiving them. For more details about applying qualifications, please live chat or email sales@qsfptek.com...
Need help?
Do you have a question about the S7300-24X2C and is the answer not in the manual?
Questions and answers