Otto Bock Veldink4kids Kiddo Up Instructions For Use Manual
Hide thumbs
Also See for Veldink4kids Kiddo Up:
- Instructions for use manual (48 pages) ,
- Instructions for use manual (48 pages)
Table of Contents
Advertisement
Quick Links
Advertisement
Table of Contents

Related Manuals for Otto Bock Veldink4kids Kiddo Up


Summary of Contents for Otto Bock Veldink4kids Kiddo Up
- Page 1 Kiddo Up Instructions for use...
- Page 2 These instructions for use have been compiled with the greatest possible care and are based on the information known to Veldink4kids at the time of publication. The information in these instructions for use applies to the standard product version. Veld- ink4kids assumes no liability for possible damage resulting from changes to or manipulations of the product after sale.
-
Page 3: Table Of Contents
Contents 1 Foreword ........................... 5 2 Intended use ..........................5 2.1 Indications for use ..................... 5 2.2 Indications ....................... 5 2.3 Contraindications ....................6 2.3.1 Absolute contraindications ................. 6 2.3.2 Relative contraindications .................. 6 3 Safety provisions ........................6 3.1 Explanation of warning symbols ................ - Page 4 10.3.3 Adjusting the length of the anti-tipper ..............28 10.4 Seating unit ....................29 10.4.1 Tilting the seating unit ..................29 11 Using the product ........................30 11.1 Water, sand, food waste, litter, etc..............30 11.2 Assistance from an attendant ................30 ...
-
Page 5: Foreword
1 Foreword The Kiddo Up wheelchair was built specifically to meet the requirements and wishes of future users following extensive adaptations. It is custom-made. Numerous options and accessories are available. This enables a precise, customised fit. The wheelchair is easy to adjust and adapt. As a rule, the wheelchair can grow with the user starting from the delivered size. -
Page 6: Contraindications
2.3 Contraindications 2.3.1 Absolute contraindications None known 2.3.2 Relative contraindications Failure to meet physical or mental requirements 3 Safety provisions 3.1 Explanation of warning symbols Caution: Warning regarding possible risks of accident or injury. Warning: Warning regarding possible serious risks of accident or injury. 3.2 Safety notices Please read these instructions for use carefully before putting the product into use. - Page 7 Cross railway systems and railway tracks only in the designated areas. Negotiate level crossings so the caster wheels of the product cannot get caught in the gap between the rail and the road surface. Speeds above 5 km/h can be dangerous if you do not have enough practice. ...
- Page 8 Ensure that examinations and treatments are carried out exclusively under the pre- scribed conditions in order to avoid impairment of the results of the examination or the effectiveness of treatment due to interactions between the product and the equip- ment being used.
- Page 9 Additional information Veldink4kids is not liable for damage or injuries caused by negligence or failure to observe safety notices. Depending on the special circumstances or the accessories used, additional safety notices may be required. Ensure that the product is always in good condition. ...
-
Page 10: Explanation Of Symbols
3.3 Explanation of symbols On the following page you will find the explanations and positions of the stickers used with this product. Label Meaning CE marking WARNING! Read the instructions for use be- fore using the product. Observe important safety-related information (e.g. warnings, precautions). -
Page 11: Positioning Of The Stickers
3.4 Positioning of the stickers Figure 1: Signage on the product If a sticker on the Kiddo Up is unusable or no longer legible, you can request a new sticker at info@veldink4kids.com. The affixed CE marking can also be replaced via the customer file. 4 Side effects The following side effects may occur during use of the product: ... - Page 12 The warranty/statutory rights do not apply if the cause of the damage is due to any of the fol- lowing: If the product is not maintained according to the instructions provided. Non-use of original parts supplied by the manufacturer. These are available from stock and can be ordered from the manufacturer.
-
Page 13: Technical Data
6 Technical data The following specifications apply to the Kiddo Up: Max. load [kg] Weight [kg] From 9.0 Weight of the product without wheels [kg] From 6.4 Weight of the heaviest component [kg] From 6.4 Seat width [mm] 160–320* Front seat height [mm] 370–460** Rear seat height [mm] 360–450**... - Page 14 Back support height [mm] 160–380 Lower leg length [mm] 140–350 Angle between leg support and seat bot- Up to 10 tom [°] Horizontal axle position [mm] 255, 280 or 305 Ground clearance [mm] Wheel camber [°] Seat inclination [°] -10 to +10 Tilt range [°] -5 to +40 Drive wheels [”]...
-
Page 15: Product Overview
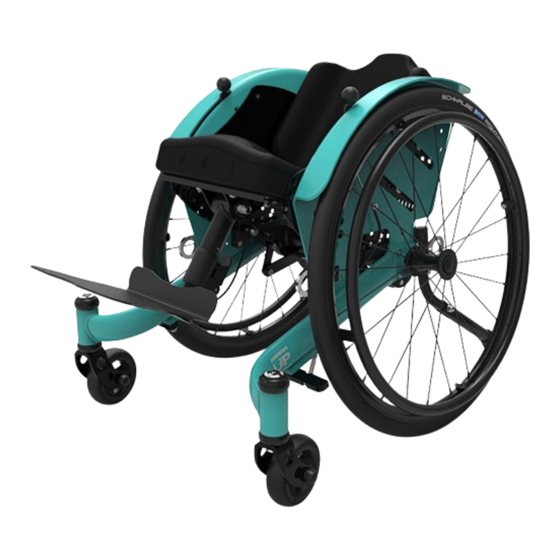
7 Product overview The figure below shows the Kiddo Up. Figure 2: Kiddo Up 1 Caster wheel 6 Back support pad 2 Frame 7 Anti-tipper 3 Leg support 8 Drive wheel with aluminium handrim 4 Braking system 9 Tilt mechanism 5 Seat cushion Kiddo Up... -
Page 16: Handing Over The Product
8 Handing over the product The following steps must be performed for the safe handover of the product: A sitting test has to be conducted with the user of the product. Pay special attention to proper positioning according to medical considerations. ... -
Page 17: Seat Depth, Back Support Height And Back Support Angle
9.1 Seat depth, back support height and back support angle 9.1.1 Adjusting the seat depth The seat depth corresponds to the thigh length and is measured from the front edge of the seat to the back support. Figure 3: Seat depth In connection with sitting stability, skewed sitting or swivelling of the legs, it is important that there is sufficient support over the entire seat depth. -
Page 18: Adjusting The Back Support Height
Figure 5: Repositioning the seat brackets Figure 6: Hole pattern in the clothing guard for adjusting the seat depth There should be a distance of 2–3 fingers between the front edge of the seat and the hollow of the knee. This space is necessary to ensure good blood circulation in the legs and to prevent the pinching of nerves and blood vessels. -
Page 19: Adjusting The Back Support Angle
Figure 7: Adjusting the back support height Figure 8: Hole pattern in the clothing guard for adjusting the height 9.1.3 Adjusting the back support angle 1. Loosen the upper nut (see Figure 7) and remove the hexagon head screw on both sides. 2. -
Page 20: Adjusting The Seat Angle
2. Slide the seat brackets along the hole pattern of the clothing guards to the new position (see Figure 9). The possible positions for attaching the seat brackets are shown in Fig- ure 10. 3. Use the screws and nuts to attach the seat bracket in the new position. Figure 9: Screw connection of the seat bracket Figure 10: Hole pattern in clothing guard 9.2.2 Adjusting the seat angle... - Page 21 Figure 11: Adjusting the positive seat angle 9.2.2.2 Adjusting the negative seat angle In this case, the child has to get out of the wheelchair. 1. Fully loosen the four hexagon socket screws (see Figure 12, item 1) securing the seat (see “Seat depth”...
-
Page 22: Knee And Foot Angle
Figure 13: Removing the seat supports 9.3 Knee and foot angle 9.3.1 Adjusting the knee angle 1. Loosen the upper hexagon socket screw (see Figure 14, item 1) slightly. This allows the entire leg support to move. 2. Adjust the position of the leg support. 3. -
Page 23: Attaching The Foot Plate
If necessary, a counter nut can be screwed onto the round head screw on the underside of the adjustment plate. Figure 15: Adjusting the foot angle Notice: A “normal” foot and knee angle is when there is 90° between the foot and lower leg and between the thigh and lower leg. -
Page 24: Adjusting The Head Support
Figure 16: Adjusting the head support height The fixation piece (see Figure 17, item 4) is height-adjustable. It ensures that the head support is repositioned at the same height if it has been removed from the wheelchair. Figure 17: Fixation piece 9.4.2 Adjusting the head support The head support consists of loose joint plates (see Figure 18, item 5) which can be adjusted so that the head support is positioned above the back support at the desired height and angle. ... -
Page 25: Tray (Optional)
The head support shown in Figure 18 has a belt spacer with fasteners (fix locks) (see Figure 18, item 7). These fasteners are used to attach belts. Figure 18: Adjusting the head support 9.5 Tray (optional) Figure 19: Kiddo Space with tray 9.5.1 Attaching/removing the tray 1. -
Page 26: Adjusting The Height Of The Tray
Figure 20: Attaching/removing the tray 9.5.2 Adjusting the height of the tray 1. Press the compression spring (see Figure 21, item 1). 2. Slide the tubes up or down to the desired position and allow the compression spring to en- gage in the new position. -
Page 27: Wheel Assembly And Function Of The Wheel Lock
Figure 22: Disassembling the Up 10.2 Wheel assembly and function of the wheel lock 10.2.1 Removing/attaching the drive wheel 1. To install a wheel on a quick-release axle, set the wheel lock to the freewheel position*. 2. Tip the wheelchair with one hand on the clothing guard or frame. 3. -
Page 28: Anti-Tipper
Figure 24: Wheel lock lever 10.3 Anti-tipper The anti-tipper prevents the wheelchair from tipping backward. The anti-tipper can be deac- tivated, for example when crossing obstacles. 10.3.1 Deactivating the anti-tipper 1. Push the anti-tipper (see Figure 25, item 1) down. 2. -
Page 29: Seating Unit
10.4 Seating unit 10.4.1 Tilting the seating unit 1. To tilt the seating unit, press the control pedal (see Figure 26, item 1) of the tilt mechanism down with your foot. 2. Now push on the push bar and tilt the seating unit to the desired position. 3. -
Page 30: Using The Product
11 Using the product 11.1 Water, sand, food waste, litter, etc. You may come into contact with the above-mentioned impurities while using your wheelchair, which may impair its function. Avoid full or partial immersion in water. If your wheelchair gets wet or you clean it with water, dry it as well as possible. -
Page 31: Dressing And Changing
Figure 28: Ramp to a transport vehicle 11.5 Dressing and changing Warning: When you get dressed or changed, your weight shifts in your wheelchair. This may cause you to fall or tip over, which may lead to serious injury. 11.6 Wheelies (balancing on the drive wheels) When you perform a wheelie, you balance on the drive wheels of your wheelchair while the caster wheels are not touching the ground. -
Page 32: Hills And Slopes
11.8 Hills and slopes Warning: When you drive up or down a slope, or cross a slope, your wheelchair’s centre of gravity changes. Failure to observe these warnings may lead to serious injury as a result of the wheelchair tipping over or you losing control of it: Avoid turning on a slope or crossing one sideways as this may cause the wheelchair to tip over. -
Page 33: Transferring (From The Wheelchair To Another Seat Or Vice Versa)
11.9 Transferring (from the wheelchair to another seat or vice versa) Warning: Failure to observe these warnings may cause you to fall or tip over, which may lead to serious injury. Transferring requires good balance and dexterity and can be very dangerous. Remember that there is a moment when the wheelchair is not below you. -
Page 34: Security Systems
Avoid this if possible to prevent injury to yourself and/or your attendants. Read and observe the warnings for attendants. Failure to observe these warnings may cause the user to fall or tip over and lead to serious injury to the user and/or attendant. Always use two or more attendants when bringing a wheelchair up or down stairs together with the user. -
Page 35: Transport
12 Transport 12.1 Transportation without the user When transporting the product in vehicles, remove the wheels, if necessary. Follow the IATA (International Air Transport Association) rules and those of the relevant airline when transporting the product in an aircraft. Inform the airline several days before your flight. Use the SSR (special service request) codes if needed to describe the type of limited mobility. - Page 36 Figure 31: Rear attachment points Figure 32: Front attachment points The Kiddo Up must be positioned so that the user is facing forward. The wheelchair must be secured according to the instructions specified by the manufacturer of the wheelchair restraint system. ...
- Page 37 Figure 33: Attachment angles Figure 34: Positioning the belts The lap belt must rest where the hip meets the pelvis on the front of the body. The belt must be close to the body. The upper belt must support the user fully (see Figure 34). ...
-
Page 38: Positioning Belt
Constriction of the back plate for vehicle bracket” can be ordered to provide additional space for the belt. Figure 35: Incorrect positioning 12.2.1 Positioning belt The positioning belt is used to bring the occupant into the correct position. Attach it to the metal frame of the seat. -
Page 39: Malfunctions And Maintenance
13 Malfunctions and maintenance All Veldink products leave the factory tested and adjusted for immediate use. Continuous use requires regular maintenance and adjustments, especially when the original settings are changed. The initial adjustments made by qualified personnel should be appropriate to your physique and personal preferences. -
Page 40: Cleaning And Care
14 Cleaning and care In addition to the routine maintenance mentioned above, both the frame and the product uphol- stery must be cleaned regularly. Light dirt can be removed with a solution of mild detergent and warm water. Rinse with clean water before allowing the upholstery to dry. Never put the wheelchair upholstery in a tumble dryer! Do not use bleaching agents or solvents. -
Page 41: Information On Re-Use
16 Information on re-use The product is generally suitable for re-use. Please note, however, that the product has perma- nently welded dimensions and was custom-made for a particular user. Similar to second-hand machines or vehicles, products that are being re-used are subject to increased strain. -
Page 42: Appendices
19 Appendices Threshold values for wheelchairs transportable by train The products in this series fully satisfy the minimum technical requirements of Regulation (EU) No. 1300/2014 regarding train accessibility for people with disabilities. However, not all ver- sions can comply with all threshold values due to different settings. With the help of the table that follows, you or the qualified personnel can take measurements and verify whether the specific product in question meets the threshold values. - Page 43 Kiddo Up...
- Page 44 Your specialist dealer Veldink4kids Drentse Poort 15 A Nieuw-Buinen 9521 JA The Netherlands...
Need help?
Do you have a question about the Veldink4kids Kiddo Up and is the answer not in the manual?
Questions and answers