Advertisement
Quick Links
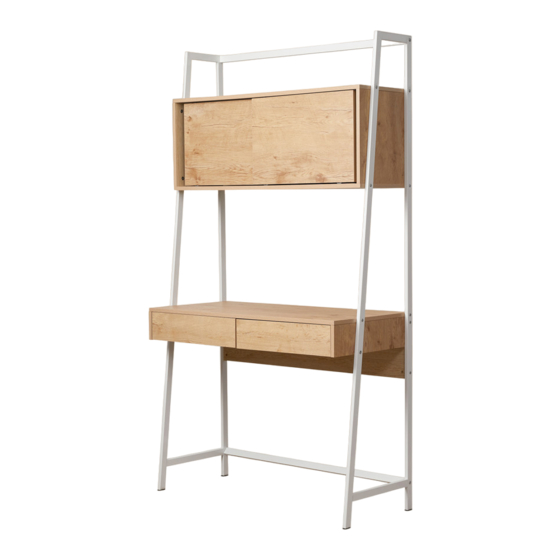
Kent
Ladder Desk
Thank you for purchasing a Mocka
Kent Ladder Desk
manufacturer's assembly instructions in detail to ensure the safety
s
features of the
Desk i
not compromised.
A
B
C
bolt & nut
screw 25mm
dowel
x28
x4
x18
F
G
H
G3
G4
G1
G2
slide rail
plastic clip
screw 14mm
x2
x4
x48
K
L
M
bracket
wall plug
screw 25mm
x2
x6
x2
Phillips & Flathead screwdrivers required.
For quicker assembly, we recommend the
use of a power drill on a low-speed setting.
mocka.co.nz I mocka.com.au
WARNING:
. Please follow the
and can be especially dangerous to children. Serious injury or death may result.
It is undesirable to place objects of interest to children in view on this type of
furniture item, as children may be tempted to climb to retrieve the objects the result
being that the furniture item may tip and cause injury or death.
D
E
This furniture item meets the requirements of AS/NZS 4935. However, even furniture
items that meet these requirements can tip under certain circumstances, especially when
placed on carpet, uneven or sloping flooring, or when subject to extreme use.
Attachment of the furniture item to an appropriate structural component of the building
using suitable means, as advised by a qualified tradesperson, is strongly recommended even
for those furniture items meeting the suitability requirements of AS/NZS 4935.
screw 40mm
screw 50m
x28
x2
I
J
plastic clip
screw 18mm
x4
x6
N
O
wall strap
×2
This furniture item can become unstable and may topple if climbed upon
Advertisement

Related Manuals for Mocka Kent


Summary of Contents for Mocka Kent
- Page 1 Kent Ladder Desk WARNING: Thank you for purchasing a Mocka Kent Ladder Desk . Please follow the This furniture item can become unstable and may topple if climbed upon manufacturer’s assembly instructions in detail to ensure the safety and can be especially dangerous to children. Serious injury or death may result.
- Page 2 ①Insert 4 × nuts (A) into panels (4) and (6). ②Attach 1 × slide rail (G1) to panel (4) with 2 × screws (F). ③Attach 1 × slide rail (G3) to panel (6) with 2 × screws (F). mocka.co.nz I mocka.com.au...
- Page 3 Insert 8 × bolts (A) into panel (3). ①Insert 2 × nuts (A) into the back of panel (7). ②Attach panels (4), (5) and (6) to panel (7) with 3 × screws (E). ③Attach frame (21) to panel (5) with 1 × screw (E). mocka.co.nz I mocka.com.au...
- Page 4 Kent Ladder Desk Insert 12 × bolts (A) and 12 × dowels (B) into panels (1) Attach panel (3) to panels (4), (5) and (6) with 6 × and (2). dowels (B). mocka.co.nz I mocka.com.au...
- Page 5 Kent Ladder Desk mocka.co.nz I mocka.com.au...
- Page 6 Kent Ladder Desk Slide panel (11) into the position. Attach panel (1) to panels (8), (9) and (10) with 6 × bolts (A) and 6 × dowels (B). mocka.co.nz I mocka.com.au...
- Page 7 Make sure the clips are pushed down when putting Attach 4 × plastic clip (H) and 4 × plastic clip (I) panels (12) into the cabinet then push up to secure. to panels (12) with 32 × screws (F) as shown. mocka.co.nz I mocka.com.au...
- Page 8 Insert 6 × screws (K) and 6 × screws (J) into panel (8). ②Slide panel (17) into the position as shown. ③Attach panels (13) and (18) to panels (14) and (15) with 4 × nuts (A) and 4 × bolts (A). mocka.co.nz I mocka.com.au...
- Page 9 Attach slide rails (G2) and (G4) to panels (14) and (15) Attach frames (20) and the cabinet to the main frame (19) with 4 × screws (F). with 2 × screw (C), 1 × screw (D), 1 × screw (N) and 8 × screw (E) as shown. mocka.co.nz I mocka.com.au...
- Page 10 2 × safety and 8 × screw (E) as shown. strap (N). Fasten to the wall using 2 × wall anchors (M) and 2 × screws (L). Ensure unit is balanced and steady before use. mocka.co.nz I mocka.com.au...
- Page 11 Kent Ladder Desk You`re done, enjoy! mocka.co.nz I mocka.com.au...
Need help?
Do you have a question about the Kent and is the answer not in the manual?
Questions and answers