
Related Manuals for Pottinger NOVACAT V 10000


Summary of Contents for Pottinger NOVACAT V 10000
- Page 1 Original Operating Instructions Mower combination NOVACAT V 10000 3880 Machine No.: +..00001 3880.en-GB.80X.0...
- Page 2 Internet. • Spare parts lists can be obtained exclusively via MyPÖTTINGER. • Individual information such as operating instructions and maintenance information con- cerning your machines can be obtained from Original Operating Instructions NOVACAT V 10000 3880.en-GB.80X.0...
- Page 3 The operating instructions are part of the machine, therefore pass them on to any new owner when passing on the machine. Instruct the new owner and make them aware of the regula- tions mentioned. Your PÖTTINGER service team wishes you every success. Original Operating Instructions NOVACAT V 10000 3880.en-GB.80X.0...
- Page 4 Text sections marked in this way contain advice on the subject of environmental protection. Directions Directions (such as left, right, front, rear) are given based on the normal "working travel direc- tion" of the machine. Original Operating Instructions NOVACAT V 10000 3880.en-GB.80X.0...
- Page 5 Use of symbols Illustrations may contain additional symbols, arrows and other lines that serve to improve the comprehensibility of the image content or are intended to draw attention to a specific area of the image. Original Operating Instructions NOVACAT V 10000 3880.en-GB.80X.0...
- Page 6 TINGER. If you have not received this mail, please contact your local dealer. Your dealer can fill in the handover declaration online. Austria PÖTTINGER Landtechnik GmbH Industriegelände 1 4710 Grieskirchen Phone+43 7248 600-0 Fax+43 7248 600-2513 info@poettinger.at Original Operating Instructions NOVACAT V 10000 3880.en-GB.80X.0...
- Page 7 Amendment index Date Index Amendment reason Amended chapter 90902021 No time-stamp available in Noxum Prototype is VS Original Operating Instructions NOVACAT V 10000 3880.en-GB.80X.0...
-
Page 8: Table Of Contents
Power requirements......................Hydraulics......................... Select Control......................Power control / ISOBUS....................Electrics..........................SELECT CONTROL Terminal..................POWER CONTROL Terminal..................EXPERT 75 Terminal....................Terminal CCI 1200...................... Noise emission........................Safety and the environment Safety advice........................Qualification of personnel....................Original Operating Instructions NOVACAT V 10000 3880.en-GB.80X.0... - Page 9 3 Test menu........................Test menu 1.1 - control computer................Test menu 1.2 - CAN-IO module................. Test menu 2 - sensors....................Test menu 3 - lifting..................... Test menu 4 - sideshift....................Test menu 4 - collector....................Original Operating Instructions NOVACAT V 10000 3880.en-GB.80X.0...
- Page 10 Structure of control unit..................... 101 START screen........................104 Open the “WORK” menu....................106 2 SET menu........................112 1.1 Front mower - overview..................112 1.2 Adjustments for lifting and lowering............... 113 2.1 Side protection flap....................115 10 | Original Operating Instructions NOVACAT V 10000 3880.en-GB.80X.0...
- Page 11 Configuration menu 3.5 - manual operation - collector............. 158 Configuration menu 4 - serial number................. 160 Configuration menu 5 - factory setting................. 161 Valves / cover / auxiliary equipment Auxiliary equipment......................163 Original Operating Instructions NOVACAT V 10000 | 11 3880.en-GB.80X.0...
- Page 12 Fit conditioner / swath former.................... 221 Collector (option)......................223 Cross flow (option)....................... 234 Swath former (option)....................239 Swath comb (option)....................242 Work assignment......................243 Turning manoeuvres on slopes................... 244 Reversing.......................... 244 12 | Original Operating Instructions NOVACAT V 10000 3880.en-GB.80X.0...
- Page 13 Set cross conveyor belt sensors..................278 Predetermined maintenance Before every season......................281 Checking the friction clutch..................281 Check the cardan shaft cam clutch................281 Make input gear overrunning clutches "movable"............282 Original Operating Instructions NOVACAT V 10000 | 13 3880.en-GB.80X.0...
- Page 14 Change mower input gear oil..................312 Change cutter bar gear oil................... 315 Annually..........................317 Check / replenish cutter bar oil level................317 Check / fill input gear crossflow oil level..............320 14 | Original Operating Instructions NOVACAT V 10000 3880.en-GB.80X.0...
- Page 15 Select Control......................345 Power control....................... 347 Hydraulics......................... 352 Select Control......................352 Power control....................... 355 Supplement to USA / CANADA operating instructions Warning signs, GB / USA / CANADA................357 Secure load towing......................363 Original Operating Instructions NOVACAT V 10000 | 15 3880.en-GB.80X.0...
-
Page 16: Factory Standard Tightening Torques
230 Nm 81000 N 320 Nm 115000 N M 20 x 1.5 460 Nm 134000 N 650 Nm 189000 N M 24 x 2 780 Nm 188000 N 1090 Nm 265000 N 16 | Original Operating Instructions NOVACAT V 10000 3880.en-GB.80X.0... -
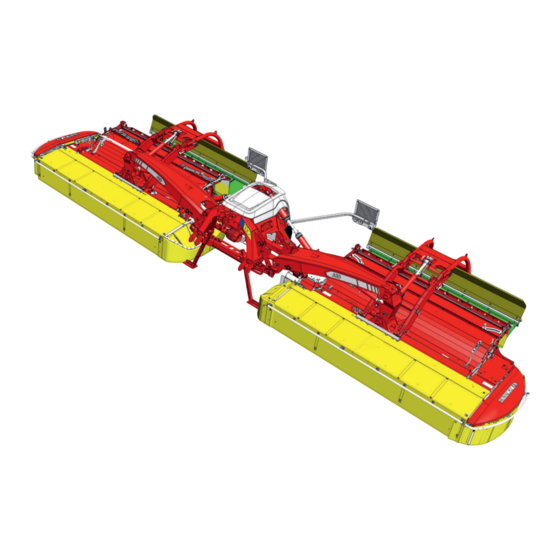
Page 17: Layout And Function
Can be retro-fitted underneath the cutter bar to in- lustration crease the distance between the knife and the ground. Elements marked as "left" or "right" are present on both sides of the machine. Original Operating Instructions NOVACAT V 10000 | 17 3880.en-GB.80X.0... -
Page 18: Accessories Included In The Scope Of Delivery
Operational instructions, spare part list and declaration of transfer (1) • Blade box (2) Upgrade program The PÖTTINGER Landtechnik GmbH upgrade program offers many upgrade possibilities. You can receive additional information from your service dealer. 18 | Original Operating Instructions NOVACAT V 10000 3880.en-GB.80X.0... -
Page 19: At A Glance
The following data is displayed on the identification plate for each machine type and design. Data Data Chassis number Year of mfr. Model Model year Vehicle identification number Axle load per axle Type Bearing load Serial number Permissible total weight Basic weight Original Operating Instructions NOVACAT V 10000 | 19 3880.en-GB.80X.0... -
Page 20: Description
Description EU - declaration of conformity 20 | Original Operating Instructions NOVACAT V 10000 3880.en-GB.80X.0... -
Page 21: Intended Use
Transporting persons or animals on the machine. • Immersion in liquids during transport, operation or storage of the machine. • Working of roads, stony ground and other surfaces consisting essentially or partially of stone, sand or asphalt. Original Operating Instructions NOVACAT V 10000 | 21 3880.en-GB.80X.0... -
Page 22: Technical Data
NOVACAT V 10000 ED 3780 kg NOVACAT V 10000 RC 3890 kg If your machine is equipped with additional fitting components, the indicated weight may be incorrect! basic settings Headland position 22 | Original Operating Instructions NOVACAT V 10000 3880.en-GB.80X.0... -
Page 23: Mower Discs And Cutter Blades
Blades per mower disc (unit) 16 (2x8) The outer and inner mower drum / mower disc on all mowers (for each mower unit) must turn inwards on the front of the machine! Original Operating Instructions NOVACAT V 10000 | 23 3880.en-GB.80X.0... - Page 24 The blade equipment used is shown on the sticker on the tool box. The top lines show the blade equipment suitable for disc mowers, the bottom lines show the blade equipment suit- able for drum mowers. Blade equipment 24 | Original Operating Instructions NOVACAT V 10000 3880.en-GB.80X.0...
-
Page 25: Power Requirements
180 up to max. 200 bar Oil supply volume min. 80 l/min Select Control Optimum hydraulic system variant Connections for double- 1 x mower operation acting control valves 1 x hydraulic upper link (optional) Original Operating Instructions NOVACAT V 10000 | 25 3880.en-GB.80X.0... -
Page 26: Power Control / Isobus
For tractors with open load-sensing (constant current system, pressureless circulation). Tighten LS screw fully. • For tractors with closed load-sensing (constant pressure system): Release LS screw fully. Electrics Voltage 12 V DC 26 | Original Operating Instructions NOVACAT V 10000 3880.en-GB.80X.0... -
Page 27: Select Control Terminal
Data transmission/power supply interface 8-pin plug Function Signal Contact Power supply KL30 (+12 V) Power supply of implement +12 V DC (Electron- ic Control Unit Power) USB data + USB (Universal Serial Bus) Original Operating Instructions NOVACAT V 10000 | 27 3880.en-GB.80X.0... -
Page 28: Expert 75 Terminal
5,6 " TFT colour display with brightness control Keyboard Membrane keypad with back- lighting Connection cable 1x plug, 8-pin - CAN-IN Additional interfaces - see the operating instructions for the terminal. 28 | Original Operating Instructions NOVACAT V 10000 3880.en-GB.80X.0... -
Page 29: Terminal Cci 1200
Work should only be carried out if the cab is permanently closed. • Alternatively, suitable heating protection can be worn during field work! • Hearing protection must be removed during transport runs. Original Operating Instructions NOVACAT V 10000 | 29 3880.en-GB.80X.0... -
Page 30: Safety And The Environment
Such obligations may concern for example the wearing of personal protective equipment or the road traffic regulations. • Appropriate workshop equipment is required to perform testing, adjustment and repair work. 30 | Original Operating Instructions NOVACAT V 10000 3880.en-GB.80X.0... -
Page 31: Maintaining Operational Safety
Maintenance work, as described in this manual, must be fully carried out at the given time intervals or have them completed in a specialist workshop. • Do not make any software alterations to the programmable control system. Original Operating Instructions NOVACAT V 10000 | 31 3880.en-GB.80X.0... -
Page 32: Special Hazards
Irritation of skin, eyes or respiratory tract caused by oils, greases, solvents and de- tergents! ► Observe the safety regulations applicable to the respective product. ► Provide sufficient ventilation. ► Use personal protective equipment such as protective clothing, gloves /safety goggles. 32 | Original Operating Instructions NOVACAT V 10000 3880.en-GB.80X.0... -
Page 33: Warning Pictograms
For machines which are to be operated in the USA / CANADA, a conversion kit with warn- ing stickers (to adapt to local applicable regulations) is available from PÖTTINGER in Eng- lish or French! See also "Supplement to the Operating Instructions USA / CANADA". Original Operating Instructions NOVACAT V 10000 | 33 3880.en-GB.80X.0... - Page 34 Study the operating manual in detail before putting the machine into operation. Switch off tractor engine and remove ignition key prior to all maintenance or repair work. Check dis- tance from tractor. Support frame note 34 | Original Operating Instructions NOVACAT V 10000 3880.en-GB.80X.0...
- Page 35 Safety and the environment Warning signs Meaning Never reach into the crushing danger area as long as parts may move. Lubricating nipple position Original Operating Instructions NOVACAT V 10000 | 35 3880.en-GB.80X.0...
-
Page 36: Traffic Safety Equipment
For machines which are operated in the USA / CANADA, a "Flasher Control Module" (to adapt the blinking frequency of the direction indicators to the current applicable regulations) is available from PÖTTINGER! Lighting 36 | Original Operating Instructions NOVACAT V 10000 3880.en-GB.80X.0... - Page 37 Standard lighting USA / Canada Pos. Equipment Warning traingle Red rear lights Yellow indicator lights Red reflective film Yellow reflective film Yellow indicator lights Collector / Crossflow USA / Canada lights Original Operating Instructions NOVACAT V 10000 | 37 3880.en-GB.80X.0...
-
Page 38: Handling Hazardous Substances
In addition to the information in these Instructions, the generally applicable, statutory or oth- erwise binding regulations on environmental protection are to be observed. Fuel efficiency and soil protection Careful adjustment of the machine preserves machine/soil and saves fuel. 38 | Original Operating Instructions NOVACAT V 10000 3880.en-GB.80X.0... -
Page 39: Disposal Of The Machine
Remove lubricants such as gear oil, hydraulic oil, etc. from components before they are scrapped. Disposal of rubber parts / tyres • Take tyres with and without rims, and other rubber components to the relevant recycling point. Original Operating Instructions NOVACAT V 10000 | 39 3880.en-GB.80X.0... -
Page 40: Select Control-Terminal
Preselect right mower unit Preselect side guard folding Preselect lateral displacement Raise / lower preselection left belt unit or fold crossflow preselection Raise / lower preselection right belt unit or fold crossflow preselection 40 | Original Operating Instructions NOVACAT V 10000 3880.en-GB.80X.0... - Page 41 With the selection of input fields that require an input of text, numbers or a selection of pre- defined options, the corresponding input mask is automatically displayed. See "Input masks" on page 42.;See "Selection masks" on page 44. Original Operating Instructions NOVACAT V 10000 | 41 3880.en-GB.80X.0...
-
Page 42: Select Control Operator Terminal
Deletes the last digit Deletes the entire number Complete the input Increase the value of the entered number Decrease the value of the entered number Numerical value positive (+) or negative (-) 42 | Original Operating Instructions NOVACAT V 10000 3880.en-GB.80X.0... - Page 43 2. Input mask 2 for special characters. Press to switch to character input. Symbols Explanation Deletes the entire word. Deletes the last letter. Complete the input Original Operating Instructions NOVACAT V 10000 | 43 3880.en-GB.80X.0...
-
Page 44: Selection Masks
Activate terminal with scrolling wheel (rotary encoder) selection screen: Turn the rotary encoder in the appropriate direction and press the integrated key or OK when the input field is reached. Symbols Explanation Exit menu without changing and without saving 44 | Original Operating Instructions NOVACAT V 10000 3880.en-GB.80X.0... -
Page 45: Structure Of Control Unit
Structure of control unit Menu Tab Sub-Tab Work menu All relevant displays and settings for mowing operation. SET menu All settings that have to be adjusted before the start of the mowing op- eration. Original Operating Instructions NOVACAT V 10000 | 45 3880.en-GB.80X.0... - Page 46 Data menu: Display and resetting of hectare and hour counter Test menu: Status summary of control and sensors Supply voltage status report Supply voltage of main ECU board Supply voltage of CAN-IO module A Sensors Lifting 46 | Original Operating Instructions NOVACAT V 10000 3880.en-GB.80X.0...
- Page 47 Free options Paid options (section control and task control) Calibration menu Calibrate sideshift Calibrate working and transport po- sition Reset to factory settings Customer list menu Only for customer service! Emergency operation Original Operating Instructions NOVACAT V 10000 | 47 3880.en-GB.80X.0...
-
Page 48: Start Screen
Please delete data that is no longer required so that some memory can be freed up. See the instructions for the termi- nal. 48 | Original Operating Instructions NOVACAT V 10000 3880.en-GB.80X.0... - Page 49 ► Wait for the PTO shaft and other moving parts to stop completely before approaching the tractor. ► All drives may only be switched on again after the hazardous situation has been recti- fied. Original Operating Instructions NOVACAT V 10000 | 49 3880.en-GB.80X.0...
-
Page 50: Pop-Up Messages
Set sideshift to narrow Set sideshift to wide Cross conveyor belts are not rotating Swivel the cross conveyor belt down Swivel the cross conveyor belt down Turn off the power take-off 50 | Original Operating Instructions NOVACAT V 10000 3880.en-GB.80X.0... - Page 51 Illustration Turn on the power take-off Release PTO brake Activate control device in Plus direction Activate control device in Minus direction Active emergency operation Fold out from transport to headland position Original Operating Instructions NOVACAT V 10000 | 51 3880.en-GB.80X.0...
-
Page 52: Open The "Work" Menu
Calibration process not successful Calibration process successful Open the “WORK” menu Retrieve all required status information during work operation. Machine functions can be turned on or off. Prerequisite • START" menu called up 52 | Original Operating Instructions NOVACAT V 10000 3880.en-GB.80X.0... - Page 53 Display Symbol Explanation Working lights on If the working lights are not on, the Current PTO speed High cross conveyor belt speed Low cross conveyor belt speed Transport position Headland position Original Operating Instructions NOVACAT V 10000 | 53 3880.en-GB.80X.0...
- Page 54 Press the symbol to view the error list. Transport preselection inactive / active Side protection inactive / active Sideshift inactive / active Left / right cross conveyor belt lowered - working position inactive - black 54 | Original Operating Instructions NOVACAT V 10000 3880.en-GB.80X.0...
- Page 55 Right cross conveyor belt working position The hydraulic valve status is displayed by the cross conveyor belt (black / green) Right mower unit preselection in active / active Left mower unit preselection in active / active Original Operating Instructions NOVACAT V 10000 | 55 3880.en-GB.80X.0...
- Page 56 Carry out lateral traverse to the right: Press key for preselection and move to re- quired direction using the control device. ▷ Both mower units are moved at the same time. 56 | Original Operating Instructions NOVACAT V 10000 3880.en-GB.80X.0...
-
Page 57: Set Menu
1.1 Front mower - overview You can configure your front mower in the overview menu. How do I get there? START menu displayed ► Press key to display the SET menu ► Press TAB 1.1 Original Operating Instructions NOVACAT V 10000 | 57 3880.en-GB.80X.0... -
Page 58: 2.1 Lift Height Display
In this menu you can activate the lift height display in the work menu. How do I get there? START menu displayed ► Press key to display the SET menu ► Press TAB 2 ► Press 58 | Original Operating Instructions NOVACAT V 10000 3880.en-GB.80X.0... -
Page 59: 2.2 Lifting
In the lifting menu, you can set the parameters that allow the machine to move freely be- tween the given positions. How do I get there? START menu displayed ► Press key to display the SET menu ► Press TAB 2 ► Press TAB 2.2 Original Operating Instructions NOVACAT V 10000 | 59 3880.en-GB.80X.0... - Page 60 Explanation Stop Stops all hydraulic functions. Reverse Up one menu level Press and hold the key to change to the work menu Tab keys Change to the next / previous tab 60 | Original Operating Instructions NOVACAT V 10000 3880.en-GB.80X.0...
-
Page 61: 2.3 Cross Conveyor Belt
Explanation Stop Stops all hydraulic functions. Reverse Up one menu level Press and hold the key to change to the work menu Tab keys Change to the next / previous tab Original Operating Instructions NOVACAT V 10000 | 61 3880.en-GB.80X.0... -
Page 62: Service Menu
Display of time remaining until next lubrication with grease. The interval to which the setting reverts is displayed in grey in brack- ets. Keys Explanation STOP Stops all hydraulic functions. Reverse Up one menu level 62 | Original Operating Instructions NOVACAT V 10000 3880.en-GB.80X.0... -
Page 63: Data Menu
This menu presents a complete display of the work carried out with the device. How do I get there? ► Press the soft key on the START screen to show the data menu. Original Operating Instructions NOVACAT V 10000 | 63 3880.en-GB.80X.0... -
Page 64: Data Menu - Order Display
This menu presents two displays of the work carried out with the device on the selected or- der. How do I get there? ► Press the soft key on the START screen to show the data menu. ► Press an order key in the data menu (1-10) 64 | Original Operating Instructions NOVACAT V 10000 3880.en-GB.80X.0... - Page 65 Service time in headland position in h (percentage share of complete time) Service time in transport position in h (percentage share of complete time) Complete worked area (all customer orders combined) Original Operating Instructions NOVACAT V 10000 | 65 3880.en-GB.80X.0...
- Page 66 Press this button to reset the selected order value to 0. To start an order with reset values, begin by pressing the [delete] button fol- lowed by the [start[ button. Scroll keys 66 | Original Operating Instructions NOVACAT V 10000 3880.en-GB.80X.0...
-
Page 67: Test Menu
Display Symbol Explanation Supply voltage in control computer • Current control unit supply voltage in volts • Current sensors supply voltage in volts • Current angle sensor supply voltage in volts Original Operating Instructions NOVACAT V 10000 | 67 3880.en-GB.80X.0... -
Page 68: Test Menu 1.2 - Can-Io Module
Symbol Explanation Supply voltage in CAN-IO module • Current supply voltage on the CAN-IO module in volts • Current supply voltage for angle sensors provided by the CAN-IO module in volts 68 | Original Operating Instructions NOVACAT V 10000 3880.en-GB.80X.0... -
Page 69: Test Menu 2 - Sensors
Symbol Explanation B1 pressure sensor • Error-free /error exists • mV: Volt value at the analogue input [1000-6000mV] • Bar: calculated value [0-250 bar]. Keys Explanation STOP Stops all hydraulic functions. Original Operating Instructions NOVACAT V 10000 | 69 3880.en-GB.80X.0... -
Page 70: Test Menu 3 - Lifting
Left rear mower (B5) • Left lifting angle sensor error-free Fault • Current voltage in mV • Y5 raise left mower unit directional control valve • Y15 release left mower unit poppet valve 70 | Original Operating Instructions NOVACAT V 10000 3880.en-GB.80X.0... -
Page 71: Test Menu 4 - Sideshift
How do I get there? ► Press the soft key on the START screen to show the test menu. ► Press tabulator 4 in the test menu to change to test menu 4 - sideshift. Original Operating Instructions NOVACAT V 10000 | 71 3880.en-GB.80X.0... -
Page 72: Test Menu 4 - Collector
How do I get there? ► Press the soft key on the START screen to show the test menu. ► Press tabulator 4 in the test menu to change to test menu 4 - collector. 72 | Original Operating Instructions NOVACAT V 10000 3880.en-GB.80X.0... - Page 73 B22 current speed - left band speed sensor Y28 band on / off Only with cross conveyor belt! B22 current speed - right band speed sensor Y27 band on / off Crossflow display / cross conveyor belt Original Operating Instructions NOVACAT V 10000 | 73 3880.en-GB.80X.0...
-
Page 74: Test Menu 6 - Speed Signal
Press tabulator 2 in the test menu to change to test menu 2 - speed signal. Display Symbol Explanation current speed signal Keys Explanation STOP Stops all hydraulic functions. Reverse Up one menu level Tab keys Change to the next / previous tab 74 | Original Operating Instructions NOVACAT V 10000 3880.en-GB.80X.0... -
Page 75: Error-List
Explanation Alarm message text here: "77" - Alarm message number "Tank 2 empty" - textual description of the fault Date and time of the last error message occurrence Frequency of occurrence Original Operating Instructions NOVACAT V 10000 | 75 3880.en-GB.80X.0... - Page 76 Scroll keys inactive If a scroll key is greyed out, the top/bottom line of the error list has been reached. Delete error list Keep pressed to delete the error list completely. 76 | Original Operating Instructions NOVACAT V 10000 3880.en-GB.80X.0...
-
Page 77: Configuration Menu
► Press tabulator 1 in the configuration menu to change to configuration menu 1. ► Press tabulator 1 in the configuration menu to change to configuration menu 1.1 - Gen- eral Original Operating Instructions NOVACAT V 10000 | 77 3880.en-GB.80X.0... - Page 78 Measurement units (metric or imperial) Work lights on / off Swath merging using crossflow using cross conveyor belt hydraulic side protection flap on / off hydraulic sideshift on / off Headland management on / off 78 | Original Operating Instructions NOVACAT V 10000 3880.en-GB.80X.0...
-
Page 79: Configuration Menu 1.3 - Serial Number
Press tabulator 1 in the configuration menu to change to configuration menu 1. ► Press tabulator 1.3 in the configuration menu to change to configuration menu 1.3 - seri- al number. Keys Explanation STOP Stops all hydraulic functions. Original Operating Instructions NOVACAT V 10000 | 79 3880.en-GB.80X.0... -
Page 80: Configuration Menu 2.0 - Factory Settings
Press tabulator 2 in the configuration menu to change to configuration menu 2 - Factory settings. Keys Explanation STOP Stops all hydraulic functions. Reverse Up one menu level Tab keys Change to the next / previous tab 80 | Original Operating Instructions NOVACAT V 10000 3880.en-GB.80X.0... -
Page 81: Configuration Menu 3.1 - Developer Mode
Depress soft key in the START screen for 10 seconds to show the configuration menu. ► Press tabulator 4 in the configuration menu to change to configuration menu 4 - emer- gency operation. Display Symbol Explanation Emergency operation on / off Original Operating Instructions NOVACAT V 10000 | 81 3880.en-GB.80X.0... -
Page 82: Configuration Menu 5 - Manual Operation
Press tabulator 5 in the configuration menu to change to configuration menu 5. ► Press tabulator 1.3 in the configuration menu to change to configuration menu 3 - man- ual operation. 82 | Original Operating Instructions NOVACAT V 10000 3880.en-GB.80X.0... -
Page 83: Configuration Menu 5.1 Manual Operation - Side Protection Flap
Parameters for raising and lowering side protection flap. Display Symbol Explanation Side protection flap poppet valve: Operational check on Y1 Side protection flap poppet valve: Operational check on Y2 Softkeys Explanation Stop Stops all hydraulic functions. Original Operating Instructions NOVACAT V 10000 | 83 3880.en-GB.80X.0... -
Page 84: Configuration Menu 5.2 - Manual Operation - Mower
Keep the softkey pressed down to diaply the tabs. ► Press tabulator 5.2 in the manual operation configuration menu to change to configura- tion menu 5.2 - manual operation -mower. Display Symbol Explanation Poppet valve lock hook 84 | Original Operating Instructions NOVACAT V 10000 3880.en-GB.80X.0... -
Page 85: Configuration Menu 5.3 - Manual Operation - Sideshift
Keep the key pressed down whilst carrying out the movement with the con- trol device Transport Configuration menu 5.3 - manual operation - sideshift Adjust the parameters associated with the sideshift manually in the manual operation - side protection flap menu. Original Operating Instructions NOVACAT V 10000 | 85 3880.en-GB.80X.0... - Page 86 5.3 - manual operation - sideshift. Display Symbol Explanation Left lateral displacement • B11 left sideshift sensor Error-free sensor Fault • Current sensor voltage in mV • Y29 mowing unit outwards 86 | Original Operating Instructions NOVACAT V 10000 3880.en-GB.80X.0...
-
Page 87: Configuration Menu 5.4 - Manual Operation - Collector
Keep the softkey pressed down to diaply the tabs. ► Press tabulator 5.4 in the manual operation configuration menu to change to configura- tion menu 5.4 - manual operation - collector. Original Operating Instructions NOVACAT V 10000 | 87 3880.en-GB.80X.0... - Page 88 (depending on version) B22 current speed - left band speed sensor Y28 band on / off B22 current speed - right band speed sensor Y27 band on / off 88 | Original Operating Instructions NOVACAT V 10000 3880.en-GB.80X.0...
-
Page 89: Configuration Menu 6.1 - Sideshift Calibration
Depress soft key in the START screen for 10 seconds to show the configuration menu. ► Press tabulator 6 in the configuration menu to change to configuration menu 6 - calibra- tion. ► Press tabulator 6.1 to change to submenu 6.1 "Sideshift calibration". Original Operating Instructions NOVACAT V 10000 | 89 3880.en-GB.80X.0... - Page 90 This key is normally greyed out and turns black when it is possible to save the value. Save narrow position This key is normally greyed out and turns black when it is possible to save the value. 90 | Original Operating Instructions NOVACAT V 10000 3880.en-GB.80X.0...
-
Page 91: Configuration Meun 6.2 - Raise / Lower Calibration
(-249 V to 250 V) height. (-249 V to 250 V) Original Operating Instructions NOVACAT V 10000 | 91 3880.en-GB.80X.0... - Page 92 Keep the preselection key pressed down to calibrate the transport position sensors until an acoutsic signal can be heard. Then move to transport position with the control device Confirm the information window to save the value reached as transport posi- tion. 92 | Original Operating Instructions NOVACAT V 10000 3880.en-GB.80X.0...
-
Page 93: Power-Control Terminal Operation
Change cross conveyor speed Raise front mower Lower front mower Raise left mower unit Lower left mower unit Increase working width Reduce working width Lower right mower unit Raise right mower unit Original Operating Instructions NOVACAT V 10000 | 93 3880.en-GB.80X.0... - Page 94 With the selection of input fields that require an input of text, numbers or a selection of pre- defined options, the corresponding input mask is automatically displayed. See "Input masks" on page 42.;See "Selection masks" on page 44. 94 | Original Operating Instructions NOVACAT V 10000 3880.en-GB.80X.0...
-
Page 95: Expert 75 Isobus-Terminal
Pos. Press key Turn terminal on / off Home Change key Acknowledgement key Machine-Stop-Key( MSK) - All active machine functions are switched off. Function keys F1-F12 (function depends on the menu) Original Operating Instructions NOVACAT V 10000 | 95 3880.en-GB.80X.0... - Page 96 When selecting input fields that require an input of text, numbers or a selection of prede- fined options, the corresponding input mask is automatically displayed. See "Input masks" on page 42.See "Selection masks" on page 44. 96 | Original Operating Instructions NOVACAT V 10000 3880.en-GB.80X.0...
-
Page 97: Cci Isobus-Terminal
Do not wear gloves when operating! When selecting input fields that require an input of text, numbers or a selection of prede- fined options, the corresponding input mask is automatically displayed. Original Operating Instructions NOVACAT V 10000 | 97 3880.en-GB.80X.0... -
Page 98: Isobus Operation
Deletes the last digit Deletes the entire number Complete the input Increase the value of the entered number Decrease the value of the entered number Numerical value positive (+) or negative (-) 98 | Original Operating Instructions NOVACAT V 10000 3880.en-GB.80X.0... - Page 99 2. Input mask 2 for special characters. Press to switch to character input. Symbols Explanation Deletes the entire word. Deletes the last letter. Complete the input Original Operating Instructions NOVACAT V 10000 | 99 3880.en-GB.80X.0...
-
Page 100: Selection Masks
Activate terminal with scrolling wheel (rotary encoder) selection screen: Turn the rotary encoder in the appropriate direction and press the integrated key or OK when the input field is reached. Symbols Explanation Exit menu without changing and without saving 100 | Original Operating Instructions NOVACAT V 10000 3880.en-GB.80X.0... -
Page 101: Structure Of Control Unit
Structure of control unit Menu Tab Sub-Tab Work menu All relevant displays and settings for mowing operation. SET menu All settings that have to be adjusted before the start of the mowing op- eration. Original Operating Instructions NOVACAT V 10000 | 101 3880.en-GB.80X.0... - Page 102 Customer service menu Service menu: Display and resetting of greasing interval counter Data menu: Display and resetting of hectare and hour counter Test menu: Status summary of control and sensors 102 | Original Operating Instructions NOVACAT V 10000 3880.en-GB.80X.0...
- Page 103 In the START menu, press and hold the key for 10 seconds to display the configu- ration menu. Free options 1 Free options 2 Paid options (section control and task control) Calibration menu Calibrate working and trans- port position Calibrate sideshift Original Operating Instructions NOVACAT V 10000 | 103 3880.en-GB.80X.0...
-
Page 104: Start Screen
Please delete data that is no longer required so that some memory can be freed up. See the instructions for the termi- nal. 104 | Original Operating Instructions NOVACAT V 10000 3880.en-GB.80X.0... - Page 105 Terminal change: Display machine control on other terminal Stop hydraulic functions All hydraulic functions can be stopped immediately if danger arises. The stop function is shown in all WORK, DATA, SET AND TEST screens, top right. Original Operating Instructions NOVACAT V 10000 | 105 3880.en-GB.80X.0...
-
Page 106: Open The "Work" Menu
Retrieve all required status information during work operation. Machine functions can be turned on or off. Prerequisite • START" menu called up Implementation ► Open “WORK” menu: Press the function key for symbol 106 | Original Operating Instructions NOVACAT V 10000 3880.en-GB.80X.0... - Page 107 High cross conveyor belt speed Low cross conveyor belt speed Transport position Headland position Working position Front mower unit working position - float position Original Operating Instructions NOVACAT V 10000 | 107 3880.en-GB.80X.0...
- Page 108 Automatic lubricating system off / on Working lights off / on Press they key to activate / deactivate the working lights Left / right cross conveyor belt lowered - working position 108 | Original Operating Instructions NOVACAT V 10000 3880.en-GB.80X.0...
- Page 109 Change cross conveyor belt speed Activating "TRANSPORT" menu Automatic mowing unit lifting system Automatic mowing unit lowering system Left wide placement: swing left cross conveyor belt out / open left crossflow flap Original Operating Instructions NOVACAT V 10000 | 109 3880.en-GB.80X.0...
- Page 110 Reduce relief pressure (cutter bar ground pressure is increased): Press the function key for symbol ► Check the very outside weight of the cutter bar and repeat the adjustment if necessary. 110 | Original Operating Instructions NOVACAT V 10000 3880.en-GB.80X.0...
- Page 111 Rear mower in working position • Front mower in working position Implementation ► Carry out lateral traverse to the right: Press key. ▷ Both mower units are moved to the right at the same time. Original Operating Instructions NOVACAT V 10000 | 111 3880.en-GB.80X.0...
-
Page 112: Set Menu
You can configure and activate your front mower in the overview menu. How do I get there? START menu displayed ► Press key to display the SET menu ► Press TAB 1.1 112 | Original Operating Instructions NOVACAT V 10000 3880.en-GB.80X.0... -
Page 113: 1.2 Adjustments For Lifting And Lowering
Adjust the parameters associated with raising and lowering the mower in the adjustments for lifting and lowering menu. How do I get there? START menu displayed ► Press key to display the SET menu Original Operating Instructions NOVACAT V 10000 | 113 3880.en-GB.80X.0... - Page 114 Explanation Stop Stops all hydraulic functions. Reverse Up one menu level Press and hold the key to change to the work menu Tab keys Change to the next / previous tab 114 | Original Operating Instructions NOVACAT V 10000 3880.en-GB.80X.0...
-
Page 115: 2.1 Side Protection Flap
Status of side protection flap poppet valve: Operational check on Y2 Softkeys Explanation Stop Stops all hydraulic functions. Reverse Up one menu level Press and hold the key to change to the work menu Original Operating Instructions NOVACAT V 10000 | 115 3880.en-GB.80X.0... -
Page 116: 2.2 Lift Height Display
Press TAB 2 ► Press Activate the lifting height display in the work menu. Display Symbol Explanation Lifting height display in work menu active / inactive Softkeys Explanation Stop Stops all hydraulic functions. 116 | Original Operating Instructions NOVACAT V 10000 3880.en-GB.80X.0... -
Page 117: 2.3 Sideshift
Press key to display the SET menu ► Press TAB 2.3 Parameters for lifting and lowering mowing units. Display Symbol Explanation Setting the maximum achievable working width as a percentage of the maximum possible lateral shift. Original Operating Instructions NOVACAT V 10000 | 117 3880.en-GB.80X.0... -
Page 118: 2.4 Adaptive Hydraulic Relief
2.4 Adaptive hydraulic relief Adjust the parameters in the adaptive hydraulic relief menu. How do I get there? START menu displayed ► Press key to display the SET menu ► Press TAB 2.4 118 | Original Operating Instructions NOVACAT V 10000 3880.en-GB.80X.0... - Page 119 "Right mowing unit" value when in "Mowing unit extended" position (maximum width) Softkeys Explanation Stop Stops all hydraulic functions. Reverse Up one menu level Press and hold the key to change to the work menu Original Operating Instructions NOVACAT V 10000 | 119 3880.en-GB.80X.0...
-
Page 120: 2.5 Cross Conveyor Belt
You can set the cross conveyor belt parameters in its menu. How do I get there? START menu displayed ► Press key to display the SET menu ► Press TAB 2 ► Press TAB 2.5 Cross conveyor belt parameters. 120 | Original Operating Instructions NOVACAT V 10000 3880.en-GB.80X.0... - Page 121 This can be prevented by reducing the speed of the cross conveyor belt. Softkeys Explanation Stop Stops all hydraulic functions. Reverse Up one menu level Press and hold the key to change to the work menu Original Operating Instructions NOVACAT V 10000 | 121 3880.en-GB.80X.0...
-
Page 122: 2.6 Automatic Grease Lubrication
Time counter per lubrication cycle. A lubrication cycle consists of the runtime plus the wait- ing time of the lubrication pump. Lubrication pump runtime per lubrication cycle. Lubrication pump waiting time per lubrication cycle 122 | Original Operating Instructions NOVACAT V 10000 3880.en-GB.80X.0... -
Page 123: Emergency Operation
How do I get there? START menu displayed ► Press key to display the SET menu ► Press TAB 3 Activating emergency operation in the set menu. Display Symbol Explanation Emergency operation active / inactive Original Operating Instructions NOVACAT V 10000 | 123 3880.en-GB.80X.0... -
Page 124: Gps
Entry field for the distance between the centre of the bolt on the three-point upper link and the front edge of the rear mower 124 | Original Operating Instructions NOVACAT V 10000 3880.en-GB.80X.0... -
Page 125: Speed Signals
5 Speed signals You can define the speed signal in this menu. How do I get there? START menu displayed ► Press key to display the SET menu ► Press TAB 5 Original Operating Instructions NOVACAT V 10000 | 125 3880.en-GB.80X.0... - Page 126 The meter display is used to check the signal: If the tractor/ wagon combination is moving, the displayed value changes. If the tractor/wagon combination is stationary, the value does not change. 126 | Original Operating Instructions NOVACAT V 10000 3880.en-GB.80X.0...
-
Page 127: Service Menu
Press the soft key on the START screen to show the service menu. Display Symbol Explanation Display of time remaining until next lubrication with grease. The interval to which the setting reverts is displayed in grey in brack- ets. Original Operating Instructions NOVACAT V 10000 | 127 3880.en-GB.80X.0... -
Page 128: Data Menu
This menu presents a complete display of the work carried out with the device. How do I get there? ► Press the soft key on the START screen to show the data menu. 128 | Original Operating Instructions NOVACAT V 10000 3880.en-GB.80X.0... -
Page 129: Data Menu - Order Display
This menu presents two displays of the work carried out with the device on the selected or- der. How do I get there? ► Press the soft key on the START screen to show the data menu. Original Operating Instructions NOVACAT V 10000 | 129 3880.en-GB.80X.0... - Page 130 Service time in headland position in h (percentage share of complete time) Service time in transport position in h (percentage share of complete time) Complete worked area (all customer orders combined) 130 | Original Operating Instructions NOVACAT V 10000 3880.en-GB.80X.0...
- Page 131 Press this button to reset the selected order value to 0. To start an order with reset values, begin by pressing the [delete] button fol- lowed by the [start[ button. Scroll keys Original Operating Instructions NOVACAT V 10000 | 131 3880.en-GB.80X.0...
-
Page 132: Data Menu - Year Display
Service time in headland position in h (percentage share of complete time) Service time in transport position in h (percentage share of complete time) Complete worked area (all customer orders combined) 132 | Original Operating Instructions NOVACAT V 10000 3880.en-GB.80X.0... -
Page 133: Test Menu
Press tabulator 1 in the test menu to change to test menu 1 - sensors. ► Press tabulator 1.1 in the test menu to change to test menu 1.1 - sensor voltages. Original Operating Instructions NOVACAT V 10000 | 133 3880.en-GB.80X.0... - Page 134 P.t.o. speed Speed of travel Steering turns from -32,000 up to +32000 straight ahead = 0 Keys Explanation STOP Stops all hydraulic functions. 134 | Original Operating Instructions NOVACAT V 10000 3880.en-GB.80X.0...
-
Page 135: Test Menu 1.2 - Mower
Press tabulator 1 in the test menu to change to test menu 1 - sensors. ► Press tabulator 1.2 in the test menu - sensors to change to test menu 1.2 - mower. Display Symbol Explanation Y1 Lower Poppet valve lock hook Y2 Lift Original Operating Instructions NOVACAT V 10000 | 135 3880.en-GB.80X.0... -
Page 136: Test Menu 1.3 - Sideshift
Stops all hydraulic functions. Reverse Up one menu level Tab keys Change to the next / previous tab Test menu 1.3 - sideshift This menu gives an overview of all sensors concerning sideshifts. 136 | Original Operating Instructions NOVACAT V 10000 3880.en-GB.80X.0... - Page 137 Y30 mowing unit inwards Right lateral displacement • B12 Right sideshift sensor Error-free sensor Fault • Current sensor voltage in mV • Y31 mowing unit outwards • Y30 mowing unit inwards Original Operating Instructions NOVACAT V 10000 | 137 3880.en-GB.80X.0...
-
Page 138: Test Menu 1.4 - Collector
Y25 cross conveyor belt or cross flow flap poppet valve posi- tion attained (depending on version) • Y26 cross conveyor belt or cross flow flap poppet valve posi- tion attained (depending on version) 138 | Original Operating Instructions NOVACAT V 10000 3880.en-GB.80X.0... -
Page 139: Test Menu 1.5 - Relief
Press tabulator 1 in the test menu to change to test menu 1 - sensors. ► Press tabulator 1.5 in the test menu to change to test menu 1.5 - relief. Original Operating Instructions NOVACAT V 10000 | 139 3880.en-GB.80X.0... - Page 140 Y15 Poppet valve relief is active • Y16 Fill poppet valve relief Y17 Fill / empty collision protection Right mower unit • Y13 Poppet valve relief is active • Y14 Fill poppet valve relief 140 | Original Operating Instructions NOVACAT V 10000 3880.en-GB.80X.0...
-
Page 141: Test Menu 1.5 - Relief
Press tabulator 1.5 in the test menu to change to test menu 1.5 - relief. Display Symbol Explanation Voltage supply control computer • 12 V Voltage supply control computer • 12 V Sensor supply voltage • 5 V Sensor supply voltage Original Operating Instructions NOVACAT V 10000 | 141 3880.en-GB.80X.0... -
Page 142: Error-List
► Press the soft key on the START screen to show the test menu. ► Press tabulator 3 in the test menu to change to test menu 3 - error list. 142 | Original Operating Instructions NOVACAT V 10000 3880.en-GB.80X.0... - Page 143 Suppress alarm message Suppressed alarm messages no longer appear until the control is restarted. Neither the continued existence of the fault nor a recur- rence of it will trigger the alarm message. Original Operating Instructions NOVACAT V 10000 | 143 3880.en-GB.80X.0...
-
Page 144: Configuration Menu
How do I get there? ► Depress soft key in the START screen for 10 seconds to show the configuration menu. ► Press one of the tabulator keys to change to the corresponding sub-menu. 144 | Original Operating Instructions NOVACAT V 10000 3880.en-GB.80X.0... -
Page 145: Configuratoin 1.1 - General
Press tabulator 1 in the configuration menu to change to configuration menu 1.1 - Gen- eral Display Symbol Explanation Machine type Work lights Hydraulic relief Measurement units (metric or imperial) Crossflow unit Speed signal in tractor available Hydraulic lateral displacement Original Operating Instructions NOVACAT V 10000 | 145 3880.en-GB.80X.0... -
Page 146: Configuration Menu 1.2 - Emergency Operation
Press tabulator 4 in the configuration menu to change to configuration menu 4 - emer- gency operation. Display Symbol Explanation Emergency operation on / off Keys Explanation STOP Stops all hydraulic functions. Reverse Up one menu level 146 | Original Operating Instructions NOVACAT V 10000 3880.en-GB.80X.0... -
Page 147: Configuration Menu 1.3 - Subject To A Charge
Press tabulator 1.3 in the configuration menu to change to configuration menu 1.3 - Sec- tion Control Display Symbol Explanation Section Control Task control Automatic steering angle system If these options are greyed out, your payment has not been received. Original Operating Instructions NOVACAT V 10000 | 147 3880.en-GB.80X.0... -
Page 148: Configuration Meun 2.1 - Raise / Lower Calibration
Press tabulator 2.2 to change to submenu 2.2 "Raise /lower calibration". Display Symbol Explanation ACTUAL Current value in left sensor Current value in right sensor Left working position target value (can Right working position target value be calibrated) (can be calibrated) 148 | Original Operating Instructions NOVACAT V 10000 3880.en-GB.80X.0... -
Page 149: Configuration Menu 2.2 - Sideshift Calibration
Depress soft key in the START screen for 10 seconds to show the configuration menu. ► Press tabulator 2 in the configuration menu to change to configuration menu 6 - calibra- tion. Original Operating Instructions NOVACAT V 10000 | 149 3880.en-GB.80X.0... - Page 150 Save the value for the corresponding position by pressing the corresponding key. Save wide position This key is normally greyed out and turns black when it is possible to save the value. 150 | Original Operating Instructions NOVACAT V 10000 3880.en-GB.80X.0...
-
Page 151: Configuration Menu 3 - Terminal Supported Manual Activation
Adjust the parameters associated with the side protection flap manually in the manual opera- tion - side protection flap menu. How do I get there? ► Depress soft key in the START screen for 10 seconds to show the configuration menu. Original Operating Instructions NOVACAT V 10000 | 151 3880.en-GB.80X.0... - Page 152 Side protection flap poppet valve: Operational check on Y2 Softkeys Explanation Stop Stops all hydraulic functions. Reverse Up one menu level Press and hold the key to change to the work menu 152 | Original Operating Instructions NOVACAT V 10000 3880.en-GB.80X.0...
-
Page 153: Configuration Menu 3.2 - Terminal Supported Manual Activation - Mower
Press tabulator 3.2 in the manual operation configuration menu to change to configura- tion menu 3.2 - terminal supported manual activation -mower. Display Symbol Explanation Y1 Lower Poppet valve lock hook Original Operating Instructions NOVACAT V 10000 | 153 3880.en-GB.80X.0... - Page 154 Right side protection flap poppet valve Keys Explanation STOP Stops all hydraulic functions. Reverse Up one menu level Tab keys Change to the next / previous tab Raise / lower right mower unit 154 | Original Operating Instructions NOVACAT V 10000 3880.en-GB.80X.0...
-
Page 155: Configuration Menu 3.3 - Manual Operation - Sideshift
Keep the softkey pressed down to diaply the tabs. ► Press tabulator 3.3 in the manual operation configuration menu to change to configura- tion menu 3.3 - manual operation - sideshift. Original Operating Instructions NOVACAT V 10000 | 155 3880.en-GB.80X.0... - Page 156 Change to the next / previous tab Right sideshift, move to minimum position Right sideshift, move to maximum position Left sideshift, move to minimum position Left sideshift, move to minimum position 156 | Original Operating Instructions NOVACAT V 10000 3880.en-GB.80X.0...
-
Page 157: Configuration Menu 3.4 - Manual Operation - Relief
3.4 - manual operation - relief. Display Symbol Explanation Left relief sensor • B06 Relief sensor functions does not function • B06 value in mV • B06 value in bar Original Operating Instructions NOVACAT V 10000 | 157 3880.en-GB.80X.0... -
Page 158: Configuration Menu 3.5 - Manual Operation - Collector
- collector menu. How do I get there? ► Press the soft key on the START screen to show the configuration menu. 158 | Original Operating Instructions NOVACAT V 10000 3880.en-GB.80X.0... - Page 159 (depending on version) • Y24 cross conveyor belt or cross flow flap poppet valve posi- tion attained (depending on version) B22 Speed sensor - current left belt speed Y28 Belt on / off Original Operating Instructions NOVACAT V 10000 | 159 3880.en-GB.80X.0...
-
Page 160: Configuration Menu 4 - Serial Number
► Press tabulator 1 in the configuration menu to change to configuration menu 1. ► Press tabulator 4 in the configuration menu to change to configuration menu 4 - serial number. 160 | Original Operating Instructions NOVACAT V 10000 3880.en-GB.80X.0... -
Page 161: Configuration Menu 5 - Factory Setting
► Press tabulator 1 in the configuration menu to change to configuration menu 1. ► Press tabulator 5 in the configuration menu to change to configuration menu 5 - factory settings. Original Operating Instructions NOVACAT V 10000 | 161 3880.en-GB.80X.0... - Page 162 ISOBUS operation Keys Explanation STOP Stops all hydraulic functions. Reverse Up one menu level Tab keys Change to the next / previous tab Press the key to restore the factory settings. 162 | Original Operating Instructions NOVACAT V 10000 3880.en-GB.80X.0...
-
Page 163: Valves / Cover / Auxiliary Equipment
Unlock and open tailgate Implementation ► Remove linch pin (5). ► Swing operating lever (4) to the side and press upwards as shown. This causes the lock hooks underneath the tailgate to swing out. Original Operating Instructions NOVACAT V 10000 | 163 3880.en-GB.80X.0... - Page 164 Swivel operating lever (4) to the right until the lock button (6) clicks into place. ► Remove operating lever and swivel flap upwards slightly with the handle (H) with one hand. The flap can now be swiveled freely. 164 | Original Operating Instructions NOVACAT V 10000 3880.en-GB.80X.0...
- Page 165 The flap is left in this position during operation when mowing is to take place without the formation of swaths. In this case, the operating lever is returned to its transport position and secured with the linch pin as shown. Original Operating Instructions NOVACAT V 10000 | 165 3880.en-GB.80X.0...
- Page 166 Remove operating lever and insert sideways in its transport position so that the lock hooks can be closed. Do not insert linch pin yet! ► Close the tailgate completely and press the operating lever downwards to close the lock- ing lever completely. 166 | Original Operating Instructions NOVACAT V 10000 3880.en-GB.80X.0...
-
Page 167: Apron Carrier Operation
In certain tractor types, it is necessary to fold up the protectors before the machine is swung into transport position to prevent damage being caused to an open rear window or the mud guards. Original Operating Instructions NOVACAT V 10000 | 167 3880.en-GB.80X.0... - Page 168 Implementation ► Depending on the design of the tractor / control device and / or activate the control ter- minal to move the corresponding protector into the required position. 168 | Original Operating Instructions NOVACAT V 10000 3880.en-GB.80X.0...
- Page 169 ► Carry out procedure similarly on both sides of the machine. ► Fold front protection down - press the front protection down with the handle (2) until the lock engages again. Original Operating Instructions NOVACAT V 10000 | 169 3880.en-GB.80X.0...
- Page 170 Swivel the side protection slightly upwards until the bolt can no longer engage, remove the screwdriver and swivel the side protection backwards as far as it will go. The spring-loaded locking bolt automatically locks the side protection in the raised posi- tion. 170 | Original Operating Instructions NOVACAT V 10000 3880.en-GB.80X.0...
-
Page 171: Operation Of Parking Supports
Tractor motor turned off, parking brake applied, ignition key removed and stored. Implementation ► Move rear support stand to working position Remove locking lever (V) and swing rear support stands up so that the locking lever (V) can no longer engage. Original Operating Instructions NOVACAT V 10000 | 171 3880.en-GB.80X.0... - Page 172 • Tractor motor turned off, parking brake applied, ignition key removed and stored. • Support stands swung into working position. Implementation ► Hold foot with one hand on handle 1. 172 | Original Operating Instructions NOVACAT V 10000 3880.en-GB.80X.0...
- Page 173 If the foot is pulled out too far, it may fall out of the guide! ► Move the foot slowly. ► Do not pull the foot out completely. ► Move linch pin to required position. Original Operating Instructions NOVACAT V 10000 | 173 3880.en-GB.80X.0...
- Page 174 Hold handle (2) on support stand with one hand. ► Pull the spring-loaded locking pin (3) until the support stand can be moved. ► Move the support as required and release the spring-loaded locking pin. 174 | Original Operating Instructions NOVACAT V 10000 3880.en-GB.80X.0...
- Page 175 Move right support stand to working position: Unlock support stand by pulling spring-loa- ded bolts (B) and move all the way to the top with the handle (A). ► Allow support stand to engage in upper position with spring-loaded bolts (B). Original Operating Instructions NOVACAT V 10000 | 175 3880.en-GB.80X.0...
- Page 176 Move front support stand to park position: Repeat the process in reverse and make sure that all supports have been adjusted to the same height so that the machine can be parked horizontally. 176 | Original Operating Instructions NOVACAT V 10000 3880.en-GB.80X.0...
-
Page 177: Operation
Danger of crushing the whole body when activating the power lift! ► Direct people from the risk area around the power lift. ► Do not stand between the tractor and the power lift when operating the power lift via external buttons. Original Operating Instructions NOVACAT V 10000 | 177 3880.en-GB.80X.0... -
Page 178: Mounting On Tractor
Set the two lower links in parallel in the required setting for the height and width of the headstock and secure against lateral movement. ▷ Attach spacer sleeves and lower link balls on the lower link bolts if required, and se- cure with linchpin if not already done. 178 | Original Operating Instructions NOVACAT V 10000 3880.en-GB.80X.0... -
Page 179: Connect The Tractor Terminal
See "Operation of parking supports" on page 171. Connect the tractor terminal Implementation ► Stick the plug of the ISOBUS cable of the machine in the ISOBUS outlet of the tractor. Original Operating Instructions NOVACAT V 10000 | 179 3880.en-GB.80X.0... -
Page 180: Mounting The Select Control Terminal
There is a bracket designated for fasten- ing the cable on the hind side of the terminal. ► Plug the power supply plug into the power socket. 180 | Original Operating Instructions NOVACAT V 10000 3880.en-GB.80X.0... -
Page 181: Mounting The Power Control Terminal
► Stick the plug of the ISOBUS cable in the outlet of the interface cable. ► Stick the power supply plug of the interface cable into the power socket. Original Operating Instructions NOVACAT V 10000 | 181 3880.en-GB.80X.0... -
Page 182: Fit Expert 75 Isobus Terminal
► Stick the plug of the ISOBUS cable in the outlet of the interface cable. ► Stick the power supply plug of the interface cable into the power socket. 182 | Original Operating Instructions NOVACAT V 10000 3880.en-GB.80X.0... -
Page 183: Fit Expert 100 (Cci-100) Terminal
► Stick the plug of the ISOBUS cable in the outlet of the interface cable. ► Stick the power supply plug of the interface cable into the power socket. Original Operating Instructions NOVACAT V 10000 | 183 3880.en-GB.80X.0... -
Page 184: Mounting The Cci 1200 Terminal
► Stick the plug of the ISOBUS cable in the outlet of the interface cable. ► Stick the power supply plug of the interface cable into the power socket. 184 | Original Operating Instructions NOVACAT V 10000 3880.en-GB.80X.0... -
Page 185: Tractor Ballast
</= kg (G Total weight perm kg (T kg (T Front axle load </= kg V act V perm kg (T </= kg (T Rear axle load </= kg H act H perm Original Operating Instructions NOVACAT V 10000 | 185 3880.en-GB.80X.0... -
Page 186: Determine The Required Tractor Ballast Weights Using The Weighing Method
See the tractor operational instructions. Weigh the total weight ► Drive the tractor together with the machine in transport position and the ballast weights with the front and rear axle on the scales. 186 | Original Operating Instructions NOVACAT V 10000 3880.en-GB.80X.0... - Page 187 ) taking the tyre bearing capacity into account. See the tractor opera- H perm tional instructions. ► Verify if the technical data of the tyres and rims correspond to the tractor manufacturer requirements. See the tractor operational instructions. Original Operating Instructions NOVACAT V 10000 | 187 3880.en-GB.80X.0...
-
Page 188: Determine The Required Tractor Ballast Weights Using Calculation
► Double the permitted tyre load capacity according to the tractor operational instructions or the documentation of the tyre manufacturer (two tyres per axle) and enter in the value table. 188 | Original Operating Instructions NOVACAT V 10000 3880.en-GB.80X.0... -
Page 189: Adjustment / Retrofitting
The distance from the tractor can be established the first time the machine is attached to the tractor and must be checked and adjusted if necessary each time a machine is first attached. Original Operating Instructions NOVACAT V 10000 | 189... - Page 190 ► Remove lower link balls and spacer sleeves. ► Remove nuts (1), washers (2) and lower link bracket (3). 190 | Original Operating Instructions NOVACAT V 10000 3880.en-GB.80X.0...
- Page 191 ► Also move the outer lower link bracket forward by one hole (B). ► Reinsert the washers and nuts and tighten with 450 Nm. Original Operating Instructions NOVACAT V 10000 | 191 3880.en-GB.80X.0...
- Page 192 "In- creasing the lower link distance". Position of right lower link bracket for use with Quickhitch. 192 | Original Operating Instructions NOVACAT V 10000 3880.en-GB.80X.0...
-
Page 193: Requirements For The Commissioning Of A Pto Shaft
A sliding distance (a) of 40 mm must be available. If necessary, have the cardan shaft shortened by an authorized service specialist. Check the permissible cardan shaft angulation. Refer to the cardan shaft's operating manual. Original Operating Instructions NOVACAT V 10000 | 193 3880.en-GB.80X.0... - Page 194 ► Remove the cardan shaft parts. ► Shorten the outer protective tube at the marked point. ► Shorten the inner protective tube to the same length as the external protective tube. 194 | Original Operating Instructions NOVACAT V 10000 3880.en-GB.80X.0...
-
Page 195: Remove / Reposition Conveyor Cones
We recommend using the conveyor cone to improve output, particularly for heavy, dense quantities of fodder. Original Operating Instructions NOVACAT V 10000 | 195 3880.en-GB.80X.0... - Page 196 Remove the covering cap from the conveyor cone and keep handy. ► Loosen M10x35 screw, remove conveyor cones and keep both handy. Assemble and tighten the cover supplied with the machine with the M10x30 screw. 196 | Original Operating Instructions NOVACAT V 10000 3880.en-GB.80X.0...
-
Page 197: Hydraulic Anti-Collision Safety Trigger Pressure Setting
Pretension factory setting 3 m hitching frame 3.5 m hitching frame 100 bar 120 bar Change pretension of anti-collison safety with POWER CONTROL or ISOBUS: Change SELECT CONTROL pretension Preparation • Torque wrench Original Operating Instructions NOVACAT V 10000 | 197 3880.en-GB.80X.0... -
Page 198: Rear Power Lift Height
► Direct persons out of the danger area around the machine before moving the machine. WARNING Simultaneous operation of machine and tractor by several people! ► Clearly define the areas of responsibility of present assistants and discuss work proce- dures. 198 | Original Operating Instructions NOVACAT V 10000 3880.en-GB.80X.0... - Page 199 Park tractor and machine on level and stable ground in working position and secure against rolling. • PTO drive switched off. Implementation Rear power lift height with standard 3-point attachment! Mower unit and top link hidden! Original Operating Instructions NOVACAT V 10000 | 199 3880.en-GB.80X.0...
-
Page 200: Hydraulic Relief, Select Control Adjustment Variant
Height adjustments are not generally necessary during normal operation. Hydraulic relief, select control adjustment variant Correct relief setting reduces wear and allows for clean mowing. 200 | Original Operating Instructions NOVACAT V 10000 3880.en-GB.80X.0... - Page 201 ► Do not lift manually. ► Use a crane, forklift truck or similar equipment together with a suitably sized spring bal- ance. Implementation Complete weighing process: Raise outer mowing unit as shown. Original Operating Instructions NOVACAT V 10000 | 201 3880.en-GB.80X.0...
- Page 202 The hydraulic block with the three relief adjustment shut-off valves are loctaed un- der the cover. Shut-off valves in working position. Activate relief adjustment: Move shut-off valve (1) to position (B). 202 | Original Operating Instructions NOVACAT V 10000 3880.en-GB.80X.0...
- Page 203 = the weight of the mower unit on the ground is reduced. Reduce pressure = reduce release = the weight of the mower unit on the ground is in- creased. Original Operating Instructions NOVACAT V 10000 | 203 3880.en-GB.80X.0...
-
Page 204: Cutter Bar Position Adjustment
Mower parked, ignition key removed from tractor waiting for mower discs to come to a standstill. Implementation ► Adjust the upper link and set the cutter bar position so that the surface of the skids un- derneath the cutter bar rest entirely on the ground. 204 | Original Operating Instructions NOVACAT V 10000 3880.en-GB.80X.0... -
Page 205: Connect / Separate Connecting Lines On Front Mower
Connect / separate connecting lines on front mower. With the "Power Control" variant, it is possible to control the automatically folding front mower side guard and the rear mower simultaneously (option). Original Operating Instructions NOVACAT V 10000 | 205 3880.en-GB.80X.0... -
Page 206: Conditioner (Option)
Conditioning is achieved by means of 2 parallel, interlocking, flexibly mounted rubber rollers. Conditioning intensity is adjusted by means of the spring tension of the upper roller. The fol- lowing settings may be used for optimum adjustment to existing conditions. 206 | Original Operating Instructions NOVACAT V 10000 3880.en-GB.80X.0... - Page 207 Reduce the conditioning intensity using the crank (see "setting the conditioning intensi- ty"). ► Set the gap width at the adjusting screws (1, 2 ) to a value of 2 - 4 mm between the roller flanges. Original Operating Instructions NOVACAT V 10000 | 207 3880.en-GB.80X.0...
- Page 208 The swath boards shape the cut and conditioned fodder to the desired swath width. The most appropriate setting is determined during operation. Implementation ► Loosen and adjust the adjusting screw (1) to set the swatch width. 208 | Original Operating Instructions NOVACAT V 10000 3880.en-GB.80X.0...
- Page 209 Mount guide plates ▷ Attach guide plates to brackets (L) ▷ Guide plates that are not needed can be stored in the parking position (2, 3) at the top of the hood. Original Operating Instructions NOVACAT V 10000 | 209 3880.en-GB.80X.0...
- Page 210 The most appropriate setting is determined during operation. The additional third roller on the roller conditioner influences the fodder ejection angle. The height of the roller is movable for adjustment purposes. 210 | Original Operating Instructions NOVACAT V 10000 3880.en-GB.80X.0...
-
Page 211: Tine Conditioner Settings
► Use suitable supports to prevent accidental lowering / swinging of hydraulically control- led machine parts. ► On completion of the work, check tightness of loosened screw connections and correct operation of safety / protective equipment. Original Operating Instructions NOVACAT V 10000 | 211 3880.en-GB.80X.0... - Page 212 ► Check the setting and if necessary set the swath and guiding plates to be wider Implementation ► Adjust the conditioning intensity to the required setting using the adjustment lever (1) on the tine conditioner. 212 | Original Operating Instructions NOVACAT V 10000 3880.en-GB.80X.0...
- Page 213 Loosen ring nut (1) on both sides, adjust impact plate to inclined position and tighten ring nuts again. ► Carry out procedure similarly on both sides of the machine. Setting the swath width The most appropriate setting is determined during operation. Original Operating Instructions NOVACAT V 10000 | 213 3880.en-GB.80X.0...
- Page 214 The most appropriate setting is determined during operation. Implementation ► Adjust wide spread placement: Swing swath discs (2) completely out 2 = toggle nut ► Adjust position of guide plates on ring nuts (3). 214 | Original Operating Instructions NOVACAT V 10000 3880.en-GB.80X.0...
- Page 215 Carry out procedure similarly on both sides of the machine. ► Adjust swath deposit: Pivot swath plates (2) inwards depending on required swath width. 2 = toggle nut ► Adjust guide plates (4) as shown. Original Operating Instructions NOVACAT V 10000 | 215 3880.en-GB.80X.0...
-
Page 216: Mowing Without Conditioner
Swath former operation (option) is only possible without a conditioner (option) and only if the rear protection (option) is used. Dismantle the collector when operating the machine without a conditioner to avoid unnec- essary weight. 216 | Original Operating Instructions NOVACAT V 10000 3880.en-GB.80X.0... - Page 217 Repeat procedure correspondingly on both sides of the machine. Open protection. Loosen the belt tension using the blade wrench (1) and remove the belt (2) on the condi- tioner belt pulley. Original Operating Instructions NOVACAT V 10000 | 217 3880.en-GB.80X.0...
- Page 218 Push chassis (5) into the bracket on both sides as far as the end stop. Remove retaining bolt and set aside for use on the rear protection or if the conditioner is to be re-assembled at a later stage. 218 | Original Operating Instructions NOVACAT V 10000 3880.en-GB.80X.0...
- Page 219 Push lubricant line connection out from mower unit. Remove conditioner at the rear, place on a level, weight-bearing surface and secure against rolling using wheel chocks. The chassis is not suitable for manouvering the conditioner on unpaved surfaces! Original Operating Instructions NOVACAT V 10000 | 219 3880.en-GB.80X.0...
- Page 220 The parts must be or- dered additionally (see spare parts list, component: "REAR PROTECTION“). Fit rear protection If swath formers are assembled, the cutter bar reinforcement must be dismantled before as- sembling the swath former. 220 | Original Operating Instructions NOVACAT V 10000 3880.en-GB.80X.0...
-
Page 221: Fit Conditioner / Swath Former
Machine is fully attached and properly secured to a suitable tractor. • Park tractor and machine on level and stable ground in working position and secure against rolling. • Conditioner / swath former dismantled. Original Operating Instructions NOVACAT V 10000 | 221 3880.en-GB.80X.0... - Page 222 See "Check / correct conditioner drive and tension roller run" on page 290. Install belt, tension and attach protective cover. Activate blade key (1) and move belt tensioner to park position. Lay all belts (2) on the belt pulleys. 222 | Original Operating Instructions NOVACAT V 10000 3880.en-GB.80X.0...
-
Page 223: Collector (Option)
The cross conveyor belt is swung in / out with the control ter- minal. The band speed can be adjusted infinitely on each side with the control terminal (with the exception of Select Control). Original Operating Instructions NOVACAT V 10000 | 223 3880.en-GB.80X.0... - Page 224 Loosen ring nuts (1-2) and adjust deflector plate so that the fodder is thrown into the center of the cross conveyor belt as far as possible. Roller conditioner symbol illustration ► Tighten ring nuts (1-2) again. 224 | Original Operating Instructions NOVACAT V 10000 3880.en-GB.80X.0...
- Page 225 Move inner swath board out of park position and assemble in a similar way to the outer swath board. Original Operating Instructions NOVACAT V 10000 | 225 3880.en-GB.80X.0...
- Page 226 The inner swath boards should be removed when mowing with the collector and set to park position! Otherwise this could cause blockages with the inner swath. Implementation ► Dismantle the inner swath board on the conditioner and move to park position. 226 | Original Operating Instructions NOVACAT V 10000 3880.en-GB.80X.0...
- Page 227 Adjusting the accelerator rollers (optional) The height of the accelerator rollers (1) can be adjusted to change the casting distance. Implementation ► Remove the screws (2-3) on both sides of the accelerator roller. Original Operating Instructions NOVACAT V 10000 | 227 3880.en-GB.80X.0...
- Page 228 Reduce the hydraulic release to zero if not already done. The assembly sequence is presented below using the example of the right-hand condi- tioner. Repeat procedure correspondingly on both sides of the machine. 228 | Original Operating Instructions NOVACAT V 10000 3880.en-GB.80X.0...
- Page 229 Remove the linchpins (1) and locking bolts (2) from the hydraulic cylinder. ► Activate control device / tractor and retract hydraulic cylinder until "Cross conveyor belt swung out" is displayed on the terminal. Original Operating Instructions NOVACAT V 10000 | 229 3880.en-GB.80X.0...
- Page 230 (3). ► Remove linch pins (4) and locking pins (5) on both sides of the support (6). ► Lift off cross conveyor belt to the rear. 230 | Original Operating Instructions NOVACAT V 10000 3880.en-GB.80X.0...
- Page 231 Tractor motor switched off, parking brake applied, ignition key removed and stored dur- ing the assembly or dismantling work. Preparation • Crane or similar. • 2 lifting slings - maximum stress resistance at least 250 kg each Original Operating Instructions NOVACAT V 10000 | 231 3880.en-GB.80X.0...
- Page 232 Attach cross conveyor belt to support (1) as shown and position locking pins (2) and linch pins (3) on both sides of the tractor (1). ► Lower cross conveyor belt until it rests fully on the rubber buffers (3) on both sides of the support. 232 | Original Operating Instructions NOVACAT V 10000 3880.en-GB.80X.0...
- Page 233 Attach cleaned locking pin (6) and linch pin (7) on the hydraulic cylinder. ► Grease lubricating nipple (8) on the pivoting cylinder piston with lithium grease. ► Connect hydraulic lines to band speed sensor. Original Operating Instructions NOVACAT V 10000 | 233 3880.en-GB.80X.0...
-
Page 234: Cross Flow (Option)
After both cross conveyor belts have been fully assembled, the relief needs to be read- justed to accommodate the additional weight. Cross flow (option) To release the powertrain of the machine, the wiping strip (B) can be removed with lengthy fodder and increased power requirements. 234 | Original Operating Instructions NOVACAT V 10000 3880.en-GB.80X.0... - Page 235 Adjust wiping strips Preparation • Ring spanner / wrench with 8 mm, 13 mm, 19 mm width Ratchet / box spanner with 8 mm and 13 mm width Feeler gauge or similar Original Operating Instructions NOVACAT V 10000 | 235 3880.en-GB.80X.0...
- Page 236 If the conveyor rubs against the scraper, repeat adjustment from point 3. ▷ If the conveyor does not rub against the scraper, continue with the next point. Open tailgate Tighten fixing screws (1-6) in slits on inside of the cover. 236 | Original Operating Instructions NOVACAT V 10000 3880.en-GB.80X.0...
- Page 237 To release the powertrain of the machine, the wiping strip (B) can be removed with lengthy fodder and increased power requirements. Screw conveyor hidden! A = upper wiping strip B = lower wiping strip Original Operating Instructions NOVACAT V 10000 | 237 3880.en-GB.80X.0...
- Page 238 Tighten 3 threaded pieces again to secure threaded pieces against loss. ► Attach wiping strip to upper side of CROSSFLOW using previously removed screws as shown below. Attach and tighten surplus screws and nuts on the wiping strip. 238 | Original Operating Instructions NOVACAT V 10000 3880.en-GB.80X.0...
-
Page 239: Swath Former (Option)
Swath former (option) A narrow swath is formed when using the swath plates while mowing. This avoids driving over the crop with wide tractor tyres. Determine optimum swath width setting during operation. Original Operating Instructions NOVACAT V 10000 | 239 3880.en-GB.80X.0... - Page 240 Adjust the working depth using the bolts (1) in the slotted hole so that the swath discs run under the lower edge of the cutter bar at a maximum distance of 10 mm. 240 | Original Operating Instructions NOVACAT V 10000 3880.en-GB.80X.0...
- Page 241 Carry out procedure similarly on both sides of the machine. Set spring tension of additional swath discs Determine optimum setting during operation. Z = additional swath discs Prerequisite • Machine is fully attached and properly secured to a suitable tractor. Original Operating Instructions NOVACAT V 10000 | 241 3880.en-GB.80X.0...
-
Page 242: Swath Comb (Option)
Adjust the swath comb tine height using the hole pattern so that the tines do not destroy the swath from the front mower. 1 = highest position 6 = lowest position ► Insert the bolts in the desired hole and secure with spring pin. 242 | Original Operating Instructions NOVACAT V 10000 3880.en-GB.80X.0... -
Page 243: Work Assignment
► Stop the PTO shaft and wait for the drive to come to a standstill before raising the ma- chine. NOTICE Damage due to driving over obstacles! ► Drive carefully. ► Remove known obstacles if possible before starting work. Original Operating Instructions NOVACAT V 10000 | 243 3880.en-GB.80X.0... -
Page 244: Turning Manoeuvres On Slopes
Damage to hitching frame and mowing unit! The anti-collision safety is not effective if the machine is driven backwards in working posi- tion! ► Always raise machine to headland position if driving backwards in normal operation! 244 | Original Operating Instructions NOVACAT V 10000 3880.en-GB.80X.0... -
Page 245: Establish Working Position
Machine is fully attached to a suitable tractor • Tractor PTO drive switched off • Tractor PTO brake switched off • Park tractor and machine on level and stable ground in transport position and secure against rolling. Original Operating Instructions NOVACAT V 10000 | 245 3880.en-GB.80X.0... -
Page 246: Mowing Work
Upper link is set in such a way that the entire surface of the cutter bar rests on the skids. See "Cutter bar position adjustment" on page 204. • Check blades, blade fixings and mower discs for damage. 246 | Original Operating Instructions NOVACAT V 10000 3880.en-GB.80X.0... -
Page 247: Trigger / Reset Anti-Collision Safety
► Remove known obstacles before starting work. Release during mowing operation The anti-collision safety is only triggered if the cutter bar is moved in the mowing direction during the collision! Original Operating Instructions NOVACAT V 10000 | 247 3880.en-GB.80X.0... - Page 248 Replace all damaged parts / have them replaced by a specialist workshop before con- tinuing to work with the machine. 248 | Original Operating Instructions NOVACAT V 10000 3880.en-GB.80X.0...
-
Page 249: Establish Road Transport Position
► Direct persons out of the danger area around the machine before moving the machine. Prerequisite • Machine is fully attached to a suitable tractor • Tractor PTO drive switched off • PTO shaft brake switched off on tractor Original Operating Instructions NOVACAT V 10000 | 249 3880.en-GB.80X.0... - Page 250 Slowly raise cutter bar to transport position. ▷ Make sure that the transport safeguard has locked the arm to prevent acciden- tal lowering. Set double-acting tractor control device to float position. 250 | Original Operating Instructions NOVACAT V 10000 3880.en-GB.80X.0...
-
Page 251: Uncoupling
Machine is parked on level and stable ground and secured against rolling away. Implementation ► Move the cardan shaft holder to the stop position. ► Unhook the protective retaining chain from the tractor. Original Operating Instructions NOVACAT V 10000 | 251 3880.en-GB.80X.0... -
Page 252: Uncouple The Machine From The Tractor
Mower units hidden ► Activate rear power lift and lower machine until the parking supports are on the ground and the load on the lower links is released. 252 | Original Operating Instructions NOVACAT V 10000 3880.en-GB.80X.0... -
Page 253: Dismantle Cci 1200 Terminal
Pull the plug of the ISOBUS cable out of the tractor outlet. Install the covering caps. Pull the plug of the power cable out of the power outlet. Dismantling the terminal Remove and store the ISOBUS cable from the cab. Original Operating Instructions NOVACAT V 10000 | 253 3880.en-GB.80X.0... -
Page 254: Remove Expert 100 Terminal
Pull the plug of the ISOBUS cable out of the tractor outlet. Install the covering caps. Pull the plug of the power cable out of the power outlet. Dismantling the terminal Remove and store the ISOBUS cable from the cab. 254 | Original Operating Instructions NOVACAT V 10000 3880.en-GB.80X.0... -
Page 255: Remove Expert 75 Terminal
Pull the plug of the ISOBUS cable out of the tractor outlet. Install the covering caps. Pull the plug of the power cable out of the power outlet. Dismantling the terminal Remove and store the ISOBUS cable from the cab. Original Operating Instructions NOVACAT V 10000 | 255 3880.en-GB.80X.0... -
Page 256: Dismounting The Power Control Terminal
Install the covering caps. Pull the plug of the power cable out of the power outlet. Dismantling the terminal Remove and store the ISOBUS cable from the cab. Dismantling the SELECT CONTROL terminal 256 | Original Operating Instructions NOVACAT V 10000 3880.en-GB.80X.0... -
Page 257: Separate The Tractor Terminal
► Apply rust protection to bare machine parts, e.g. hydraulic cylinder piston rods or simi- lar. ► Disconnect drive shafts from the machine, push together fully lengthwise and store in dry weather-protected area Original Operating Instructions NOVACAT V 10000 | 257 3880.en-GB.80X.0... -
Page 258: Maintain Operational Readiness
Before wintering the machine, unplug the control terminals and store them in a dry, frost- proof area which is protected from direct sunlight. Fully charge battery-operated terminals before winter storage and then check the battery status regularly to prevent its destruction through being totally discharged. 258 | Original Operating Instructions NOVACAT V 10000 3880.en-GB.80X.0... -
Page 259: Cardan Shaft
Brand-new cardan shafts or ones that have been stationary for a long time before com- missioning should be cleaned and greased with universal grease with lubricant code (IV) until grease flows from the bearings. Original Operating Instructions NOVACAT V 10000 | 259 3880.en-GB.80X.0... -
Page 260: Equipment Table
H, E Lighting Relay Motors Horn Switch, key Plug-in connections Valves Seat valve Directional control valve Short description Right mower position Right relief pressure Left mower position Left relief pressure 260 | Original Operating Instructions NOVACAT V 10000 3880.en-GB.80X.0... - Page 261 Right SV relief Fill right SV relief Left SV relief Fill left SV relief SV anti-collision safety Widen left WV sideshift Narrow left WV sideshift Widen right WV sideshift Narrow right WV sideshift Original Operating Instructions NOVACAT V 10000 | 261 3880.en-GB.80X.0...
-
Page 262: Maintenance Based On Actual Condition
/ mowing drums, always replace them with new ones to avoid imbalances. ► Always note direction of rotation markings when fitting new mower blades. Preparation • Remove knife wrench from the toolbox / bracket. 262 | Original Operating Instructions NOVACAT V 10000 3880.en-GB.80X.0... - Page 263 • Contact surfaces of the blade, the blade holder and mowing disc have been cleaned. • With new mower blades, remove the anti-corrosion paint at the attachment points around the hole. Original Operating Instructions NOVACAT V 10000 | 263 3880.en-GB.80X.0...
- Page 264 Ensure that the blade can move on the blade bolt and that the blade rests fully on the cutting disc and the blade holder on the blade. ► Remove the knife wrench and store it. ► Carry out the same procedure for all cutter blades. 264 | Original Operating Instructions NOVACAT V 10000 3880.en-GB.80X.0...
-
Page 265: Replace Toothed Belt Conditioning Roller
Tractor motor turned off, parking brake applied, ignition key removed and stored. 1 = adjusting nut 2 = console 3 = Disc Implementation Remove cover ▷ Remove side protection: Remove 2 screws (14) Original Operating Instructions NOVACAT V 10000 | 265 3880.en-GB.80X.0... - Page 266 Re-installation is carried out logically in the reverse order to detaching. Check tensioner pulley running Check that the tension roller is running after every drive conversion The tension roller must run in alignment with the driving belts, see illustration 266 | Original Operating Instructions NOVACAT V 10000 3880.en-GB.80X.0...
-
Page 267: Replace Conditioner Drive V-Belt
Tractor motor turned off, parking brake applied, ignition key removed and stored. Implementation Remove inner side protection: Remove 2 screws (S). Lift side protection up and away using the grip (G). Remove inner covering: Remove 3 screws (S). Original Operating Instructions NOVACAT V 10000 | 267 3880.en-GB.80X.0... - Page 268 Adjust belt tension to factory setting: Pointer tip (Z) = parallel with the bottom edge of the washer under the adjusting nut (M). 10 Reassemble the machine unit in reverse sequence. 268 | Original Operating Instructions NOVACAT V 10000 3880.en-GB.80X.0...
-
Page 269: Tine Conditioner, Tines And Tine Fastening Assembly Work
► If worn tine attachments are replaced with new ones, the same number of tine attach- ments must also be replaced on the 180 ° opposed rotor side. Symbol illustration of possible tine assembly positions on the rotor Original Operating Instructions NOVACAT V 10000 | 269 3880.en-GB.80X.0... - Page 270 Attach the fitting aid and counteract the pressure of the internal rubber buffer using the fitting aid. Fitting aid SK08936-0379 ► Tap out spring pin with pin punch, adapt applied pressure on fitting aid accordingly if re- quired. 270 | Original Operating Instructions NOVACAT V 10000 3880.en-GB.80X.0...
- Page 271 Maintenance based on actual condition ► Remove fitting aid. ► Remove individual parts. ► Replace faulty individual parts with new ones if required. ► Carry out the same procedure on all conditioner tines if required. Original Operating Instructions NOVACAT V 10000 | 271 3880.en-GB.80X.0...
- Page 272 8 = spring pin 13x36 mm 9 = bolt M8x55 DIN931 Implementation ► Assemble individual parts paying particular attention to the fitting position of brackets (1), rubber buffers (2) and tines (5-6) as shown! 272 | Original Operating Instructions NOVACAT V 10000 3880.en-GB.80X.0...
- Page 273 Spring pin assembly position ► Knock the dowel pin in until it stops and remove the fitting mandrel. Original Operating Instructions NOVACAT V 10000 | 273 3880.en-GB.80X.0...
-
Page 274: Rotary Tine Conditioner Fitting Positions
Fit and tighten the cover (2) and bolt (1) M8x55 (1). ► Carry out the same procedure on all conditioner tines if required. Rotary tine conditioner fitting positions Overview of the individual fitting positions of the rotor tines. 274 | Original Operating Instructions NOVACAT V 10000 3880.en-GB.80X.0... -
Page 275: Replace Crossflow Drive V-Belt
= Fitting position without tines Replace crossflow drive V-belt Belt cover is shown as transparent. When the drive belts show signs of damage or wear, they must be replaced. Always replace all V-belts simultaneously! Original Operating Instructions NOVACAT V 10000 | 275 3880.en-GB.80X.0... - Page 276 Loosen belt tension by releasing the adjusting nut (3). 1 = Console 2 = Disc 3 = adjusting nut ► Remove covering (A) ► Remove V-belts ► Clean the pulleys if necessary. 276 | Original Operating Instructions NOVACAT V 10000 3880.en-GB.80X.0...
-
Page 277: Fill Lubricant Container For Central Lubrication
Park tractor and machine on level and stable ground, and secure against rolling. • Machine parked in working position • PTO turned off • Tractor motor turned off, parking brake applied, ignition key removed and stored. Original Operating Instructions NOVACAT V 10000 | 277 3880.en-GB.80X.0... -
Page 278: Set Cross Conveyor Belt Sensors
The sensors register the different operating statuses of the cross conveyor belts such as belt position and belt speed. In the event of error messages, first check the sensor positions and correct as follows if nec- essary. 278 | Original Operating Instructions NOVACAT V 10000 3880.en-GB.80X.0... - Page 279 Adjust speed sensor Implementation ► Remove hydraulic motor The hydraulic hoses do not have to be removed. ► Adjust distance of speed sensor from motor adapter sensor ring to 3-5 mm as shown. Original Operating Instructions NOVACAT V 10000 | 279 3880.en-GB.80X.0...
- Page 280 Maintenance based on actual condition ► Reinstall the hydraulic motor and tighten screws. ► Carry out procedure similarly on both sides of the machine. 280 | Original Operating Instructions NOVACAT V 10000 3880.en-GB.80X.0...
-
Page 281: Predetermined Maintenance
Check the cardan shaft cam clutch The cardan shaft cam clutch should be checked (pulled off) once a year. This inspection is important, especially if it never responds during normal operation. Original Operating Instructions NOVACAT V 10000 | 281 3880.en-GB.80X.0... -
Page 282: Make Input Gear Overrunning Clutches "Movable
• On both sides of the machine Daily maintenance Maintenance is to be carried out at the beginning of each working day before using the ma- chine. 282 | Original Operating Instructions NOVACAT V 10000 3880.en-GB.80X.0... -
Page 283: Check Hydraulic System
Depressurize the hydraulic system before carrying out any maintenance and repair work on the hydraulics. To do so, move the tractor control device several times between raised and lowered positions whilst the hydraulic pressure supply is switched off. Original Operating Instructions NOVACAT V 10000 | 283 3880.en-GB.80X.0... -
Page 284: Check / Change Lighting Of Lamps
Correctly dispose of the defective light. Changing the indicator light (USA lights) LED lights with built-in bulbs. Implementation ► Open the bayonet connector on the rear side off the light and unplug the connector. 284 | Original Operating Instructions NOVACAT V 10000 3880.en-GB.80X.0... -
Page 285: Check / Replace Warning Signs, Warning Triangles, Warning Sheets
► Clean soiled warning signs, warning triangles, warning foils before travelling in public traffic areas with the machine. ► Replace damaged warning signs, warning triangles, warning foils before travelling on public roads with the machine. Original Operating Instructions NOVACAT V 10000 | 285 3880.en-GB.80X.0... -
Page 286: Once After 1 Hour
1 = stud bolt (lock) 2 = forcing hole (number dependent on design) 3 = taper bushing (bushing number lasered onto the front) 4 = stud bolt (lock) 5 = belt pulley 286 | Original Operating Instructions NOVACAT V 10000 3880.en-GB.80X.0... -
Page 287: Retighten Blade Bolts
7/16 2017 7/16 2517 2525 3020 3030 3525 3535 Retighten blade bolts Mower discs with attached conveyor drums or conical discs will also be referred to simply as mower discs below! Original Operating Instructions NOVACAT V 10000 | 287 3880.en-GB.80X.0... -
Page 288: After 5 Hours, After 10 Hours, Then Every 20 Hours
After 5 hours, after 10 hours, then every 20 hours Correct cross conveyor belt run Slight deviations from the optimal setting can significantly increase wear, which can cause the cross conveyor belt to fail in a short time. 288 | Original Operating Instructions NOVACAT V 10000 3880.en-GB.80X.0... - Page 289 Tighten the belt with a perforated disc (L) until the marked distance 2008 - 2010 mm is reached. Tensioning the conveyor belt more than specified increases wear considerably! Adjust belt length by adjusting the roller position by moving the tensioning block (S). Original Operating Instructions NOVACAT V 10000 | 289 3880.en-GB.80X.0...
-
Page 290: Once, After 8 Hours
V-belt, conditioner). NOTICE Damage due to tension roller running askew! ► The tension roller must always run absolutely parallel to the belt pulley. Preparation • Tool • Check ruler 290 | Original Operating Instructions NOVACAT V 10000 3880.en-GB.80X.0... - Page 291 Lift side protection up and away using the grip (G). Remove inner covering: Remove 3 screws (S) Check the tension roller run using the check ruler. ▷ If the tension roller runs exactly parallel, continue with step 8. Original Operating Instructions NOVACAT V 10000 | 291 3880.en-GB.80X.0...
-
Page 292: Every 20 Hours
• Park tractor and machine on level and stable ground, and secure against rolling. • PTO turned off • Tractor motor turned off, parking brake applied, ignition key removed and stored. 292 | Original Operating Instructions NOVACAT V 10000 3880.en-GB.80X.0... -
Page 293: Crossflow Cleaning
Tractor motor turned off, parking brake applied, ignition key removed and stored. Implementation ► Open the coverings and service accesses to the belt drive. ► Remove dirt deposits ► Clean cross-feeding auger Original Operating Instructions NOVACAT V 10000 | 293 3880.en-GB.80X.0... -
Page 294: Every 50 Hours
Tractor motor turned off, parking brake applied, ignition key removed and stored. Implementation ► Unscrew covers. ► Thoroughly clean / vacuum the case with compressed air. ► Reattach the covers and tighten the screws. 294 | Original Operating Instructions NOVACAT V 10000 3880.en-GB.80X.0... -
Page 295: Roller Conditioner Toothed Belt Drive (Variant) Cleaning
In case of problems with tine conditioner which can only stem from the toothed belt drive (rubber rollers colliding in the gearing, etc.), do not continue working but contact a specialist dealer to overhaul the machine. Original Operating Instructions NOVACAT V 10000 | 295 3880.en-GB.80X.0... - Page 296 ▷ If the sleeve can be twisted very slightly and there is extra play along the longitudi- nal axis, continue with step 2. Have the machine overhauled by a specialist dealer. 296 | Original Operating Instructions NOVACAT V 10000 3880.en-GB.80X.0...
-
Page 297: Lubricate Roller Conditioner Roller Bearings
Tractor motor turned off, ignition key removed and stored, an parking brake applied. Implementation ► Grease all available lubrication points on V-belt drive side. Lubrication nipple (S) ► Grease all available lubrication points on toothed belt drive side / chain drive side. Original Operating Instructions NOVACAT V 10000 | 297 3880.en-GB.80X.0... -
Page 298: Mowing Blade Holder Wear Check
Tractor motor turned off, ignition key removed and stored, an parking brake applied. • Mower blades dismantled. • Front protection folded up (if possible). • Side protection folded up (if possible). 298 | Original Operating Instructions NOVACAT V 10000 3880.en-GB.80X.0... - Page 299 If the blade bolt does not show any signs of wear whatsoever, the blade bolt can still be used unless excessive wear and tear was detected on the bolt cone at the start of the verification. Original Operating Instructions NOVACAT V 10000 | 299 3880.en-GB.80X.0...
-
Page 300: Lubricate Crossflow
Park tractor and machine on level and stable ground in working position and secure against rolling. • Machine parked in working position • PTO turned off • Tractor motor turned off, parking brake applied, ignition key removed and stored. 300 | Original Operating Instructions NOVACAT V 10000 3880.en-GB.80X.0... -
Page 301: Lubricate Roller Conditioner
Damage to bearings due to contamination entering through the lubrication nipple! ► Clean lubrication nipple before the lubrication process. ► Clean lubricant nozzle before the lubrication process. ► Contaminated lubricant should not be used and should be disposed of correctly. Original Operating Instructions NOVACAT V 10000 | 301 3880.en-GB.80X.0... -
Page 302: Initially After 50 Hours, Then Every 100 Hours
Park tractor and machine on level and stable ground, and secure against rolling. • PTO turned off • Tractor motor turned off, parking brake applied, ignition key removed and stored. • Cover removed 302 | Original Operating Instructions NOVACAT V 10000 3880.en-GB.80X.0... - Page 303 Adjust the setting with the locknut (5) so that the console (2) and washer are flush when closed. ▷ Close the crank lock (4) to secure the locking (5) in position. Repeat procedure correspondingly on both sides of the machine. Original Operating Instructions NOVACAT V 10000 | 303 3880.en-GB.80X.0...
-
Page 304: Every 100 Hours
So that the oil can be drained as completely as possible, it is necessary to bring it almost up to operating temperature. We recommend carrying out the change on warm days of >15 °C. 304 | Original Operating Instructions NOVACAT V 10000 3880.en-GB.80X.0... - Page 305 ► Clean the filler plug, reinsert and tighten. ► Clean dirt away from the area around the filler plug. ► Dispose of lubricant contaminated cleaning paper and other lubricant residues properly. Original Operating Instructions NOVACAT V 10000 | 305 3880.en-GB.80X.0...
-
Page 306: Every 150 Hours
Tractor motor turned off, ignition key removed and stored, an parking brake applied. Implementation ► Lubricate the cardan joints in the cap bottom until the grease escapes from the seals. ► Repeat procedure correspondingly on both sides of the machine. 306 | Original Operating Instructions NOVACAT V 10000 3880.en-GB.80X.0... -
Page 307: Every 300 Hours
So that the oil can be drained as completely as possible, it is necessary to bring it almost up to operating temperature. We recommend carrying out the change on warm days of >15 °C. Original Operating Instructions NOVACAT V 10000 | 307 3880.en-GB.80X.0... -
Page 308: Change Roller Conditioner Gear Oil
So that the oil can be drained as completely as possible, it is necessary to bring it almost up to operating temperature. We recommend carrying out the change on warm days of >15 °C. 308 | Original Operating Instructions NOVACAT V 10000 3880.en-GB.80X.0... - Page 309 Clean dirt away from the area around the filler plug. ► Open drain splug and drain lubricant completely. ► Re-insert and tighten the drain plug. ► Remove filler plug. ► Fill with fresh lubricant. Original Operating Instructions NOVACAT V 10000 | 309 3880.en-GB.80X.0...
-
Page 310: Change Crossflow Input Gear Oil
1 = Cutter bar input gear 2 = Crossflow input gear Preparation • Tool • 0.88 litre SAE 90 • Waste oil collecting pan with a minimum capacity of 2 litres. • Cleaning paper or similar 310 | Original Operating Instructions NOVACAT V 10000 3880.en-GB.80X.0... - Page 311 ► Fill gears up to the maximum level of the upper marking on the measuring rod. 11 Clean oil level inspection plug and screw back in with a new seal, and tighten. Original Operating Instructions NOVACAT V 10000 | 311...
-
Page 312: Change Mower Input Gear Oil
So that the oil can be drained as completely as possible, it is necessary to bring it almost up to operating temperature. We recommend carrying out the change on warm days of >15 °C. 312 | Original Operating Instructions NOVACAT V 10000 3880.en-GB.80X.0... - Page 313 5 = right sub-gearbox oil filler plug 6 = central sub-gearbox oil level sight glass 7 = central sub-gearbox drain plug 8 = right sub-gearbox oil level sight glass 9 = right sub-gearbox drain plug Original Operating Instructions NOVACAT V 10000 | 313 3880.en-GB.80X.0...
- Page 314 Clean dirt away from the area around the oil fill plugs of the sub-gearboxes. ► Reinsert oil fill plugs and tighten. ► Dispose of used oil and oily waste paper responsibly. 314 | Original Operating Instructions NOVACAT V 10000 3880.en-GB.80X.0...
-
Page 315: Change Cutter Bar Gear Oil
Tractor PTO switched off • Park tractor and machine on level and stable ground in working position. • Tractor motor turned off, ignition key removed and stored, an parking brake applied. Original Operating Instructions NOVACAT V 10000 | 315 3880.en-GB.80X.0... - Page 316 ► Fill gears up to the maximum level of the upper marking on the measuring rod. 11 Clean oil level inspection plug and screw back in with a new seal, and tighten. 316 | Original Operating Instructions NOVACAT V 10000 3880.en-GB.80X.0...
-
Page 317: Annually
2 = oil filler plug / oil level control plug 3 = Conical disc 4 = mower disc 5 = Cutter bar 6 = Skid 7 = Input gear 8 = Oil drain plug Original Operating Instructions NOVACAT V 10000 | 317 3880.en-GB.80X.0... - Page 318 When propping up, make sure that the cutter bar is not inclined on the broad side but is in a fully horizontal position. Otherwise the oil level shown at the oil filler plug will be in- correct. 318 | Original Operating Instructions NOVACAT V 10000 3880.en-GB.80X.0...
- Page 319 ► Clean the filler plug, reinsert and tighten. ► Clean dirt away from the area around the filler plug. ► Dispose of cleaning paper which has been contaminated with lubricant correctly. Original Operating Instructions NOVACAT V 10000 | 319 3880.en-GB.80X.0...
-
Page 320: Check / Fill Input Gear Crossflow Oil Level
Tractor PTO switched off • Park tractor and machine on level and stable ground in working position. • Tractor motor turned off, ignition key removed and stored, an parking brake applied. 320 | Original Operating Instructions NOVACAT V 10000 3880.en-GB.80X.0... -
Page 321: Check / Correct Mower Input Drive Oil Level
Dispose of lubricant contaminated cleaning paper and other lubricant residues properly. Check / correct mower input drive oil level The input gear is made up of 3 parts and each part has a separate oil reservoir. Original Operating Instructions NOVACAT V 10000 | 321 3880.en-GB.80X.0... - Page 322 5 = right sub-gearbox oil filler plug 6 = central sub-gearbox oil level sight glass 7 = central sub-gearbox drain plug 8 = right sub-gearbox oil level sight glass 9 = right sub-gearbox drain plug 322 | Original Operating Instructions NOVACAT V 10000 3880.en-GB.80X.0...
-
Page 323: Check / Fill Cutter Bar Oil Level
Remove the oil filler plug and fill with fresh oil up to the upper edge of the sight glass. ► Screw in oil filler plug again and tighten. Check / fill cutter bar oil level 1 = Cutter bar input gear 2 = Crossflow input gear Original Operating Instructions NOVACAT V 10000 | 323 3880.en-GB.80X.0... - Page 324 Clean oil level inspection plug and screw back in with a new seal, and tighten. Clean oil residue away from the area around the oil level inspection plug. Dispose of lubricant contaminated cleaning paper and other lubricant residues properly. 324 | Original Operating Instructions NOVACAT V 10000 3880.en-GB.80X.0...
-
Page 325: After Every Season (Winter Storage)
Preservative oil Implementation Thoroughly clean with a high-pressure cleaner. CAUTION Danger to eyes from using high-pressure cleaners! ► Wear safety goggles when carrying out cleaning activities with high-pressure cleaners or compressed air. Original Operating Instructions NOVACAT V 10000 | 325 3880.en-GB.80X.0... -
Page 326: Every 4 Years
► Welding, soldering or mechanical work are not permitted on the hydraulic accumulator. Prerequisite • Machine is to be set over levelled and stable ground and secured against rolling away. • Tractor motor turned off, ignition key removed and stored. 326 | Original Operating Instructions NOVACAT V 10000 3880.en-GB.80X.0... -
Page 327: Every 6 Years
Hydraulic hoses that are older than 6 years should be replaced. Only use replacement hoses of the same specification and use the attachment points and attachment method of the "old" hoses or transfer them to the new hoses. See Spare Parts List also. Original Operating Instructions NOVACAT V 10000 | 327 3880.en-GB.80X.0... -
Page 328: Lubrication Charts
See "operating material specification" section for the operating curved brackets e.g. material code; see "lubricants and fill quantities" section for fill (III), (IV), etc. quantities Observe the manufacturer's safety instructions! Lubricate every "X" operating hours 328 | Original Operating Instructions NOVACAT V 10000 3880.en-GB.80X.0... - Page 329 Predetermined maintenance Original Operating Instructions NOVACAT V 10000 | 329 3880.en-GB.80X.0...
-
Page 330: Operating Materials
Mower central lubri- (IV) Lithium univer- NLGI 12 If required cation system (op- sal grease tional) 3-part input gearbox (VIII) Fully synthetic PAO 75W-90 GL5 Total of 3.7 li- (central gearbox) tres 330 | Original Operating Instructions NOVACAT V 10000 3880.en-GB.80X.0... - Page 331 0.88 litres gearbox 85W - 140 accord- ing to API-GL 4 or API-GL 5 Cutter bar angular (VIII) Fully synthetic PAO 75W-90 GL5 1.2 litres gear Gas container Nitrogen As required Original Operating Instructions NOVACAT V 10000 | 331 3880.en-GB.80X.0...
-
Page 332: Help And Advice
/ protective equipment. Lighting The lighting does not work Causes and remedies ► Defective fuse. ▷ Replace with fuse of identical specification. ► Present contact error of the cable. 332 | Original Operating Instructions NOVACAT V 10000 3880.en-GB.80X.0... -
Page 333: Conditioner Blockages
This can also lead to situations in which blockages occur which would not normal- ly be problematic. Unsuitable drive speeds increase the possibility of blockages and reduce the conditioner quality. Original Operating Instructions NOVACAT V 10000 | 333 3880.en-GB.80X.0... - Page 334 If the blockage is difficult to remove, it can be helpful to break down the fodder manually. Remove blockages in the tine conditioner Example: right tine conditioner. 4-level adjustment lever for conditioning intensity 334 | Original Operating Instructions NOVACAT V 10000 3880.en-GB.80X.0...
- Page 335 Break down the fodder if required and remove without damaging the conditioner tines. ► Reset the conditioning intensity on the adjustment lever (1) of the tine conditioner to the previous setting using the adjustment lever (2). Original Operating Instructions NOVACAT V 10000 | 335 3880.en-GB.80X.0...
- Page 336 Adjusting spring for conditioning intensity and setting for distance between rollers. Swath plate assembled in parking position when not in use. Eye bolt for swath plate adjustment (right swath plate). Right standard roller conditioner 336 | Original Operating Instructions NOVACAT V 10000 3880.en-GB.80X.0...
-
Page 337: Remove Cross Flow Blockage
Break down the fodder if required and remove without damaging the rollers. ► Reset the spring compressors on both sides to the previously measured spring length (=tension). Remove cross flow blockage A blockage is generally found in the ejector area. Original Operating Instructions NOVACAT V 10000 | 337 3880.en-GB.80X.0... - Page 338 Tractor motor turned off, parking brake applied, ignition key removed and stored while working. Implementation ► Open cross flow tailgate if not already done. ► Remove all residual fodder from conveyor and ejector area. ► Close cross flow tailgate as required. 338 | Original Operating Instructions NOVACAT V 10000 3880.en-GB.80X.0...
-
Page 339: Select Control - Emergency Operation
Carry out the desired hydraulic function • -Screw the allocated valve button in • - Active control valve on tractor (the hydraulic function is carried out) • Finally, unscrew the allocated valve button. Original Operating Instructions NOVACAT V 10000 | 339 3880.en-GB.80X.0... - Page 340 Help and advice 340 | Original Operating Instructions NOVACAT V 10000 3880.en-GB.80X.0...
-
Page 341: Power Control Emergency Operation
Carry out the desired hydraulic function • -Screw the allocated valve button in • - Active control valve on tractor (the hydraulic function is carried out) • Finally, unscrew the allocated valve button. Original Operating Instructions NOVACAT V 10000 | 341 3880.en-GB.80X.0... - Page 342 Help and advice 342 | Original Operating Instructions NOVACAT V 10000 3880.en-GB.80X.0...
-
Page 343: Vibrations With Tine Conditioner During Mowing Operation
Park tractor and machine on level and stable ground in working position and secure against rolling. • Tractor motor turned off, parking brake applied, ignition key removed and stored during the work. Original Operating Instructions NOVACAT V 10000 | 343 3880.en-GB.80X.0... - Page 344 ▷ Replace lost or damaged tines / tine fastenings immediately. ► Carry out assembly work according to maintenance instructions. See "Tine conditioner, tines and tine fastening assembly work" on page 269. 344 | Original Operating Instructions NOVACAT V 10000 3880.en-GB.80X.0...
-
Page 345: Electric
-B5:1, -B3:1, -B11:1, -B12:1, -X1A:A7 200 mm 150 mm RUSTV-07-B V-07-B 211PC249S0033 Buchse 150 mm 120 Ω 120 Ω -X1A -X1A -X1A -X1A -X1A -X1A -X1A -X1A slitted corrugated tube Original Operating Instructions NOVACAT V 10000 | 345 3880.en-GB.80X.0 120 Ω... - Page 346 Left mower unit seat valve Transport lock seat valve Right side protection seat valve Left side protection seat valve Right seat valve relief Left seat valve relief Sideshift seat valve Sideshift seat valve 346 | Original Operating Instructions NOVACAT V 10000 3880.en-GB.80X.0...
-
Page 347: Power Control
Plans Power control Job computer External plug view. Original Operating Instructions NOVACAT V 10000 | 347 3880.en-GB.80X.0... - Page 348 Plans Connecting cable for tractor signal socket G = tractor transmission signal R = tractor radar sensor signal (if available) 348 | Original Operating Instructions NOVACAT V 10000 3880.en-GB.80X.0...
- Page 349 Plans Tractor cable External plug view. Original Operating Instructions NOVACAT V 10000 | 349 3880.en-GB.80X.0...
- Page 350 CAN 0L -SP4 Output K1 -SP3 -X2:209, -X2:235, -X3a:6 ECU GND -X1:142, -X1:143, -X1:144, -X1:145, -X10:4 -SP1H1 CAN 1H -X10:10, -X2:223, -X2:249 +12V Power -SP1L1 CAN 1L -X10:2, -X2:210, -X2:236 fuse box 350 | Original Operating Instructions NOVACAT V 10000 3880.en-GB.80X.0...
- Page 351 Lower right hydraulic relief pressure Increase right hydraulic relief pressure Lower left hydraulic relief pressure Increase left hydraulic relief pressure Collision protection Right lateral displacement Right lateral displacement Left lateral displacement Left lateral displacement Original Operating Instructions NOVACAT V 10000 | 351 3880.en-GB.80X.0...
-
Page 352: Hydraulics
Plans Hydraulics Select Control Select Control with collector 352 | Original Operating Instructions NOVACAT V 10000 3880.en-GB.80X.0... - Page 353 Seat valve - Left cross conveyor belt Flow control valve - right cross conveyor belt Flow control valve - left cross conveyor belt Seat valve - sideshift Seat valve - sideshift Swath comb Original Operating Instructions NOVACAT V 10000 | 353 3880.en-GB.80X.0...
- Page 354 Plans Select Control 354 | Original Operating Instructions NOVACAT V 10000 3880.en-GB.80X.0...
-
Page 355: Power Control
Left swing limit Left folding cylinder Left relief Left lateral displacement Collision Prevention Right drive roller (option) Right cross conveyor belt drive Left cross conveyor belt drive Left drive roller (option) Original Operating Instructions NOVACAT V 10000 | 355 3880.en-GB.80X.0... - Page 356 Plans Function Power beyond Pivot collector / crossflow left Pivot collector / crossflow right Swath comb (option) 356 | Original Operating Instructions NOVACAT V 10000 3880.en-GB.80X.0...
-
Page 357: Supplement To Usa / Canada Operating Instructions
For machines which are to be operated in the USA / CANADA, a conversion kit with warn- ing stickers (to adapt to local applicable regulations) is available from PÖTTINGER in Eng- lish or French! See also "Supplement to the Operating Instructions USA / CANADA". Original Operating Instructions NOVACAT V 10000 | 357 3880.en-GB.80X.0... - Page 358 Supplement to USA / CANADA operating instructions 571-15-09 358 | Original Operating Instructions NOVACAT V 10000 3880.en-GB.80X.0...
- Page 359 Supplement to USA / CANADA operating instructions 495.213.0006/16 Original Operating Instructions NOVACAT V 10000 | 359 3880.en-GB.80X.0...
- Page 360 Supplement to USA / CANADA operating instructions 360 | Original Operating Instructions NOVACAT V 10000 3880.en-GB.80X.0...
- Page 361 Supplement to USA / CANADA operating instructions 571-15-07 Original Operating Instructions NOVACAT V 10000 | 361 3880.en-GB.80X.0...
- Page 362 Supplement to USA / CANADA operating instructions 571-15-08 362 | Original Operating Instructions NOVACAT V 10000 3880.en-GB.80X.0...
-
Page 363: Secure Load Towing
The trac- tor must be heavy and powerful enough with adequate braking power for the towed load. Be especially careful when towing loads on unfavourable ground conditions, when turning and on slopes. Original Operating Instructions NOVACAT V 10000 | 363 3880.en-GB.80X.0... - Page 364 Supplement to USA / CANADA operating instructions 364 | Original Operating Instructions NOVACAT V 10000 3880.en-GB.80X.0...
- Page 365 PÖTTINGER sales locations Austria PÖTTINGER Landtechnik GmbH Industriegelände 1 4710 Grieskirchen Phone+43 7248 600-0 Fax+43 7248 600-2513 info@poettinger.at Australia POETTINGER Australia Pty. Ltd. 11 Efficient Drive TRUGANINA 3029 VIC Phone+61 3 8353 2770 Fax+61 3 8353 2773 info@poettinger.com.au Belgium PÖTTINGER Belgium BV. PÖTTINGER Belgium BV.
- Page 366 China 奥地博田 科技(青 )有限公司 Phone+86 186 98726714 info@poettinger.cn Germany PÖTTINGER Deutschland GmbH Verkaufs- und Servicecenter Hörstel Gutenbergstraße 21 48477 Hörstel Phone:+49 5459 80570-0 hoerstel@poettinger.at PÖTTINGER Deutschland GmbH Landsberg Service Centre Justus-von-Liebig-Straße 6 86899 Landsberg am Lech Phone+49 8191 9299-0 Fax+49 8191 59656 landsberg@poettinger.at Denmark PÖTTINGER Scandinavia ApS...
- Page 367 E91 D326 Clonmel/Co. Tipperary Phone+353 52 6125766 info@poettinger.ie Italy POETTINGER Italia s.r.l. Via E. Fermi, 6 - Loc. Polignano 29010 San Pietro in Cerro/PC Phone+39 0523 838012 Fax+39 0523 838253 info@poettinger.it Poland PÖTTINGER Polska Sp. o.o. ul. Skawinska 22 61333 Poznan Phone+48 61 8 700 555 info@poettinger.pl Russia...
- Page 368 вул. Привокзальна, 50, офіс Бориспіль, Київська обл. 08300 The Ukraine Phone+38 04595 710 42 FaxБориспіль, Київська обл. info@poettinger.ua Great Britain Alois POTTINGER UK Ltd. 15 St Marks Road NN18 8AN Corby Northamptonshire Phone+44 1536 272220 Fax+44 1536 206220 info@pottinger.uk POETTINGER US, Inc.
- Page 369 PÖTTINGER Service Partner A worldwide network of well established Service Specialist Centres is at your disposal. This regional proximity guarantees the prompt supply of spare parts, enables optimum product delivery and machine configuration by expert personnel. Our service features include: •...
- Page 370 3880.en-GB.80X.0...
Need help?
Do you have a question about the NOVACAT V 10000 and is the answer not in the manual?
Questions and answers