
Related Manuals for Golander pump BT100S


Summary of Contents for Golander pump BT100S
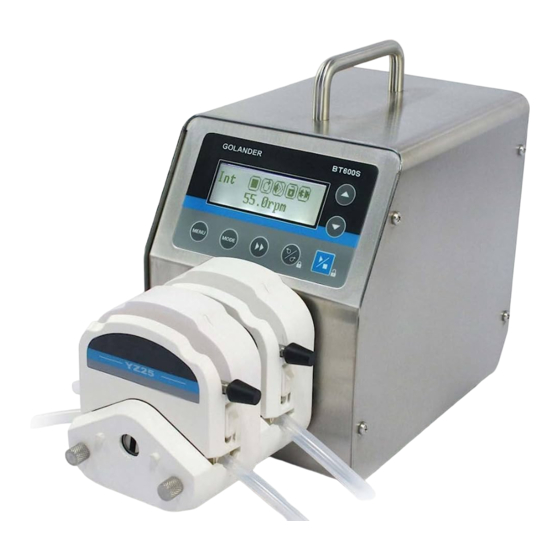
- Page 1 GOLANDER BT100S/BT300S/BT600S / BT100S-1 Variable-Speed Peristaltic Pump Operating Manual...
-
Page 2: Table Of Contents
Contents Safety Precautions ..................1 1 Description ....................6 2 Functions and Features ................6 3 Components and Connectors ..............7 4 Display Panel and Operating Keypads ............8 4.1 Keypad ..................... 8 4.2 LCD Screen Display ................. 9 5 Parameter Settings ................... 11 6 System Advanced Parameter Settings ............. -
Page 3: Safety Precautions
BT100S/BT300S/BT600S/ BT100S-1 Peristaltic Pump Safety Precautions Danger Use the correct voltage indicated on the rating plate label of the pump to • avoid any damage. Do not make any unauthorized dismantling, changes or modifications to • the pump which could result in malfunctions or even potential accidents. - Page 4 BT100S/BT300S/BT600S/ BT100S-1 Peristaltic Pump (DE) SICHERHEITSHINWEISE Gefahr Verwenden Sie die richtige Spannung, die auf dem Typenschild der Pumpe • angegeben ist, um Schäden zu vermeiden. Nehmen keine unbefugten Demontagen, Änderungen oder Modifikationen an der • Pumpe vor, die zu Fehlfunktionen oder sogar zu Unfällen führen könnten.
- Page 5 BT100S/BT300S/BT600S/ BT100S-1 Peristaltic Pump (FR) CONSIGNES DE SÉCURITÉ Danger • Utilisez la tension correcte indiquée sur la plaque signalétique de la pompe afin d'éviter tout dommage. Ne procédez pas à des démontages, changements ou modifications non • autorisés de la pompe qui pourraient entraîner des dysfonctionnements, voire des accidents.
- Page 6 BT100S/BT300S/BT600S/ BT100S-1 Peristaltic Pump (ES) INSTRUCCIONES DE SEGURIDAD Peligro bomba Utilice la tensión correcta indicada en la placa de características de la para • evitar daños. No realice ningún desmontaje, cambio o modificación no autorizada en la bomba • que pueda provocar un mal funcionamiento o incluso accidentes.
- Page 7 BT100S/BT300S/BT600S/ BT100S-1 Peristaltic Pump (IT) ISTRUZIONI DI SICUREZZA Pericolo corretta Usare la tensione indicata sull'etichetta della targhetta della pompa per • evitare qualsiasi danno. Non eseguire smontaggi, cambiamenti o modifiche non autorizzati alla pompa che • potrebbero causare malfunzionamenti o addirittura potenziali incidenti.
-
Page 8: Description
BT100S/BT300S/BT600S/ BT100S-1 Peristaltic Pump 1 Description BT100S/300S/600S variable-speed peristaltic pump provides not only basic functions such as start/stop, reversible direction and adjustable speed, but also the Time Dispense Mode and Anti-Drip function. With the MODBUS RS485 interface, the pump is easy to communicate with external devices, such as PC, HMI or PLC. -
Page 9: Components And Connectors
BT100S/BT300S/BT600S/ BT100S-1 Peristaltic Pump An external logic level signal can control start/stop, direction and • dispense functions; an external analogue signal can adjust the rotating speed. The signal is optically isolated. The RS485 MODBUS interface allows easy communication with •... -
Page 10: Display Panel And Operating Keypads
BT100S/BT300S/BT600S/ BT100S-1 Peristaltic Pump 4 Display Panel and Operating Keypads LCD DISPLAY DOWN 32.5rpm MENU MODE MENU MODE START/STOP PRIME DIRECTION Figure 2. Display Panel 4.1 Keypad UP Key. When pressed shortly, the last digit of the value will increase by 1. -
Page 11: Lcd Screen Display
BT100S/BT300S/BT600S/ BT100S-1 Peristaltic Pump 4.2 LCD Screen Display 32.5rpm Figure 3. Display screen 4.2.1 A. Control Mode It displays the current control mode. Press the MODE key to switch the control mode: Internal Control Mode, External Control Mode, Time Dispense Mode, Logic Level 1 Control Mode or Logic Level 2 Control Mode. - Page 12 BT100S/BT300S/BT600S/ BT100S-1 Peristaltic Pump 4.2.2 B. Running State It shows current drive running state. Stop Running Pause Figure 4. Running State 4.2.3 C. Direction State It shows current drive direction setting. Clockwise Counterclockwise Figure 5. Direction 4.2.4 Key Tone Sate / Wi-Fi Signal Strength When Wi-Fi is enabled in System Advanced Parameter Settings , it shows the state of the key tone, on or off.
-
Page 13: Parameter Settings
BT100S/BT300S/BT600S/ BT100S-1 Peristaltic Pump 4.2.5 E. Keypad Lock State When the keypad is locked, only the START/STOP key will work. On the main screen, press and hold the DIRECTION key to lock the keypad; press and hold the START/STOP key to unlock the keypad. - Page 14 BT100S/BT300S/BT600S/ BT100S-1 Peristaltic Pump 1.Run Time Unit Menu Second 1.Run Time Unit 2. Disp Time Menu 2.Disp Time 1.0 second Menu 3.Pause Time Unit 3.Pause Time Unit Second 4.Pause Time Menu 10second 4.Pause Time 5.Cycles Menu 5.Cycles 6.Reverse Angle Menu 6.Reverse Angle...
-
Page 15: System Advanced Parameter Settings
BT100S/BT300S/BT600S/ BT100S-1 Peristaltic Pump 1. Run Time Unit: Time unit for the dispense duration of Time Dispense mode. The unit can be in days, hours, minutes or seconds. 2. Disp Time: Dispense time for Time Dispense mode. It is the dispense duration for each dose. - Page 16 BT100S/BT300S/BT600S/ BT100S-1 Peristaltic Pump START/STOP key. To return to the main interface, press MENU key. 1.Baud System 9600 1.Baud 2.Stop Bit System 2.Stop Bit System 3.Parity Mode 3.Parity Mode EVEN 4.Pulse Trigger System Rising Edge 4.Pulse Trigger 5.Level Trigger System High level 5.Level Trigger...
- Page 17 BT100S/BT300S/BT600S/ BT100S-1 Peristaltic Pump 1. Baud: In the communication mode, set the baud to 4800, 9600, 19200, • 38400 (the default is 9600). 2. Stop Bit: In the communication mode, set the size of the stop bit, which • can be set to 1 and 2 (the default is 1).
-
Page 18: External Control Interface
BT100S/BT300S/BT600S/ BT100S-1 Peristaltic Pump 7 External Control Interface DB15 Mark Note ADC_W Positive of external analogue input Communication interface, B pole of RS485 Communication interface, A pole of RS485 VCC_W External DC power input CW_W External input signal to control the direction... -
Page 19: Power Connection
BT100S/BT300S/BT600S/ BT100S-1 Peristaltic Pump manufacturer or distributor. 2) Read the instruction. 3) A minimum of 200 mm space from the back of the pump should be maintained when it is in operation. 8.2 Power Connection The voltage of the power supply should match what is indicated on the rating plate label of the pump. -
Page 20: External Control Mode
BT100S/BT300S/BT600S/ BT100S-1 Peristaltic Pump control the start/stop. 1) Turn on the power switch. The pump will display the main screen. 2) Press the MODE key to change the mode to Internal Control mode (Int shown on the screen). 3) Press the UP or DOWN key to adjust the speed. - Page 21 BT100S/BT300S/BT600S/ BT100S-1 Peristaltic Pump CW_W ADC_W AGND RS_W VCC_W 0-5V/0-10V /4-20mA 5V/12V/24V DC Figure 14. DB15 Wiring with an External Power Source CW_W ADC_W AGND RS_W 0-5V/0-10V /4-20mA Figure 15. DB15 Wiring with the Internal 12VDC Power Source 2) Turn on the power switch. The pump will display the main screen.
-
Page 22: Time Dispense Mode
BT100S/BT300S/BT600S/ BT100S-1 Peristaltic Pump 8.6 Time Dispense Mode The pump will dispense fluid automatically by setting the duration for each dose, pause time between doses and the number of cycles. When dispensing, the display will show the dispensing time or lag time (1.2s in Figure 16), and the total cycles (4 in Figure 16) that has dispensed. -
Page 23: Logic Level 1 Control Mode (Footswitch)
BT100S/BT300S/BT600S/ BT100S-1 Peristaltic Pump To run the Time Dispense mode: 1) Press the DIRECTION key to change the running direction, clockwise or counterclockwise. 2) Press the START/STOP key to start dispensing. 3) When the drive is running, press the START/STOP key to stop the drive at any time. -
Page 24: Logic Level 2 Control Mode (Footswitch And Direction Switch)
BT100S/BT300S/BT600S/ BT100S-1 Peristaltic Pump RS_W VCC_W 5V/12V/24V DC Figure 20. Logic Level 1 Control with an External Power Source 2) Turn on the power switch. The pump will display the main screen. 3) Press the MODE key to change the mode to Logic Level 1 control mode (shows lev1 on the screen). - Page 25 BT100S/BT300S/BT600S/ BT100S-1 Peristaltic Pump or Figure 23, and connect it to the DB15 port on the rear of the pump. CW_W RS_W Figure 22. Logic Level 2 Control with the Internal 12V Power Source CW_W RS_W VCC_W 5V/12V/24V DC Figure 23. Logic Level 2 Control with an External Power Source 2) Turn on the power switch.
-
Page 26: Communication Mode
BT100S/BT300S/BT600S/ BT100S-1 Peristaltic Pump speed; when the switch RS_W is opened, the drive will stop. 6) When the switch CW_W is open, the drive will be running clockwise. When the switch CW_W is closed, the drive will be running counterclockwise. -
Page 27: Speed Setting
BT100S/BT300S/BT600S/ BT100S-1 Peristaltic Pump 3) Press the MODE key to change the mode to Internal Control mode or Time Dispense mode. 4) Control pump with the communication interface. 5) Press the START/STOP key to stop the drive at any time. - Page 28 BT100S/BT300S/BT600S/ BT100S-1 Peristaltic Pump 3. Check the internal power cord connection inside the pump. Hardware Motor does 1. Check the indicator of the driver board. not work 2. Check the wire connection between the motor and the driver board. 3. Check the wire connection between the driver and the mainboard.
-
Page 29: Dimensions
2. Reset the address of the pump. 3. Check whether on the bus there are two pumps using the same address If the problem cannot be solved, please contact the manufacturer or distributor. 10 Dimensions Figure 26. BT100S/BT300S/BT600S Dimensions (mm) -
Page 30: Naming Rule
BT100S/BT300S/BT600S/ BT100S-1 Peristaltic Pump Figure 27. BT100S-1 Dimensions (mm) 11 Naming Rule Drive Type Flow Rate Rotation Speed Version Pump type Function Code IP rating B: Step motor Q: Microflow 05: 50 rpm D: Fixed speed Default: 1-9 for special... -
Page 31: Specifications
(9.37 x 5.91 x 8.90 inch) BT100S-1: 278 x 150 x 238 mm (10.94 x 5.91 x 9.37 inch) Weight BT100S: 4.7 kg (10.4 lbs) BT300S: 4.9 kg (10.8 lbs) BT600S: 5.2 kg (11.5 lbs) BT100S-1: 4.9 kg (10.8 lbs) - Page 32 BT100S/BT300S/BT600S/ BT100S-1 Peristaltic Pump BT100S Suitable Pump Heads and Tubing, Flow Parameters Pump No. of Flow rate per Tubing size (mm) head Channels channel (mL/min) DG6-1 Wall:0.8~1, ID:≤3.17 0.0002-49 (6rollers) DG10-1 Wall:0.8~1, ID:≤ 3.17 0.0001-41 (10rollers) DG6-2 Wall:0.8~1, ID:≤ 3.17 0.0002-49...
- Page 33 BT100S/BT300S/BT600S/ BT100S-1 Peristaltic Pump BT300S Suitable Pump Heads and Tubing, Flow Parameters Pump No. of Flow rate Tubing size Head Channels per channel (mL/min) YZ15 13# 14# 16# 19# 25# 17# 0.006~990 YZ25 15# 24# 0.17~990 2 x YZ15 13# 14# 16# 19# 25# 17# 0.006~990...
- Page 34 BT100S/BT300S/BT600S/ BT100S-1 Peristaltic Pump BT100S-1 Suitable Pump Heads and Tubing, Flow Parameters Pump No. of Flow rate per Tubing size (mm) head Channels channel (mL/min) DG6-8 wall thickness 0.8~1, ID≤3.17 0.00016~49 (6 rollers) DG10-8 wall thickness 0.8~1, ID≤3.17 0.00011~41 (10 rollers) DG6-12 wall thickness 0.8~1, ID≤3.17...
- Page 35 BT100S/BT300S/BT600S/ BT100S-1 Peristaltic Pump KZ25 15# 24# 35# 36# 0.25~1500 2×KZ25 15# 24# 35# 36# 0.25~1500 DT15-44 19# 16# 25# 17# 0.05~400 YT15 13# 14# 16# 19# 25# 17# 18# 0.006~570 YT25 15# 24# 35# 36# 0.17~720 2×YT15 13# 14# 16# 19# 25# 17# 18# 0.006~570...
- Page 36 Golander LLC Golander GmbH 4405 International Blvd Dechant-Heimbach-Str. 29 Ste B117, Norcross, GA 30093 53177 Bonn Germany Tel: +1 678-587-8806 Tel: +49 228 50446952 info@golanderpump.com info@golander.de www.golanderpump.com www.golander.de...
Need help?
Do you have a question about the BT100S and is the answer not in the manual?
Questions and answers