Table of Contents
Advertisement
Quick Links
Serial ATA+Ultra ATA Combo
Quick Installation Guide
Features and Benefits
•
Compliant with Serial ATA Specification, rev. 1.0
•
Compliant with PCI Specification, revision 2.2
•
Provides two independent channels to connect one
Serial ATA and one Ultra ATA hard disk drive
•
Features independent 256-byte FIFOs per channel
for host reads and writes
•
Co-exists with on-board controller
•
Features Watch Dog timer for fault resiliency
•
Supports 32-bit wide PCI bus at 66MHz
•
Backward compatible with existing Ultra ATA 133/
100/66 hard disk drives
•
Supports drives with capacities larger than 137GB
System Requirements
•
Pentium-class computer with an available PCI slot
•
Windows 98/98SE/ME/NT4.0/2000/XP
Package Contents
•
Serial ATA+Ultra ATA Combo board
•
Driver diskette
•
Serial ATA cable
•
Serial ATA power cable adapter
•
This quick installation guide
04-0264C
1
Advertisement
Table of Contents

Related Manuals for SIIG Serial ATA


Summary of Contents for SIIG Serial ATA
- Page 1 Compliant with Serial ATA Specification, rev. 1.0 • Compliant with PCI Specification, revision 2.2 • Provides two independent channels to connect one Serial ATA and one Ultra ATA hard disk drive • Features independent 256-byte FIFOs per channel for host reads and writes •...
-
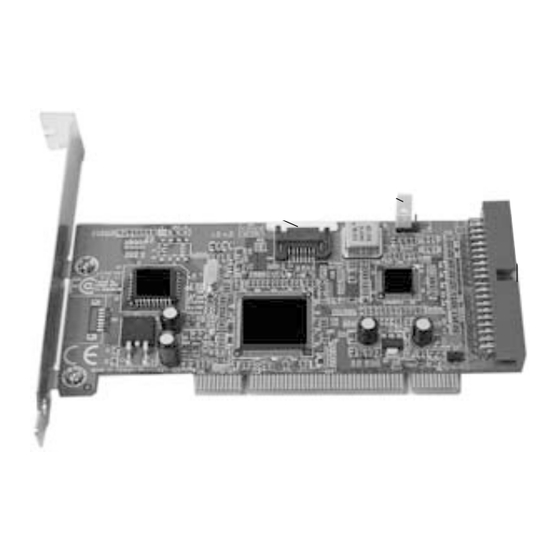
Page 2: Jumper Configuration
Ultra ATA JP7 (Default Setting) Connector Serial ATA Connector Figure 1. Serial ATA+Ultra ATA Combo Layout Jumper Configuration Important: This jumper JP7 has to be set at the correct position for this controller to work properly. Enable Ultra ATA Connector... -
Page 3: Hardware Installation
Connect the Serial ATA hard disk drive to the system power supply using the Serial ATA power cable adapter. Connect one end of the Serial ATA cable to the hard disk drive. Attach the other end of the Serial ATA cable to the... - Page 4 Serial ATA cable Serial ATA power cable adapter Figure 2. Serial ATA drive connections If you are not connecting an Ultra ATA hard drive at this time, replace the PC's cover and plug-in the power cord. Connecting the Ultra ATA drive Note: Skip the following 5 steps if you are not installing an Ultra ATA drive at this time.
-
Page 5: Software Installation
Connect the system's power connector to the drive's power connector. Replace the PC's cover after all the connections have been made and plug-in the power cord. Software Installation This section provides information on how to install the SerialATA+Ultra ATA Combo drivers. Windows 98/98SE Driver Installation For New Windows 98/98SE Installation Follow Microsoft procedures to install Windows 98... - Page 6 Insert the driver diskette, check Floppy disk drives, clear the other boxes, then click Next. Click Next and Finish. Remove the driver diskette and restart Windows to complete driver installation. Windows ME Driver Installation For New Windows ME Installation Follow Microsoft procedures to install Windows ME accordingly.
- Page 7 Verify Installation for Windows 98/98SE/ME Right-click My Computer, then click Properties. Select Device Manager tab. Double click SCSI Controllers, an entry, Silicon Image SiI 3112... Controller should be listed. Highlight Silicon Image SiI 3112... Controller and click Properties. A message This device is working properly is displayed in the dialog box.
- Page 8 Click Add... then Have Disk..Insert the driver diskette, type in A:, then click OK. Highlight Silicon Image SiI 3112... Controller and click OK. Click OK, remove the driver diskette and restart NT to complete driver installation. Verify Installation for Windows NT4.0 Double click My Computer/Control Panel/SCSI Adapters.
- Page 9 Boot up Windows. At the Found New Hardware Wizard, click Next. Select Search for a suitable driver for my device (recommended) and click Next. Insert the driver diskette, check Floppy disk drives, uncheck the other boxes, and click Next. Click Next again to continue.
-
Page 10: Bios Configuration
Bios Configuration The Serial ATA+Ultra ATA Combo BIOS will appear everytime your system starts up. If the bios doesn't show, please try your controller in another PCI slot. During this (Post) process, the bios will show up and indicate the devices attached to it. -
Page 11: Technical Support And Warranty
RMA number posted on the outside of the shipping carton. • You are responsible for the cost of shipping the product to SIIG at the following address: SIIG, Inc. 6078 Stewart Avenue... - Page 12 Fremont, CA 94538-3152 Serial ATA+Ultra ATA Combo is a trademark of SIIG, Inc. SIIG and SIIG logo are registered trademarks of SIIG, Inc. Microsoft and Windows are registered trademarks of Microsoft Corporation. Pentium is a registered trademark of Intel Corporation.
Need help?
Do you have a question about the Serial ATA and is the answer not in the manual?
Questions and answers