Table of Contents
Advertisement
Quick Links
Serial ATA PCI
Quick Installation Guide
Introducing the Serial ATA PCI
The Serial ATA PCI is an ultra high-speed dual channel
Serial ATA controller board for use in Pentium-class
computers. It achieves burst data transfer rates up to
150MB/s (1.5Gb/s) and supports various brand of hard
disk drives with capacities greater that 137GB.
Features and Benefits
Add up to two high-speed SATA hard drives
•
New Serial ATA cable - easier to install & provides
•
better air circulation
Compliant with Serial ATA 1.0 specification
•
Compliant with PCI 2.3 specification
•
Supports data transfer rate up to 1.5Gb/s
•
(150MB/s)
Two independent bus master DMA channels with
•
256-byte FIFOs per channel for host reads and writes
Breaks the 137GB barrier! Works with various brands
•
of large capacity Serial ATA hard disk drives
System Requirements
•
Pentium
slot
•
Windows
bit) / Server 2003 & 2008 (32-/64-bit) / Vista (32-/
64-bit)
04-0265F
or equivalent PC with an available PCI
®
98SE / ME / NT4.0 / 2000 / XP (32-/64-
®
1
Advertisement
Table of Contents

Related Manuals for SIIG Serial ATA PCI


Summary of Contents for SIIG Serial ATA PCI
-
Page 1: Quick Installation Guide
Serial ATA PCI Quick Installation Guide Introducing the Serial ATA PCI The Serial ATA PCI is an ultra high-speed dual channel Serial ATA controller board for use in Pentium-class computers. It achieves burst data transfer rates up to 150MB/s (1.5Gb/s) and supports various brand of hard disk drives with capacities greater that 137GB. -
Page 2: Hardware Installation
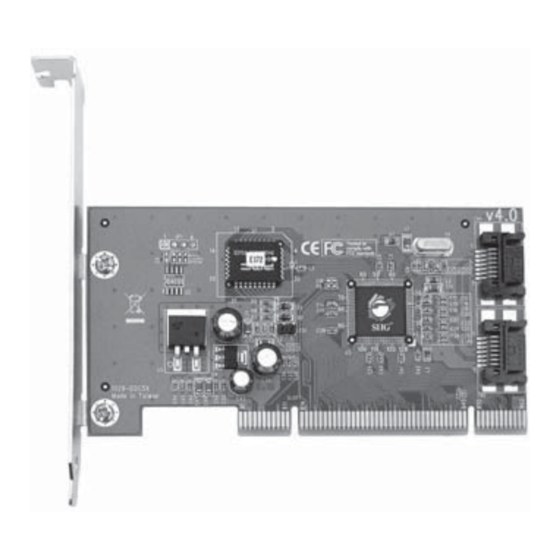
Package Contents Serial ATA PCI adapter • Driver CD • Serial ATA cable • Serial ATA power cable • Quick installation guide • Board Layout Serial ATA connector Figure 1. Serial ATA PCI Board Layout Hardware Installation General instructions for installing the card are provided below. -
Page 3: Disk Drive
Turn OFF the power to your computer and any other connected peripheral devices. Unplug the power cord from the back of the computer. Remove the computer cover. Remove the slot bracket from an available PCI slot. To install the card, carefully align the card bus connector to the selected PCI slot on the motherboard. -
Page 4: Driver Installation
Serial ATA cable Figure 3. Connecting the Serial ATA cable Follow the same instructions when connecting a second hard drive. Device connection is now complete. Replace the computer cover and reconnect the power cord. Driver Installation This section provides information on how to install the Serial ATA PCI drivers. - Page 5 Select Search for a better driver..., then click Next. Check Specify a location, uncheck the other boxes, then click Next. Click Next, then click Finish. Remove the driver CD and restart Windows to complete the installation. For Existing Windows 98SE Installation Install the board and boot up Windows.
- Page 6 Check Specify a location, uncheck the other box, type D:\ME, click Next. (Change D: to match the drive letter of your CD-ROM) Click Next, then click Finish. Remove the driver CD and restart Windows to complete the installation. For Existing Windows ME Installation Install the board and boot up Windows ME.
- Page 7 Windows NT4.0 For New Windows NT4.0 Installation A new installation of Windows NT4.0 requires a floppy disk for the driver installation. To make this floppy disk, copy the contents of the NT4 folder, found on the driver CD, onto a blank floppy disk then follow the directions below.
- Page 8 To Verify Windows NT4.0 Installation Double click My Computer/Control Panel/SCSI Adapters. Highlight Silicon Image... Controller from SCSI Adapters listing and click Properties. A message This device is working properly is displayed in the dialog box when the driver is correctly installed. Windows 2000 For New Windows 2000 Installation A new installation of Windows 2000 requires a floppy...
- Page 9 Insert the driver CD, check CD-ROM drives, uncheck the other boxes, and click Next. Click Next again to continue. Click Finish, remove the driver CD and restart Windows to complete the installation. Windows XP/Server 2003 (32-bit) For New Windows XP/Server 2003 Installation A new installation of Windows XP/Server 2003 requires a floppy disk for the driver installation.
- Page 10 Click Finish and restart Windows to complete the installation. Windows XP /Server 2003 (64-bit) For New Windows XP/2003 Installation A new installation of Windows XP 64-bit/Server 2003 64-bit requires a floppy disk for the driver installation. To make this floppy disk, copy the contents of the 64bit folder, found on the driver CD, onto a blank floppy disk then follow the directions below.
- Page 11 To Verify Windows 2000/XP/2003 Installation Right click My Computer and click Manage. Select Device Manager. Double click SCSI and RAID Controllers, Silicon Image SiI 3512... Controller should be displayed. ™ Windows Vista (32-bit) For New Windows Vista Installation Install the board and follow Microsoft procedures to install Windows Vista accordingly.
- Page 12 Click on the Plus (+) sign next to the CD-ROM drive, then double click the 64bit folder. Highlight AMD64 (for 64-bit extended processors) or IA64 (for 64-bit Intel Itanium processors), then click Ok. Select Silicon Image... SATALink Controller, then press Next. Follow the on-screen instructions to complete the installation.
- Page 13 Select Silicon Image Sil 3512 SATALink Controller..., then click OK Follow on-screen instructions to complete Windows Server 2008 installation. Existing Windows 2008 Installation Install the board and boot up Windows. At the Found New Hardware Wizard, select Locate and install driver software (Recommended), then click Don't search online.
-
Page 14: Bios Configuration
Existing Windows 2008 Installation Install the board and boot up Windows. At the Found New Hardware Wizard, select Locate and install driver software (Recommended), then click Don't search online. Insert the driver CD. The driver will install automatically. Click Close. Remove the driver CD and restart your Windows to complete the installation. -
Page 15: Technical Support And Warranty
Step 1: Submit your RMA request. Go to www.siig.com, click Support, then RMA to submit a request to SIIG RMA. If the product is determined to be defective, an RMA number will be issued. Step 2: After obtaining an RMA number, ship the product. - Page 16 Fremont, CA 94538-3152, USA Ph: 510-657-8688 Serial ATA PCI is a trademark of SIIG, Inc. SIIG and the SIIG logo are registered trademarks of SIIG, Inc. Microsoft, Windows and Windows Vista are either registered trademarks or trademarks of Microsoft Corporation in the United States and/or other countries. Pentium is a registered trademark of Intel Corporation.
Need help?
Do you have a question about the Serial ATA PCI and is the answer not in the manual?
Questions and answers