
Subscribe to Our Youtube Channel
Related Manuals for FingerTec i-Kiosk 100


Summary of Contents for FingerTec i-Kiosk 100
- Page 1 We Make Things Easy i-Kiosk 100 Premier Color Fingerprint Access Control & Time Attendance System User Guide...
- Page 2 CONTENTS CHAPTER 6 • DATA CHAPTER 1 • Deleting Transaction Logs GETTING STARTED Deleting All Data Viewing the User Manual in the Internet Managing User Privilege Included Accessories Deleting Screen Savers Included Printed Materials Resetting to Factory Settings Activating Terminal Registering Terminal CHAPTER 7 •...
-
Page 3: Viewing The User Guide In The Internet
1 • GETTING STARTED Viewing the User Guide in the Internet The User Guide is available in the package when you purchase FingerTec terminal. The user guide is also published online at fingertec.com and user.fingertec.com. Choose the language you prefer to view the User Guide. -
Page 4: Included Printed Materials
To download the data from the i-Kiosk 100, you need to have the product key and activation code for the TCMS. The product key and activation codes can be retrieved at the back of the Fin- gerTec Going Green CD case. -
Page 5: Introduction To Terminal
The USB function on the i-Kiosk 100 makes it even simpler to use, as updates, transaction logs and other information can be uploaded or downloaded into the terminal easily. -
Page 6: Power On/Off Button
Power On/Off Button Use the power on/off button to turn the i-Kiosk 100 on or off. You can disable the button to avoid accidental shut off of the i-Kiosk 100. Refer to page 17, Chapter 5: System General Settings- Power Key for details. -
Page 7: Voice Control
If something isn’t working right, try restarting or resetting i-Kiosk 100. Restarting the Terminal: Push the On/Off button on the terminal to restart the i-Kiosk 100. If you can’t restart the i-Kiosk 100, or if the problem persists, you might want to reset the terminal instead. Resetting the Terminal: Go to Menu, select System and select Reset. -
Page 8: Enrolling User
Place your fingerprint 3 times following instructions given by the terminal > Select Auth > OK to save. CARD ENROLLMENT The default card for the i-Kiosk 100 is RFID. MiFare and HID card systems are avail- To enroll card: able upon request. -
Page 9: Voice Message
VOICE MESSAGE VOICE / MESSAGE WHAT DOES IT MEAN? “Verified” Identity verification is successful, the terminal stores the transaction logs and opens the door (if connected to door access) “Try again please” Identity verification is failed because the finger is not properly posi- tioned, the template is not available in the terminal or the password is incorrect. -
Page 10: Adding User Information
Adding User Information User information can be added into the i-Kiosk 100 through two ways. One is through the FingerTec terminal and the other is through the TCMS V2. To add/change user information via the terminal, press Menu > User icon > Manage > Select User ID >... -
Page 11: Access Level/Privilege
Access Level/Privilege FingerTec terminals offers three types of access level or privilege. PRIVILEGE USER ROLES Normal User Only use the terminal to verify your identity. You cannot access into Menu and make changes into settings and system Administrator You are allowed to access into menu to enroll users and edit settings and... -
Page 12: Installations
4 • CONNECTION – SYNCING TERMINALS Installations FingerTec terminals offer several connections for power and communications. Instal- lations of FingerTec time attendance terminals are simpler than installation for door access functions. Mount On Wall Back Plate 4 feet / 1.2 meter... - Page 13 Communications Connection points for power and communication are available at the back of the terminals. Refer to the following diagrams. 1. RS485 Single Connection 485B 485B 485A 485A RS232/RS485 Data Converter RS232 2. RS485 Network Connection cable 485B 485A 485B 3rd party controller RS232/RS485 with 26 bits...
-
Page 14: Descriptions Of Available Connections
Descriptions of Available Connections USB PORT Linking with USB flash disk for remote data transfer. FRONT TCP/IP PORT Connect with a CAT 5 cable for LAN connection, one end to terminal’s port and another end to the computer’s TCP/IP Port. JOINT 1 PIN JOINT 2 PIN TCP/IP for Single Connection... - Page 15 001010 2008-2009 HRM System All right reserved. TCMS V2 is a genuine software by FingerTec. Check the genuine sticker the TCMS V2 software on the FingerTec DVD cover to retrieve product and activation code. The serial number of the terminal must match the serial number printed on the sticker in order to activate the system.
-
Page 16: Using Tcp/Ip
RS482 connection to ON > Change baudrate > Save Using USB to Download/Upload Data The USB flash disk feature is useful in cases where the i-Kiosk 100 is installed far from a PC or where there is a connection problem. To determine the type of USB compatible by the i-Kiosk 100, please refer to this link at fingertec.com/newsletter/... -
Page 17: General Settings
System icon > System > Date Format > Select Format >Save SOUND OF KEYBOARD The i-Kiosk 100 can be set to emit a sound when you press any of its buttons. To turn on/off the keypad sound: Press Menu > System icon > System > Keybeep > On/Off >Save... -
Page 18: Display Settings
The i-Kiosk 100 offers various languages to match your local requirements. A maxi- mum of 3 language packs are available in the i-Kiosk 100 and it is set according to your request during purchase. Default language is English. Press Menu > System icon >... -
Page 19: Log Settings
The recommended value is 99. Menu > Sys- tem icon > System Settings> Log Alert > Input your value > Save UPDATE INTERVAL The i-Kiosk 100 needs to update transaction logs DESCRIPTION CODE of all users in a time interval to avoid duplication Check In of punch period. -
Page 20: System Information
> On/ Off > Save. To add work code: through the i-Kiosk 100, Press Menu > User > Workcode > Menu > New > Enter Code Number eg: 02 > Enter Code Name eg: Emergency Leave > OK to save. -
Page 21: Deleting Transaction Logs
These logs need to be managed to maintain the effectiveness of the terminal. It is recommended to do the housekeeping of data from the TCMS V2 software. There are 5 functions available in Data icon to enable you to manage your data in the FingerTec terminal. - Page 22 Types of USB There is various type of USB available in the market. The i-Kiosk 100 can only work with USB flash disks that support minimum Linux Kernel 2.4.x, working ideally with Imation, Transcend and Pen Drive (minimum support Linux Kernel 2.4.x) To deter- mine the type of USB compatible with the FingerTec terminal, please refer to this link fingertec.com/newsletter/HL_74.html...
-
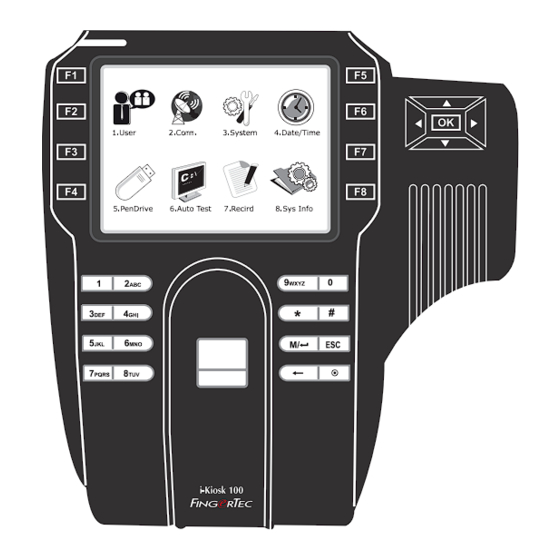
Page 23: Confi Guring Shortcut Keys
Shortcut keys give you quick access to your most used functions. A total of 8 shortcut keys are available each on the i-Kiosk 100 and the TA200 Plus for you to configure. They are labeled as F1, F2, F3, F4, F5. F6, F7, and F8. - Page 24 Place your finger on the scanner. If you can see your fin- gerprint on the white square, the optical scanner works fine. Otherwise, kindly send your i-Kiosk 100 for checking and repair. To run test: Press Menu > Auto Test icon > Sensor Test RTC Test Time is an essence for the i-Kiosk 100 and it should not be compromised.
- Page 25 For example, a group of employee’s lunch time is at 10:30a.m while the other group is at 2:00p.m. The i-Kiosk 100 offers up to 56 schedules for you to define. Press Menu > System Icon > Bell > Choose the bell slot that you want to set >...
- Page 26 This function only works when there is an alarm system installed with the i-Kiosk 100. You can define the amount of time that the door is not closed before the i-Kiosk 100 triggers the alarm system. Input the value in seconds. The default value is 30s.
- Page 27 TROUBLESHOOTING “Unable to Connect” Appears When this message appears, it means that the settings for the i-Kiosk 100 and the computer are not properly done. Find out which method you are using to connect. The i-Kiosk 100 offers LAN, RS232, RS485 and USB communication methods. Refer to Chapter 4 to further understand the topic.
-
Page 28: "Duplicate Finger" Appears
FingerTec terminals are intelligent. It will not accept the same fingerprint twice into its system. If you have registered a finger into the i-Kiosk 100, the system would prompt “duplicate finger” when you try to enroll that finger again. Choose a different finger to proceed. -
Page 29: Copyright Notice & Disclaimer
FingerTec Worldwide Sdn Bhd. Every precaution has been made to supply complete and accurate information. Information in this document is subject to change without prior notice. - Page 30 © 2011 FingerTec Worldwide Sdn. Bhd. All rights reserved. • 0811...
Need help?
Do you have a question about the i-Kiosk 100 and is the answer not in the manual?
Questions and answers