FingerTec TimeLine 100 User Manual
Time attendance rfid card
system
Hide thumbs
Also See for TimeLine 100:
- Quick start manual (5 pages) ,
- Installation diagram (2 pages) ,
- Quick start manual (4 pages)
Table of Contents
Advertisement
Quick Links
Advertisement
Table of Contents

Subscribe to Our Youtube Channel
Related Manuals for FingerTec TimeLine 100


Summary of Contents for FingerTec TimeLine 100
- Page 1 TimeLine 100 Time Attendance RFID Card System User Guide...
-
Page 2: Table Of Contents
CONTENTS Chapter 6 • DATA Chapter 1 • GETTING STARTED 3-4 17 Deleting Transaction Logs Viewing the User Guide in the Internet Deleting All Data Terminal Included Accessories Managing User Privileges Included Printed Materials Resetting to Factory Settings Activating Terminal Registering Terminal Chapter 7 • USB Chapter 2 • BASICS Understanding the Need for USB Flash Disk Type of USB Introduction to Products Downloading Attendance Logs Overview Downloading User Data Keypad Uploading User Data from USB to Terminal Battery Uploading Short Messages Date/Time Voice Control Security Features Chapter 8 • 19 Cleaning Terminal RFID CARD FUNCTION Restarting and Resetting Terminal Enrollment of RFID Card Deleting RFID Card Chapter 3 • INSTALLATION & 8-11 Changing Card ID COMMUNICATIONS Installation Chapter 9 •... -
Page 3: Chapter 1 • Getting Started
1• GETTING STARTED Viewing the User Guide in the Internet The User Guide is available in the package when you purchased the terminal. The User Guide is also available online at http://www.fingertec.com and http://user.fingertec.com. Choose the language that you prefer for your User Guide. Terminal Included Accessories Cable Protector To keep cables intact. DC 5V Power Adaptor For supplying power to the terminal. USB Extension To connect to the USB port of a computer A Packet of Bolts for uploading and downloading of data. Use the screws to hold the back plate of the terminal against a wall. Siren Cable For connecting the terminal to external RFID Cards (5 pieces) siren. For card enrollment and verification. -
Page 4: Included Printed Materials
Included Printed Materials • FingerTec Comprehensive DVD • Quick Start Guide • User Enrollment Template Form • Warranty Card Activating Terminal Every FingerTec access control model comes bundled with a unique license key. To start using the terminal with TCMS V3, you must connect the terminal to TCMS V3 and per- form online activation. TCMS V3 reads the serial number of your terminal and sends it for verification at the FingerTec server via Internet. In case you do not have an Internet connection, you would need to do offline activation. Please send the serial number and models of your terminals to your local resellers or support@fingertec.com to request for a product key. Registering Terminal Make sure that you register your terminal’s warranty with us at http://www.fingertec. com/ver2/english/e_warranty.htm. -
Page 5: Chapter 2 • Basics
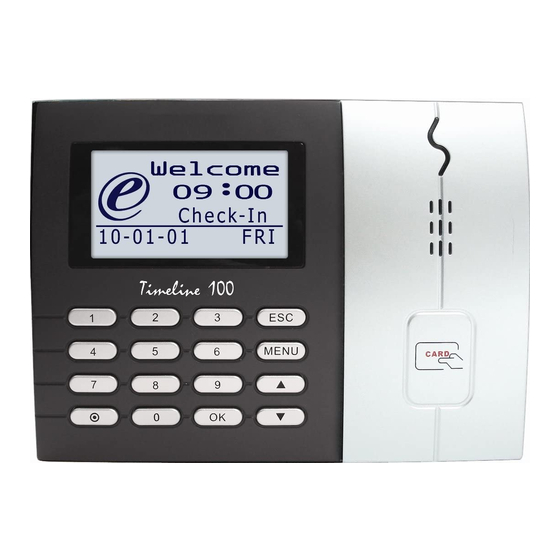
2 • BASICS Introduction to Products FingerTec is a renowned brand name for commercial products for door access and time attendance systems. FingerTec offers a wide range of products to cater to the growing needs for biometrics products in office/home automation as well as in security indus- try. FingerTec terminals are loaded with powerful microprocessor that can process biomet- rics authentication methods for accurate personal identifications and for collection of precise data for time attendance. In addition, some fingerprint terminals are made to accept card verification as an added security measure. This manual covers time attendance models of FingerTec products from TimeLine100 model. The terminal acts as a tool to collect attendance data. For a processing of attend- ance data, FingerTec is providing a powerful time management software, TCMS V3 to process data and provide accurate and reliable attendance reports. Overview LCD Screen L.E.D Display Speaker RFID Card Keypad Induction Area ITEM FUNCTION LCD Screen Displaying status of terminal, day, date and time. Green LED – The terminal is working fine and it is in standby mode. LED Display Red LED – There is an error at the terminal that requires checking. For first time use, the terminals need to be charged fully to avoid having the red light blinking. Keypad To input instructions into the terminal and to allow configuration. RFID Card Induction Area Area that reads RFID cards. Speaker For terminal voice emission. Reset Button... -
Page 6: Keypad
OK button, an ESC/Cancel button, a Scroll up/down button, a doorbell button and a Menu button. MENU Battery Fingerprint terminals operate using power supply from a standard power outlet. Mini UPS: Mini UPS 5V provides mobile power supply to the terminals. Charge the mini UPS sufficiently for optimum performance. Refer to http://accessory.fingertec.com for more information about accessories. Date/Time The terminals display the date and time at the home screen. Choose the date and time format based on your preference. Press Menu > Options > Systems Options > Date/Time > set your time and save. To change the date format: Press Menu > Options > Systems Options > Fmt > Deter- mine the date format based on your preference. Voice Control Voice Control lets you control the level of volume emitted by the terminal. -
Page 7: Cleaning Terminal
AdMIN AFFIrM Register an administrator to the system by enrolling, fingerprint or password to a user ID. Press Menu > User Manage > Enroll Admin > Choose enrollment method > Perform enrolment and Save. After enrolling an administrator, the main menu can only be ac- cessed by the administrator. Cleaning Terminal ClEANINg ThE BOdy Use a dry cloth to clean the terminal’s body. Do not use any liquids, household cleaners, aerosol spray, solvents, alcohol, ammonia and abrasive solutions to clean the body of the terminal because it could damage it. Restarting and Resetting Terminal If a feature isn’t functioning as it should, try restarting or resetting the terminals rEsTArTINg ThE TErMINAl Push the On/Off button or “reset button” on the terminal to restart the terminal. If you can’t restart the terminal, or if the problem persists, you might want to reset. rEsETTINg ThE TErMINAl Press Menu > Option > System Option > Adv Opt > Rest terminal. Resetting of the ter- minal will cause all your settings to return to it’s original factory settings. Make sure that you have backed up all data before you proceed. -
Page 8: Chapter 3 • Installation
3 • INSTALLATIONS & COMMUNICATION Installations FingerTec terminals offer several connections for power and communications. Installations of FingerTec time attendance terminals are simple. MOUNT ON WAll • After measuring the height accord- ingly and make relevant marking on the wall, drill the screws into the wall to secure the back plate. • Attach the terminal to the back plate and tighten the screws. Refer to Ap- pendix I for dimensions and measure- ments of installation. 4 feet / 1.2 meter (recommended) FlExI-KIT FingerTec offers flexi-kit for all its time attendance models. Attach the terminal on the flexi-kit for convenience. - Page 9 Wiring for Power Supply Connection points for power and communication are available on top of the terminals. Refer to the following diagrams for the terminals you require. USB PORT TCP/IP PORT POWER PORT SERIAL PORT UsB POrT Linking with USB flash disk for remote data transfer. TCP/IP POrT Connect with CAT 5 cable for LAN connection, one end to this port and another end to the computer’s TCP/IP Port. TOP TCP/IP for Single Connection – Linking the terminal to a single computer using TCP/IP requires Ethernet 10/100Base-T Crossover Cable. The cable can be used to cascade hubs or to connect Ethernet stations back-to-back without a hub.
-
Page 10: Tcms V3 Online Activation
Connecting with third party connector or terminal(s). TCMS V3 Online Activation TCMS V3 is a genuine software by FingerTec. Every FingerTec time attendance mod- el comes bundled with a unique license key. To start using the terminal with TCMS V3, you must connect the terminal to TCMS V3 and perform an online activation. TCMS V3 reads the serial number of your terminal and sends it for verification at the FingerTec server via the Internet. In case you do not have an Internet connection, you need to do offline activation. Please send the serial number and model of your terminal to your local reseller or support@fingertec.com to request for a product key. Installation and Setup of TCMS V3 Install TCMS V3 in a PC that fulfils the software’s minimum requirements. Refer to http://www.fingertec.com/customer/download/postsales/SUM-TCMSV3-E.pdf for the TCMS V3 user guide online. Setup Wizard will require you to do online activation before any connection is established between TCMS V3 and the terminal(s). Connecting the Terminals to TCMS V3 dETErMININg TErMINAl NUMBEr Identify the number of your terminals to differentiate them between one another. TCMS V3 can connect up to 999 units of terminal. Press Menu > Options > Comm Opt > Dev Num > Select the number. UsINg TCP/IP IP address is important, as it is a unique address of the terminal in LAN. Without the To input the IP address of IP address, locating the specific terminal is not possible. the terminal: Press Menu > Options > Comm Opt > IP Addr > Key in IP address. -
Page 11: Using Usb To Download/Upload Data
To turn on RS485 connection and set the baudrate: Press Menu > Options > Comm Opt > RS232 > Change the RS485 connection to Y. To change baudrate: Press Menu > Options > Comm Opt > Baudrate > Change the Baudrate accordingly. Using USB to Download/Upload Data A USB flash disk is useful in cases where the terminal is installed far from a PC or there is a connection problem. To determine the type of USB flash disks compatible with the terminal, please refer to this link at http://www.fingertec.com/newsletter/HL_74.html ing USB Press Menu > PenDrive Mgmt > Choose the operation that you want to carry out via USB flash disk. Communication Key Since the software is controlled by a product key, set the COMM key to zero. Press Menu > Options > Comm Opt > COMM Key > Set to 0. -
Page 12: Chapter 4 • User
4 • USER Enrolling User The terminals can enroll fingerprint templates, passwords and card information. This chapter covers all possible user enrollments in the terminals. Caution: Enrollment of supervisor or administrator is important to making sure of the terminals data safety. Prior to enrolling new user, supervisor has to be enrolled first by using any of methods mentioned below. Select Enroll Admin > Choose the Privilege Level either Supervisor or Administrator to proceed. CArd ENrOllMENT The default card for the terminal with card reading feature is the RFID card. MiFare and HID card systems are available upon request. Enrolling card: Press Menu > User Manage > Enroll User > Reg RFID > New Enroll? > OK > Key in User ID (PIN) > Wave the card at the scanning area until the screen displays the Card ID > (OK) Save PAssWOrd ENrOllMENT The terminals offer password verification and maximum length of password is 5 digit. Enrolling password: Press Menu > User Manage > Enroll User > Enroll Pwd > New En- roll? > OK > Key in User ID (PIN) > OK > Input your password > LCD showing the ID with minus -P to indicate that the user ID is using password > OK (Save) Changing password: Press Menu > User Manage > Enroll User > Enroll Pwd > ESC > Input User ID > OK > Change your password > LCD showing the ID with minus -P to indicate that the user ID is using password > OK (Save) Verifying User VOICE MEssAgE VOICE / MEssAgE WhAT dOEs IT MEAN? “Verified” Identity verification is successful, the terminal stores the transaction logs and opens the door (if connected to door access) “Try again please” Identity verification is failed because card is not available in the ter- minal or the password is incorrect. “Admin Affirm”... -
Page 13: Adding User Information
PAssWOrd VErIFICATION Password can be an option for those who do not prefer to use other verification methods. To verify using password, insert User ID > OK > insert password and press OK. CArd VErIFICATION Place the card on the card scanning area and the terminal will read and verify the card. Adding User Information User information can be added into FingerTec terminals through the TCMS V3 software. After the information is updated, sync TCMS V3 and the terminal to display the informa- tion. Deleting User Only an administrator can perform user deletion at the terminal. To delete certain user(s), press Menu > User Manage > Delete > Input User ID > The terminal will tell you the verification method enrolled by the user ID > OK > Prompting you to Delete User > Press OK > Confirmation is required > OK as Yes and Esc as No Access Level/Privilege The terminal offers various types of access level or privilege. PrIVIlEgE UsEr rOlEs Normal User Only use the terminal to verify your identity. You cannot access into the Menu and make changes on settings and system Enroller You are allowed to access into the menu to enroll user only. Administrator You are allowed to access into the menu to enroll users only and edit simple se... -
Page 14: Chapter 5 • System
Opt > Fmt > Select Format > OK sysTEM lANgUAgE The terminals offers various languages to match your local requirements. Maximum of 3 language packs available in one terminal at a time and it’s set according to your request during purchase. Default language is English. Press Menu > Options > System Opt > Language > Choose your language > OK VOICE The terminal has certain voice commands to guide users during enrolment and to no- tify users during the identity verification process. Press Menu > Options > System Opt > Adv Option > Voice > Y/N VOlUME (%) Voice Control lets you control the level of volume emitted by the terminal. Adjust Volume: Default volume of the terminal’s voice is 65. The volume can go as high as 100 and as low as 0. To sustain the performance of speaker in the terminal it’s recom- mended to stay at range 60-70. To adjust the volume Press Menu > Options > System Opt > Adv Option > Adj VOL (%) > Set your number > OK. UsEr INTErFACE sTylE The terminals offer different user interface style. Select your style based on your prefer- ence. Press Menu > Options > UI Style > Select your style > OK Update Firmware FingerTec offers update of the terminal regularly through software in a PC. Please al- ways consult your local reseller before you update firmware of the terminal or alter- natively you can contact us at support@fingertec.com. Save the latest firmware in a USB flash disk before attempting this operation. Press Menu > Options > System Opt > Adv Option > Upd Firmware > OK > Plug Pen Drive? > Insert the USB Flash Disk into the slot > OK... -
Page 15: System Information
Menu > Sys Info > User Cnt > View the number QUANTITy OF FINgErPrINT TEMPlATEs sTOrEd IN ThE TErMINAl (FP COUNT) (This feature is NOT available in TimeLine 100 model.) The terminals contain fingerprint templates and the capacity differs from one model to another. To find out the number of fingerprint count in the terminal: Press Menu > Sys Info > FP Cnt > View the number QUANTITy OF ATTENdANCE lOgs sAVEd IN ThE TErMINAl (ATT lOg) Once verification is completed, an attendance log will be stored in the terminal as record. A terminal can contain up to 120,000 logs depending on the models. Press... -
Page 16: Log Information (Log Opt)
All models have different names. If you don’t know the name of the terminal that you are having, get it here. Algorithm Version: FingerTec Worldwide has already released a few algorithm ver- sions into the market since the year 2000. New algorithm version comes with some improvements. This is where you can find terminal’s algorithm version. -
Page 17: Chapter 6 • Data
6 • DATA Every time an enrollment is performed or a veri- dEsCrIPTION COdE fication is done, a transaction log is created and Terminal ID stored inside the terminal. The data contains cre- Date (ddmmyy) 050210 ated terminal ID, date, time, userID and transac- tion activity. For example, 010502100900000000 Time (hhmm) 0900 0010000: Code User ID 000000001 These logs need to be managed to maintain the Transaction Code effectiveness of the terminal. It is recommended Terminal Activity to do the housekeeping of data from the soft- ware but there are 5 functions available in Data icon to enable you to manage data in the termi- nals Deleting Transaction Logs Delete Attendance Logs: The fingerprint terminal stores every transaction logs of its user. Once a user is enrolled and verified, the logs will be kept in the terminal. Sometimes housekeeping needs to be done to sustain the terminal’s performance. Please be certain before performing this operation because once the OK button is pressed, all attendance... -
Page 18: Chapter 7 • Usb
USB (Universal Serial Bus) connectivity. USB can con- nect to the terminal with a computer for download and upload of user information and transaction logs. In the terminal, the USB Flash Disk function is known as Pen Drive Man- agement. Type of USB There are various types of USB available in the market. The terminal can only work with USB flash disks that support minimum Linux Kernel 2.4.x, working fine with Imation, Transcend and Pen Drive (minimum support Linux Kernel 2.4.x) To determine the type of USB compatible by FingerTec terminal, please refer to this link http://www.fingertec. com/newsletter/HL_74.html Downloading Attendance Logs To download attendance logs from the terminal to the computer: Press Menu > Pen- Drive Mng > DwnLoad AttLog > The terminal would require you to plug in the USB Flash Disk to proceed. After download process is complete, eject USB Flask Disk from the ter- minal and connect it to your PC that has been installed with the software. Upload the data from the USB into software for further processing. -
Page 19: Rfid Card Function
8 • RFID CARD FUNCTION The fingerprint terminals are versatile and it can accept card verifications. This chap- ter covers the Radio Frequency Identification or better known as RFID system. The terminals accept RFID card with specifications of 64-bit, 125kHz. Enrollment of RFID Card RFID can be enrolled alone, with fingerprint or with password. Each RFID card comes with a unique ID and the terminals will read from the numbers and match it with the card. Enrollment of RFID is easy. Press Menu > User Manage > Enroll User/Admin > Reg RFID > OK > Do you want to do new enrollment? > OK > Insert the user ID > OK > Wave the card to the induction area and the machine will display the card number on the LCD along with the User ID > OK > The terminal will display User ID-C meaning that the ID is enrolled with card > OK(Save) Deleting RFID Card RFID card can be used again and again but the information in the card must be de- leted first before inserting new information. Press Menu > User Manage > Delete > Input the User ID and wave the card at the induction area > The LCD will ask whether you want to delete the User ID-C > The terminal will ask whether you want to delete User ID > And to delete user. Press OK to all. Once the card has been emptied, it can be used again. Changing Card ID Press Menu > User Manage > Enroll User/Admin > Reg RFID > ESC > Change Card ID > Key in Original ID > OK > Wave new card > OK (Save) -
Page 20: Hid Card Function
9 • HID CARD FUNCTION The terminals accept HID card with specifications of 1325, 26-bit, 125kHz. The Prox II cards support 26-bit and it comes with unique programming information into its con- tents, which include card reading bits, card number range, facility code, site code, etc. HID cards also applies encryption to the contents o the card to maintain high level of security and to eliminate duplications. Registering HID Card Registration of HID card is similar to registration of normal RFID cards. Press Menu > User Manage > Enroll User/Admin > Reg RFID > Do you want to do new enrollment? > Insert user ID > Wave the card to the induction area and the machine will display the card number along with the user ID on the LCD > The terminal will display UserID-C indicating that the user ID has been enrolled with card > OK(Save) Deleting HID Card HID card can be used again and again but the information in the card must be deleted first before inserting new information. Press Menu > User Manage > Delete > Input the User ID and wave the card at the in- duction area > The LCD will ask whether you want to delete the User ID-C > The termi- nal will ask whether you want to delete User ID > And to delete user. Press OK to all. Once the card has been emptied, it can be used again. -
Page 21: Chapter 10 • Auto Test
10 • AUTO TEST Who should do the Auto Test? Auto Test page is to diagnose or analyze the conditions in the terminal. There are 6 tests available in the Auto Test page and only the administrator is allowed to perform the test. Before running any tests, kindly contact your reseller for advice or you could email support@fingertec.com. Run All Tests At Once The Auto Test contains 6 tests and to run all of them at once, Press Menu > Options > Auto Test > Run All Test > OK > “Pls keep Pwr On” message will be displayed > The termi- nal will run all tests and when finished the LCD will display the result such as this: All: 31 Bad: 0, to indicate the level of breakdown in the terminal. FLASH Test Press Menu > Options > Auto Test > FLASH test > OK > “Pls keep Pwr On” message will be displayed > The terminal will run all tests and when finished the LCD will display the result such as this: All: 31 Bad: 0 LCD Test Press Menu > Options > Auto Test > LCD test > OK > The screen will display lines of ‘W’. Any missing Ws or jagged W indicates LCD error. Escape to return to the previous page Voice Test Press Menu > Options > Auto Test > Voice test > OK > The LCD will display for example: “Play Voice 1” and you will hear the message for that. Press OK to listen to the next voice. Any error indictes that something is wrong with the speaker. FP Reader (This feature is NOT available in TimeLine 100 model.) Press Menu > Options > Auto Test > FP Reader > OK > If your fingerprint sensor is not in good condition, you will see “OK!” Key Test Press Menu > Options > Auto Test > Key Test > OK > Press any key and look at the LCD display. If the key matches the description on the LCD, the keypad is in good condition RTC Test Press Menu > Options > Auto Test > RTC test > OK > If the RTC battery is still working, the test will prompt an “OK!”... -
Page 22: Troubleshooting
TROUBLESHOOTING “Unable to Connect” Appears When this message appears, it means that the settings for the terminals and the com- puters are not properly done. Find out which method you are using to connect. Fin- gerTec offers LAN, RS232, RS485 and USB communication methods. Refer to Chapter 3: Connection - Syncing Terminal, page 14 to further understand the topic. “Admin Affirm” Appears You are not an administrator of this terminal. Only an authorized administrator of the system is allowed to access the Menu. Any attempt of normal user to access the Menu will prompt “Admin Affirm” message on the screen. In case the administrator has re- signed from the company, kindly contact your FingerTec authorized reseller to access the terminal. The LED is Blinking All The Time You have nothing to worry about unless the blinking light is red. The green light indi- cates that terminal is on standby mode. Red blinking light may signal a problem in the terminal. Charge your terminals for a few hours to avoid the red light from blinking. Consult your reseller for technical advice. RFID Card Doesn’t Respond Two possibilities for this problem Have you registered the card to the terminal? The card must be registered to the terminal before the terminal could read the informa- tion in the card. Refer to chapter 8 User, page 29 for card enrollment. Have you assigned the user ID to the verification group that supports RFID card? Without setting the terminal that you are under a group that supports RFID card, the FingerTec terminal wouldn’t read your card. No Sound A few things could cause this problem: The terminal voice mode is silent: Perhaps someone has turned off the voice in your terminal or reduced its volume to 0%. Refer to Chapter 5 System, page 22 under Voice to rectify. Speaker is damaged: Once you have rectified the voice mode and the problem per- sists, proceed to test the voice. Go to Chapter 11 Auto Test, page 34 to do the test. If no voice emitted, contact your local reseller for support. For more troubleshooting, go to http://user.fingertec.com... - Page 23 © 2015 Timetec Computing Sdn Bhd. All rights reserved.• 022015...
Need help?
Do you have a question about the TimeLine 100 and is the answer not in the manual?
Questions and answers