Table of Contents
Advertisement
Quick Links
lower post
landing
bushing
pad post
#8 x / "
1
2
screws
1
/ -20 x 4
"
4
bolt
landing
pad post
Figure 1
assembly
landing pad
(underside)
landing
pad post
assembly
1
/ -20 x 4
"
4
bolt
1
/ " at
4
washer
1
/ -20"
4
nut
Figure 2
landing pad post
bushing (upper)
lower post
bushing
landing pad
(underside)
1
/ -20 x 4
4
bolt
storage
tower
Assembly Instructions
Instruct
Classroom Furniture
®
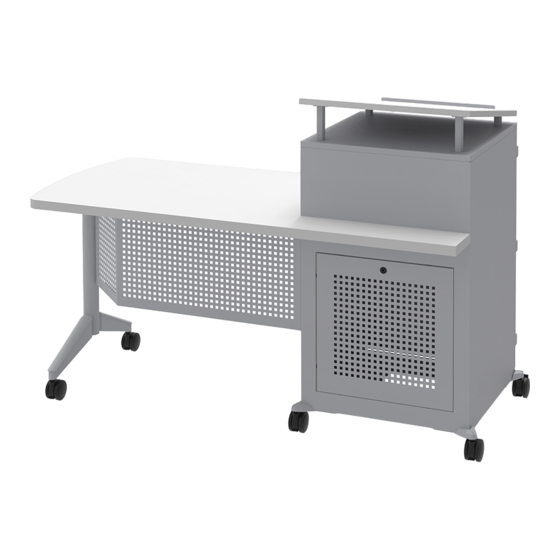
All Terrain
Mobile Instructor's Desk
®
January 2023
Landing Pad Assembly
1. The landing pad is shipped with the
landing pad worksurface secured to
the storage tower top using two
#10 x
/
" screws. Working inside the
1
2
storage tower, remove the two screws
holding the landing pad, and dispose
of the screws. Gently set the landing
pad top aside, assuring that it will
not get damaged/scratched.
Important: Two landing pad
options are available for the storage
tower, "flat" and "sloped", so your
configuration may vary.
2. Determine the style of landing pad
to be installed by locating and
examining the landing pad hardware
pack. The hardware pack for "flat"
landing
pad post
assembly
"
1
/ " at
4
washer
1
/ -20"
4
nut
Assemble units as described herein only. To do otherwise
may result in instability. All screws, nuts and bolts must be
tightened securely and must be checked periodically after
assembly. Failure to assemble properly, or to secure parts
may result in assembly failure and personal injury.
landing pad installation will include
four of the same size landing pad
posts (Figures 1 & 2). The hardware
pack for the sloped landing pad
installation will include two longer,
and two shorter landing pad posts
(Figures 3 & 4). Refer to the correct
instructions on either this, or the
following page.
Flat Landing Pad Assembly
1. Carefully place the flat landing pad
upside down on a soft, protective
surface. Open the hardware pack and
familiarize yourself with all parts and
hardware (Figure 1).
Note: If your hardware pack
includes two longer, and two shorter
landing pad posts, your landing pad
assembly is sloped, so go to the
appropriate instructions on the next
page. If your landing pad posts are
all the same size, continue with
step 2 below.
2. Insert four
/
-20 x 4" bolts into
1
4
the four upper landing pad post
bushings as illustrated, then secure
each upper landing pad post
bushing with bolt to the landing pad
underside using four #8 x
/
" screws
1
2
as illustrated (Figure 1).
3. Place a lower post bushing onto each
landing pad post and press each of
four post with lower busing assembly
onto each of four installed upper
landing pad bushings with bolts as
illustrated (Figure 1).
4. Carefully rotate the landing pad with
post, bushing and bolt assemblies
onto the top of the storage tower,
such that the bolts insert down
through the four mounting holes in
the top of the storage tower
(Figure 2).
5. From inside the tower, locate the
/
-20 bolts inserted through the top,
1
4
place a
/
" washer and
/
-20 nut
1
1
4
4
onto each bolt. Tighten the nuts to
secure the landing pad to the storage
tower top (Figure 2).
Advertisement
Table of Contents

Related Manuals for KI Instruct


Summary of Contents for KI Instruct
- Page 1 Assembly Instructions Instruct Classroom Furniture ® All Terrain Mobile Instructor’s Desk ® January 2023 Landing Pad Assembly landing pad installation will include lower post landing pad post landing 1. The landing pad is shipped with the four of the same size landing pad...
- Page 2 Instruct Classroom Furniture - All Terrain Mobile Instructor’s Desk ® ® Assembly Instructions Assemble units as described herein only. To do otherwise may result in instability. All screws, nuts and bolts must be tightened securely and must be checked periodically after assembly.
- Page 3 Instruct Classroom Furniture - All Terrain Mobile Instructor’s Desk ® ® Assembly Instructions Assemble units as described herein only. To do otherwise may result in instability. All screws, nuts and bolts must be tightened securely and must be checked periodically after assembly.
- Page 4 Instruct Classroom Furniture - All Terrain Mobile Instructor’s Desk ® ® Assembly Instructions Assemble units as described herein only. To do otherwise may result in instability. All screws, nuts and bolts must be tightened securely and must be checked periodically after assembly.
- Page 5 Instruct Classroom Furniture - All Terrain Mobile Instructor’s Desk ® ® Assembly Instructions Assemble units as described herein only. To do otherwise may result in instability. All screws, nuts and bolts must be tightened securely and must be checked periodically after assembly.
- Page 6 Instruct Classroom Furniture - All Terrain Mobile Instructor’s Desk ® ® Assembly Instructions Assemble units as described herein only. To do otherwise may result in instability. All screws, nuts and bolts must be tightened securely and must be checked periodically after assembly.
- Page 7 Instruct Classroom Furniture - All Terrain Mobile Instructor’s Desk ® ® Assembly Instructions...
- Page 8 Classroom Furniture - All Terrain Mobile Instructor’s Desk ® ® Assembly Instructions 1330 Bellevue Street • P .O. Box 8100 • Green Bay, WI 54308-8100 • Tel 1-800-424-2432 • www.ki.com Part # 80465R4 © 2023 Krueger International, Inc. All Rights Reserved • Code KI-62119R5/KI/PDF/0123...
Need help?
Do you have a question about the Instruct and is the answer not in the manual?
Questions and answers