Advertisement
Quick Links
1
/ -20 x 4"
4
bolt
1
/ " flat
4
washer
1
/ -20"
4
nut
Assembly Instructions
Instruct
All Terrain
#8 x / "
storage
tower
Classroom Furniture
®
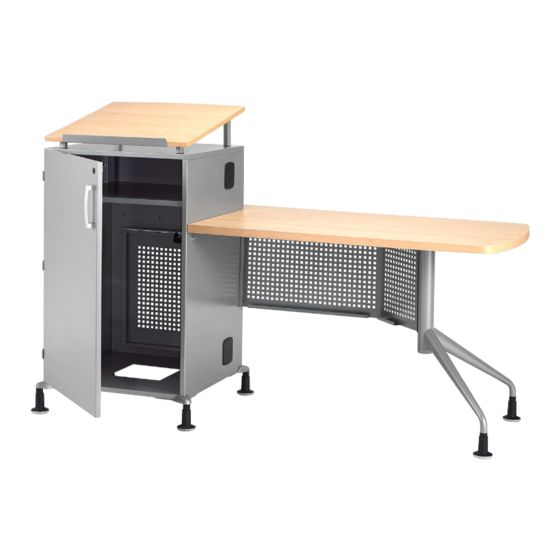
Mobile Instructor's Desk
®
February 2019
1
/ -20 x 1 / "
1
4
2
bolt
1
2
screw
1
/ " flat
4
washer
1
/
-20
4
nut
Assemble units as described herein only. To do otherwise
may result in instability. All screws, nuts and bolts must be
tightened securely and must be checked periodically after
assembly. Failure to assemble properly, or to secure parts
may result in assembly failure and personal injury.
Landing Pad Installation
1. Locate the hardware pack for the
landing pad and identify the parts by
referencing Figure 1. Take special
note of the two different size landing
pad posts supplied and two different
size attachment bolts.
Important: The shorter landing
pad posts and bolts are to be
installed to the front, instructor-
side of the storage tower. The
instructor-side has the tower
door/opening in it.
2. Begin assembly by inserting
two
/
-20 x 4" bolts and two
1
4
/
-20 x 1
/
" bolts into the four
1
1
4
2
(upper) landing pad mount bushings
(Figure 1).
3. Locate the landing pad and identify
the side having the document ledge.
Secure the upper bushings with the
shorter
/
-20 x 1
/
" bolts to the
1
1
4
2
underside of the landing pad
with the document ledge using four
#8 x
/
" screws. Then secure the
1
2
upper bushings having the 4" bolts
to the underside at the rear of the
landing pad using four #8 x
/
"
1
2
screws (Figure 1).
Note: The top of all four
landing pad posts are angled
to correspond with the slope of
the landing pad on the storage
tower.
4. Place the flat, bottom sides of the
landing pad posts (two tall, and two
short) down onto the lower landing
pad post bushings as illustrated.
Position the shorter, landing pad
posts/bushings to the installed upper
bushings closest to the document
ledge at the underside of the landing
pad. Take care to orient the angled
edge of the posts correctly to
match the slope of the landing pad
underside (Figure 1).
5. Repeat the above procedure with
the longer landing pad posts,
positioning them to the rear upper
bushings at the 4" bolt locations
correctly matching the slope angle
(Figure 1).
6. Orient the landing pad with the
document ledge to the instructor-side
of the storage tower as illustrated.
Carefully position the landing pad
with installed bushings, posts &
bolts such that the four bolts insert
down through the four mounting
holes in the top of the tower
(Figure 1).
Advertisement

Related Manuals for KI Instruct All Terrain Mobile Instructor's Desk


Summary of Contents for KI Instruct All Terrain Mobile Instructor's Desk
- Page 1 Assembly Instructions Landing Pad Installation 1. Locate the hardware pack for the Instruct Classroom Furniture landing pad and identify the parts by ® referencing Figure 1. Take special All Terrain Mobile Instructor’s Desk note of the two different size landing ®...
- Page 2 Instruct Classroom Furniture - All Terrain Mobile Instructor’s Desk ® ® Assembly Instructions Assemble units as described herein only. To do otherwise may result in instability. All screws, nuts and bolts must be tightened securely and must be checked periodically after assembly.
- Page 3 Instruct Classroom Furniture - All Terrain Mobile Instructor’s Desk ® ® Assembly Instructions Assemble units as described herein only. To do otherwise may result in instability. All screws, nuts and bolts must be tightened securely and must be checked periodically after assembly.
- Page 4 #10 x / ” screw pencil tray Figure 7 1330 Bellevue Street • P .O. Box 8100 • Green Bay, WI 54308-8100 • Tel 1-800-424-2432 • www.ki.com Part # 80465R3 © 2019 Krueger International, Inc. All Rights Reserved • Code KI-62119R4/KI/PDF/0219...
Need help?
Do you have a question about the Instruct All Terrain Mobile Instructor's Desk and is the answer not in the manual?
Questions and answers