Table of Contents
Advertisement
Quick Links
Advertisement
Table of Contents

Subscribe to Our Youtube Channel
Related Manuals for Kartsana Brava TG-1000


Summary of Contents for Kartsana Brava TG-1000
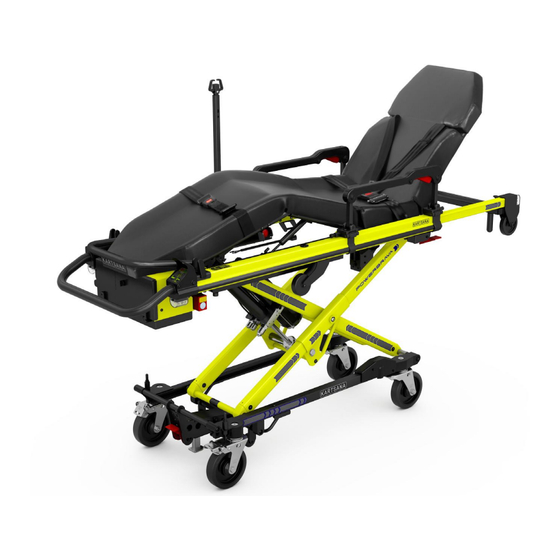
- Page 1 C/ Narcís Monturiol, 34 08192 Sant Quirze del Vallès BARCELONA TEL. 93 714-49-24 ventas@kartsana.com www.kartsana.com Brava Series ELECTRIC STRETCHER BRAVA Model TG-1000 INSTRUCTIONS MANUAL Read these maintenance instructions before using the product and keep them for future references.
- Page 2 OPERATING AND HANDLING BRAVA STRETCHER Rev. 9 20.12.2022...
-
Page 3: Table Of Contents
OPERATING AND HANDLING BRAVA STRETCHER CONTENT 1. INTRODUCTION 1.1. F OREWORD 1.2. I NTENDED USE OF PRODUCT 1.3. R ESPONSIBILITY AND WARRANTY 1.4. S PECIFICATIONS 1.5. A TTENTION 1.6. S UMMARY OF SAFETY PRECAUTIONS 2. INSTRUCTIONS MANUAL 2.1. T BRAVA ECHNICAL SPECIFICATIONS STRETCHER 2.2. - Page 4 OPERATING AND HANDLING BRAVA STRETCHER 4.6. D ISPOSAL 5. EXPLODED BRAVA STRETCHER 6. ACCESSORIES Rev. 9 20.12.2022...
-
Page 5: Introduction
Manual operation is possible when potential faults in the automated system occur. The BRAVA stretcher model must be joined to the ambulance using the KARTSANA BRAVO rail. -
Page 6: Intended Use Of Product
The product has a 24-months warranty from the delivery date to the end user. The warranty does not cover defects resulting from incorrect installation, misuse, or improper use of the stretcher. All repairs must be made by a technical service authorised by Kartsana or its respective representative. -
Page 7: Attention
For weights higher than 250kg it recommended to use the stretcher by a low position in patient transport, rising the stretcher until the necessary position just in the moment of introduce it into the ambulance. Kartsana reserves the right to change specifications without notice. 1.5. Attention Through this sign, information is furnished on important safety measures for the correct use of the stretcher, to prevent accidents. - Page 8 - High obstacles such as curbing, steps or rough terrain can cause the stretcher to tip, possibly causing injury to the patient or operator. - The BRAVA TG-1000 stretcher is designed to be compatible with Bravo Rail and is operator responsibility that these products work together.
- Page 9 Kartsana as replacement parts for internal components may result in increased emissions or decreased immunity of the TG- 1000 BRAVA stretcher. CAUTIONS: - Changes or modifications to the unit not expressly approved by Kartsana could void the user’s authority to operate the system. - The stretcher can be set at any stretcher load height position.
- Page 10 - Kartsana recommends that, prior to installation, the certified mechanic plan the placement of the safety hook in the rear of the vehicle.
-
Page 11: Instructions Manual
OPERATING AND HANDLING BRAVA STRETCHER INSTRUCTION MANUAL 2.1. Technical specifications BRAVA stretcher (*) Make sure that no damage is caused to the areas containing the stretcher mechanisms, to prevent them from malfunctioning. Stretcher weight 69 kg Trolley dimensions: Elevation in mm Rev. - Page 12 OPERATING AND HANDLING BRAVA STRETCHER FOLDED LEGS Rev. 9 20.12.2022...
-
Page 13: Vehicle's Configuration
2.2. Vehicle's configuration This installing instruction are recommended for the fixation of the assembly BRAVA - BRAVO (stretcher + rail) of Kartsana. The correct installation of the fastening system (rail) is providential for the appropriate use of the joint. You have to screw the... -
Page 14: Operating And Handling The Stretcher
OPERATING AND HANDLING BRAVA STRETCHER 2.3. Operating and handling the stretcher 2.3.1. Installing the battery The first step when working with BRAVA is to install the two 24 V batteries which power the system. To do this, we open the rear black cover and place the batteries opposite their housings at the back of the stretcher and push until it locks. -
Page 15: Starting And Controlling The Stretcher
OPERATING AND HANDLING BRAVA STRETCHER 2.3.2. Starting and controlling the stretcher. To avoid potential injury to the patient and companions, do not place objects in the way of the moveable parts of the stretcher. It is also recommended to avoid having objects that stick out the ambulance. - Page 16 OPERATING AND HANDLING BRAVA STRETCHER Once both batteries have been installed the system will be powered by battery 1, when this runs down, the system will automatically switch to battery 2. Both will recharge when the stretcher is on the rail and inside the ambulance. The level screen also shows us any possible system errors.
- Page 17 Check that the batteries have not The battery Voltage is above KARTSANA or the stretcher for suffered internal damage while recharging the batteries.) discharging caused by stretcher raising and lowering movements.
- Page 18 OPERATING AND HANDLING BRAVA STRETCHER Discharged battery(ies) Charge battery(ies) Check for possible oil leaks. More than 22 seconds have Failure in hydraulic system Contact technical support elapsed in the downward Check mechanism in search of movement The mechanism does not move some excessive friction or freely interference between parts...
-
Page 19: Extendable Back Rest Frame
OPERATING AND HANDLING BRAVA STRETCHER 2.3.3. Adjustable reclining head Pull the red lever that is located below the head rest and move it to the required position. Then release the lever so that the head is locked in the required position. 2.3.4. -
Page 20: Adjustable Leg Rest
OPERATING AND HANDLING BRAVA STRETCHER The head frame has a mechanical stop in the normal position (1970mm long), another in a folded position and another one in an extended position (intended for when the headrest has a headrest extension kit accessory). When the head frame movement reaches each of these three positions, we should notice the "click"... -
Page 21: Safety Rail
OPERATING AND HANDLING BRAVA STRETCHER Button for adjusting the foot inclination Press button B to change the feet inclination to the required position without changing the inclination of the legs, moving it only in the direction shown in the figure below until the required inclination is obtained. - Page 22 OPERATING AND HANDLING BRAVA STRETCHER This way the stretcher stays with the folded safety rail: The safety rail can be folded in the width direction too. You must pull the two triggers at same time to open the safety rail in width direction. Perform the same operation on both sides.
- Page 23 OPERATING AND HANDLING BRAVA STRETCHER 2.3.6.1. How to remove rails and IV support To install the bariatric kit on the BRAVA stretcher, we need to unfold the two side rails and the drip pole in accordance with the sequence shown below: 1.
- Page 24 OPERATING AND HANDLING BRAVA STRETCHER It is also necessary to remove the mattress from the stretcher, thereby leaving the top of the BRAVA entirely clear. Rev. 9 20.12.2022...
-
Page 25: Intravenous Drip Stand
OPERATING AND HANDLING BRAVA STRETCHER 2.3.7. Intravenous drip stand. The stretcher comes with a drip holder located on the left-hand side. Unscrewing the silver knob “R” we lift the salt solution section to the vertical position perpendicular to the stretcher, then we twist the knob again. The length of said drip pole may be lengthened or shortened pressing a small positioner located on the inner side, raising the hook until the upper position is reached. -
Page 26: Way Of Fastening The Safety Belts To The Patient
OPERATING AND HANDLING BRAVA STRETCHER 2.3.8. Way of fastening the safety belts to the patient. 2.3.8.1. Head belts. Place the clasps (C) in the position shown in the figure above. Pass the male part of the buckle (D) between the openings (C) until it is inserted into the female part B. Once all the parts are fastened, place them in the centre and tighten them adjusting the belt tension at ends A, E, F and/or G. -
Page 27: Position Of The Belts
OPERATING AND HANDLING BRAVA STRETCHER 2.3.9. Dismantling-assembly of the stretcher belts. Anchoring with a plate. Loosen the screws as shown in the following figure. To assembly just follow the same process but in reverse order. To assemble them just follow the process in reverse order, fastening the ‘A’ screws to the ‘B’... -
Page 28: Head Belts
OPERATING AND HANDLING BRAVA STRETCHER 2.3.10.2. Head belts The headrest belts must go through the holes in the headrest and must be secured in the panel crosspiece with a knot as shown in the following figure. The code numbers for our belts are: Rev. -
Page 29: Rear Wheel Brake Lever
OPERATING AND HANDLING BRAVA STRETCHER 2.3.11. Rear wheel brake lever. Activate the lever with your foot to enable the brake to lock the rear wheels. This lever locks both the lengthways and revolving movement of the trolley. IMPORTANT: when breaking the stretcher, use both brakes of the rear wheels at the same time, especially for weight over 250kg. -
Page 30: Assembling The Brava Stretcher Onto The Bravo Rail
OPERATING AND HANDLING BRAVA STRETCHER Front wheels must be always blocked (position 1) when you load the stretcher on the rail. The omission of this, may cause injury to the patient or operator. Never apply the optional wheel lock(s) while a patient is on the stretcher (if you must move it). - Page 31 OPERATING AND HANDLING BRAVA STRETCHER to the axle with a “H” screw which must be loosened, then we will rotate the cam until it presses against the limit switch. For this purpose, there is a sticker with a graduated scale which can be used for reference.
- Page 32 OPERATING AND HANDLING BRAVA STRETCHER Once the stretcher has been lined up with the cross section of the rails, push the stretcher until the small wheels limit has been reached. Front wheels must be always blocked (POSITION 1) when you load the stretcher on the rail.
-
Page 33: Transferring The Patient To The Stretcher
OPERATING AND HANDLING BRAVA STRETCHER Third point Unloading lever. IMPORTANT: do not disconnect the supporting battery from the ambulance when it isn’t doing any service, to allow the correct charge of the stretcher batteries between services. 2.3.14. Transferring the patient to the stretcher. ➢... -
Page 34: Faults
OPERATING AND HANDLING BRAVA STRETCHER 3. FAULTS If the hydraulic system breaks down, pull red trigger located next to the batteries at the rear. The stretcher will go down until the lower limit is reached and will remain in this position. Then, the rail hooks should be removed (see figure below) and load the broken-down stretcher manually onto the Bravo rail, with two people. -
Page 35: Product Care & Disposal
4. PRODUCT CARE & DISPOSAL 4.1. Servicing requests For any service requests or consultations regarding the use, maintenance, or installation of any KARTSANA product, please contact KARTSANA Customer Care Service. o Telephone #: +34 93 715 86 72 o E-mail: info@kartsana.com... -
Page 36: Maintenance
OPERATING AND HANDLING BRAVA STRETCHER 4.4. Maintenance 4.4.1. Precautionary Maintenance A periodic and correct maintenance guarantees the durability of the device. Creating a maintenance plan including periodic check-ups and establishing a responsible employee to carry it out is recommended. The person who carries out the precautionary maintenance of the appliance (user, manufacturer/supplier or third party) must meet or adhere to the following basic requirements: Possession of technical knowledge pertaining to the device and of the periodic... -
Page 37: Servicing Maintenance
BRAVA STRETCHER All maintenance other than lubrication, tightening of nuts and bolts and ordinary cleaning must be performed by KARTSANA or an authorized service centre. 4.4.2. Servicing Maintenance The person to whom the servicing of the product is entrusted must guarantee the... - Page 38 OPERATING AND HANDLING BRAVA STRETCHER 5. EXPLODED STRETCHER BRAVA (TG-1000) Rev. 9 20.12.2022...
- Page 39 OPERATING AND HANDLING BRAVA STRETCHER Rev. 9 20.12.2022...
- Page 40 OPERATING AND HANDLING BRAVA STRETCHER 5.1. Complete paciente area BRAVA Rev. 9 20.12.2022...
- Page 41 OPERATING AND HANDLING BRAVA STRETCHER Rev. 9 20.12.2022...
- Page 42 OPERATING AND HANDLING BRAVA STRETCHER 5.2. Chassis BRAVA Rev. 9 20.12.2022...
- Page 43 OPERATING AND HANDLING BRAVA STRETCHER Rev. 9 20.12.2022...
- Page 44 OPERATING AND HANDLING BRAVA STRETCHER 5.3 Doble leg brace BRAVA Rev. 9 20.12.2022...
- Page 45 OPERATING AND HANDLING BRAVA STRETCHER 5.4. Head complete pre-assembly BRAVA Rev. 9 20.12.2022...
- Page 46 OPERATING AND HANDLING BRAVA STRETCHER 6. ACCESORIES BRAVA (TG-1000) Rev. 9 20.12.2022...
- Page 47 OPERATING AND HANDLING BRAVA STRETCHER Rev. 9 20.12.2022...
- Page 48 OPERATING AND HANDLING BRAVA STRETCHER C/ Narcís Monturiol, 34 Technical Service 08192 Sant Quirze del Vallès sat@kartsana.com BARCELONA TEL. +34 93 715-86-72 info@kartsana.com www.kartsana.com Rev. 9 20.12.2022...
Need help?
Do you have a question about the Brava TG-1000 and is the answer not in the manual?
Questions and answers