
Related Manuals for Bell 8084150


Summary of Contents for Bell 8084150
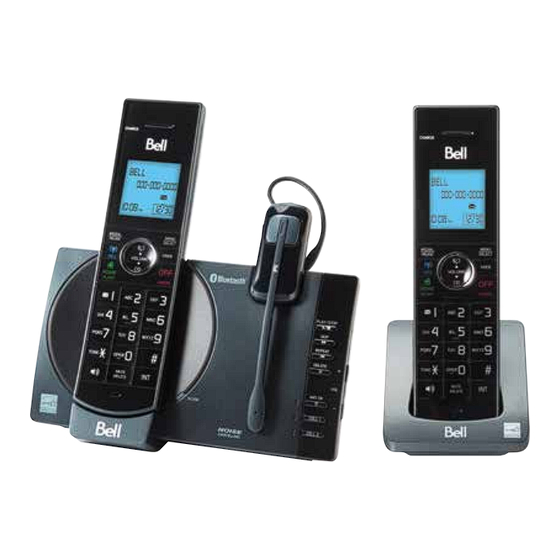
- Page 1 8084150 DECT 6.0 cordless telephone with Bluetooth wireless technology ® User’s manual (Canada version)
- Page 2 Important safety instructions. (pg 59) This manual has all the feature operations and troubleshooting necessary to install and operate your new Bell telephone. Please review this manual thoroughly to ensure proper installation and operation of this innovative and feature-rich Bell product.
-
Page 4: Table Of Contents
Table of contents Configure your telephone ........20 What’s in the box........... 1 Using the handset menu.............20 Overview ..............2 Set language ................20 Set date and time ...............20 Telephone base overview .............2 Home area code .................20 Handset overview .................3 Dial mode ...................21 Headset overview .................4 Charger overview .................5 Temporary tone dialing ...............21... - Page 5 Caller ID ..............28 Using your built-in answering system ..............36 Review the Caller ID log .............29 Memory match ................29 New message indication.............37 Missed call indicator ..............29 Message playback ..............37 View dialing options ..............29 Delete all old messages .............38 Dial a Caller ID log entry.............30 Remote access ................38 Save a Caller ID log entry to the phonebook ......30 Set remote access code .............38...
-
Page 6: What's In The Box
What’s in the box Your telephone package contains the following items. Save your sales receipt and original packaging in case it is necessary to ship your telephone for warranty service. -
Page 7: Overview
Overview CELL 1 and CELL 2 • Press to connect the paired cell Bluetooth device ® Telephone base overview • Press and hold to add or replace a Bluetooth device ® CELL 1 and CELL 2 lights • ON when the telephone base is paired and connected with a Bluetooth device ®... -
Page 8: Handset Overview
Handset overview Press to add a space when entering names • Press to start an intercom conversation or • transfer a call Microphone MUTE/DELETE Mute the microphone during a call • Delete digits or characters while using the • dialing keys Silence the ringer temporarily while the •... -
Page 9: Headset Overview
Headset overview /HOME/FLASH • Make or answer a home call • Answer an incoming home call when you will hear a call waiting alert /CELL • Make or answer a cell call • Answer an incoming cell call when you will hear a call waiting alert REDIAL/PAUSE •... -
Page 10: Charger Overview
Charger overview Display icons overview The battery icon will flash when the battery is low and needs charging. The battery icon animates when the battery is charging. The battery icon becomes solid when the battery is fully charged. The ECO mode activates Charging contacts automatically to reduce power consumption when the handset is... -
Page 11: Telephone Base Lights Overview
Telephone base lights overview Headset lights and alert tones overview Light status IN USE • ON when the telephone line is in use • ON when the headset battery is charging • ON when you are registering a handset • Will flash every 10 seconds when the headset battery is low and •... -
Page 12: Connect
Connect Connect the telephone base You can connect the telephone base for desktop usage. NOTES: • Use only the adapters provided • Even if you do not subscribe to any conventional telephone service, you can pair a Bluetooth -enabled ® cell phone to your telephone base (see Bluetooth ), and ®... -
Page 13: Install The Battery
Install the battery Install the headset battery Install the headset battery as shown below. Install the handset battery Install the handset battery as shown below. NOTE: • Use only supplied battery NOTES: • Use only supplied battery • If the handset will not be used for a long time, disconnect and remove the battery to prevent possible leakage Check the battery level After you have installed the battery check the battery... -
Page 14: Charge The Battery
Charge the battery Battery Battery status Action indicators Place the handset in the telephone base or the The screen is The battery has Charge without charger to charge. blank or shows no or very little interruption Place the headset on the telephone base to charge. Put in charger charge. -
Page 15: Position The Headset
Position the headset headset until they fit into place. To wear on the right ear: There are four earbuds and four earhooks provided. One earbud and one earhook have been attached to the headset. You can choose a suitable size of earbud, earhook and an appropriate way to position your headset. -
Page 16: Adjust The Headset To Wear On The Ear
Adjust the headset to wear on the ear 3. Rotate the headset to the vertical position until it clicks into place. • Hook the headset on your ear. Adjust the angle of the headset until the microphone is pointing towards your mouth. Firmly grip the headset with one hand whenever adjusting the headset microphone up or down 4. -
Page 17: Before Use
Before use To remove the headband from the headset: 1. Hold the headset with one hand and the After you install your telephone or power returns headband with your other hand. following a power outage and battery depletion, the 2. Rotate the headset to the horizontal position handset will prompt you to set the date and time, and the pull the headset until it separates from and the answering system through voice guide. -
Page 18: Check For Dial Tone
When the handset is out of range, the handset will the telephone base while using the 8084150 display Out of range or and cell line. no pwr at base alternately. -
Page 19: Glossary Of Terms
- enabled cell phone and your new ® that location while using the 8084150 cell line 8084150 telephone system. • If you experience poor sound quality, place your cell phone closer to the 8084150 to ensure Bluetooth cell phone–a Bluetooth -enabled ® ®... -
Page 20: Bluetooth ® Setup
-enabled cell phone with your hold CELL 1 and/or ® 8084150, you must first pair and connect it with the CELL 2 on the telephone base for about four telephone base. All 8084150 handsets can be used to seconds until the CELL 1 and/or CELL 2 light make or answer calls on the cell phone line. -
Page 21: Add A Bluetooth ® -Enabled Headset
OFF. For some ® on your cell phone and the 8084150 OFF by headset models you may need to turn the headset pressing CELL 1/ CELL 2. Repeat the steps above ON and reconnect it to the telephone base. -
Page 22: Disconnect A Paired Cell Phone Or Headset
Before downloading the phonebook, make sure the card to your cell phone memory, see the user’s manual cell phone is paired and connected to the 8084150. of your cell phone Make sure the handset battery is charged for at least •... -
Page 23: Remote Voice Control
If you have connected a cell phone to your • If you have connected one cell phone to the 8084150 telephone system, you can activate the telephone the handset will show the device voice-controlled application (voice app) of the cell... -
Page 24: Activate Remote Voice Control On Headset
Activate remote voice control on headset phone. For example, a cell call has been established via the remote voice control feature and the call has just ended NOTE: Make sure the CELL 1 slot on the telephone base is • •... -
Page 25: Configure Your Telephone
Configure your telephone 4. Use the dialing keys (0-9) to enter the hour (HH) and minute (MM). Then press to choose AM or PM. Using the handset menu 5. Press SELECT to save the settings. You will 1. Press MENU when the handset is not in use. hear a confirmation tone. -
Page 26: Dial Mode
Telephone Operations Dial mode The dial mode is preset to touch-tone dialing. If you have pulse (rotary) service, you must change the dial mode to pulse dialing before using the control key panel: Handset telephone to make a call. 1. Press MENU when the handset is not in use. to choose Settings, then 2. -
Page 27: Make A Home Call
Make a home call Make a cell call 1. Press /CELL on the handset. The handset /HOME or 1. Press on the handset. will display Select a device. 2. When you will hear a dial tone, dial the number. • If you have only one cell phone connected to The handset will display Unable to call if the •... -
Page 28: Answer A Cell Call
On some cell phones, changing the volume on Press OFF on the handset, place the handset in the the cell phone affects your cell call volume on the 8084150 handset. telephone base or handset charger. NOTES: Answer a cell call while on a home call •... -
Page 29: Join A Call In Progress
Join a call in progress Chain dialing Another handset can join you on a home call. That Use this feature to initiate a dialing sequence from call will continue until all parties hang up. You can numbers stored in the phonebook, Caller ID log or share an outside call with up to two handsets at the redial list while you are on a call. -
Page 30: Redial List
Delete a redial list entry • Press FIND HANDSET again on the telephone base 1. Press REDIAL to enter the redial list. -OR- or REDIAL repeatedly to browse until 2. Press , • Place the handset in the telephone base the desired entry displays. -
Page 31: Answer An Incoming Call During An Intercom Call
Answer an incoming call during an dialing key (0-9, , or ). Both handsets will intercom call display Intercom. -OR- If you receive an incoming home call during an To answer the intercom call on the destination intercom call, you will hear an alert tone, both headset press ON/OFF key on the headset. -
Page 32: Review Phonebook Entries
Review phonebook entries 2. Press to choose Phonebook, then press SELECT. Entries are sorted alphabetically. 3. Press SELECT again to choose Add new entry. 1. Press when the handset is not in use. The 4. When Enter number displays, use the dialing screen will display the first entry in keys to enter a number (up to 30 digits). -
Page 33: Delete A Phonebook Entry
Delete a phonebook entry 4. Use the dialing keys to edit the name. 5. Press SELECT to save the entry. The handset 1. Search for the desired entry in the phonebook will display Saved then the revised entry. You (see Review phonebook entries or will hear a confirmation tone. -
Page 34: Review The Caller Id Log
Review the Caller ID log When you have reviewed all the missed calls, the missed call indicator will disappear. 1. Press CID when the handset is not in use. If you do not want to review the missed calls one by The screen will display the first entry in the one, press and hold CANCEL on the idle handset Caller ID log. -
Page 35: Dial A Caller Id Log Entry
Dial a Caller ID log entry Delete all Caller ID log entries 1. Press MENU when the handset is not in use. 1. Search for the desired Caller ID log entry (see Review the Caller ID log). to scroll to Caller ID log, then 2. -
Page 36: Add A Call Block List Entry
Review the call block list 4. Press to choose Not block or Block, then press SELECT. You will hear 1. Press MENU when the handset is not in use. a confirmation tone. 2. Press to choose Call block, then press SELECT. Add a call block list entry to choose Block list, then 3. -
Page 37: Delete A Call Block List Entry
4. Press to choose On or Off. NOTE: 5. Press SELECT to save your selection. Then the • If you save an entry which already exists in the call block list, the handset will display Number repeated handset will return to the previous menu and you and return to previous screen will hear a confirmation tone. -
Page 38: Telephone Base Ringer Volume
About the built-in answering Telephone base ringer volume system and voicemail service Press on the side of telephone base to – /VOL/ + adjust the ringer volume when the telephone base For message recording, your telephone has a built- is not in use. in answering system and it also supports voicemail When you set the ringer volume to zero, the base services offered by your telephone service provider... -
Page 39: Set Your Built-In Answering System
Set your built-in answering system Turn the answering system ON or OFF The answering system must be turned ON to The answering system can record and store up to answer and record messages. 99 messages. Each message can be up to three minutes in length. -
Page 40: Play The Announcement
Set number of rings 4. The screen will display Play [2] Del [3] Rec [7] and will announce, “To play, press 2. To record, You can set the answering system to answer an press 7.” Press 7 to record. The handset will incoming call after 2, 3, 4, 5 or 6 rings or toll saver. -
Page 41: Message Alert Tone
Message alert tone NOTES: You can press CANCEL to quit the voice guide at • When the message alert tone is set to anytime. ON, and there is at least one new message, the • If the system does not receive any input, it will telephone base will beep every 10 seconds. -
Page 42: New Message Indication
NOTE: Message Description • Ensure you set the date and time correctly. Refer window display to Set date and time under the Configure your telephone section for more details. No messages. To play messages at the telephone base Total number of old messages 1-99 and memos recorded. -
Page 43: Delete All Old Messages
Delete all old messages Command Description You can only delete old messages. You cannot Repeat the current message delete new messages until you review them. You (during playback). cannot retrieve deleted messages. Stop. To delete all old messages at the telephone base Hear a list of remote commands. -
Page 44: Call Screening
Record, play, and delete memos 6. Press SELECT to save and you will hear a confirmation tone. Memos are your own recorded messages used as reminders for yourself or others using the same Call screening answering system. You can record your own memos using a system handset. -
Page 45: Using The Built-In Answering System And Voicemail Service
Using the built-in answering Retrieve voicemail from telephone system and voicemail service service You can use your answering system and voicemail Voicemail is a feature available from most telephone service together by setting your answering system service providers. It may be included with your to answer before voicemail service answers as telephone service, or may be optional. -
Page 46: Turn Off The New Voicemail Indicators
Screen messages Turn OFF the new voicemail indicators If you have retrieved your voicemail while away from home the handset will still display the new voicemail There is an incoming call from a Blocked call indicator. Use this feature to turn OFF the indicators. blocked caller. - Page 47 You have started the intercom You need to pair a cell phone Intercom to: Pair cell process, and need to enter the before making a cell call. first desired handset number. The handset is on a home call. Phone An extension phone, or one of Line in use There are no phonebook entries.
-
Page 48: Eco Mode
should retain its luster for many years. Clean it only The handset is out-of-range Unable to with a dry non-abrasive cloth. Do not use dampened while on a call. call cloth or cleaning solvents of any kind. Failed phone call (the telephone line is in use). -
Page 49: Frequently Asked Questions
If you cannot find the answer telephone base to register it handset does not back. The handset will show to your question, call 1 (855) 825-BELL (2354). work at all. Registered and you will hear a beep when the registration process completes. - Page 50 My If you subscribe to high-speed my 8084150. the 8084150 cell line. In order calls fade out when Internet service (DSL-digital for this to work, the telephone I am using the...
- Page 51 The display shows The handset may be out of The messages If a caller leaves a very long Out of range range. Move it closer to the on the message, part of it may be lost or and no pwr telephone base.
- Page 52 While the handset is not in use Once you have activated the I accidentally set my The remote voice or is on a call, press MENU remote voice control feature, LCD language to control feature does and then enter 364# to change you are using your cell phone’s Spanish or French, not work.
-
Page 53: The Rbrc ® Seal
The RBRC seal ® The Bluetooth function of your ® The remote voice cell phone may be OFF, or control feature ends ® The RBRC seal on the nickel-metal hydride battery you may have moved your cell unexpectedly while phone out of Bluetooth range of ®... -
Page 54: Fcc, Acta And Ic Regulations
FCC, ACTA and IC regulations maintained at a distance of approximately 20 cm (8 inches) or more. FCC Part 15 This Class B digital apparatus complies with Canadian requirement: NOTE: This equipment has been tested and found to comply with the requirements for a Class B digital device CAN ICES-3 (B)/NMB-3(B) under Part 15 of the Federal Communications Commission FCC Part 68 and ACTA... -
Page 55: Limited Warranty
Technical specifications discontinue your telephone service. The telephone service provider is required to notify you before interrupting service. If advance notice is not practical, you will be Transmit DECT frequency: notified as soon as possible. You will be given the frequency 1921.536-1928.448 MHz opportunity to correct the problem and the telephone... -
Page 56: Important Safety Instructions
Important safety instructions following conditions: • When the power supply cord or plug is When using your telephone equipment, basic safety damaged or frayed. precautions should always be followed to reduce the risk • If liquid has been spilled onto the product. of fire, electric shock and injury, including the following: •... - Page 57 Battery • Electrical power: The telephone base of this cordless telephone must be connected to a working electrical • CAUTION: Use only supplied battery. outlet. The electrical outlet should not be controlled by • DO NOT dispose of the battery in a fire. Check a wall switch.
- Page 58 The Bluetooth® word mark and logos are registered trademarks owned by Bluetooth® SIG, Inc. and any use of such marks by The Source (Bell) Electronics Inc. is under license. Other trademarks and trade names are those of their respective owners.
Need help?
Do you have a question about the 8084150 and is the answer not in the manual?
Questions and answers
Why do all my calls come in ..private caller. I cannot find out the info in the Handbook.