Table of Contents
Advertisement
Advertisement
Table of Contents

Related Manuals for PowerMax JogPad-2


Summary of Contents for PowerMax JogPad-2
- Page 1 JogPad-2 Treadmill User Manual OWNER’S MANUAL Read all instructions carefully before using this product. Retain this owner's manual for the future's reference. Product may be slightly different with photos, it is subject to actual product. Thank you for purchasing the product.
-
Page 2: Table Of Contents
SERVICE COMMITMENT 1 YEAR LIMITED WARRANTY PowerMax Fitness warrants to the original purchaser that this product is free from defects in material and workmanship when used for the purpose intended, under the conditions that it has been installed and operated in accordance with PowerMax Fitness's Owner's Manual. PowerMax Fitness's obligation under this warranty is limited to replacing or repairing, free of charge, any parts which may prove to be defective under normal home use. -
Page 3: Safety Precautions Warning Instructions
1. Safety Precautions Warning Instructions Note: Please read the instruction carefully before using and pay attention to the following safety precautions. The treadmill is suitable to be placed indoors, to avoid moisture, splash water on the treadmill and place any foreign matter. Please wear appropriate sportswear and sports shoes before exercise. - Page 4 Warning! Enforcement! Please be sure to discuss with a professional doctor before using if you are receiving medical treatment from a doctor or the following patient. 1. Having back pain now or injury for leg, waist and neck in the past. And the people who have problem with Leg (those with chronic diseases such as disc herniation, spondylolisthesis, cervical herniation) 2.
- Page 5 Do not jump up or down during exercise. —It's likely to fall or cause injury. Do not use or keep in damp places such as outdoors or near the bathroom, or in places where water drops are caught. Do not use or keep in places with direct sunlight such as high-temperature places of around ...
- Page 6 —it's easy to cause accident or injury. Do not use the power plug with needles, garbage or water. —It may cause electric shock, short circuit and fire. Do not pull out the power plug or switch the power switch to “off “during use. ...
-
Page 7: Product Introductions
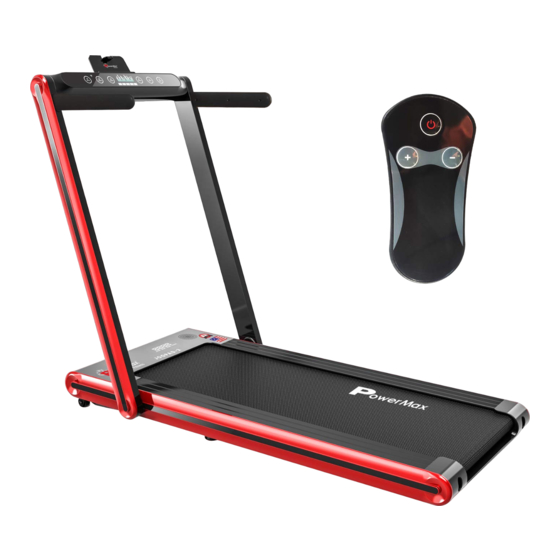
This product has a grounding plug. Make sure that the product is connected to an outlet of the same shape. this product cannot be used with an adapter socket. 2. Product Instruction Packing List: Name Qty. Remark Main body Spare parts package See table www.powermaxfitness.net... - Page 8 Technical Parameters Working Voltage 220V-240V 50/60Hz Max Load 120Kg Fold: 1484 x 739 x 131mm Outsize Unfold: 1323 x 739 x 1104mm Running Area 1100 x 400mm Speed 1.0 - 15.0 Km/h Motor Power 2.0 HP Control Method Touch Button Controller Weight 36kg Spare Parts List...
-
Page 9: Installation Procedure
3. Installation Instructions Put the main body on the carpet or cushion as shown in the picture after taking out from packing carton. As shown in step(A), open the folding handle in the direction as shown in the picture. Meanwhile the lower end of the riser will expand to the two sides naturally. -
Page 10: Method For Replacing Fuse
4. Method for Replacing Fuse Pull out the power plug from power socket as shown in the step1 of left picture. Remove the safety socket from the power socket with a straight screwdriver as shown in the step2 of left picture. Take out the fuse according to the direction shown in the picture, and insert it after replacing it. -
Page 11: Sports Advice And Guidelines
6. Sports Advice and Guidelines Warm-up exercise warm up for 5-10mins before each operation Breathe Do not hold your breath during operation. Normally prepare to release action and inhale through the nose, exhale through the mouth. The breathing should be coordinated with movement. If the breathing is too rapid, the movement should be stopped immediately. -
Page 12: Operating Instructions
1. Stretch Down Bent your knees slightly and slowly bend your body to relax your back and shoulders. And try to touch your toes with your hands. Hold for 10-15 seconds, then relax. Repeat three times (see figure1) 2. Hamstring Stretch Sit on a clean seat cushion and straighten one leg. - Page 13 How to Use the Treadmill 1. Turn on the power and check whether the treadmill works normal. 2. This treadmill speed range in running mode is 1-15km/h. 3. Clip the safety lock clip on the clothes of the runner. 4. Please check the stability and function of the treadmill before exercise. It is strictly forbidden to start the treadmill while standing on the running belt.
- Page 14 2. Display Functions Buttons: Start/Stop, Speed increasement/Speed decreasement,6km/h,12km/h, Pause/continue A: "START/STOP": START the treadmill in stopping state, STOP the treadmill in running state. Press the STOP key to slowly stop in the running state. B: "SPEED +”: Speed Increment Key, in the state of running is the key of speed increment; C: "SPEED -"Speed Decrement Key, In the state of running is the key of speed decrement;...
-
Page 15: Common Failures And Processing Method
Safety lock function Pull off the safety lock in any state, window display "E07" And the buzzer bi-bi-bi three times. The motor is stopped immediately if the motor is working. You can't start again when the safety lock falls off. Power saving mode This system has the function of power saving. -
Page 16: Product Maintenance
0.00E+00 Overload protect Overload, replace controller 0.00E+00 System self-check failed System failure, replace controller 0.00E+00 Safety lock drop Put the safety lock in correct position Abnormal External disturbance Turn off power switch, turn on it after one minute Display 9. Product Maintenance 1. - Page 17 good to be too tight. It is easy to increase the load of the motor and damage the motor, running belt and roller etc. Running Belt Deviation Adjustment All treadmills need to be adjusted the running belt before delivery and after installation. But the running belt may be deviated after a period of use which may be caused by the following reasons.
-
Page 18: Service Commitment
Adjustment steps: 1. Use a wrench to turn the motor parallelism adjustment bolt counter clockwise by half a turn 2. Turn the belt tension bolt half a turn clockwise Note: Clean the belt and pulley groove regularly Service commitment G series electric treadmill, if no-human damage, can be free for users to come to repair or provide accessories in one year use normal circumstances.
Need help?
Do you have a question about the JogPad-2 and is the answer not in the manual?
Questions and answers