
Related Manuals for PowerMax MFT-410


Summary of Contents for PowerMax MFT-410
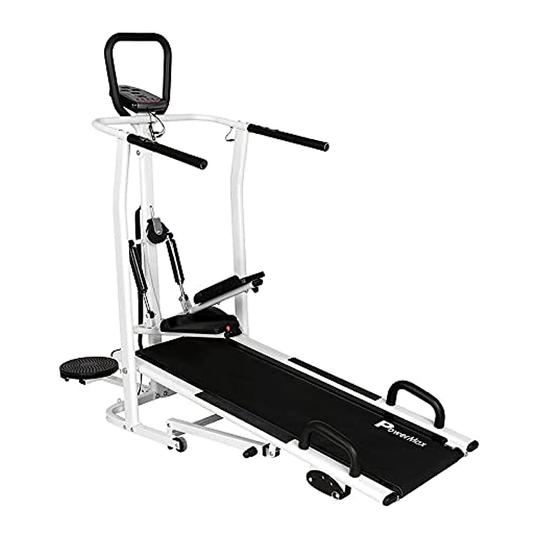
- Page 1 MFT-410 4 IN 1 MULTIFUNCTION TREADMILL OWNER’S MANUAL Read all instructions carefully before using this product. Retain this owner's manual for the future's reference. Product may be slightly different with photos, it is subject to actual product.
-
Page 2: Table Of Contents
STORAGE AND MAINTENANCE 1 YEAR LIMITED WARRANTY PowerMax Fitness warrants to the original purchaser that this product is free from defects in material and workmanship when used for the purpose intended, under the conditions that it has been installed and operated in accordance with PowerMax Fitness's Owner's Manual. PowerMax Fitness's obligation under this warranty is limited to replacing or repairing, free of charge, any parts which may prove to be defective under normal home use. -
Page 3: Important Safety Notice
IMPORTANT SAFETY NOTICE ATTENTION: Although the treadmill is considered as much as possible the safety during the design and manufacture, but still need obey some safety precautions during use, please read this manual carefully before assemble and use this treadmill, especially the below safety precautions: 1. - Page 4 EXPLOSIVE VIEW www.powermaxfitness.net...
-
Page 5: Parts List
PARTS LIST Part No. Part name/specification QTY. Part No. Part name/specification QTY. Monitor 22L/R L/R pedal tube Front Handle bar 23L/R L/R pedal Hexagon head bolt Hexagon head bolt M10*15 M10*40*25 Flat washer (1)20* (1)10.5*2.0 Hexagon head boltM10*55*30 Hexagon socket head bolt Carriage bolt M8*45*20 M8*80*30 Arc washer (1)20*(1)8.5*2.0... -
Page 6: Assembly Instruction
ASSEMBLY INSTRUCTION Step 1. Fix L/R upright (27L/R) and Central upright (9) to Base frame (28) with Carriage bolts (26), Flat washers (18), Nylon nuts (10). Don't tighten the bolts, nuts and screws securely one time, also including the following assembly step. www.powermaxfitness.net... - Page 7 Step 2. 1. Using Hexagon head bolts (25) and flat washers (4), install frame (35) to L/R upright (27L/R). 2. Fix the Adjustment tube (32) to the Main frame (35) and Base frame (28) with Hexagon socket head bolt (30) and (21), Flat washers (18), Nylon nuts (10). 3.
- Page 8 Step 3. 1. Assemble the U shape bracket (12) onto the Central upright (9) with 1pcs Hexagon head bolt (3), flat washer (4). 2. Connect the Sensor wire middle (37) with Sensor wire upper (16). 3. Connect the Grip pulse wire1(13) with Grip pulse wire2 (14). Push the Grip pulse post (15) into the U shape bracket (12) with the connected wires hiding the inside of posts.
- Page 9 Step 4. 1. Install L/R pedal tube(22L/R) to the Central upright (9) with 2 sets Hexagon socket head bolts (17) and Flat washers (18). 1. Fix the two Oil cylinders (19) to the L/R pedal tube with 2 sets Hexagon socket head bolt (21), Flat washers (18), Nylon nuts (10).
- Page 10 Step 5. 1. Expand the Front handlebar (2) slightly then slide it onto the Central upright (9). Align their holes and tighten them with 2 sets Hexagon socket head bolts (5), Arc washers (6) and Nylon nuts (10) 2. Connect the sensor wires upper (16) and Grip pulse wire1(13) with the wires from the Monitor (1) respectively.
- Page 11 Step 6. 1. For easy assembly, unscrewing the adjustment knob of the Adjustment tube (32) 2 or 3 circles and pulling it out, push the Main frame (35) to the folded position. 2. Fix the Body twister set (31) to the Central upright (9) with 1 pcs Hexagon socket head bolt (30), Nylon nut (10), flat washer (18).
-
Page 12: Storage And Maintenance
STORAGE AND MAINTENANCE 1. STORAGE: For saving the space, you can fold the treadmill. Unscrew the adjustment knob of the Adjustment tube (32) 2 or 3 circles. Pulling it out and holding, push the Main frame (35) to the folded position at the same time. Please refer below picture 2. - Page 13 4. RUNNING BELT TENSION ADJUSTMENT: When you place your foot on the belt, if you can feel a slipping sensation, then the belt has stretched and is slipping across the rollers. This is a normal and common adjustment on any treadmill. To eliminate this slipping, turn both Allen bolts on the rear roller 1/4 turn as below shown.
Need help?
Do you have a question about the MFT-410 and is the answer not in the manual?
Questions and answers