Advertisement
Quick Links
ProFlex
PCR System Installation and Operation
™
Catalog Numbers 4483636, 4483637, 4483638, 4484071, 4484073, 4484074, 4484075, 4484076, 4484078
Pub. No. 4483807 Rev. E
This document summarizes the procedures for installing and
™
using the ProFlex
PCR System, including "better than gradient
™
VeriFlex
technology, that are described in detail in the ProFlex
PCR System User Guide (Pub. no. MAN0007697).
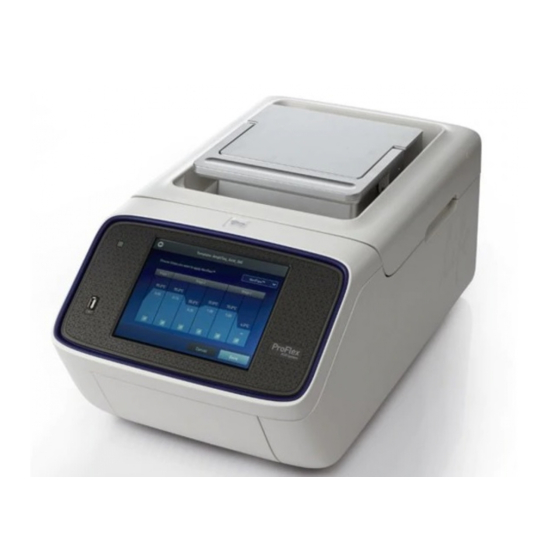
Figure 1 ProFlex
3 × 32‑Well PCR System
™
Note: For safety and biohazard guidelines, see the "Safety"
™
appendix in the ProFlex
PCR System User Guide (Pub. no.
MAN0007697). Read the Safety Data Sheets (SDSs) and follow the
handling instructions. Wear appropriate protective eyewear,
clothing, and gloves.
How to install the ProFlex
Materials required:
• Can of compressed air
Note: The can of compressed air is used to deliver a blast of
air into each well of a sample block to remove particles that
may have collected during shipping of the product.
• (Optional) Electrical protective devices
Note: We support the use of one or more of the following
electrical protective devices:
·
Power line regulator (1.5-kVA)
·
Surge protector/line conditioner (10-kVA)
·
Uninterruptible power supply (1.5-kVA)
For Research Use Only. Not for use in diagnostic procedures.
™
PCR System
™
Set up the ProFlex
™
"
IMPORTANT!
Save the packing materials and box in case you
need to ship the instrument to us for service.
1. To unpack the ProFlex
crate. You would have received three boxes for the ProFlex
System, one containing the base module, a second containing
the block module, and the third containing accessories.
2. Remove the packing material, then inspect the instrument for
shipping damage.
Figure 2 ProFlex
Figure 3 ProFlex
3. Move the ProFlex
• Meets the spatial and weight requirements for the
ProFlex
™
page 9)
• Is within 1 m (3 ft) of a 800 VA power receptacle
QUICK REFERENCE
PCR System
™
PCR System, open the shipping
™
Base packing
™
3x32-Well Sample Block packing
™
System to an installation site that:
™
System (see "Technical specifications" on
™
Advertisement

Related Manuals for ThermoFisher Scientific ProFlex PCR System


Summary of Contents for ThermoFisher Scientific ProFlex PCR System
- Page 1 QUICK REFERENCE ProFlex PCR System Installation and Operation ™ Catalog Numbers 4483636, 4483637, 4483638, 4484071, 4484073, 4484074, 4484075, 4484076, 4484078 Pub. No. 4483807 Rev. E Set up the ProFlex PCR System This document summarizes the procedures for installing and ™ ™...
- Page 2 4. Face the unit away from you. d. In the absence of the ethernet cable or the ethernet port, you can connect the instrument to the network via the USB-enabled Wi-Fi Card (Part no. 4483658) as shown in the following graphic. Insert the Wi-Fi Card into the USB port at the back of the ProFlex System.
- Page 3 • WPA2 Enterprise 7. Touch Join to continue or Cancel to exit from the Find and Join a Network screen. 8. Depending on the security type you have selected, enter the appropriate passwords and touch Join. If you entered the correct information, the Network Connection Complete screen will appear.
- Page 4 c. In the Device Settings screen, touch Remote Service. 9. Upon successful authentication, the Administrator is linked to Thermo Fisher Connect. Subsequently, any user can log in and proceed to perform linking the instrument to their Thermo Fisher Connect account. Note: The administrator account must be activated first to connect the instrument to the Cloud.
- Page 5 How to use the ProFlex System ™ Link your instrument profile to Thermo Fisher Connect ™ You can operate the ProFlex System from the touchscreen. For 1. Sign in to your instrument profile. ™ detailed instructions on using the ProFlex System, refer to the ™...
- Page 6 5. Pipette the sample into the tubes. Prevent crushing tubes 6. Seal the tube strip using the MicroAmp strip caps. See “Seal ™ IMPORTANT! Prevent crushing tubes in the thermo cycler by tubes strips with cap strips” on page 6 for instructions. using retainer/tray systems.
- Page 7 Fill, seal, and load tubes 1. Set the 96-well tray on a splash-free 96-well base. 2. Place the reaction tubes in the tray. ™ MicroAmp Reaction Tube with Cap (0.2-mL) ™ ™ MicroAmp 96-Well Tray for VeriFlex Blocks ™ MicroAmp Splash Free 96-Well Base 3.
- Page 8 Consumable Model/ Format Cat. No. MicroAmp 96-Well Reaction Tray/ Retainer for VeriFlex Systems 4381850 ™ ™ MicroAmp 3x32-Well Retainer for VeriFlex Systems 4481669 ™ ™ Seals and Covers MicroAmp Clear Adhesive Film 0.2 (96‑Well, 2x96‑Well, 4306311 ™ and 2x384‑Well) MicroAmp Optical Adhesive Film 4360954 ™...
-
Page 9: Technical Specifications
Table 2 ProFlex PCR System sample handling supplies ™ Part Name Cat. No. MicroAmp Adhesive Film Applicator 4333183 ™ MicroAmp Multi-Removal Tool 4313950 ™ MicroAmp Cap Installing Tool (Handle) 4330015 ™ MicroAmp 96-Well Base N8010531 ™ MicroAmp Splash Free 96-Well Base 4312063 ™... -
Page 10: Limited Product Warranty
Table 4 Port Description AC power cable port 10/100 Fast Ethernet port for connecting to a network USB v1.0 port for connecting to an external network drive, jump drive, or other USB storage device RS232 serial communication port for connecting the probe for the Temperature Verification Kit USB v1.0 port for connecting to USB-enabled Wi-Fi Card Limited product warranty Life Technologies Corporation and/or its affiliate(s) warrant their products as set forth in the Life Technologies' General Terms and...
Need help?
Do you have a question about the ProFlex PCR System and is the answer not in the manual?
Questions and answers