Table of Contents
Advertisement
Advertisement
Table of Contents

Related Manuals for Technogym BIOSTRENGH Chest Press


Summary of Contents for Technogym BIOSTRENGH Chest Press
- Page 1 BIOSTRENGTH ™ User manual...
-
Page 2: Table Of Contents
CONTENTS Contents ....................2 Safety devices ..................35 Important safety instruction ..............3 Electrical connection ................36 Personal safety ..................5 Turning on and off ................39 Identification of the manufacturer and the product ......7 Lifting and moving the product ............40 Technical characteristics ...............9 Routine maintenance ................ -
Page 3: Important Safety Instruction
Any other use should be considered incorrect and therefore dangerous. Do not use any accessories other than those recommended by Technogym. Never turn on the product if it has a damaged cable or plug, if it is not working correctly, if it has been knocked over or damaged, or if it has fallen into water. - Page 4 IMPORTANT SAFETY INSTRUCTION Keep the power cable away from heated surfaces. Keep your hands away from moving parts. Never drop or insert any object into any opening. To disconnect power, turn all controls to the off position, then remove the plug from the outlet. SAVE THESE INSTRUCTIONS Warnings Risk Of Electric Shock.
-
Page 5: Personal Safety
Do not attempt any maintenance work on the product other than the operations described in the user manual. The installation, maintenance and setting operations must be carried out by qualified Technogym staff or persons authorised by Technogym. The electrical system must conform to the standards and legal requirements in the country of use. - Page 6 We recommend immediately replacing the labels when they become damaged or difficult to read. Technogym is not responsible for any damage due to any failures or damage caused by unauthorized service, misuse, accident, negligence, improper assembly or installation, debris resulting from construction activities in the product’s environment, rust or corrosion as a result of the product’s location, alterations or modifications without Technogym’s written authorisation or for...
-
Page 7: Identification Of The Manufacturer And The Product
The values stated in the illustration are purely indicative; refer to the label attached to the product or the data in the “Technical characteristics” section for the correct information. Technogym S.p.A. via Calcinaro 2861, Cesena (FC) - Italy Made in Italy LOWER BACK BIOSTRENGTH Model no. - Page 8 IDENTIFICATION OF THE MANUFACTURER AND THE PRODUCT The arrows indicate the positions of the identification labels on the products. BIOSTRENGTH ™...
-
Page 9: Technical Characteristics
TECHNICAL CHARACTERISTICS Power supply 200÷240 Vac 50/60 Hz 2 kW Motor peak power 6 kW in Leg Press Maximum weight of user 180 kg (397 lb) Noise level Less than 70 dB Protection rating IP 20 from +5°C to +30°C Operating temperature (from +41°F to +86°F) Maximum capacity of the holder (A) - Page 10 TECHNICAL CHARACTERISTICS Chest Press 1270 mm (50") 1450 mm (57") 237 kg (522 lb) 1480 mm (58") 1106 mm (44") Leg Curl 1200 mm (47") 227 kg (500 lb) BIOSTRENGTH ™...
- Page 11 TECHNICAL CHARACTERISTICS Leg Extension 1435 mm (56") 1111 mm (44") 242 kg (534 lb) 1200 mm (47") Leg Press 1239 mm (49") 2082 mm (82") 372 kg (820 lb) BIOSTRENGTH ™...
- Page 12 TECHNICAL CHARACTERISTICS Low Row 1351 mm (53") 1314 mm (52") 237 kg (522 lb) Lower Back 1371 mm (54") 1108 mm (44") 229 kg (505 lb) BIOSTRENGTH ™...
- Page 13 TECHNICAL CHARACTERISTICS 1431 mm (56") Shoulder Press 1153 mm (45") 232 kg (511 lb) 1375 mm (54") 1038 mm (41") Total Abdominal 215 kg (474 lb) BIOSTRENGTH ™...
- Page 14 TECHNICAL CHARACTERISTICS Vertical Traction 1154 mm (45") 1345 mm (53") 219 kg (483 lb) BIOSTRENGTH ™...
-
Page 15: Place Of Usage
PLACE OF USAGE To ensure that exercising with the equipment is easy, safe and effective, the place where it is used should comply with certain specific requirements; in particular, before choosing the place where the equipment will be installed, please ensure that the following conditions are satisfied: the temperature is between +10°C and +25°C;... -
Page 16: Using The Equipment
USING THE EQUIPMENT The equipment has no sharp corners. All parts that come into contact with the user’s body are suitably protected with rubber coverings or padding. To adjust the position of the seat or the rollers, use the appropriate buttons on the display. To adjust the workload, use the appropriate buttons on the display. -
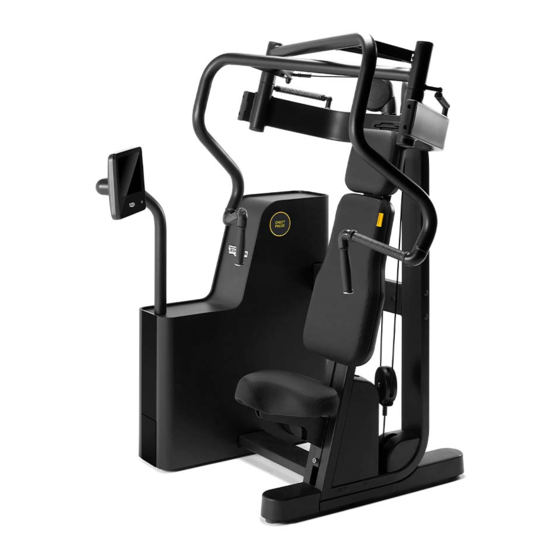
Page 17: Chest Press
USING THE EQUIPMENT Chest Press Sit down and adjust the seat height (A). In the starting position, the handgrips (B) should be at the height of your breastbone and your shoulders should be lined up with the reference marks (C). Select the workload with the buttons on the display. - Page 18 USING THE EQUIPMENT Stretch your arms forward simultaneously, without straining your elbows. Keep your elbows, wrists and shoulders aligned while performing the exercise. Maintain a smooth controlled speed; we recommend a slower speed during the return phase than when moving outwards. Placing your grip closer or wider permits you to vary the trajectory of your arm movements from more convergent to more open exercises.
-
Page 19: Leg Curl
USING THE EQUIPMENT Leg Curl Move the rollers with the buttons on the display so that you can sit down more easily. Move the seat (A) forward or backward until the fulcrum of your knee is in line with the fulcrum of the lever (B). The padding (C) should be behind your legs. Lower the roller (E) onto your legs. - Page 20 USING THE EQUIPMENT Bend and extend your legs at the same time with a slow and controlled movement. Hold the side handgrips for greater stability during movement. Maintain a smooth controlled speed; we recommend a slower speed during the return phase than when moving outwards.
-
Page 21: Leg Extension
USING THE EQUIPMENT Leg Extension Move the roller (B) with the buttons on the display so that you can sit down more easily. Move the seat (A) forward or backward until the back of your knee is in contact with the padding (C). - Page 22 USING THE EQUIPMENT Extend and bend your legs at the same time with a slow and controlled movement. Hold the side handgrips for greater stability during movement. Maintain a smooth controlled speed; we recommend a slower speed during the return phase than when moving outwards.
-
Page 23: Leg Press
USING THE EQUIPMENT Leg Press Move the seat (A) with the buttons on the display so that you can sit down more easily. Select the workload with the buttons on the display. Place your back completely flat against the backrest. Position your feet on the thrust surface (B) approximately 7.8 in (20 cm) apart, at the same height (using the horizontal lines as a reference) and with your toes pointing slightly outwards. - Page 24 USING THE EQUIPMENT Extend and bend your legs at the same time with a slow and controlled movement. Maintain a smooth controlled speed; we recommend a slower speed during the return phase than when moving outwards. During the outward movement of the exercise, do not extend your legs completely. This will help to prevent your knee joints from being harmed and ensure that your muscles remain contracted.
-
Page 25: Low Row
USING THE EQUIPMENT Low Row Sit down facing the handgrips (C). Adjust the height of the seat (A) so that the chest pad (B) is halfway up your breastbone. Select the workload with the buttons on the display. Stand up and take hold of the handgrips (C) symmetrically. In the starting position, your feet should be on the footrest (D) and your arms should be extended. - Page 26 USING THE EQUIPMENT Pull with both arms simultaneously until they are fully bent, then extend both arms at the same time. Maintain a smooth controlled speed; we recommend a slower speed during the return phase than when moving outwards. During the return movement of the last repetition, stand up and let go of the handgrips, lowering the load down slowly.
-
Page 27: Lower Back
USING THE EQUIPMENT Lower Back Move the roller (A) with the buttons on the display so that you can sit down more easily. Select the workload with the buttons on the display. Place your feet on the footrest (B). In the starting position, your torso should be bent forward, with the roller (A) resting just below your shoulders at shoulder blade height. - Page 28 USING THE EQUIPMENT Fold your arms across your chest, and press back without pushing with your feet and without going past the 90° position to avoid overloading your muscles. Maintain a smooth controlled speed; we recommend a slower speed during the return phase than when moving outwards.
-
Page 29: Shoulder Press
USING THE EQUIPMENT Shoulder Press Sit down and adjust the seat height (A) with the buttons on the display. In the starting position, your shoulders should be lined up with the reference marks (C). Do a repetition without a load to check that the levers do not reach the end of stroke when your arms are completely extended. - Page 30 USING THE EQUIPMENT Extend your arms upward at the same time, keeping your shoulders, elbows and wrists at the same level. Maintain a smooth controlled speed; we recommend a slower speed during the return phase than when moving outwards. Placing your grip closer or wider permits you to vary the trajectory of your arm movements from more convergent to more open exercises.
-
Page 31: Total Abdominal
USING THE EQUIPMENT Total Abdominal Select the workload with the buttons on the display. Sit, place your feet under the two lower rollers (B) and place the lower part of your back up against the padded roller (C). Pull the padding (D) down over the front of your shoulders. BIOSTRENGTH ™... - Page 32 USING THE EQUIPMENT Crunch forward and at the same time, bring your knees up to your chest. Maintain a smooth controlled speed; we recommend a slower speed during the return phase than when moving outwards. Maintain control of the workload during the movement. To also activate the obliques, position one foot in front of a roller and the other foot behind it.
-
Page 33: Vertical Traction
USING THE EQUIPMENT Vertical Traction Sit down and adjust the seat height (A) with the buttons on the display. In the starting position, your shoulders should be lined up with the reference marks (C), your arms should be extended and the levers (B) should be lowered slightly. Select the workload with the buttons on the display. - Page 34 USING THE EQUIPMENT Bend and extend your arms at the same time, keeping your shoulders, elbows and wrists in line. Maintain a smooth controlled speed; we recommend a slower speed during the return phase than when moving outwards. Placing your grip closer or wider permits you to vary the trajectory of your arm movements from more convergent to more open exercises.
-
Page 35: Safety Devices
SAFETY DEVICES Emergency switch (A). This device stops all motorized actions. When it is switched, the workload is released and the automatic movement of the seat, rollers and levers stops. The emergency switches are red and they can be found on the Leg Curl, Leg Extension, Lower Back and Leg Press. -
Page 36: Electrical Connection
ELECTRICAL CONNECTION Before connecting the product to the mains power supply, ensure that the electrical system specifications comply with current regulations. Check the mains power supply specifications on the identification label. To access the connector, open the panel (A). Remove the spacer (B). Remove the screw (C). - Page 37 ELECTRICAL CONNECTION Put the holding piece provided (E) in place. Run the cable through the slot. Put the cable in the clip (F). Secure the holding piece (E) and the clip (F) with the screw (C) that you removed previously. Put the spacer (B) back in place.
- Page 38 ELECTRICAL CONNECTION Warnings Check the state of the power cable periodically. The wall socket must be located in a place where the unit may be easily and safely plugged in and unplugged. When plugging in, the power supply switch must be in the OFF (0) position (the equipment must be switched off). The power supply socket must be grounded .
-
Page 39: Turning On And Off
TURNING ON AND OFF To turn the equipment on, move the switch to the ON (I) position. After a quick system check (reset), the equipment is ready for use. Some of the parts move during the automatic checking process, so keep away from the product. -
Page 40: Lifting And Moving The Product
LIFTING AND MOVING THE PRODUCT Use a pallet truck or a forklift truck to lift the product, with the forks on the motor side. We recommend that you place some padded material between the frame and the lifting equipment. Tie the Chest Press, Low Row, Shoulder Press and Vertical Traction levers together or to the frame to prevent sudden, uncontrolled movement. - Page 41 LIFTING AND MOVING THE PRODUCT Warnings When moving the product, do not exert pressure against the protective panels. Do not try to move the product with the display support arm or the levers. This could cause DAMAGE and instability. BIOSTRENGTH ™...
-
Page 42: Routine Maintenance
Clean the outside of the product with a damp sponge every week. Do not use chemical products or solvents. Call the Technogym Technical Support Service for information about any maintenance operations not described in this manual. Lubricate the guides every month or if the seat squeaks. -
Page 43: Levelling The Product
LEVELLING THE PRODUCT The product must be level for proper operation. The product must only be levelled by adjusting the feet shown in the diagram. Loosen the locknut (B). Unscrew or screw the foot (A) until the frame is stable. After adjusting, tighten the locknut (B). - Page 44 ADJUSTING THE PRODUCT BIOSTRENGTH ™...
-
Page 45: Replacing The Padded Parts
REPLACING THE PADDED PARTS If any of the padding shows signs of wear, especially for reasons of hygiene, we recommend replacing it completely. To replace the seat padding, unscrew the screws located on the opposite side of the padding. BIOSTRENGTH ™... - Page 46 REPLACING THE PADDED PARTS Total Abdominal To replace the rollers, proceed as follows. Remove the cover (A). Unscrew the screw (B). Slide off the washer (C). Slide off the roller (D). Leg Curl, Leg Extension, Lower Back To replace the rollers, proceed as follows. Remove the cover (A).
- Page 47 REPLACING THE PADDED PARTS Total Abdominal To replace the upper roller, proceed as follows: Unscrew the 4 screws (A) and remove the cover (B). Unscrew the 4 screws (C) and remove the cover (D). Unscrew the 2 screws and washers (E). Remove the pin (F) and the roller (G).
-
Page 48: Technical Service
Via Calcinaro 2861, 47521 Cesena Italy sending of original spare parts. tel: +39 0547 56047 www.technogym.com/Support When contacting the Technogym Technical Support Service, please specify the following information. Product model (A) Date of purchase Serial number (B) Precise description of the problem Technogym S.p.A. -
Page 49: Storing The Product
If the product is used for commercial purposes, contact your reseller or the Technogym Customer Service, in the various Countries, to arrange for collection and disposal of waste from electrical and electronic equipment. - Page 50 Biostrength_en-AD 0SM01091...