
Related Manuals for Merck Millipore ReadyStream


Summary of Contents for Merck Millipore ReadyStream
- Page 1 User Guide ReadyStream System ® The life science business of Merck operates as MilliporeSigma in the U.S. and Canada. www.sigmaaldrich.com...
- Page 2 Notice We make no warranties of any kind or nature, express or implied, including any implied warranty of merchantability or fitness for any particular purpose, with respect to any technical assistance or information that we provide. Any suggestions regarding use, selection, application or suitability of our products shall not be construed as an express or implied warranty unless specifically designated as such in a writing signed by an officer or other authorized representative of our company.
-
Page 3: Table Of Contents
Contents System overview Routine usage Part numbers Definition of the dispensing parameters Selection of the dispensing parameters Operator and equipment safety Using a preset program Safety symbols and instrument labels Scanning a test data matrix Specifications Customizing parameters System components Storing a customized program Description of the ReadyStream media unit... -
Page 4: System Overview
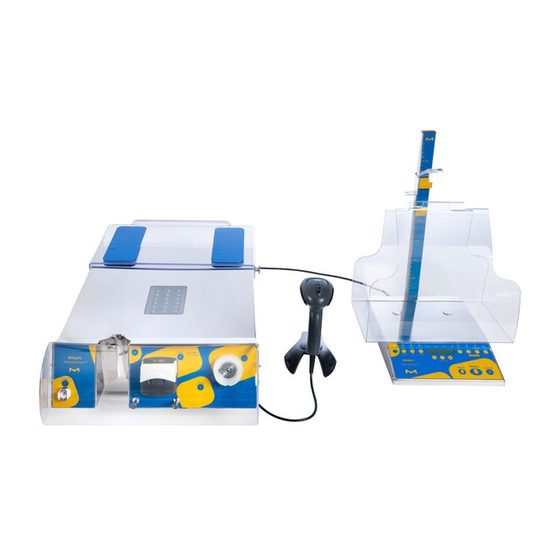
Carefully read the instructions before using the instrument. Please keep these instructions for further reading. System overview The ReadyStream system is designed to facilitate work in microbiological culture media ® preparation and dispensing. The ReadyStream dispensing unit is low in weight and can be ®... -
Page 5: Operator And Equipment Safety
Operator and equipment safety All employees who will operate and/or be near the ReadyStream system must comply with ® the following: • Read and understand this user guide before using the ReadyStream instrument. Failure to ® follow operating instructions could result in user injury or damage to the instrument. •... -
Page 6: Safety Symbols And Instrument Labels
Safety symbols and instrument labels Label Designation Description Warning, do not insert or remove the tubing, Safety symbol do not insert fingers whilst the pump is in motion Internal safety symbol Warning, surface may be hot during operation Internal safety symbol Warning, risk of electric shock during operation Power switch label Label for the unit’s main power switch... -
Page 7: Specifications
Specifications Category ReadyStream system value/range ® Catalog numbers Media unit RDYSTRM10 Dispensing unit RDYSTRM20 Standard bag holder RDYSTRM30 Large bag holder RDYSTRM40 Distribution volume range 90 mL to 9 999 mL Distribution volume accuracy ±2% Distribution temperature range in 30–42 °C heating mode Distribution temperature accuracy in priority ±2 °C... -
Page 8: System Components
System components Description of the ReadyStream media unit ® F3: Stopcock actuator in home position F2: Peristaltic pump head F1: Outlet connector for the filter set B5: Venting B4: Marking plate B3: Power cord connector B2: RJ45 connector to media dispensing unit B1: RS232 connector to barcode reader Figure 1: Front and back views of the ReadyStream media preparation unit... - Page 9 T1: Extension tray – pulled in T2: Sticky pad T3: LED transillumination panel T4: Media bag tubing guides R6: Guide for dispensing tubing R1: Extension tray screw R2: Main power switch R4: Accessory port R5: Front cover pin R3: LED transillumination switch L2: Front cover (translucent) L1: Deionized water inlet tubing connector Figure 2: Upper, right and left views of the ReadyStream...
-
Page 10: Description Of The Readystream
Description of the ReadyStream dispensing unit ® 1: Graduated unit stand 2: Position for large ReadyStream bag holder ® 6: Dispensing holder 7: Height adjustment screw 3: Position for standard ReadyStream bag holder ® 8: Tube guide 9: Stand screw 4: Bag holder magnet (inside) 10: Connector to media unit 5: Control panel... -
Page 11: Description Of The Readystream ® Filter Set
Description of the ReadyStream filter set ® A. Inlet blue cap D. Cable ties G. Label B. Male inlet connector E. 0.22 µm membrane filter H. Male outlet connector C. Silicone tubing F. Filter vent I. Outlet orange cap Figure 5: Description of the ReadyStream filter set ®... -
Page 12: Setting Up The Instrument And Consumables
Setting up the instrument and consumables Unpacking the instrument Remove the instrument components from all packaging without damaging the packing materials. Save the original packaging materials for use if the instrument must be shipped for maintenance at a later date. The shipping kit contains the following items: •... -
Page 13: Powering The Instrument On And System Initialization
Before the first use, go through a sanitization procedure by scanning the specific barcode and following the instructions on the screen (details in the maintenance section of this user guide on page 30). Connect the water inlet tubing to the instrument on the connector on the left side (Figure 2, L1). -
Page 14: Installment Of The Consumables And Calibration
Installment of the consumables and calibration Media bag Filter set Preparation unit Dispensing unit Barcode reader Bag outlet set between guiding pins Silicone tubing set in pump head 4-way valve set in rotary actuator Filter set connection to preparation module Filter set connection to media bag Figure 7: Step by Step installment of the consumables... - Page 15 After initialization of the pump and valve actuator, the instrument requests to connect the filter. The “Filter” LED on the control panel of the dispensing unit will blink orange to indicate that an action is ongoing with the filter. Remove the protective blue cap on the inlet extremity of the ReadyStream filter and connect it to the outlet of the ®...
- Page 16 When necessary clean (e.g. with water) the blue stick pads on the extension tray to prevent the bag from falling from the instrument. The pads can be removed and re- positioned on the extension tray. Dispensing Aseptically connect the ReadyStream media bag to the ®...
-
Page 17: Priming Of The Filter Set
When the ReadyStream media bag is connected to the ® instrument, scan the label. If a new bag is used, the media type (e.g. BPW100L), the maximum number of dispensations (e.g. 29) of a defined volume (e.g. 3375 mL), and the lifetime after reconstitution (e.g. -
Page 18: Water Pump Flowmeter Calibration
While the unit is dispensing water, the “Prime” LED will blink green. Once completed the user can stop the priming process by pressing [PRIME], else the pump will automatically stop after a few seconds. The user will then be asked whether to continue the priming process or to press the [-] button to move on to the next step. -
Page 19: Reconstitution Of The Media Bag Concentrated Stock
Make sure that the container has a capacity of at least 750 mL and does not create splashes as that may impact the measured volume. The water from calibration steps 3 and 4 will be warm. Strictly follow instructions on the screen. Failure to do so may affect system performance. - Page 20 The user is asked to confirm filling to begin by pressing [+]. This will start the water pump and turn on the heaters to reconstitute the media with preheated water. While the media bag is filled, the “Fill” LED is blinking green and the remaining filling volume is displayed.
-
Page 21: Calibration Of The Peristaltic Pump
Do not confirm dissolution if any undissolved media remains, as this could lead to media of a wrong concentration being dispensed. The “Filter”, “Prime”, “Bag”, and ”Fill” LEDs are all solid green at this stage to indicate that the filter is primed and the media bag stock is properly reconstituted. -
Page 22: Water Pump Calibration Status Check
By pressing [MEDIA], the “Media” LED will blink green and a volume of about 20 mL be dispensed into the tared container. When the “ml” LED is flashing green, the user is prompted to enter the volume dispensed (measured by weighing the container after dispensing) using the [+] and [-] buttons and the [DECIMAL] button to select the digit to be changed. -
Page 23: Routine Usage
Routine usage Definition of the dispensing parameters The system dispenses media by mixing pre-warmed water with concentrated media from the media bag stock. Several parameters can be adjusted on the instrument depending on the culture media type and the application and are displayed on the screen when the system is ready to dispense: Display Description... -
Page 24: Using A Preset Program
Using a preset program Four different preset programs are pre-installed in the instrument. By factory setting, the default presets are: • Preset #1: 90 mL, 1 x concentration, no heating, priority to speed (2 L/min) • Preset #2: 100 mL, 1 x concentration, no heating, priority to speed (2 L/min) •... -
Page 25: Customizing Parameters
Customizing parameters Dispensing parameters (from preset or scanned data matrix) can be modified anytime that the instrument is not dispensing. To modify the volume, temperature or concentration, the user can select the parameter to be modified by pressing either [ml], [°C] or [X:1]. The corresponding LED will be blinking in green to indicate editing mode. -
Page 26: Dispensing Water
Press [MEDIA] to dispense media according to the displayed parameters of your sample. The system will determine the volume of concentrated media and the volume of water to be dispensed to achieve the determined final volume at the final concentration. During the dispensing step, the “Media”... -
Page 27: Storing Bag With Reconstituted Media For Later Usage
Storing bag with reconstituted media for later usage It is possible to remove a fully reconstituted media bag with its filter set connected for later usage (e.g. when several bags are prepared in advance, or when the bag needs to be removed for cleaning the instrument). Before disconnecting the media bag and filter from 2. -
Page 28: Option To Pre-Heat In Priority-To-Temperature Mode
A real-time estimate of the dispensed media temperature is indicated on the display while dispensing. When no heating is required the system will automatically be in flow rate priority mode. Option to pre-heat in priority-to-temperature mode In the priority-to-temperature mode, the system will request to perform a pre-heating step in case the conditions do not achieve the requested temperature (±2 °C). -
Page 29: Tracking Consumables Usage
Tracking consumables usage The ReadyStream system can track several ® parameters, including the volume of water filtered by the filter set and the volume of media dispensed from the reconstituted bag, as well as the lifespan of both consumables. The user can access this information by scanning the data matrix on the consumables’... -
Page 30: Common Test Data Matrices
Common test data matrices The following data matrices can be scanned to configure the instrument in routine dispensing. Follow instructions on page 25 on how to modify the parameters and on how to store them as preset on the system. Custom data matrices can also be generated as described in the application sheet “ReadyStream ®... - Page 31 The following reagent is recommended for internal cleaning: Reagent Supplier Quaternary ammonium: Benzalkonium chloride (between 0.25–0.5%) Poly(hexamethylene biguanide) hydrochloride Contact (between 0.1–0.25%) our local Quaternary ammonium : Benzalkonium chloride technical (between 0.05%-0.1%), tetrasodium ethylene diamine service tetraacetate (between 50-500ppm), N-(3-aminopropyl)- N-dodecylpropane-1,3-diamine (between 50-150ppm) Isopropanol and ethanol should not be used for internal flow path cleaning.
- Page 32 Fill the bottle with at least 500 mL of sanitizer. The screen displays the number of sanitizer recirculation cycles and the waiting time between each. The “Water” LED flashes orange and the user is prompted to press [WATER] to start the sanitization process. Press [WATER] to start sanitization.
-
Page 33: Error Messages
Error messages During device operation, errors of three types may be displayed: • Critical Error • Error • Warning If a Critical Error is raised, the device will immediately shutdown and display a message on the LCD prompting the user to press the [On/Off] button. When the user presses the [On/Off] button, the device will reboot. -
Page 34: Troubleshooting
Troubleshooting Issue Proposed solution Instrument keeps When starting the instrument for the first time, when tubing are full of air, or when using a requesting to perform new filter, it may be needed to perform more than 5 priming to remove all air bubbles and pre-heating vent the filter. -
Page 35: Standard Product Warranty
For more information, please visit SigmaAldrich.com for up-to-date worldwide contact information © 2021 Merck KGaA, Darmstadt, Germany and/or its affiliates. All Rights Reserved. Merck, the vibrant M, Millipore, Lit No. MK_UG5961EN Ver.2 Sigma-Aldrich, and ReadyStream are trademarks of Merck KGaA, Darmstadt, Germany or its affiliates. All other trademarks 2020 - 31385 are the property of their respective owners.
Need help?
Do you have a question about the Millipore ReadyStream and is the answer not in the manual?
Questions and answers