
Subscribe to Our Youtube Channel
Related Manuals for Merck DiluCult


Summary of Contents for Merck DiluCult
- Page 1 User Guide DiluCult and DiluCult ™ ™ instruments The life science business of Merck operates as MilliporeSigma in the US and Canada. sigmaaldrich.com...
-
Page 2: Table Of Contents
The information in this document is subject to change without notice and should not be construed as a commitment by Merck KGaA, Darmstadt, Germany. Merck KGaA, Darmstadt, Germany assumes no responsibility for any errors that may appear in this document. This manual is believed to be complete and accurate at the time of publication. -
Page 3: Introduction
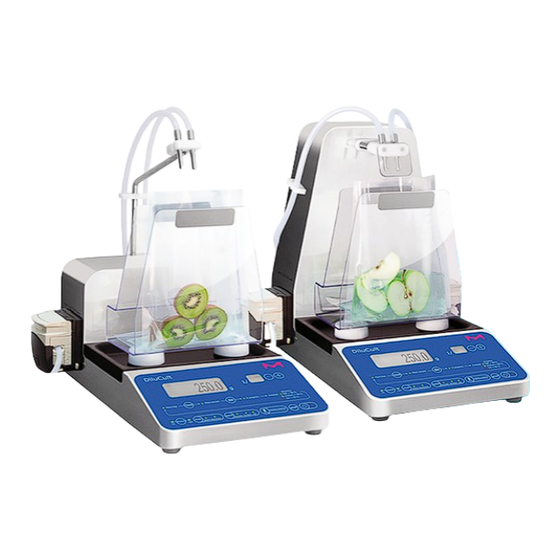
Introduction System Overview DiluCult™ and DiluCult™ 2 dilutor instruments are designed to facilitate work in a microbiological safety cabinet. They are low in height and have a removable drip tray. Part Numbers Model Cat. No. DiluCult™ Instrument 5622900001 DiluCult™ 2 Instrument... - Page 4 Specifications Category DiluCult™ Instrument DiluCult™ 2 Instrument Cat. No. 5622900001 5623350001 Weighing range 0.1 g to 3,000 g 0.1 g to 5,000 g Weighing accuracy 0 to 100 g: ± 0.05 g 0 to 100 g: ± 0.05 g 100 g to 3,000 g: ± 0.1% 100 g to 5,000 g: ±...
-
Page 5: System Components
System Components DiluCult™ 2 Instrument DiluCult™ Instrument Front Front Fixed dispensing arm Nozzle holder Nozzle holder Robotic arm Protecting plate for nozzle Tubing holder Tubing holder Bag holder Bag holder Removable drip tray Removable drip tray Back Back Jack output... -
Page 6: Setting Up The Instrument
Note: A flat, stable, horizontal, vibration-free surface is necessary for the accuracy of the weighing platform. Installing the Fixed Arm (DiluCult™ Instrument Only) Install the fixed arm at the back of the instrument. Use the Allen wrench and two screws provided. - Page 7 Installing the Bag Holder Clip the bag holder into the two holes in the base of the instrument. For the DiluCult™ 2 instrument only, also clip on the magnetized nozzle protector. DiluCult™ Instrument DiluCult™ 2 Instrument Nozzle protector To remove the bag holder, tilt it forward and then lift it up.
- Page 8 Installing the Booster Kit (Optional) The booster kit is composed of a pump and 6. Ensure that the rollers of the main pump and a pump extension. pump extension are not aligned. They should be staggered in relation to each other: To insert the pump extension between the pump and the pump holder: Correct alignment...
- Page 9 Installing the Distribution Assembly 1. Place the tube weight at the bottom of the bottle and screw the GL45 cap on the top. 2. Install the tubing. The direction of flow is indicated by the arrows on the housing. 3. For tubing with an internal diameter smaller than 6.4 mm (delivered as standard), see Adjusting the Pump and Inserting the Tubing (page 10).
- Page 10 Adjusting the Pump and Inserting the Tubing Note: Make sure tubing is not pinched. This can 1. The factory setting for tubing diameter is 6.4 mm. To change the setting, turn the button on each cause the tube to be pierced. side of the pump to obtain the right setting.
-
Page 11: Operating The Instrument
The digital display/control panel consists of: instrument, indicating that it is ready to function. • 10 action keys The arm of the DiluCult™ 2 instrument is initialized. • 14 control LEDs that indicate the current status Ensuring the Accuracy of the process and the result of the dilution/ distribution process. -
Page 12: Dilution
– + indicating the accuracy with a color code. The dilution/distribution mode, the selected • The robotic arm of the DiluCult™ 2 instrument pump, the dilution rate, and the chosen speed moves back. remain in the instrument’s memory even after the •... -
Page 13: Distribution
This guarantees an accuracy greater • The robotic arm of the DiluCult™ 2 instrument than 98%. moves back. The dilution/distribution mode, the selected pump,... -
Page 14: Calibrating The Instrument
Mode dilution distribution Downloading the Software button. Two beeps sound, and the “Dilution” LED lights. 8. Connect the DiluCult™ instrument to a computer with the supplied USB cable. 2. Press and hold the button for 2 seconds. Calibration: instructions at the back of the unit 500g “0.00 g”... -
Page 15: Using The Software
Using the Software To create a record of dilution and distribution processes, Field Description launch either dilution or distribution on the instrument. Sample number Entered by the user using the computer The following screen displays: keyboard or the barcode reader. Operator name Entered by the user using the computer keyboard or the barcode reader. -
Page 16: Using The Function Buttons
• Replace the silicone tubing whenever the tubing is not air-tight or becomes sticky or stiff. • Every 20 autoclavings, replace the air filter. • To rinse the tubing using the DiluCult™ instrument: To save the process data in a file, click the button. -
Page 17: Replacing The Pump Head
Replacing the Pump Head Cleaning the Nozzle Holder (DiluCult™ 2 Instrument Only) Peristaltic pump heads have been tested to undergo approximately 10,000 openings. The life expectancy of 1. Switch the instrument to standby mode by pressing a pump head depends on use and handling conditions. -
Page 18: Error Messages
Replace the sample and start the dilution again. low (< 0.5 g) or too high (the total weight after dilution should not exceed the weight capacity of the DiluCult™ instrument). Err 3 The liquid does not flow. Ensure that the tubing is correctly placed in the pump and nothing is preventing the liquid from flowing in the tubing. -
Page 19: Standard Product Warranty
The computer does not display Ensure that the DiluCult™ instrument is connected to the USB cable. Disconnect and then dilution or dispensing reports. reconnect the cable and ensure that the computer makes a sound every time. If the computer does not have ability to make sounds after the connection, check in the list displayed by the device manager that a new device has been added. - Page 20 Germany sigmaaldrich.com/dilutionpreparation The vibrant M, Merck, Millipore, Sigma-Aldrich, and DiluCult are trademarks of Merck KGaA, Darmstadt, Germany or its affiliates. All other Lit. No. MK_UG05436EN trademarks are the property of their respective owners. Detailed information on trademarks is available via publicly accessible resources.
Need help?
Do you have a question about the DiluCult and is the answer not in the manual?
Questions and answers