Advertisement
Quick Links
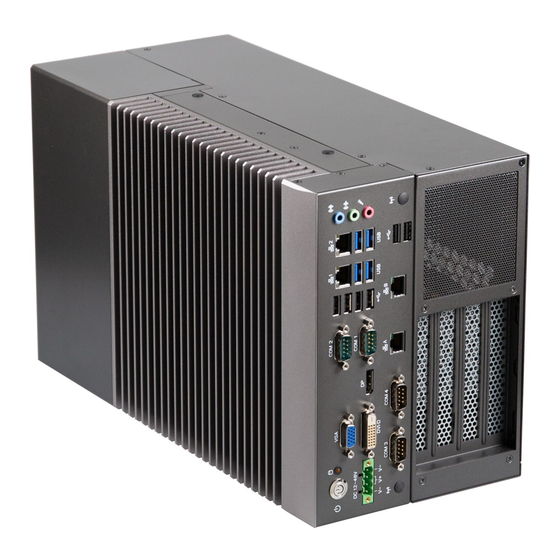
QBiX-JMB-CMLA47EHG-B1
Industrial System with Intel® Q470E Chipset,
Support for Intel® 10th Gen. Core™ i Processor
Startup Manual
Packing List
Before you begin installing your card, please make
sure that the following items have been shipped:
For Main system : 9BQJQ47EAMR-SI
1. Terminal Blocks Male Plug x 1 (P/
N: 25IO0-2ESDV0-D2R)
2. Screw M3x4L x 16 (P/N : 25984G-1C014-S00)
*
Quantity of the HDD screws in the accessory kit may decreased based on
actual HDD assemble quantity.
For Expansion slot kit : 6BQJH310BPR-SI
1. Power Cable #18 350mm x 2 (P/N: 25CRI-35030I-
S9R)
2. Screw #6-32x4L x16 (P/N: 25KS2-13004F-S0R)
Dimension
GIGAIPC reserves the right to modify or revise the content at anytime without prior notice.
Caution: DANGER OF EXPLOSION
IF BATTERY IS INCORRECTLY
REPLACED. REPLACE ONLY WITH THE
SAME OR EQUIVALENT TYPE RECOMMENDED
BY THE MANUFACTURER, DISCARD USED BATTERIES
ACCORDING TO THE MANUFACTURER'S
INSTRUCTIONS.
Specifications
Dimension
System Size: 224W x 368D x 166.3H(mm) - Discrete
GFX support (Optional)
CPU
Support for 10th Generation Intel® Core™
i9/i7/i5/i3, Pentium® and Celeron® processors in
the LGA1200 package, TDP under 65W
Chipset
Intel® Q470E Express Chipset
Memory
2 x DDR4 SO-DIMM sockets supporting up to 64
GB,
Dual channel DDR4 3200 MHz
Ethernet
1 x GbE LAN Port (Intel® I219V)
3 x GbE LAN Ports (Intel® I211AT)
Graphic
Integrated Graphics Processor - Intel® HD Graphics
support
support:
1 x DVI-D port, supporting a maximum resolution
of 1920x1080 @60Hz
1 x D-Sub port, supporting a maximum resolution
of 1920x1200 @60Hz
1 x DP port, supporting a maximum resolution of
4096x2160 @60Hz
(3 independent displays output)
Audio
Realtek® Audio Codec
Storage
4 x 2.5" HDD/SSD (SATA 6Gb/s)
Expansion
1 x 2280 M.2 M-Key (PCIe x4 & SATA 6Gb/s)
Slots
1 x 2230 M.2 E-Key
1 x Full-size mini PCIe with SIM slot
1 x PCIe slot -- Discrete riser card support
1
www.gigaipc.com
Advertisement

Related Manuals for GIGAIPC QBiX-JMB-CMLA47EHG-B1


Summary of Contents for GIGAIPC QBiX-JMB-CMLA47EHG-B1
- Page 1 1 x 2280 M.2 M-Key (PCIe x4 & SATA 6Gb/s) Slots 1 x 2230 M.2 E-Key 1 x Full-size mini PCIe with SIM slot 1 x PCIe slot -- Discrete riser card support www.gigaipc.com GIGAIPC reserves the right to modify or revise the content at anytime without prior notice.
- Page 2 (Built in Components: Please contact with your Audio Audio Jacks (Line in, Line out & Mic in) sales representative for more information or e-mailed to : sales@gigaipc.com) www.gigaipc.com GIGAIPC reserves the right to modify or revise the content at anytime without prior notice.
- Page 3 PCIE X16 Slot M2M Slot M2E Slot TPM Connector 4 x SATA 6 Gb/s COM4 2 x DDR4 SO-DIMM Connector sockets COM3 SATA Power Connector www.gigaipc.com GIGAIPC reserves the right to modify or revise the content at anytime without prior notice.
- Page 4 * Below are the possible configurations : code name PCIEX8 PCIEX16 Config. 1 Signal at x16 Config. 2 Signal at x8 Signal at x8 By auto switch www.gigaipc.com GIGAIPC reserves the right to modify or revise the content at anytime without prior notice.
- Page 5 System Dimensions www.gigaipc.com GIGAIPC reserves the right to modify or revise the content at anytime without prior notice.
- Page 6 4. Install 4 screws and memory thermal cover. Note : Thermal pad and memory thermal cover must be fully mated and compacted. 5. Replace the bottom cover and secure with screws. www.gigaipc.com GIGAIPC reserves the right to modify or revise the content at anytime without prior notice.
- Page 7 4. Remove the release paper on the thermal pad. 5. Install 4 screws and M2E thermal cover. 6. Replace the bottom cover and secure with screws. www.gigaipc.com GIGAIPC reserves the right to modify or revise the content at anytime without prior notice.
- Page 8 3. Secure storage with 4 x screws. 4. Assemble SATA cable/power cable and replace storage tray securely with 4 x screws. 5. Replace the bottom cover and secure with screws. www.gigaipc.com GIGAIPC reserves the right to modify or revise the content at anytime without prior notice.
- Page 9 5. Install the 2 screws to securely replace the aluminum heat sink and heat sink paste. 6. Install 4 screws to firmly install storage tray. 7. Replace the bottom cover and secure with screws. www.gigaipc.com GIGAIPC reserves the right to modify or revise the content at anytime without prior notice.
- Page 10 3. Assemble the Mini-PCIe expansion Card (Mini-PCIex1 + USB2.0) or 3G/4G SIM Card in SIM Slot. 4. Install 4 screws to firmly install strorage tray. 5. Replace the bottom cover and secure with screws. www.gigaipc.com GIGAIPC reserves the right to modify or revise the content at anytime without prior notice.
- Page 11 3. Loosen 4 screws on the system fan side of Expansion PCIE Slot Chassis to seperate into 2 parts as below A & B parts. (refer Figure 5 and 6) www.gigaipc.com GIGAIPC reserves the right to modify or revise the content at anytime without prior notice.
- Page 12 NOTE 3 : The graphic card model uses on above picture (refer Figure 11) is for reference only. www.gigaipc.com GIGAIPC reserves the right to modify or revise the content at anytime without prior notice.
- Page 13 8. Reinstall the cover back, and please be careful for the cables that may be harmed by the cover. (refer Figure 12) 9. Assemble 10 screws (Torsion : 4 - 5 kgf.cm). (refer Figure 13) www.gigaipc.com GIGAIPC reserves the right to modify or revise the content at anytime without prior notice.
- Page 14 4. Disassemble the graphic card from the PCIe slot. (refer Figure 4) NOTE 1 : The graphic card model in this page is for reference only. www.gigaipc.com GIGAIPC reserves the right to modify or revise the content at anytime without prior notice.
- Page 15 17. RESTRICTED ACCESS AREA: The equipment should only be installed in a Restricted Access Area. 18. DISCLAIMER: This set of instructions is given according to IEC 704-1. GIGAIPC disclaims all responsibility for the accuracy of any statements contained here in.
- Page 16 Decrease the numeric value or make changes – General Help Previous Values Load Optimized Defaults Settings Save changes & Exit the BIOS Setup program Exit the BIOS Setup program www.gigaipc.com GIGAIPC reserves the right to modify or revise the content at anytime without prior notice.
- Page 17 (Format : Week - Month - Day - Year) Set the time for the system System Time (Format : Hour - Minute - Second) www.gigaipc.com GIGAIPC reserves the right to modify or revise the content at anytime without prior notice.
- Page 18 The Advanced menu is to configure the functions of hardware settings through submenu. Use arrow keys to move among the items, and press <Enter> to access into the related submenu. www.gigaipc.com GIGAIPC reserves the right to modify or revise the content at anytime without prior notice.
- Page 19 PTT : Internal TPM (Default setting) TPM Device dTPM : External TPM (When using External TPM module or having TPM Selection chip on MB) www.gigaipc.com GIGAIPC reserves the right to modify or revise the content at anytime without prior notice.
- Page 20 Disabled : Disables TPM feature None : No execution will be conducted (Default setting) Pending operation TPM clear : Set to clear data on TPM www.gigaipc.com GIGAIPC reserves the right to modify or revise the content at anytime without prior notice.
- Page 21 Disabled : if Disabled, displays no configuration for the serial port Device settings : Display the specified Serial Port base I/O address and IRQ www.gigaipc.com GIGAIPC reserves the right to modify or revise the content at anytime without prior notice.
- Page 22 Shows current System fan 2 Speed for the extend kit of the system Speed (This numerical value will shows only if you add the extend kit on the system) www.gigaipc.com GIGAIPC reserves the right to modify or revise the content at anytime without prior notice.
- Page 23 Disabled : Disables system to wake on a specific time (Default setting) from S5 Fixed Time : Enables system to wake on a specific time (Format : hr : min : sec) www.gigaipc.com GIGAIPC reserves the right to modify or revise the content at anytime without prior notice.
- Page 24 Disabled : Disables CPU P states function (Default setting) To optimize CPU performance. Optimize Performance Enabled : Enables optimize performance function Disabled : Disables optimize performance function (Default setting) www.gigaipc.com GIGAIPC reserves the right to modify or revise the content at anytime without prior notice.
- Page 25 M.2 SSD information Serial ATA Port 0 Serial ATA Port 1 shows 2.5" SATA HDD/SSD information Serial ATA Port 3 Serial ATA Port 4 www.gigaipc.com GIGAIPC reserves the right to modify or revise the content at anytime without prior notice.
- Page 26 Enabled : Enables Ipv4 PXE Support When Network stack is enabled : Ipv6 PXE Support Disabled : Disables Ipv6 PXE Support Enabled : Enables Ipv6 PXE Support www.gigaipc.com GIGAIPC reserves the right to modify or revise the content at anytime without prior notice.
- Page 27 2.8 NVMe Configuration www.gigaipc.com GIGAIPC reserves the right to modify or revise the content at anytime without prior notice.
- Page 28 2.9 Offboard SATA Controller Configuration www.gigaipc.com GIGAIPC reserves the right to modify or revise the content at anytime without prior notice.
- Page 29 Disabled : Disables XHCI Hand-off function Enable/Disable BIOS Lock function BIOS Lock Enabled : Enables BIOS Lock function (Default setting) Disabled : Disabled BIOS Lock funtion www.gigaipc.com GIGAIPC reserves the right to modify or revise the content at anytime without prior notice.
- Page 30 To set up User's password User Password Minimum length : 3 Maximum length : 20 Secure Boot Press <Enter> to configure the advanced items www.gigaipc.com GIGAIPC reserves the right to modify or revise the content at anytime without prior notice.
- Page 31 No : Cancel to setup mode Enables expert users to modify Secure boot policy variables without full authentication Management Press <Enter> to configure the advanced items www.gigaipc.com GIGAIPC reserves the right to modify or revise the content at anytime without prior notice.
- Page 32 Key Exchange Keys Authorized Signatures These items allows you to enroll factory defaults or load Certificates from a file. Forbidden Signatures Authorized TimeStamps OsRecovery Signatures www.gigaipc.com GIGAIPC reserves the right to modify or revise the content at anytime without prior notice.
- Page 33 Disabled : Disables Full screen LOGO Show on POST screen Boot Option #1 Shows the information of the storage that be installed in the system Boot Option #2 Choose/set the boot priority www.gigaipc.com GIGAIPC reserves the right to modify or revise the content at anytime without prior notice.
- Page 34 Enable/Disable Me FW image re-flash function Me FW Image Enabled : Enables Me FW image re-flash function Re-Flash Disabled : Disables Me FW image re-flash function (Default setting) www.gigaipc.com GIGAIPC reserves the right to modify or revise the content at anytime without prior notice.
Need help?
Do you have a question about the QBiX-JMB-CMLA47EHG-B1 and is the answer not in the manual?
Questions and answers