Table of Contents
Advertisement
Quick Links
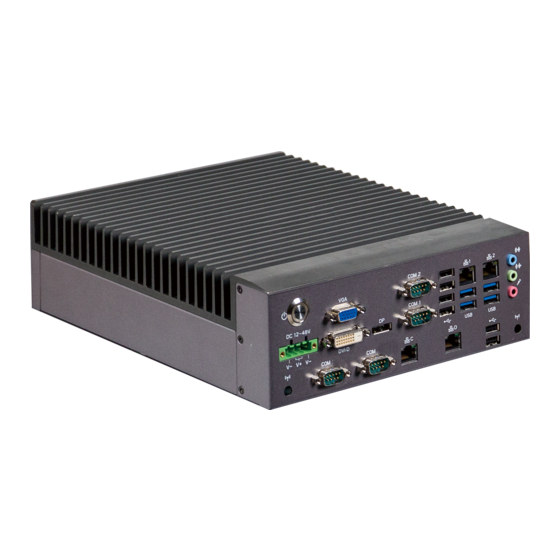
QBiX-JMB-CMLA47EH-A1
Industrial Fanless System with Intel® Q470E Chipset,
Support for Intel® 10th Gen. Core™ i Processor
Startup Manual
Packing List
Before you begin installing your card, please make
sure that the following items have been shipped:
1. Screw HDD x 20 pcs (25984G-1C014-S00)
2. 4-pin Terminal Blocks Male Plug x 1 pcs
(25IO0-2ESDV0-D2R)
Dimension
32.0
77.7
GIGAIPC reserves the right to modify or revise the content at anytime without prior notice.
256.1
224.1
264.3
Caution: DANGER OF EXPLOSION IF
BATTERY IS INCORRECTLY
REPLACED. REPLACE ONLY WITH THE
SAME OR EQUIVALENT TYPE RECOMMENDED
BY THE MANUFACTURER, DISCARD
USED BATTERIES
ACCORDING TO THE MANUFACTURER'S
INSTRUCTIONS.
Specifications
Dimension
System Size: 224W x 256.1D x 77.7H(mm)
CPU
Support for 10th Generation Intel® Core™
i7/i5/i3, Pentium® and Celeron® processors
in the LGA1200 package, TDP under 65W
Chipset
Intel® Q470E Express Chipset
Memory
2 x DDR4 SO-DIMM sockets supporting up to
64 GB,
Dual channel DDR4 3200 MHz
Ethernet
1 x GbE LAN Port (Intel® I219V)
3 x GbE LAN Ports (Intel® I211AT)
Graphic
Integrated Graphics Processor - Intel® HD
support
Graphics support:
1 x DVI-D port, supporting a maximum
resolution of 1920x1080 @60Hz
1 x D-Sub port, supporting a maximum
resolution of 1920x1200 @60Hz
1 x DP port, supporting a maximum resolution
of 4096x2160 @60Hz
3 independent displays output
Audio
Realtek® Audio Codec
Storage
4 x 2.5" HDD/SSD (SATA 6Gb/s)
Expansion
1 x 2280 M.2 M-Key (PCIe x4, SATA 6Gb/s)
Slots
1 x 2230 M.2 E-Key (WiFi/BT)
1 x Full-size Mini PCIe with SIM slot
1
www.gigaipc.com
Advertisement
Table of Contents

Related Manuals for GIGAIPC QBiX-JMB-CMLA47EH-A1


Summary of Contents for GIGAIPC QBiX-JMB-CMLA47EH-A1
- Page 1 1 x 2280 M.2 M-Key (PCIe x4, SATA 6Gb/s) Slots 1 x 2230 M.2 E-Key (WiFi/BT) 1 x Full-size Mini PCIe with SIM slot www.gigaipc.com GIGAIPC reserves the right to modify or revise the content at anytime without prior notice.
-
Page 2: Jumpers And Connectors
Intel® I211AT LAN B Intel® I211AT Power and Storage Device Status LED DC-12-48V Power connector Audio Audio Jacks (Line in, Line out & Mic in) www.gigaipc.com GIGAIPC reserves the right to modify or revise the content at anytime without prior notice. -
Page 3: Internal I/O Connectors
PCIE X16 Slot M2M Slot M2E Slot TPM Connector 4 x SATA 6 Gb/s COM4 2 x DDR4 SO-DIMM Connector sockets COM3 SATA Power Connector www.gigaipc.com GIGAIPC reserves the right to modify or revise the content at anytime without prior notice. -
Page 4: Memory Installation
4. Install 4 screws and memory thermal cover. Note : Thermal pad and memory thermal cover must be fully mated and compacted. 5. Replace the bottom cover and secure with screws. www.gigaipc.com GIGAIPC reserves the right to modify or revise the content at anytime without prior notice. - Page 5 4. Remove the release paper on the thermal pad. 5. Install 4 screws and M2E thermal cover. 6. Replace the bottom cover and secure with screws. www.gigaipc.com GIGAIPC reserves the right to modify or revise the content at anytime without prior notice.
- Page 6 3. Secure storage with 4 x screws. 4. Assemble SATA cable/power cable and replace storage tray securely with 4 x screws. 5. Replace the bottom cover and secure with screws. www.gigaipc.com GIGAIPC reserves the right to modify or revise the content at anytime without prior notice.
- Page 7 5. Install the 2 screws to securely replace the aluminum heat sink and heat sink paste. 6. Install 4 screws to firmly install the hard disk storage aluminum sheet 7. Replace the bottom cover and secure with screws. www.gigaipc.com GIGAIPC reserves the right to modify or revise the content at anytime without prior notice.
- Page 8 3. Assemble the Mini-PCIe expansion Card (Mini-PCIex1 + USB2.0) or 3G/4G SIM Card in SIM Slot. 4. Install 4 screws to firmly install the hard disk storage aluminum sheet 5. Replace the bottom cover and secure with screws. www.gigaipc.com GIGAIPC reserves the right to modify or revise the content at anytime without prior notice.
-
Page 9: Safety Instructions
17. RESTRICTED ACCESS AREA: The equipment should only be installed in a Restricted Access Area. 18. DISCLAIMER: This set of instructions is given according to IEC 704-1. GIGAIPC disclaims all responsibility for the accuracy of any statements contained here in.
Need help?
Do you have a question about the QBiX-JMB-CMLA47EH-A1 and is the answer not in the manual?
Questions and answers