Table of Contents
Advertisement
Quick Links
Advertisement
Table of Contents

Related Manuals for Thermo Scientific NICOLET iS10


Summary of Contents for Thermo Scientific NICOLET iS10
- Page 2 The information in this publication is provided for reference only. All information contained in this publication is believed to be correct and complete. Thermo Fisher Scientific shall not be liable for errors contained herein nor for incidental or consequential damages in connection with the furnishing, performance or use of this material.
-
Page 3: Table Of Contents
Contents Getting Started..................1 What’s in the box? ................2 What are the features?..............3 What’s on the rear panel? ............7 Collecting a Spectrum ................8 How do I collect a spectrum?............8 Taking the Next Steps................16 What options are available?............16 How do I check performance? ............19 How do I maintain my spectrometer? ..........20 Where is the documentation?............21 What if I have a question?..............22... - Page 4 This page intentionally left blank...
-
Page 5: Getting Started
Getting Started Congratulations on your purchase! The Thermo Scientific Nicolet™ iS™10 spectrometer is designed with integrated validation features, a powerful software suite, and many other features that make it easy for you to collect data and get the answers you need. -
Page 6: What's In The Box
Your spectrometer will be unpacked and installed by one of our service What’s representatives, but if necessary, you can unpack the shipping box in the box? before the installation. The following drawing shows the typical contents of the box. Notice To avoid permanent damage to the optical components in your spectrometer, do not open anything, especially the plastic bag that protects the spectrometer, until the entire shipping box has come to... -
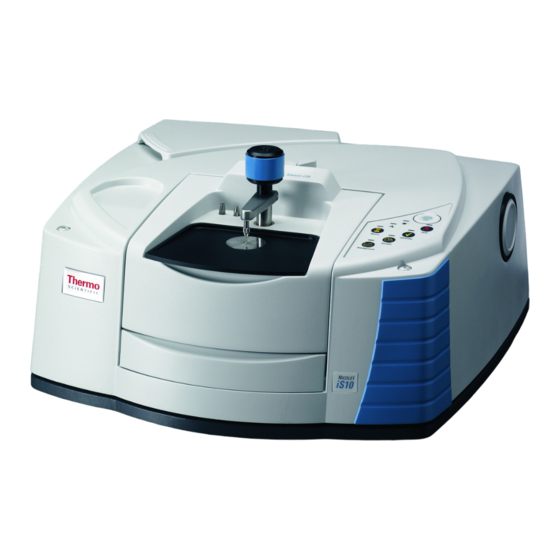
Page 7: What Are The Features
The following drawing shows the main features of your spectrometer. What are After the drawing, you will find descriptions of these features. For the features? additional information, please see the spectrometer help available through the Help menu in the OMNIC™ software. External beam port (on right side) Source... - Page 8 ➁ The humidity indicator monitors the level of humidity inside the spectrometer. The status is indicated by the color of the indicator: BLUE LIGHT BLUE PINK Good Change desiccant Call service ➂ The external beam port on the right side of the spectrometer allows the spectrometer to be connected to an FT-IR microscope or a Nicolet iZ10 module.
- Page 9 The Smart OMNI-Transmission Accessory: Use the transmission accessory to collect data from samples held in any of the typical transmission cells or holders, including: • Standard liquid cells • Film holders • KBr pellet holders • ST-IR cards • Mineral oil mulls •...
- Page 10 ➅ Your spectrometer is protected from environmental humidity and other chemical vapors by two windows. These windows isolate the optics in the spectrometer and are coated to improve their resistance to water vapor. You still, however, need to be careful when cleaning your spectrometer to avoid damaging the optics or the windows.
-
Page 11: What's On The Rear Panel
The following drawing shows the connectors that are on the rear panel What’s on of your spectrometer: the rear panel? Purge Auxiliary USB 2.0 Accessory Power connector connector port connector supply port • The USB 2.0 port is where you connect the system computer. •... -
Page 12: Collecting A Spectrum
Collecting a Spectrum To collect a sample spectrum, you must first collect a reference (or background) spectrum that shows the response of the system when no sample is present. Once you have the background spectrum, you can collect data with a sample in place. The sample data is then ratioed with the background data, which leaves only the signals from the sample. - Page 13 Next, make sure the sampling accessory is properly installed in the sample compartment: If you have… You should… An ATR accessory Make sure the pressure device, if included, is not in contact with the crystal. Clean the crystal with a soft cloth and, if needed, an appropriate solvent.
- Page 14 Now, press the Background button on the operations panel to collect a background spectrum: Background Getting Started with an iS10 Spectrometer Thermo Fisher Scientific...
- Page 15 Next, install a sample: If you have… You should… An ATR accessory Place the sample on the crystal and apply pressure. A good first sample might be a credit card, an old CD, or a piece of plastic. For liquids, no pressure is needed. The Smart OMNI-Transmission Slide a sample into place.
- Page 16 Now, press the Sample button on the operations panel to collect a sample spectrum. Sample When the data collection is complete, the sample spectrum will be displayed. The following is an example of a typical sample spectrum. Getting Started with an iS10 Spectrometer Thermo Fisher Scientific...
- Page 17 Finally, you can verify, identify, and quantify your data: If you want to… You can… Verify the purity or quality Use the OMNIC QCheck tool. of your sample. Thermo Fisher Scientific Getting Started with an iS10 Spectrometer...
- Page 18 If you want to… You can… Identify an unknown material. Use the OMNIC Search feature or the Specta software features. Getting Started with an iS10 Spectrometer Thermo Fisher Scientific...
- Page 19 If you want to… You can… Quantify the amount of a Use the features in the component in your sample. TQ Analyst™ software. Thermo Fisher Scientific Getting Started with an iS10 Spectrometer...
-
Page 20: Taking The Next Steps
Taking the Next Steps Now that you are familiar with your spectrometer and have collected a sample spectrum, you’re ready to explore other options and learn where you can find additional information. Several accessories, or instruments, that expand what you can do with What options your spectrometer are available. - Page 21 This accessory or instrument… Does this… The Micro Well Plate accessory Allows higher throughput screening applications in either transmission or reflection modes. A Near-IR Integrating Sphere Uses a built-in detector to quickly identify materials contained in vials or blister packs. A liquid autosampler Allows you to set up automated processes to analyze fluid...
- Page 22 This accessory or instrument… Does this… A bar code reader Allows SOP implementation, error free data entry and no- touch data collection. (A macro that supports this accessory is provided with your spectrometer.) You can use any reader that is ASCII-compatible. The following software is also available for your spectrometer: •...
-
Page 23: How Do I Check Performance
The performance of your spectrometer is continuously monitored by How do I check the System Performance Verification (SPV) features in OMNIC. For performance? detailed information about using SPV, open OMNIC Help Topics from the Help menu in OMNIC. Find “System Performance Verification”... -
Page 24: How Do I Maintain My Spectrometer
Note The standard wheel that SPV uses is shown below. This wheel contains NIST traceable and NG-11 standards. To keep your spectrometer in good working order, check the desiccant How do I maintain indicator frequently and replace the desiccant canisters as soon as they my spectrometer? become saturated. -
Page 25: Where Is The Documentation
Audit requirements and good practices often make it necessary for you Where is the to keep track of important documentation for your instruments. The documentation? documents listed below are for your spectrometer and are available in either print or PDF format. The following documents are located in your spectrometer documentation binder: •... -
Page 26: What If I Have A Question
In case of emergency, follow the procedures established by your facility. What if I If you have questions or concerns about safety or need assistance with have a question? operation, repairs, or replacement parts, you can contact our sales or service representative in your area or use the information at the beginning of this document to contact us.
Need help?
Do you have a question about the NICOLET iS10 and is the answer not in the manual?
Questions and answers