Table of Contents
Advertisement
Quick Links
AX-GMLAN11-SWC
GM Data Interface
• Provides accessory power (12-volt 10-amp)
• Retains R.A.P. (retained accessory power)
• Provides NAV outputs (parking brake, reverse,
and speed sense)
• Retains chimes
• Retains audio controls on the steering wheel
• Retains OnStar / OE Bluetooth
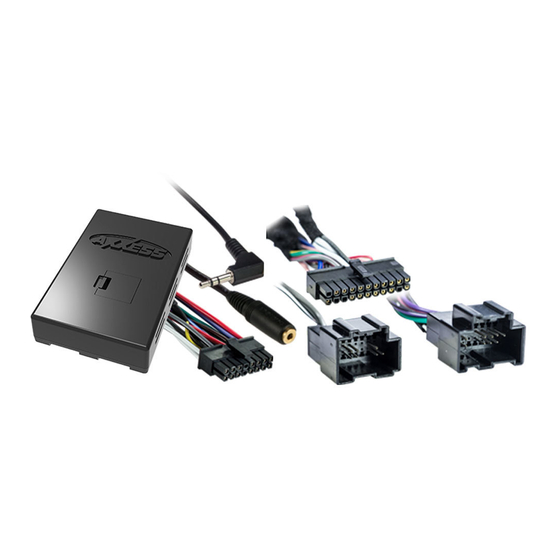
• AX-GMLAN11-SWC interface • AX-GMLAN11-SWC harness
• 16-pin harness with stripped leads
• 4-pin to 4-pin resistor pad harness
• Female 3.5mm connector with stripped leads
CHEVROLET
PONTIAC
Cobalt
2007-2010
G5
HHR
2006-2011
G6 (5th digit of VIN must
Malibu
2008-2012
be a J, K, or L)
®
Axxess Integrate
Installation instructions for part AX-GMLAN11-SWC
2006-2012
INTERFACE FEATURES
• Adjustable OnStar level
• Retains the factory AUX-IN jack
• Retains SAT (satellite radio)
• Can be used in non-amplified or amplified models
• Retains balance and fade
• Micro "B" USB updatable
INTERFACE COMPONENTS
APPLICATIONS
PONTIAC (CONT)
2007-2009
G6
2010
Solstice
2006-2009
2009
axxessinterfaces.com
®
Connections to be made ................................................2-4
Installing the AX-GMLAN11-SWC ..................................... 4
Adjusting the AX-GMLAN11-SWC .................................... 5
Extra features ................................................................... 6
Steering wheel control extra settings...........................7-9
TOOLS REQUIRED
• Wire cutter • Crimp tool • Solder gun • Tape
• Connectors (example: butt-connectors, bell caps, etc.)
SATURN
CAUTION!
Aura
2007-2009
especially air bag indicator lights must be connected before cycling
Sky
2007-2009
the ignition. Also, do not remove the factory radio with the key in the
on position, or while the vehicle is running.
•
metraonline.com
Table of Contents
For models without an amplifier .................................. 2
For models with an analog amplifier ........................... 3
3.5mm jack steering wheel control retention ............. 4
L.E.D. feedback ............................................................. 7
Changing radio type ..................................................... 7
Remapping the steering wheel control buttons .......... 8
Resetting the AX-GMLAN11-SWC ................................ 9
All accessories, switches, climate controls panels, and
© COPYRIGHT 2016 METRA ELECTRONICS CORPORATION
Advertisement
Table of Contents

Related Manuals for Axxess AX-GMLAN11-SWC


Summary of Contents for Axxess AX-GMLAN11-SWC
-
Page 1: Table Of Contents
For models with an analog amplifier ......3 3.5mm jack steering wheel control retention ..... 4 INTERFACE FEATURES Installing the AX-GMLAN11-SWC ........4 Initializing and programming the AX-GMLAN11-SWC ..5 • Provides accessory power (12-volt 10-amp) • Adjustable OnStar level Adjusting the AX-GMLAN11-SWC ........5 •... -
Page 2: Connections To Be Made
Attention! This interface will work with models that are either factory amplified, From the AX-GMLAN11-SWC harness to the aftermarket radio: or non-amplified. Please follow the instructions carefully for your model vehicle. • Connect the Black wire to the ground wire. -
Page 3: For Models With An Analog Amplifier
Green, Green/Black, Purple, Purple/Black From the 16-pin harness with stripped leads to the aftermarket radio: From the AX-GMLAN11-SWC harness to the aftermarket radio: • Connect the Red wire to the accessory wire. • Connect the Black wire to the ground wire. -
Page 4: Mm Jack Steering Wheel Control Retention
For the radios listed below, connect the included female 3.5mm connector with stripped leads onto the male 3.5mm SWC jack of the AX-GMLAN11-SWC. Any remaining wires, tape off and disregard : • Connect the AX-GMLAN11-SWC harness to the wiring harness in the vehicle. -
Page 5: Initializing And Programming The Ax-Gmlan11-Swc
• Volume Up • If the vehicle does not come equipped with steering wheel controls, locate the • Seek Up Black/Yellow wire on the AX-GMLAN11-SWC harness. • Volume Up • While OnStar is speaking, tap the Black/Yellow wire to ground. Once the •... -
Page 6: Extra Features
• Listed below are the advanced menu options: • Show Text - Exits menu. • If the vehicle is equipped with AUX-IN or satellite radio, the AX-GMLAN11-SWC can retain these features. • Set Tuning Mode - Allows the user to select tuning by either a preset, or a channel. -
Page 7: Steering Wheel Control Extra Settings
4. Press and hold the Volume-Up button until the L.E.D. goes solid, and then * Note: If the AX-GMLAN11-SWC flashes Red (7) times, and you do not have an Alpine radio release. Repeat this step for the desired radio number you have selected. -
Page 8: Remapping The Steering Wheel Control Buttons
4. Seek-Down/Prev 13. On-Hook * wheel control buttons: 5. Source/Mode 14. Off-Hook * 1. Ensure the AX-GMLAN11-SWC is visible so you can see the L.E.D. flashes to confirm button recognition. 6. Mute 15. Fan-Up * 7. Preset-Up 16. Fan-Down * Tip: Turning the radio off is recommended. -
Page 9: Dual Assignment Instructions (Long Button Press)
Dual assignment legend 1. Not allowed 5. Mode/Source 10. Band 15. Fan-Up * The AX-GMLAN11-SWC has the capability to assign (2) functions to a single button, except Volume-Up and Volume-Down. Follow the steps below to 2. Not allowed 6. ATT/Mute 11. Play/Enter 16. - Page 10 ® AX-GMLAN11-SWC Notes...
- Page 11 ® AX-GMLAN11-SWC Notes...
- Page 12 ® Installation instructions for part AX-GMLAN11-SWC IMPORTANT If you are having difficulties with the installation of this product, please call our Tech Support line at 1-800-253-TECH. Before doing so, look over the instructions a second time, and make sure the installation was performed exactly as the instructions are stated.
Need help?
Do you have a question about the AX-GMLAN11-SWC and is the answer not in the manual?
Questions and answers