Table of Contents
Advertisement
Quick Links
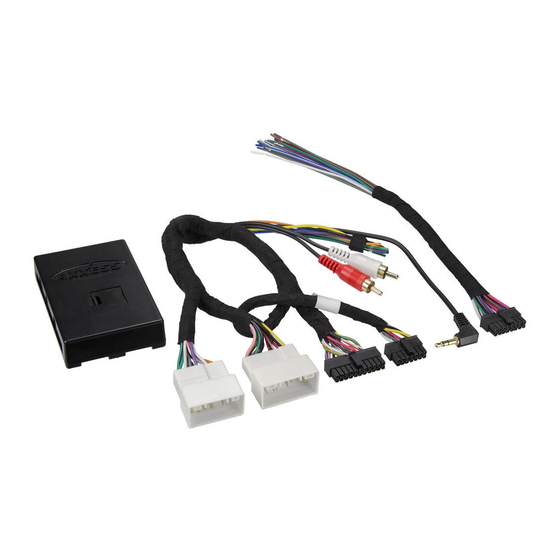
INTERFACE COMPONENTS
• AX-HYKIA1-SWC interface
• AX-HYKIA1-SWC harness
• 16-pin harness with stripped leads
• Female 3.5mm connector with stripped leads
APPLICATIONS
HYUNDAI
Elantra *
2011-2016
Sonata *
Genesis Coupe *
2013-2016
Sonata Hybrid *
Santa Fe *
2013-2016
Tucson *
Santa Fe Sport *
2014-2016
* Without NAV
AxxessInterfaces.com
Hyundai/Kia Data Interface with SWC
Visit
AxxessInterfaces.com
for more detailed information about the product and up-to-date
vehicle specific applications
INTERFACE FEATURES
• Provides NAV outputs (parking brake, reverse, speed sense)
• Retains audio controls on the steering wheel
• Retains BlueLink
• Designed for amplified* and non-amplified models**
• Retains balance and fade†
• Micro-B USB updatable
* Requires the AX-HYKIA-SPDIF (sold separately)
** Bristol Audio Systems not covered
† Non-amplified models only
KIA
2011-2016
Optima *
2011-2015
Optima Hybrid *
2010-2015
Sorento (with UVO) * 2011-2013
© COPYRIGHT 2021 METRA ELECTRONICS CORPORATION
2010-2016
2011-2015
Sorento *
2014-2016
2011-2016
Soul *
2012-2013
Sportage
2011-2016
AX-HYKIA1-SWC
I N S TA L L AT I O N I N S T R U C T I O N S
TABLE OF CONTENTS
Connections ........................................................ 2-4
Installation .............................................................5
Programming .........................................................6
Steering Wheel Control Settings ...................... 7-9
L.E.D. feedback ....................................................5
Changing radio type ...........................................7
Remapping .......................................................7-8
Dual assignment .............................................8-9
Troubleshooting .....................................................9
TOOLS REQUIRED
• Crimping tool and connectors, or solder gun, solder,
and heat shrink • Tape • Wire cutter • Zip ties
ATTENTION: With the key out of the ignition,
disconnect the negative battery terminal
before installing this product. Ensure that all
installation connections are secure before
cycling the ignition to test this product.
NOTE: Refer to the instructions included with
the aftermarket radio.
REV. 9/17/21 INSTAX-HYKIA1-SWC
Advertisement
Table of Contents

Related Manuals for Axxess AX-HYKIA1-SWC


Summary of Contents for Axxess AX-HYKIA1-SWC
-
Page 1: Table Of Contents
• Retains balance and fade† Dual assignment ..........8-9 INTERFACE COMPONENTS • Micro-B USB updatable Troubleshooting .............9 • AX-HYKIA1-SWC interface * Requires the AX-HYKIA-SPDIF (sold separately) • AX-HYKIA1-SWC harness ** Bristol Audio Systems not covered • 16-pin harness with stripped leads TOOLS REQUIRED †... -
Page 2: Connections
NON-AMPLIFIED VEHICLES AUX IN RETENTION USB RETENTION Black - Ground Yellow - Constant Blue - Power antenna Orange - Illumination Blue/Pink - VSS Green - Left Rear (+) Green/Black - Left Rear (-) Purple - Right Rear (+) Purple/Black - Left Rear IMPORTANT! White - Left Front (+) White/Black - Left Front (-) - Page 3 AMPLIFIED VEHICLES WITHOUT NAVIGATION SPDIF AUX IN RETENTION USB RETENTION Black - Ground Yellow - Constant Blue - Power antenna Orange - Illumination Blue/Pink - VSS Green - Left Rear (+) Green/Black - Left Rear (-) Purple - Right Rear (+) Purple/Black - Left Rear IMPORTANT! White - Left Front (+)
- Page 4 AMPLIFIED VEHICLES WITH NAVIGATION SPDIF AUX IN RETENTION USB RETENTION Black - Ground Yellow - Constant Blue - Power antenna Orange - Illumination Blue/Pink - VSS Green - Left Rear (+) Green/Black - Left Rear (-) Purple - Right Rear (+) Purple/Black - Left Rear IMPORTANT! White - Left Front (+)
-
Page 5: Installation
INSTALLATION *Note: If the AX-HYKIA1-SWC flashes Red With the key in the off position: L.E.D. feedback L.E.D. Feedback Legend (7) times, and you do not have an Alpine • Connect the 16-pin harness with Flash Count Radio The (21) Red L.E.D. flashes represent which radio connected to it, that means the stripped leads, and the AX-HYKIA1- Eclipse (type 1) †... -
Page 6: Programming
Green LED Turn the vehicle off then on again to make sure the programming worked. Connect the AX-HYKIA1-SWC harness to the wiring harness in the vehicle. Green & Red LED The L.E.D. will initially turn solid Green, then turn off for several seconds, while it auto detects the radio installed. -
Page 7: Steering Wheel Control Settings
For example, the Seek-Up button can be Changing radio type reprogrammed to be the Mute button. Follow the steps below to remap the steering wheel If the LED flash count does not match the radio in the Radio Legend, then the AX-HYKIA1-SWC control buttons: must be manually programmed: 1. - Page 8 STEERING WHEEL CONTROL SETTINGS (CONT.) Button assignment legend Dual assignment (long button press) The AX-HYKIA1-SWC has the capability to assign (2) functions to a single button, except Volume-Up 1. Volume-Up 10. Band and Volume-Down. Follow the steps below to program the button(s) to the desired setting.
-
Page 9: Dual Assignment
STEERING WHEEL CONTROL SETTINGS TROUBLESHOOTING (CONT.) TROUBLESHOOTING Dual assignment legend Resetting 1. Not allowed 10. Band 1. The Blue reset button is located between the two connectors on the outside of the interface. 2. Press and hold the reset button for 2 seconds, and then let go to reset the interface. 2. - Page 11 REV. 9/17/21 INSTAX-HYKIA1-SWC...
- Page 12 AX-HYKIA1-SWC I N S TA L L AT I O N I N S T R U C T I O N S Having difficulties? We’re here to help. Contact our Tech Support line at: 1-386-257-1187 Or via email at: techsupport@metra-autosound.com...
Need help?
Do you have a question about the AX-HYKIA1-SWC and is the answer not in the manual?
Questions and answers