Advertisement
Quick Links
APPLICATIONS
CHEVROLET
Colorado (1)
2015-2018
Equinox (1)
2018
Malibu (3)
2016-up
Silverado 2500/3500 (2)
2015-2018
• (1) With RPO code I05 or I06 • (2) With RPO code I03, I05, or I06 • (3) With Base model radio, RPO code IP1
The IOA/IOB code, if applicable, can be found in the Service Parts Identification label located:
Glovebox: Canyon/Colorado/Cruze/Equinox/Silverado/Sierra – Rear Compartment Floor: Malibu
AxxessInterfaces.com
GM Data Interface
Visit
AxxessInterfaces.com
vehicle specific applications
INTERFACE FEATURES
• Provides accessory power
(12-volt 10-amp)
• Retains R.A.P. (retained
accessory power)
• Provides NAV outputs (parking
brake, reverse, speed sense)
•
Designed for non-amplified models
• Retains OnStar/OE Bluetooth
Silverado 1500 (2)
2014-2018
Suburban
2015-up
Tahoe
2015-up
© COPYRIGHT 2020 METRA ELECTRONICS CORPORATION
2014-Up
for more detailed information about the product and up-to-date
• Retains all warning chimes
• Adjustable volume for chimes
and OnStar
• Retains the AUX-IN jack
• Prewired AXSWC harness
(AXSWC sold separately)
• Retains balance and fade
• Micro-B USB updatable
GMC
Canyon (1)
2015-2018
Sierra 2500/3500 (2)
2015-2018
Sierra 1500 (2)
2014-2018
Yukon / Yukon XL
AXGMLN-09
I N S TA L L AT I O N I N S T R U C T I O N S
TABLE OF CONTENTS
Connections .........................................................2-3
Installation .............................................................3
Programming .........................................................3
Adjustments ...........................................................4
Troubleshooting .....................................................4
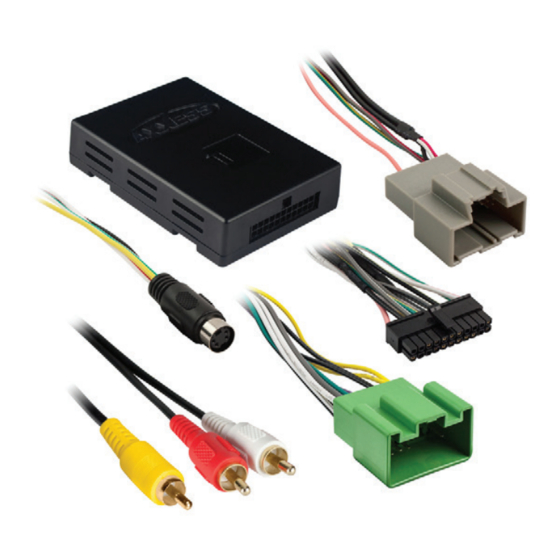
INTERFACE COMPONENTS
• AXGMLN-09 interface • AXGMLN-09 harness
• 16-pin harness with stripped leads
OPTIONAL ACCESSORIES (sold separately)
Extension Harness: AXEXH-GM09
Steering Wheel Control Interface: AXSWC
TOOLS REQUIRED
• Crimping tool and connectors, or solder gun,
solder, and heat shrink • Tape • Wire cutter
• Zip ties • Small flat-blade screwdriver
2015-up
Attention!
Let the vehicle sit with the key
out of the ignition for a few minutes before
removing the factory radio. When testing the
aftermarket equipment, ensure that all factory
equipment is connected before cycling the
key to ignition.
REV. 2/4/20 INSTAXGMLN-09
Advertisement

Related Manuals for Axxess AXGMLN-09


Summary of Contents for Axxess AXGMLN-09
- Page 1 INTERFACE COMPONENTS • Retains R.A.P. (retained and OnStar accessory power) • Retains the AUX-IN jack • AXGMLN-09 interface • AXGMLN-09 harness • Provides NAV outputs (parking • 16-pin harness with stripped leads • Prewired AXSWC harness brake, reverse, speed sense) (AXSWC sold separately) OPTIONAL ACCESSORIES (sold separately) •...
- Page 2 • Disregard the DIN jack, it will not be used in this application. Note: The relay attached to the AXGMLN-09 harness is only for audible turn signal clicks. No extra steps are required to retain this feature, so leave the relay as-is.
- Page 3 3.5mm jack. If it is to be used, please refer to the AXSWC instructions for radio connections 2. If an AXSWC (sold separately) will be used, do not connect it until the AXGMLN-09 is and programming. Disregard the harness that comes with the AXSWC.
- Page 4 2. While OnStar is speaking, press the VOLUME UP or VOLUME DOWN buttons on the steering wheel to raise or lower the OnStar level. 3. If the vehicle does not come equipped with steering wheel controls, find the Black/Yellow wire on the AXGMLN-09 harness.
Need help?
Do you have a question about the AXGMLN-09 and is the answer not in the manual?
Questions and answers