Advertisement
Quick Links
•
Axxess bassknob for AX-DSP
subwoofer control
AX-BASSKNOB
This is an add-on accessory for the AX-DSP. If you are using
the AX-DSP to install an aftermarket subwoofer and would
like quick independent control of the subwoofer gain.
Installation is extremely easy.
• Connect the Orange wire
Oil
the AX-BASSKNOB to the
Orange wire on the AX-DSP 20-pin harness or the
vehicles specific harness that was
purchased.
• Connect the Black wire on the AX-BASSKNOB to a
chassis ground in the
vehicle.
We provide two mounting options for the
AX-BASSKNOB,
there is a detac.h~ble mount so the gain control knob can be
mounted under a dash or in a pocket, also
provided,
a washer
and locking nut so the gain control can be flush
mounted.
Advertisement

Subscribe to Our Youtube Channel
Related Manuals for Axxess AX-BASSKNOB


Summary of Contents for Axxess AX-BASSKNOB
- Page 2 AXDSPX-ETH1 I N S TA L L AT I O N I N S T R U C T I O N S GENERAL MOTORS 2019-UP TABLE OF CONTENTS Connections ............2 ETHERNET DSPX PACKAGE Installation .............3 Visit axxessinterfaces.com for current application list. Troubleshooting .............4 INTERFACE COMPONENTS • AXDSPX-ETH1 interface •...
- Page 3 CONNECTIONS Factory Amp Harness RCA Jacks (sold separately) Gray - Front Right + Purple - Rear Right + Gray/Black - Front Right - Purple/Black - Rear Right - White - Front Left + Green - Rear Left + White/Black - Front Left - Green/Black - Rear Left - Applications Brown/White * - Center +...
- Page 4 INSTALLATION 1. Locate the factory amp (†), unplug all connectors, then remove the amp. 2. Install the AXDSPX-ETH1 harness and make all necessary connections, but leave the amp turn-on wire disconnected. 3. Plug the 8-pin and 16-pin connectors from the AXDSPX-ETH1 harness into the AXDSPX-ETH1 interface.
- Page 5 AXDSPX-ETH1 I N S TA L L AT I O N I N S T R U C T I O N S Having difficulties? We’re here to help. TROUBLESHOOTING Contact our Tech Support line at: 386-257-1187 • If the Red light in the AXDSPX-ETH1 interface is blinking, it is not communicating with the vehicle. Remove the key from the Or via email at: ignition, unplug the connectors from the interface, then inspect all connections made.
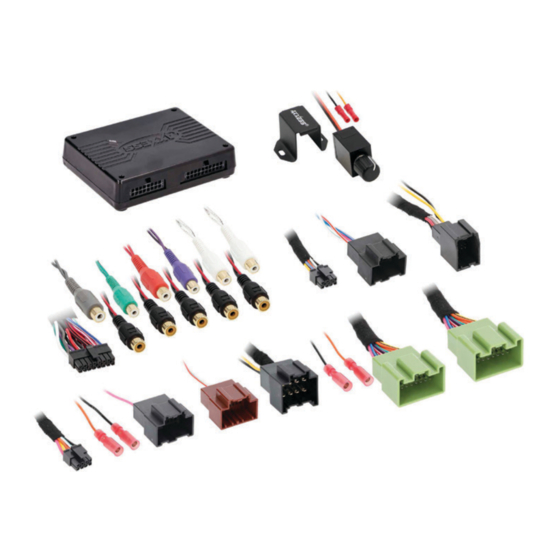
- Page 6 AXDSPX-ETH1 I N T E R FAC E INTERFACE COMPONENTS • AXDSPX-ETH1 interface • AXDSPX-ETH1 harness • LD-DSP-ETH1 • LD-DSP-ETH2 • AXBK-1 • AXDSPX-ETH1 interface harness (male connectors: 8-pin, 16-pin) • Amplifier bypass harness (female connectors: 8-pin black and 20-pin green ) Visit axxessinterfaces.com for current application list.
Need help?
Do you have a question about the AX-BASSKNOB and is the answer not in the manual?
Questions and answers