
Related Manuals for SPRT SP-L51


Summary of Contents for SPRT SP-L51
- Page 1 SPRT ® SP-L51 Portable Thermal Printer User’s Manual VER 1.03 Beijing Spirit Technology Development Co., Ltd www.sprt-printer.com...
-
Page 2: Table Of Contents
CONTENTS NOTICE ......................1 Notice of Safety ..................1 Notice of Using ..................1 Notice of Storing ..................2 Chapter 1 Outer Appearance and Model No............2 1.1 Outer Appearance ................2 1.2 Model No..................... 3 Chapter 2 Characteristic Specification ............. 4 2.1 Printing Specification ................ -
Page 3: Notice
NOTICE Please read this manual carefully before using the printer! Notice of Safety Be sure to use the specified battery and power supply provided by our company. Otherwise it may cause fire, explosion or damage printer, meanwhile, the battery also may be damaged. Don’t put battery into the fire, don’t disassemble or heat the battery, don’t be short circuit, it may cause fire, explosion or damage printer;... -
Page 4: Notice Of Storing
pre-printed black mark is accordant with the printing rule of black mark (please refer to details in Chapter 4.2), otherwise the black mark can not be detected correctly. Be sure to use up the power of the battery before charge up it, as it can ensure the using life of the battery. -
Page 5: Model No
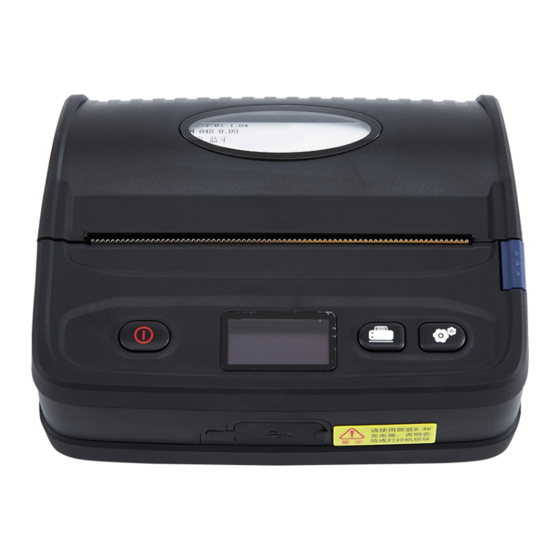
Feed Button Set Key Cover Open Button Lower Case ansparency window Paper Case Cover 1.2 Model No. SP-L51BTDM/SP-L51BTMM Support USB and Bluetooth Interface as default... -
Page 6: Chapter 2 Characteristic Specification
Chapter 2 Characteristic Specification 2.1 Printing Specification ● Printing Method: Thermal line ● Paper Width:111.5mm±0.5mm, 104mm±0.5mm, 79.5mm±0.5mm, 57.5±0.5mm, 44±0.5mm ● Effective Printing Width: 104mm, 100mm, 72mm, 48mm, 37.5mm; ● Resolution: 8dots/mm(203dpi) ● Printing Speed: 80mm/s (thermal paper); 50mm/s (label paper) ●... -
Page 7: Chapter 3 Operation Method
black mark manual). ● Printing Control Command: ESC/POS compatible command set/CPCL command set (Refer to<L51 Printer Command Program Manual >). ● Power Supply: 7.4VDC/2300mAh rechargeable polymer lithium battery. ● Power Alarm: when the battery is low, the battery indicator on LCD blinks ●... - Page 8 mind the direction of the paper roll. (Pic.3&Pic4) 3. Pull out a part of paper and put the end of the paper in the middle of the paper out orifice. 4. Shut down paper case cover and cut off the redundant paper 5.
-
Page 9: Others
3.1.3 Others ● Open and close the door slowly with both hands. ● Abnormal operation:Paper blocking is not allowed at the outlet. ● Placement direction: Hand-held flat printing when printing, to ensure the stability of the paper roll as far as possible. -
Page 10: Paper Feeding (Manual Feeding)
3.2.4 Paper Feeding (Manual Feeding) Under the normal work status and using the thermal receipt paper, press 【 FEED 】 button, the paper feeding begins, and stop when loosen 【FEED】 button. When the printer uses black mark paper and label paper, press 【 FEED 】 button, the printer begins to feed paper and stops over the position of black mark or label spacing. -
Page 11: Battery Charging
parameters setting mode. Press the 【FEED】 button or 【MODE】 button, LCD shows the first item which can be set parameters and the current numerical value. (Refer to Appendix A.) Quitting parameter setting:hold down the 【MODE】 button, press the 【FEED】 buttons, then loosen【MODE】button and【FEED】button. Saving the set parameter and exiting the parameter setting mode. -
Page 12: Printer Parameters Setting
3.3 Printer Parameters Setting Users can set more parameters by using the specified 〈 SP-L51 Setting Tools 〉 software through computer. The setting includes: language、 font、 printing density、 default code page、 Bluetooth device name and password, printing mode etc. About the setting method please refer to the <SP-L51 Setting Tools Software Help>, offered... -
Page 13: Buzzer
Android devices and one IOS device connect printer simultaneously. Notice: 1, When pairing, please make SP-L51 printer switch on. 2. Once the Bluetooth of SP-L51 has paired with the host Bluetooth device successfully, it can’t be paired with other Bluetooth device until it unconnected with the host device. -
Page 14: Lcd Indication
One high one low: power off; Circulation continuous two lows: printer at error status 3.6 LCD indication Turn on the printer, the LCD shows “Loading...”, and shows the relevant information after printer initialization. If printer didn’t receive any data or connect with any device within 5seconds, the display will turn off showing automatically. -
Page 15: Chapter 4 Other Information
Chapter 4 Other Information 4.1 Command Programming Manual <SP-L51 Technical Manual> is a technical manual for engineer to develop printer utility, and users can claim our company for it. 4.2 Description of pre-printed Black Mark If user use pre-printed black mark to locate the receipt, please be sure to abide by the following pre-printed black mark regulation when print the black mark paper. - Page 16 Appendix A Setting introduction: Press【MODE】button to choose setting,when press it once , the set become the next one and it will print the present set value; use 【 FEED】 button to set the set value, when press it once , the set become the next one and it will print the present set value.
- Page 17 Paper sensor sensitivity setting: 44mm Paper Type Setting: 112mm/100mm/80mm/58mm Paper type Setting Power off Setting: Printing Direction Setting:...
- Page 18 Appendix B Setting introduction:Press【MODE】button to choose setting, when press it once, the set become the next one and it will shows the present set value; use 【 FEED】 button to set the set value, when press it once , the set become the next one and it will print the present set value.
- Page 19 Visible Bluetooth Setting: Label Sensor Setting: Under standard mode, set as label paper under paper mode. Press 【MODE】 button, adjust the setting items to label sensor setting, then press【FEED】 button, the printer will feed paper by 260mm, and print out the self-test paper for max power voltage, min voltage, set threshold voltage and the voltage difference value between the max and min voltage.
Need help?
Do you have a question about the SP-L51 and is the answer not in the manual?
Questions and answers