Advertisement
Quick Links
INSTRUCTION MANUAL [EN]
250.120RC – DISTY 120RC
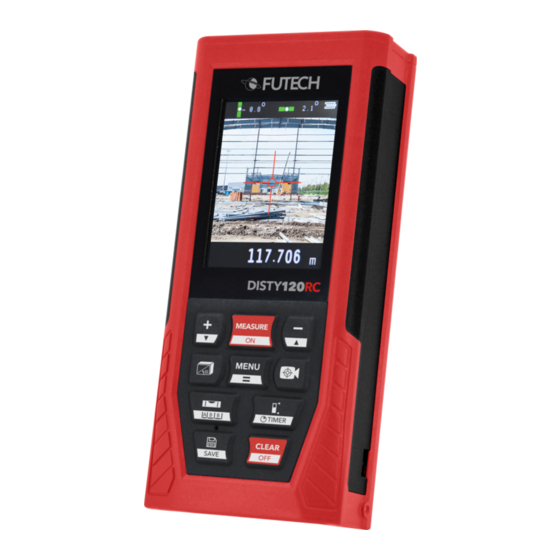
OVERVIEW
1.
Battery compartment
2.
Micro USB socket
3.
Measure / ON
4.
Plus / Up
(*)
5.
Minus / Down
6.
Menu/Equal
7.
Measuring modes
8.
Camera
9.
Digital bubble / Staking-out
10. Reference point / Timer
11. Records / Save
12. Clear / OFF
13. End piece
14. 1/4" tripod connection
a.
Reference point setting
b.
Laser indicator
c.
Measuring mode
d.
Tilt angle
e.
Power supply
f.
Measuring mode: dimension
g.
Auxiliary display area: value + unit
h.
Major display area
i.
Unit of the major display.
(*) It is possible that on your device the up and down arrows printed on the keys are swapped.
We apologise for the inconvenience.
SAFETY
Please read the complete safety instructions in the booklet delivered with this device.
Use extreme caution when the laser beam is turned on.
Do not let the beam enter your eyes, another person's eyes or the eyes of an animal. Be careful that reflections
of the beam (on a reflective surface) do not strike your eyes.
Do not aim the laser beam at any gas that may explode.
DO NOT USE THE MICRO USB SOCKET [2] IN COMBINATION WITH ALKALINE BATTERIES.
MANUAL 250.120RC – DISTY 120RC [EN]
(*)
DISTY120RC
3
4
6
7
9
11
14
1
5
8
10
12
13
b
f³
f²
f¹
V1.0 – 09.2022
2
a
c
d
e
g³
g²
g¹
h
i
1
Advertisement

Related Manuals for Futech DISTY 120RC


Summary of Contents for Futech DISTY 120RC
- Page 1 (on a reflective surface) do not strike your eyes. Do not aim the laser beam at any gas that may explode. DO NOT USE THE MICRO USB SOCKET [2] IN COMBINATION WITH ALKALINE BATTERIES. MANUAL 250.120RC – DISTY 120RC [EN] V1.0 – 09.2022...
-
Page 2: First Use
Auto Power OFF Determine how long the device remains switched on 100 seconds ~ 300 seconds after the last manipulation. After this time the device will turn itself off. Tone (De-)Activate the sound MANUAL 250.120RC – DISTY 120RC [EN] V1.0 – 09.2022... - Page 3 Four different reference points can be used. Front Middle (screw) Back End-piece Different reference points can be chosen using the Reference point / Timer button [10]. The Reference point setting [a] will be visible on screen. MANUAL 250.120RC – DISTY 120RC [EN] V1.0 – 09.2022...
- Page 4 Measurement symbol appears on the measuring mode area [c] on the screen. Measure the area in 2 steps: Press the Measure / ON button [3] Length of side 1 appears on to measure the first side auxiliary display area [g MANUAL 250.120RC – DISTY 120RC [EN] V1.0 – 09.2022...
- Page 5 [c] on the screen. Measure the Volume in 3 steps: Press the Measure / ON button [3] The height appears on auxiliary to measure the height of the room display area [g MANUAL 250.120RC – DISTY 120RC [EN] V1.0 – 09.2022...
- Page 6 Length of Hypothenuse (c) appears on auxiliary display area The length of the horizontal side (a) appears on auxiliary display area [g The Major display Area [h] shows the length of side (b). MANUAL 250.120RC – DISTY 120RC [EN] V1.0 – 09.2022...
- Page 7 (90°). Press the Measure / ON button [3] The length of side (a) appears on to measure the length of the first the auxiliary display area. [g side (a). MANUAL 250.120RC – DISTY 120RC [EN] V1.0 – 09.2022...
- Page 8 (90°) triangle. Press the Measuring modes button [7] that number of times needed until the “Pythagoras: subtraction of 2 triangles” symbol appears on the measuring mode area [c] on the screen. MANUAL 250.120RC – DISTY 120RC [EN] V1.0 – 09.2022...
- Page 9 [g Press the Measure / ON button [3] The length of leg (b) appears on a second time to measure the the auxiliary display. [g second leg (b). MANUAL 250.120RC – DISTY 120RC [EN] V1.0 – 09.2022...
-
Page 10: Calculation Options
[h] appears in front of the major display area [h] Measure the second area as described above. The results of the new measurement will be visible. MANUAL 250.120RC – DISTY 120RC [EN] V1.0 – 09.2022... - Page 11 To see the result of all added / subtracted volume measurements, press the Menu / Equal button [6]. Tip: You can switch between Addition and Subtraction by pressing the Plus / Up button [4] (to add MANUAL 250.120RC – DISTY 120RC [EN] V1.0 – 09.2022...
-
Page 12: Other Options
This function is used to measure positions with a fixed distance. Staking out value. The distance to the nearest, measured from the start. Value a Distance between Start and the first target MANUAL 250.120RC – DISTY 120RC [EN] V1.0 – 09.2022... - Page 13 The arrow shows the direction to the nearest target. : Move forward : Move backward : Match the position Example: To exit the Staking out function, press the Clear / OFF [12] button. MANUAL 250.120RC – DISTY 120RC [EN] V1.0 – 09.2022...
- Page 14 / ON button [3] a second time to measure the distance. Press the camera button [8] to deactivate the camera. The measuring result is now registered and will be shown on the first Auxiliary display line [g MANUAL 250.120RC – DISTY 120RC [EN] V1.0 – 09.2022...
- Page 15 Chose a surface with a weaker reflectance or use a reflector ERR 3 Low Power Replace (or recharge in case of rechargeable batteries) the batteries DO NOT RECHARCHE WHEN ALKALINE BATTERIES ARE USED MANUAL 250.120RC – DISTY 120RC [EN] V1.0 – 09.2022...
-
Page 16: Specifications
Typical Tolerance: ±2mm, when reflectivity 100% (white surface), environment light <2000 LUX. 25 °C Tolerance is usually affected by the distance, reflectivity, and environment light etc. It probably gets tolerance around ±( 2mm+0.2mm/m). MANUAL 250.120RC – DISTY 120RC [EN] V1.0 – 09.2022...
Need help?
Do you have a question about the DISTY 120RC and is the answer not in the manual?
Questions and answers