Table of Contents
Advertisement
Quick Links
Advertisement
Table of Contents

Subscribe to Our Youtube Channel
Related Manuals for Nilfisk-Advance BR 755


Summary of Contents for Nilfisk-Advance BR 755
- Page 1 BR755, BR855 Instructions for use Instructions for Use Original Instructions Kullanim Talimatlari Instruc iuni de utilizare A-English 12/2008 revised 8/2016 REV C B-Türkçe Form no. 56041743 D-Românesc Model: 56601014(BR755), 56601015(BR855), 56601016(BR755C)
-
Page 3: Table Of Contents
A-2 / ENGLISH TABLE OF CONTENTS Page Introduction ................... A-2 Cautions and Warnings ................ A-3 Know Your Machine ..............A-4 – A-5 Control Panel ..................A-6 Prepare the Machine for Use Install the Batteries ................A-7 Install the Brushes ................A-8 Install the Squeegee ................ -
Page 4: Cautions And Warnings
ENGLISH / A-3 CAUTIONS AND WARNINGS SYMBOLS Nilfi sk uses the symbols below to signal potentially dangerous conditions. Always read this information carefully and take the necessary steps to protect personnel and property. DANGER! Is used to warn of immediate hazards that will cause severe personal injury or death. WARNING! Is used to call attention to a situation that could cause severe personal injury. -
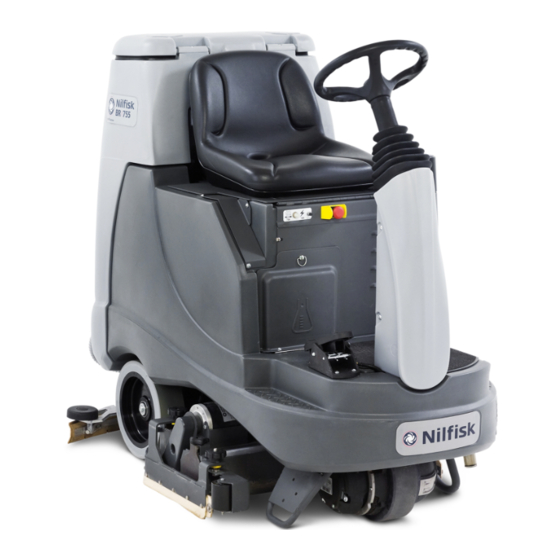
Page 5: Know Your Machine
A-4 / ENGLISH KNOW YOUR MACHINE As you read this manual, you will occasionally run across a bold number or letter in parentheses - example: (2). These numbers refer to an item shown on these pages unless otherwise noted. Refer back to these pages whenever necessary to pinpoint the location of an item mentioned in the text. NOTE: Refer to the service manual for detailed explanations of each item illustrated on the next 3 pages. - Page 6 ENGLISH / A-5 KNOW YOUR MACHINE Solution Shutoff Valve Recovery Tank Drain Hose Solution Filter Squeegee Tilt Adjustment Knob Steering Wheel Tilt Adjust Knob Seat Prop-Rod Control Panel Machine Battery Connector Solution Tank Fill Cover Rear Squeegee Blade Removal Latch Recovery Tank Cover Hopper (Cylindrical models only) Vacuum Motor Filter Housing...
-
Page 7: Control Panel
A-6 / ENGLISH CONTROL PANEL Key Switch Scrub Pressure Increase Switch Solution Increase Switch Scrub ON/OFF Switch Solution ON/OFF Switch Scrub Pressure Indicators (Normal, Heavy and Extreme) Solution Flow Indicators (Normal, Heavy & Extreme) Scrub Pressure Decrease Switch Solution Decrease Switch EcoFlex Switch Detergent ON/OFF Switch Horn Switch... -
Page 8: Install The Batteries
ENGLISH / A-7 BATTERIES If your machine shipped with batteries installed do the following: Check that the batteries are connected to the machine (34). Turn ON the Key Switch (A) and check the Battery Indicator (F6). If the gauge is completely fi lled, the batteries are ready for use. If the gauge is less than full, the batteries should be charged before use. -
Page 9: Install The Brushes
A-8 / ENGLISH INSTALL THE BRUSHES (DISC SYSTEM) CAUTION ! Turn the key switch off (O) and remove the key, before changing the brushes, and before opening any access panels. Make sure the Scrub Deck is in the RAISED position. FIGURE 2 Make sure the Key Switch (A) is off (O). -
Page 10: Install The Squeegee
ENGLISH / A-9 INSTALL THE SQUEEGEE See Figure 4. Slide the Squeegee Assembly (11) onto the squeegee mount bracket and tighten the Squeegee Mount Thumb Nuts (AA). Connect the Recovery Hose (AB) to the squeegee inlet. Lower the squeegee, move the machine ahead slightly and adjust the squeegee tilt and height using the Squeegee Tilt Adjust Knob (32) and Squeegee Height Wheel (AC) so that the rear squeegee blade touches the fl... -
Page 11: Detergent System
A-10 / ENGLISH DETERGENT SYSTEM PREPARATION AND USE (ECOFLEX MODELS ONLY) COMMON INSTRUCTIONS: Pressing and releasing the Detergent Switch (E) while the solution system is active will cause the detergent system to alternately turn on and off. The system should be purged of previous detergent when switching to a different detergent. SERVICE NOTE: Move machine over fl oor drain before purging because a small amount of detergent will be dispensed in the process. - Page 12 ENGLISH / A-11 DETERGENT SYSTEM PREPARATION AND USE (ECOFLEX MODELS ONLY) DETERGENT ENABLED DETERGENT DISABLED FULL (RESET) Press and hold (B) & (D) for 3 seconds to Reset. LOW DETERGENT PURGE Press and hold (C) & (E) for 3 seconds to Purge. Detergent system is ON when indicator is ON.
-
Page 13: Operating The Machine
A-12 / ENGLISH OPERATING THE MACHINE WARNING! Be sure you understand the operator controls and their functions. While on ramps or inclines, avoid sudden stops when loaded. Avoid abrupt sharp turns. Use low speed down hills. Clean only while ascending (driving up) the ramp. To Scrub... - Page 14 ENGLISH / A-13 FIGURE 6 revised 1/10 FORM NO. 56041743 - BR755, BR855 - A-13...
-
Page 15: After Use
A-14 / ENGLISH AFTER USE When fi nished scrubbing, press the Scrub ON/OFF Switch (H), this will automatically raise, retract and stop all the machine systems (brush, squeegee, vacuum, solution and detergent (EcoFlex models)). Then drive the machine to a service area for daily maintenance and review of other needed service up keep. -
Page 16: Charging The Batteries (Wet
ENGLISH / A-15 CHARGING WET BATTERIES Charge the batteries each time the machine is used or when the Battery Indicator (F6) is reading less than full. WARNING! Do not fi ll the batteries before charging. Charge batteries in a well-ventilated area. Do not smoke while servicing the batteries. -
Page 17: Squeegee Maintenance
A-16 / ENGLISH SQUEEGEE MAINTENANCE If the squeegee leaves narrow streaks or water, the blades may be dirty or damaged. Remove the squeegee, rinse it under warm water and inspect the blades. Reverse or replace the blades if they are cut, torn, wavy or worn. To Reverse or Replace the Rear Squeegee Wiping Blade... -
Page 18: Side Skirt Maintenance
ENGLISH / A-17 SIDE SKIRT MAINTENANCE The side skirts’ function is to channel the waste water to the squeegee, helping contain the water within the machine’s cleaning path. During normal use the blades will wear in time. The operator will notice a small amount of water leaking out underneath the side skirts. A height adjustment can easily be made to lower the blades so that all the water can be picked up by the squeegee. -
Page 19: Troubleshooting
A-18 / ENGLISH GENERAL MACHINE TROUBLESHOOTING Problem Possible Cause Remedy Poor water pick-up Worn or torn squeegee blades Reverse or replace Squeegee out of adjustment Adjust so blades touch fl oor evenly across entire width Recovery tank full Empty recovery tank Recovery tank drain hose leak Secure drain hose cap or replace Recovery tank cover gasket leak... - Page 20 ENGLISH / A-19 TECHNICAL SPECIFICATIONS (as installed and tested on the unit) Model BR 755 BR 755C BR 855 Model No. 56601014 56601016 56601015 Voltage, Batteries Battery Capacity Protection Grade IPX3 IPX3 IPX3 Sound Power Level (IEC 60335-2-72: 2002 Amend. 1:2005, ISO dB(A) 63.7dB LWA, 3dB KWA...
Need help?
Do you have a question about the BR 755 and is the answer not in the manual?
Questions and answers