Table of Contents
Advertisement
Quick Links
Advertisement
Table of Contents

Related Manuals for ThermoFisher Scientific HERASAFE 2030i Series


Summary of Contents for ThermoFisher Scientific HERASAFE 2030i Series
- Page 1 Safety cabinets 21st September 2021 50155215 Rev. B Valid: 30.08.2017 / 50155204...
- Page 2 Copyright 2021 These operating instructions are protected by copyright. Rights resulting thereof, particularly reprint, photomechanical or digital postprocessing or reproduction, even in part, are only allowed with the written consent of Thermo Electron LED GmbH. This regulation does not apply to reproductions for in-plant use. Trademarks Herasafe and Maxisafe are registered trademarks of Thermo Electron LED GmbH.
-
Page 3: Table Of Contents
Table of Contents Chapter 1 General Notes..............................1 General Safety Instructions..........................2 Warranty ............................... 3 Explanation of Symbols ..........................3 Symbols used in the Operating Instructions ....................3 Symbols on the Device ..........................5 Use of the Device............................7 Intended Use ............................7 Non-intended Use ............................. - Page 4 Table of Contents Main Screen (Region R2) ......................... 44 Control Panel (Region R2B) ........................47 Main Navigation Bar (Region R3) ......................49 Working Mode............................. 50 Startup Mode .............................. 51 Standby Mode ............................. 51 Cleaning and Loading Mode ......................... 52 Idle Mode..............................53 Sleep Mode..............................
- Page 5 Table of Contents Work Rules ............................... 122 Chapter 8 Shut-down ..............................125 Interrupting an Operation ........................... 125 Shutting the Unit down..........................125 Chapter 9 Cleaning and Decontamination ........................127 Decontamination Procedure ........................127 Wipe/Spray Disinfection ..........................127 UV Disinfection after a Wipe/Spray Disinfection.................... 129 UV Disinfection using the integral UV Lamps ...................
- Page 6 Table of Contents 50155215 Herasafe 2030i / Maxisafe 2030i...
- Page 7 Figures Figure 1 Correct Location.............................12 Figure 2 Lift Points .............................14 Figure 3 Overall View, Herasafe 2030i version ......................15 Figure 4 Overall View, Maxisafe 2030i version ......................17 Figure 5 Filter System with Downflow Filter and Exhaust Air Filter................20 Figure 6 Filter System with Prefilters, Downflow Air Filters and Exhaust Air Filters............21 Figure 7 Controls and Display..........................22 Figure 8 Access through Front Cover ........................23 Figure 9 Access through Front Window.........................24...
- Page 8 Figures Figure 40 „Tap to wake“ Screensaver........................54 Figure 41 Basic window functions of the auxiliary Rocker Switch................54 Figure 42 Info & Health Status Area with “Login” Prompt..................57 Figure 43 “Login” Screen ............................58 Figure 44 “Log out” Screen ..........................59 Figure 45 “Log out” Screen: Logged out Message....................59 Figure 46 Main Screen: “UV disinfection”...
- Page 9 Figures Figure 80 “Display Setting” Screen: “Menu Bar Customization” Screen with Icon Swapping Options......85 Figure 81 “Display Setting” Screen: “Region” Screen ....................86 Figure 82 “Programs” Screen ..........................87 Figure 83 “Programs” Screen: “Edit AutoStart” Screen..................88 Figure 84 “Programs” Screen: “Edit AutoStop” Screen ..................89 Figure 85 “Alarms and Alerts”...
- Page 10 Figures 50155215 Herasafe 2030i / Maxisafe 2030i...
-
Page 11: Chapter 1 General Notes
General Notes The following are the addresses of the international Thermo Sales Organisations. Postal address Germany Thermo Electron LED GmbH Robert-Bosch-Straße 1 D - 63505 Langenselbold Enquiries from Germany Phone Sales 0800 1 536376 Service 0800 1 112110 Sales/Service 0800 1 112114 E-Mail info.labequipment.de@thermofisher.com Enquiries from Europe, Middle East and Africa... -
Page 12: General Safety Instructions
| General Notes Chapter 1 General Safety Instructions These safety instructions describe the safety features of the Herasafe 2030i and Maxisafe 2030i series. The safety cabinet has been manufactured in keeping with the latest technological developments and has been tested before delivery for its correct function. It may, however, present potential hazards if it is not used according to the intended purpose or outside of operating parameters. -
Page 13: Warranty
General Notes | Chapter 1 Warranty Thermo Electron LED warrant the operational safety and functions of the safety cabinet only under the condition that: the device is operated and serviced exclusively in accordance with its intended purpose and as described in these operating instructions, the device is not modified, ... - Page 14 | General Notes Chapter 1 Before installing, using or maintaining this product, please be sure to read the manual and product warning labels carefully. Failure to follow these instructions may cause the product to malfunction, which could result in injury or damage. This symbol indicates possible pinch points which may cause personal injury.
-
Page 15: Symbols On The Device
General Notes | Chapter 1 Symbols on the Device Observe operating instructions (cover of electrical box) Biohazard (left device front) USB interface The European voltage models of this product meet all the applicable requirements of the European Directives and therefore display the CE Marking. The most current EU Declaration of Conformity may be obtained from the manufacturer. - Page 16 | General Notes Chapter 1 X20 connection for an external fan X21 connection for a solenoid valve X22 connection for an external component Armrest installation UV lamp This equipment is FCC listed Exhaust and supply lines 50155215 Herasafe 2030i / Maxisafe 2030i...
-
Page 17: Use Of The Device
General Notes | Chapter 1 Use of the Device Intended Use Herasafe 2030i version: The safety cabinet is a laboratory device for installation and operation in microbiological and biotechnical laboratories of safety levels 1, 2, and 3. It has been designed as a Class II microbiological safety cabinet, in accordance with EN 12469:2000. -
Page 18: Non-Intended Use
| General Notes Chapter 1 Non-intended Use The safety cabinet must not be used in laboratories that do not comply with the requirements of safety levels 1, 2, and 3. The unit must not be operated as a Class II safety cabinet if: no repeat test is performed after changes to the installation conditions or after ... -
Page 19: Chapter 2 Delivery
Delivery Items supplied Delivery for the safety cabinet includes the following: Herasafe 2030i version: safety cabinet armrests Maxisafe 2030i version: safety cabinet armrests stand All versions: device documentation with: operating instructions (CD) factory test report ... - Page 20 | Delivery Chapter 2 50155215 Herasafe 2030i / Maxisafe 2030i...
-
Page 21: Chapter 3 Installation Of The Device
Installation of the Device Ambient Conditions The operational safety and correct function of the unit depend on the location where it is to be operated. The safety cabinet must be operated only at locations that meet the ambient conditions listed below. Location requirements: The electrical system of the device has been designed for an operating height of up ... -
Page 22: Room Ventilation
| Installation of the Device Chapter 3 Room Ventilation The room ventilation should preferably be a ventilation system that complies with the national requirements for the application. The inlet air and exhaust air openings of the room ventilation must be located so that ... -
Page 23: Connections
Installation of the Device | Chapter 3 Connections Power cable X22 X21 X20 Cable glands allow for connecting up to 3 external devices. Connect directly to the printed circuit board! Caution! Make sure the max. current output is not exceeded! X22 230V Power Supply / X21 Monitor Alarm / X20 External Fan The leads can be attached on the outer face of the anti-tilt anchor using cable ties. -
Page 24: Transport
| Installation of the Device Chapter 3 Transport Version Herasafe 2030i: Figure 2 Lift Points To prevent tilting, always transport the device using a suitable carrier, even for a transport within a building, and separate it from the stand. Danger of tipping over! For transport, lift the device only using the lift points shown in the illustration. -
Page 25: Chapter 4 Unit Description
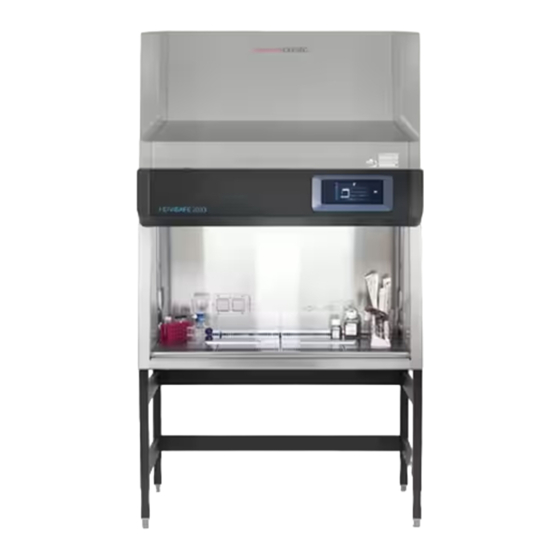
Unit Description Overall View Herasafe 2030i version: Figure 3 Overall View, Herasafe 2030i version Plenum assembly [5] with plenum for downflow fan [20] and plenum for exhaust air fan [2]. The downflow filter and the exhaust air filter are installed directly to the pertaining fan. - Page 26 | Unit Description Chapter 4 At the top side of the plenum, the optional media supply lines [3] are routed into the sample chamber [10]. Power supply cable [4]. Front cover [19] with integral, electrically movable front window [7]. An auxiliary rocker ...
-
Page 27: Figure 4 Overall View, Maxisafe 2030I Version
Unit Description | Chapter 4 Maxisafe 2030i version: Figure 4 Overall View, Maxisafe 2030i version Figure 4: Stand [5] with built-in prefilter casing [6]. Filter cartridges [2] for installation in prefilter casing. The number of filter cartridges supplied with the device depends on the overall width of the unit. To prevent the accumulation of fluid residues, the filter cartridges are arranged at a slight angle to the rear wall of the unit to form a drain channel towards the drain pan [3]. -
Page 28: Safety System
| Unit Description Chapter 4 Safety System The safety system comprises a combination of protective and alarm systems that ensure maximum personal and material protection. Safety systems: Vacuum-sealed air system An air system in combination with HEPA filters for downflow and exhaust air forms the basis of the safety system for personal and material protection. - Page 29 Unit Description | Chapter 4 Visual and audible alarm system The warning system constantly monitors the safety-relevant device functions: inflow speed of the air aspired from the exterior, downflow speed, working position of the front window. If the warning system detects changes to one of these device functions, it issues: an audible and a visual alarm signal.
-
Page 30: Filter System
| Unit Description Chapter 4 Filter System Version Herasafe 2030i Figure 5 Filter System with Downflow Filter and Exhaust Air Filter The filter system consists of two HEPA filters [2] and [5] for the circulating air and for the exhaust air and a coarse filter for the aspired air. HEPA filters: Room air [10] is drawn into the sample chamber through the working opening. -
Page 31: Figure 6 Filter System With Prefilters, Downflow Air Filters And Exhaust Air Filters
Unit Description | Chapter 4 Maxisafe 2030i version Figure 6 Filter System with Prefilters, Downflow Air Filters and Exhaust Air Filters The filter system consists of a set of HEPA prefilters [10] (the number of filters depends on the overall width of the workspace) and two HEPA filters [2] and [5] for the downflow and exhaust air flow. -
Page 32: Controls And Display
| Unit Description Chapter 4 HEPA Filter: From the air duct, the prefiltered air is then: filtered proportionally by the downflow filter [5] and supplied as ultrapure air [6] evenly into the sample chamber of the device, filtered by the exhaust air filter [2] and released as ultrapure air [1] to the exterior of ... -
Page 33: Sample Chamber Access
Unit Description | Chapter 4 Sample Chamber Access The sample chamber of the device is accessible via two modes. Figure 8 Access through Front Cover Front cover: Manual opening of the front cover [1] allows access to the complete sample chamber width with an opening height C. -
Page 34: Figure 9 Access Through Front Window
| Unit Description Chapter 4 A - minimum working opening B - maximum opening height Figure 9 Access through Front Window Front window: The electrically operated front window [1] is made of multi-layer safety glass and integral to the front cover frame. It can be raised to a maximum opening height B. To access the sample chamber during the work process, the front window must stay in the work position with opening height A. -
Page 35: Device Interfaces
Unit Description | Chapter 4 Device Interfaces Figure 10 Supply Interfaces The standard equipment includes the outlets [9] for internal power supply as well as the SmartPort and openings [8] on both sides for routing of cables and hoses. All other supply connections are available as options and may also be retrofitted. - Page 36 | Unit Description Chapter 4 Media connections (optional): The media supply unit consists of three pipes that are routed into the sample chamber through the top of the unit. The inlet connections [1] and outlet connections [6] with thread (R 3/8”), e.g. for media valves [7], are preinstalled and equipped with a sealing plug.
-
Page 37: Figure 11 Workspace Illumination
Unit Description | Chapter 4 Workspace Illumination Figure 11 Workspace Illumination The workspace illumination [2] is equipped with two LED that are installed behind the light dome [3]. NOTE The reflector side (9) must be installed upwards, so that the radiation side (10) is fully active. -
Page 38: Uv Lamp Unit
| Unit Description Chapter 4 UV Lamp Unit Figure 12 UV Lamp Unit The UV lamp unit consists of two lamp housings [2] with two UV lamps each [1] that are integral to the side walls. Both lamp housings are protected by a stainless steel cover [3]. By cross-radiation of the UV units, all surfaces will be disinfected as the shadow zone is reduced. -
Page 39: Working Area
Unit Description | Chapter 4 Working Area The standard equipment comprises the segmented workplate for the Herasafe 2030i and the one-piece workplate for the Maxisafe 2030i. Special workplates are available as optional accessories. The workplates or workplate segments are placed onto the frame above the workspace drain pan. - Page 40 | Unit Description Chapter 4 Models with NF label! Any deviation from the installation instructions for low-voltage cables or tubing through the access port constitutes a non-compliant use of the NF. Such action will, in the event of an accident with biohazardous materials, result in the complete loss of the manufacturer's liability.
-
Page 41: Chapter 5 Start-Up
Start-up Initial Operation Prior to initial operation, the safety cabinet must be subjected to an installation test. Correct assembly and installation performed by the operator are essential for good start-up. Installing Unit and Accessories Herasafe 2030i version: Device without stand: Place the device without stand onto a sufficiently stable substructure so that the ... -
Page 42: Figure 14 Stand Installation
| Start-up Chapter 5 Device with stand: To assemble the (optional) stand and to install the device frame to the stand: Figure 14 Stand Installation 1. Slide the two crossmembers [2] onto the retaining angles [3] of the sidemembers [1]. Secure the crossmembers to the two sidemembers using the screws [4]. - Page 43 Start-up | Chapter 5 2. To attach the device frame [5] to the stand [7], install four Allen screws [6] loosely into the corresponding threaded holes at the underside of the device. 3. Place the safety cabinet [1] onto the stand so that the Allen screws [6] pass through the corresponding holes [8] of the retaining tabs [10].
-
Page 44: Figure 15 Installing The Maxisafe 2030I Version
| Start-up Chapter 5 Maxisafe 2030i version: The stand [3] and prefilter casing [1] form a mechanical unit. To facilitate the installation of the body, the stand is equipped with a lifting device. The four columns [7] of the stand have built-in spindles [6], on which the body can be placed and lowered to its final position. -
Page 45: Leveling The Device
Start-up | Chapter 5 1. Extend the spindles by approx. 10 cm by turning the respective hexagon heads [5] and adjust the spindles to the same height on all four columns. 2. Place the safety cabinet on the spindles. Check whether the guide pins [4] fit exactly in the receptacles on the lower frame of the body. -
Page 46: Power Supply Connection
| Start-up Chapter 5 Power Supply Connection High voltage! Contact with current-carrying components may cause a lethal electric shock. Before connecting the device to the power supply system, check plug and power supply cable for possible damage. Do not use damaged components to connect the device to the power supply system! The connection has to be carried out according to country specific standards. -
Page 47: Initial Setup
Start-up | Chapter 5 Initial Setup This section explains how to set up the device using the initial setup routine. When the unit is turned on for the first time after delivery to the customer site, you must complete an initial setup process before you can use the unit. There are five single screens with initial adjustments you must make and confirm using the “Next”... -
Page 48: Figure 18 Initial Setup: Setting The Region
| Start-up Chapter 5 3. Tap the up/down arrows or swipe your finger across the wheel up or down to set the language (default is English). 4. Once you have chosen your display language, tap the “Next” button. The next screen allows you to select your location. Enter the name of the city/country and select from the list of suggestions displayed (see “Appendix: City Time Zones”... -
Page 49: Figure 20 Initial Setup: Setting The Time Of Day In 12Hr, Am/Fm Format
Start-up | Chapter 5 5. Tap the “MMM/DD/YYYY”, “DD/MMM/YYYY”, or “YYYY/MMM/DD” radio button on the left side of the screen to choose a date format. The segments of the wheel picker screen are rearranged to reflect the selected date format. For example, if you select the “DD/MMM/YYYY” radio button, the wheel picker will change to 01 | Jan | 2016. -
Page 50: Figure 22 Initial Setup: Completing The Initial Setup
| Start-up Chapter 5 The “Setup completed” screen appears with its “Finish” button highlighted, prompting you to complete the setup, as shown in Figure 22 below. Step 5 of 5 Setup completed Back Finish Figure 22 Initial Setup: Completing the Initial Setup 11. -
Page 51: Usb Interface
Start-up | Chapter 5 USB Interface The USB port on top of the device is reserved for servicing! Figure 24 USB Interface and Display The USB port next to the display window enables the user to save log data and install new software releases. - Page 52 | Start-up Chapter 5 NOTE Device hygiene The initial start-up with subsequent installation test does not include any decontamination measures. For operation in the work process, the sample chamber of the device and the accessories required for the work process must be disinfected and cleaned in accordance with the hygiene guidelines set forth for the application.
-
Page 53: Chapter 6 Operation
Operation This chapter describes how to control the Herasafe 2030i and Maxisafe 2030i Biological Safety Cabinets from the touchscreen display mounted in the light dome of the unit. The screen display unit measures 17.8 cm (7 inches) diagonally across and has touch-sensitive areas that support finger gestures like tapping, swiping and pinching. -
Page 54: Info & Health Status Area
| Operation Chapter 6 Info & Health Status Area The Info & Health Status Area at the top of the display window appears in all screen displays. Figure 26 shows an example of the Info & Health Status Area on a unit that is in a proper working condition. -
Page 55: Figure 27 Main Screen
Operation | Chapter 6 Figure 27 shows the unit in working mode, with the window ready in the working position and the downflow and inflow speeds at operational speeds. The sample space illumination, fans, gas supply and power receptacle functions are all on. Figure 27 Main Screen The screen content changes with operational state, depending on whether the unit is:... -
Page 56: Figure 28 Overview Of Side-View Symbol Graphics For Unit Status
| Operation Chapter 6 Working properly, with animated “Downflow” and “Inflow” icons to show that air barrier has been established Start-up alert symbol, with animated “Downflow” and “Inflow” icons in tangerine color to show that air barrier is building up, but not operational Alarming symbol, with animated “High downflow”... -
Page 57: Control Panel (Region R2B)
Operation | Chapter 6 The following examples show different combinations of status indicator boxes for major operational states. All green circles with checkmark: unit is ready. All yellow timers: unit is not ready, but running up to operational state. All red circles with cross: window and airflow val- ues are too low. -
Page 58: Figure 30 Control Panel For Unit Without Gas Option
| Operation Chapter 6 Functions that are currently working are identified by a light gray frame around the button, as shown in the bottom rows of Figure 29 and Figure 30. A frame dimmed to dark gray, as shown in the top rows, indicates that the function is available, but currently not in use. Figure 30 shows the Control Panel for a unit equipped with all options but the gas supply. -
Page 59: Main Navigation Bar (Region R3)
Operation | Chapter 6 The “Autostop” button stops the unit immediately, closing the window and leaving only a user-selected set of functions enabled, as previously selected in the “Autostop” settings (see “Programs” on page 86). Tap and hold this button for 3 sec. to stop the unit in “Autostop”... -
Page 60: Working Mode
| Operation Chapter 6 Icon Meaning “Alarms and Alerts” icon : opens the “Alarms and Alerts” screen (see “Alarms and Alerts” on page 91). “Data Plate” icon : opens the “Data Plate” screen (see “Data Plate” on page 97) showing general data about the unit. “Programs”... -
Page 61: Startup Mode
Operation | Chapter 6 Startup Mode Figure 35 shows the Main Screen while the unit is starting up. The following startup screen shows what happens when the “AutoStart” or “Fan” button is tapped: The screen shows alerts for the air barrier because the airflow speeds are not up to speed yet. Figure 35 Main Screen - Unit starting up The symbol graph shows that the window is opened to the working position, and the... -
Page 62: Cleaning And Loading Mode
| Operation Chapter 6 Standby mode is entered when you close the window from within a working session, which is indicated by the closed window in the side-view symbol graphic. A Standby header appears to the right of the graphic, showing the unit is in standby mode, maintaining cleanliness and containment, and ready to resume work when you move the window back to the working position. -
Page 63: Idle Mode
Operation | Chapter 6 Idle Mode Idle mode is entered when you turn all functions (including the fans) off, with the window either in the working position or closed. Idle mode is indicated by the gray “no activity” icons in the downflow and inflow status indicator boxes, as shown in Figure 38. Figure 38 Main Screen - Unit in Idle Mode, Window closed Idle mode is also possible with the window opened to the working position, as shown in... -
Page 64: Handling And Control
| Operation Chapter 6 Figure 40 „Tap to wake“ Screensaver To exit Sleep Mode and return to the previous screen, tap anywhere on the touchscreen display. The device exits Sleep Mode automatically when one of the following occurs: a new alarm occurs ... -
Page 65: Moving The Front Window To The Working Position
Operation | Chapter 6 Moving the Front Window The movement of the front window is controlled by depressing the auxiliary rocker switch control element with the corresponding arrow symbol. Crushing hazard During movement of the front window do not try to access the inner chamber. Proceed as follows to raise the window: 1. -
Page 66: Lowering The Front Window
| Operation Chapter 6 When the front window reaches the working position, the movement stops automatically. When the movement starts above the working position, the front window stops at the maximal opening position. NOTE The working position is factory pre-set and cannot be changed in the Settings. Proceed as follows to stop the upward movement: 2. -
Page 67: Activating And Deactivating The Internal Gas Supply
Operation | Chapter 6 Activating and deactivating the internal Gas Supply The solenoid valve controlling the gas inflow can be opened and closed from the Control Panel. NOTE The solenoid valve for activating the internal gas supply is an additional safety feature that enables the gas supply to the safety cabinet. -
Page 68: Logging In
| Operation Chapter 6 Logging in Proceed as follows to log into a unit in “Secure” Mode: 1. Tap the word “Login” in the top right corner of the screen, or tap anywhere else on the screen. The “Login” screen appears on top of the screen, then a keypad slides up from the bottom and pushes the “Login”... -
Page 69: Logging Out
Operation | Chapter 6 Logging out 1. Tap the word “Logout” in the top right corner of the screen. The “Log out” screen shown in Figure 44 appears on top of the screen, asking you to confirm that you want to log out. Log out Are you sure you want to log out? -
Page 70: Figure 46 Main Screen: "Uv Disinfection" Running
| Operation Chapter 6 For running the UV disinfection routine, the front window must be completely lowered to protect against UV radiation. A safety interlock ensures that the routine cannot be run until the front window is in the closed position. While the routine is running, the “UV disinfection”... -
Page 71: Starting The Uv Disinfection Cycle
Operation | Chapter 6 When the “Light Bulb” button is tapped, a pop-up window appears, stating “The LED light cannot be switched during the UV disinfection cycle. Would you like to abort the UV cycle and switch the LED lights on?” UV cycle The LED light cannot be switched during the UV disinfection cycle. -
Page 72: Turning The Fan On And Off During Uv Disinfection
| Operation Chapter 6 3. If this happens, tap the “OK” button to close the pop-up window, then use the “Light Bulb” button to turn off the sample chamber illumination and/or the “Close window” button to close the window. 4. Tap the “UV” button on the Control panel (again) to start the UV disinfection cycle. -
Page 73: Figure 52 Reduced Flow Mode Alert During Uv Disinfection Cycle
Operation | Chapter 6 If this is the first time you turn the fans on during the ongoing UV disinfection cycle, the pop-up window shown in Figure 52 will appear, reminding you that the fans will continue to run in reduced flow mode after the UV disinfection cycle is complete. Fans The fans will continue to run in reduced flow mode... -
Page 74: Restarting A Disrupted Uv Disinfection Cycle
| Operation Chapter 6 Restarting a disrupted UV Disinfection Cycle If the UV disinfection cycle is disrupted, for example, because the front window has been opened or another error has occurred, a pop-up window appears, stating that the UV disinfection cycle has been disrupted (see Figure 55 below). UV cycle UV disinfection cycle has been interrupted. -
Page 75: Alarms
Operation | Chapter 6 Alarms If the downflow, inflow or window parameters are not at operational settings, there may be at risk of exposure to biohazardous material or contamination. In this case, the biological safety cabinet emits a visual and audible alarm to alert the user, as shown in Figure 56 below. -
Page 76: Figure 57 "Health Status Alarm" Icon ("Alarm Bell") In Unsnoozed And Snoozed Modes
| Operation Chapter 6 Tapping the “Snooze” button silences the audible alarm temporarily for a pre-set timeout period. (The default alarm snooze timeout period is 5 minutes, but the setting may be changed in the “Alarms and Alerts” screen, as explained in “Snooze Timeout” on page 93). -
Page 77: Silencing And Handling Alarms
Operation | Chapter 6 Additionally, you will be taken directly to the Health Status Danger screen with its alarm list shown in Figure 59. Figure 59 “Health Status Alarm” Screen Once the ticker message has been visible for two cycles of displayed text, the screen changes to the appearance shown in Figure 60 below: Figure 60 Main Screen after two Cycles of Alarm Ticker Message... -
Page 78: Alerts
| Operation Chapter 6 3. Read the instructions in the newsticker area to learn more about the issue(s) and available troubleshooting options. After two cycles of displayed text, the ticker message disappears and is replaced by the Main Screen shown in Figure 60 above. 4. -
Page 79: Figure 62 "Status Alert" Screen With Alert Screen Message, Status Alert Gfi
Operation | Chapter 6 The symbol graphic in the Main Screen appears remains unchanged. In the filter message example shown in Figure 61, the air barrier is displayed as fully functional (see Figure 28 on page 46 for a complete overview of appearances). If you tap the “Alert triangle”... -
Page 80: Handling Alerts
| Operation Chapter 6 Handling Alerts Proceed as follows to handle alerts: 1. When an alert appears, inspect the small blue alarm counter in the “Health Status Alert” icon to find out whether you have to handle one or more alerts. 2. -
Page 81: Figure 65 "Status Good" Screen #1: Operating Hours, Uv And Filter
Operation | Chapter 6 The “Status Good” screens display the following information: First screen: Total Operating Hours including last time the cabinet was run UV light total operating hours, last cycle, and install date Second screen: Filter running time, estimated time left, and install date ... -
Page 82: Figure 66 "Status Good" Screen #2: Operating Hours, Uv And Filter (Eu Version)
| Operation Chapter 6 The “UV Total hours” counter and “Last cycle” date will be reset to zero and a default date, while the “Installed” date will be reset to the current date. Reset the UV operating hours only when you have positively replaced the UV light bulb. Resetting the operating hours without previously replacing the UV light bulb results in a misleading operating hours count. -
Page 83: Settings
Operation | Chapter 6 Settings This section explains how to set up the unit using the various options of the “Settings” screen. After completing the initial setup process, you can further set up and customize the unit by using the options of the “Settings” screen shown below in Figure 68. Figure 68 “Settings“... -
Page 84: Setting Uv Disinfection Cycle Time
| Operation Chapter 6 The “Settings” screen opens up when you tap the “Settings” icon in the Main Navigation Bar. It offers nine menu items that can be tapped to open further screens with advanced adjustment options: “Disinfection Cycle Settings”: See “Setting UV Disinfection Cycle Time” on page 74. ... - Page 85 Operation | Chapter 6 Hours are entered by using a calculator-style keypad, minutes are selectable from a drop-down list. NOTE The default setting is 1 hour, 00 minutes. 0 hours and 00 minutes is NOT a selectable option. “Auto-adjustment of UV disinfection cycle time based on UV light bulbs operating ...
-
Page 86: Figure 70 "Settings Saved" Pop-Up Windows For Disinfection Cycle Settings
| Operation Chapter 6 A pop-up window appears stating that “Your settings have been saved.”. If a disinfection cycle is active at this time, you will be asked whether you would like to apply the changes to the current cycle. A header in the top left corner states: “Settings Saved”. Settings Saved Your settings have been saved. -
Page 87: Display Settings
Operation | Chapter 6 Display Settings Tapping the “Display Settings” button on the “Settings” screen takes you to the “Display Settings” screen shown in Figure 71. Thermo Fisher BSC 11:42 AM | 08/10/2018 Display Settings Brightness Language English Date Sleep Mode Save Thermo Fisher BSC 11:42 AM | 08/10/2018... - Page 88 | Operation Chapter 6 “Time”; see “Setting the Time of Day” on page 80 “Unit Name”; see “Setting the Unit Name” on page 83 “Menu Bar Customization”; see “Customizing the Menu Bar” on page 84 “Region”; see “Setting the Region” on page 85 ...
-
Page 89: Figure 72 "Display Settings" Screen: "Language" Screen
Operation | Chapter 6 The “Language” screen appears with a wheel picker, prompting you to choose a display language, as shown in Figure 72 below. Thermo Fisher BSC 11:42 AM | 08/10/2018 Language English Save Figure 72 “Display Settings” Screen: “Language” Screen 4. -
Page 90: Figure 73 "Display Setting" Screen: "Date" Screen
| Operation Chapter 6 The “Date” screen appears with a wheel picker, prompting you to set the date, as shown in Figure 73 below. Thermo Fisher BSC 11:42 AM | 08/10/2018 Date MMM/DD/YYYY Aug 15 2018 YYYY/MMM/DD DD/MMM/YYYY Save Figure 73 “Display Setting”... -
Page 91: Figure 74 "Display Setting" Screen: "Time" Screen With 12-Hour Am/Pm Format
Operation | Chapter 6 The “Time” screen appears with a three-segmented wheel picker, prompting you to set the time of day, as shown in Figure 74 below. Thermo Fisher BSC BSC 11:42 AM | 08/10/2018 Time 12-hour display 22 AM 24-hour display Save Figure 74... -
Page 92: Activating / Deactivating Sleep Mode
| Operation Chapter 6 Activating / Deactivating Sleep Mode Proceed as follows to activate/deactivate Sleep Mode (see “Sleep Mode” on page 53): 1. Tap the “Settings” icon on the Main Navigation Bar. 2. Tap the “Display Settings” button on the “Settings” screen. 3. -
Page 93: Figure 78 "Display Settings" Screen: "Unit Name" Screen
Operation | Chapter 6 6. To commit the changes, tap the “OK” button in the pop-up window that appears (see “Saving Changes” on page 95). You will be returned to the “Display Settings” screen. Setting the Unit Name You may set a name for the unit that will be displayed above the time/date field in the Info &... -
Page 94: Figure 79 "Display Settings" Screen: "Unit Name" Screen
| Operation Chapter 6 If a unit name has been previously set, that name will be selected for overwriting. Thermo Fisher BSC 11:42 AM | 08/10/2018 Unit Name Thermo Fisher BSC Unit Name Save Save ?!123 Figure 79 “Display Settings” Screen: “Unit Name” Screen 6. -
Page 95: Figure 80 "Display Setting" Screen: "Menu Bar Customization" Screen With Icon Swapping Options
Operation | Chapter 6 The “Menu Bar Customization” screen appears, as shown in Figure 80 below. Thermo Fisher BSC 11:42 AM | 08/10/2018 Menu Bar Customization To replace a shortcut, drag it on any outlined item in the menu bar on the left. Display Access Disinfection... -
Page 96: Programs
| Operation Chapter 6 The “Region” screen appears. Enter the name of the city or country and select from the list of suggestions displayed (see “Appendix: City Time Zones” on page 149: Thermo Fisher BSC 11:42 AM I 08/10/2018 Region Enter a major city and country closest to your time zone City, Country: New York, US... -
Page 97: Figure 82 "Programs" Screen
Operation | Chapter 6 The settings you make in these screens determine which of the unit‘s functions are turned on by default when you press the “AutoStart” button or which functions are turned off when you press the “AutoStop” button in the Control Panel. -
Page 98: Figure 83 "Programs" Screen: "Edit Autostart" Screen
| Operation Chapter 6 Doing so will open up the “Edit AutoStart” screen shown in Figure 83 below. By default, the “Edit AutoStart” screen comes up with all four checkboxes already selected, as shown in the top image in Figure 83. Thermo Fisher BSC 11:42 AM | 08/10/2018 Edit AutoStart... -
Page 99: Figure 84 "Programs" Screen: "Edit Autostop" Screen
Operation | Chapter 6 Setting up AutoStop Proceed as follows to set up the biological safety cabinet for AutoStop: 1. Tap the “Settings” icon on the Main Navigation Bar, followed by the “Programs” button on the “Settings” screen. Alternatively, you can also tap the “Programs” icon on the Main Navigation Bar. - Page 100 | Operation Chapter 6 “Close window” will automatically close the window. NOTE If the window is set to close as part of AutoStop, you must press and hold the “AutoStop” button while the window is closing. This is a safety feature.
-
Page 101: Alarms And Alerts
Operation | Chapter 6 Alarms and Alerts Tapping the “Alarms and Alerts” button on the “Settings” screen takes you to the “Alarms and Alerts” screen, shown in Figure 85 below. From the “Alarms and Alerts” screen, you may change the volume, tone, and timing of several audible alarms and alerts emitted by the biological safety cabinet. -
Page 102: Figure 86 "Alarms And Alerts" Screen: "Alarm Volume" Options
| Operation Chapter 6 Alarm Volume You may change the volume of the alarm tone directly on the main “Alarms and Alerts” screen by just tapping on the dropdown list labeled “Alarm Volume” (see Figure 86 below) and selecting one of the four “Off”, “Low”, “Medium”, or “High” options. Alarm Volume High Medium... -
Page 103: Figure 88 "Alarms And Alerts" Screen: Airflow Alarm Tone Options
Operation | Chapter 6 Alternatively, you can also tap the “Alarms and Alerts” icon on the Main Navigation Bar to open the “Alarms and Alerts” screen. 3. Tap the “Window Alarm Tone” dropdown menu and choose an option. 4. Save your changes as explained in the section “Saving Changes” on page 95, or change any other desired option on the “Alarms and Alerts”... -
Page 104: Figure 89 "Alarms And Alerts" Screen With Snooze Timeout Options Expanded
| Operation Chapter 6 Thermo Fisher BSC 11:42 AM | 08/10/2018 Alarms and Alerts Airflow Alarm Tone Snooze Timeout 1 min 5 min Alert Volume High 15 min Alert Tone Save Figure 89 “Alarms and Alerts” Screen with Snooze Timeout Options expanded Proceed as follows to change the snooze timeout period: 1. -
Page 105: Figure 91 "Alarms And Alerts" Screen: Alert Tone Options
Operation | Chapter 6 3. Tap the “Alert Volume” dropdown menu and choose an option. 4. Save your changes as explained in the section “Saving Changes” on page 95, or change any other desired option on the “Alarms and Alerts” screen. Alert Tone You may choose an alert tone directly on the main “Alarms and Alerts”... -
Page 106: Figure 93 "Changes Not Saved" Message
| Operation Chapter 6 2. Tap the “OK” button to apply the changes and close the window. NOTE The window will close automatically after 5 seconds if you do not tap the “OK” button. 3. If you wish to cancel saving, tap the X icon in the top right corner of the pop-up window. Another pop-up window appears, asking whether you are sure about exiting. -
Page 107: Data Plate
Operation | Chapter 6 Data Plate Tapping the “Data Plate” icon on the Main Navigation Bar takes you to the “Data Plate” screen shown in Figure 94. The “Data Plate” screen displays pertinent information about the biological safety cabinet, including: Serial no. -
Page 108: Connectivity
| Operation Chapter 6 You may tap into the three fields to edit or add text. A keyboard (see Figure 96) appears when the user taps into any of the boxes. Thermo Fisher BSC 11:42 AM | 08/10/2018 Contact Us North America Europe Asia... -
Page 109: Figure 97 "Connectivity" Screen
Operation | Chapter 6 b. If you do not already have a Thermo Fisher Cloud account open the URL below using a web browser: https://www.thermofisher.com/cloud c. Choose the “create an account” option. WiFi Network Specifications Parameter Specification WiFi protocol 802.11b/g/n WiFi Security WEP, WPA PSK, WPA2 PSK WiFi band... -
Page 110: Figure 98 "Connectivity" Screen With Network Name Displayed
| Operation Chapter 6 If the unit is actively connected to a WiFi network the name of the network is displayed as in the following screen: Thermo Fisher BSC 11:42 AM I 08/10/2018 Connectivity WiFi ACME Thermo Fisher Cloud Figure 98 “Connectivity”... -
Page 111: Figure 100 Screen With Network Connection Message
Operation | Chapter 6 If the network does not require a password and the connection is successful, the following pop-up window message is displayed: Connected This unit is now connected to the ACME network. Figure 100 Screen with Network Connection Message 50155215 | 101 Herasafe 2030i / Maxisafe 2030i... -
Page 112: Figure 101 "Wifi" Screen With Password Required
| Operation Chapter 6 If the unit requires a password to join, the following screen is displayed: Thermo Fisher BSC 11:42 AM 08/10/2018 WiFi Edit Status: Connected Network: ACME Security: WPA2 PSK Password: **************** Type: DHCP Static/Manual IP Address: 123.456.789.0 123.456.789.0 Netmask: 123.456.789.0... -
Page 113: Figure 102 Network Connection Message
Operation | Chapter 6 If the password is accepted and the unit is able to join the network, the following pop-up window is displayed: Connected This unit is now connected to the ACME network. Figure 102 Network Connection Message Tapping the “OK” button or the X icon in the top right corner will close the pop-up window and the display returns to the “Connectivity”... - Page 114 | Operation Chapter 6 On the following screen, you will be prompted to enter the Network name, choose the type of security from the drop-down menu, and enter the password for the Network (if a secure network requiring a password): Thermo Fisher BSC 11:42 AM I 08/10/2018 WiFi Edit...
- Page 115 Operation | Chapter 6 Editing a WiFi Network If you are connected to a WiFi network and you would like to view or edit the connection, the following visual screen is displayed when you tap on the “WiFi” button: Thermo Fisher BSC 11:42 AM 08/10/2018 WiFi Edit Status:...
- Page 116 | Operation Chapter 6 You are shown a Save confirmation screen stating your changes have been saved: Settings Saved Your settings have been saved. You may tap the “OK” button or the X icon in the top right corner to close this window and return to the “Connectivity”...
-
Page 117: Figure 104 "Thermo Fisher Cloud" Screen
Operation | Chapter 6 Example showing content below the main screen (scroll to view): Thermo Fisher BSC 11:42 AM 08/10/2018 WiFi Edit Status: Connected Network: ACME Security: WPA2 PSK Password: **************** Type: DHCP Static/Manual IP Address: 123.456.789.0 123.456.789.0 Netmask: Gateway: 123.456.789.0 DNS1: 123.456.789.0... - Page 118 | Operation Chapter 6 You must have an active Thermo Fisher Cloud account before you can use one of the three methods listed above to connect the unit. If the unit is not actively connected to a WiFi network, the following screen is displayed: Unable to connect Connection to the Thermo Fisher Cloud requires a network connection (Wi-Fi).
-
Page 119: Figure 105 Thermo Fisher Cloud Connection Successful Message
Operation | Chapter 6 Once you complete the steps successfully and the unit has connected, the following confirmation screen is displayed: Connected This unit is now connected to your Thermo Fisher Cloud account. Figure 105 Thermo Fisher Cloud Connection Successful Message You may tap the “OK”... -
Page 120: Figure 106 "Connect Via Passcode" Screen
| Operation Chapter 6 The system generates a passcode and displays it on the “Connect via Passcode” screen shown in Figure 106: Thermo Fisher BSC 11:42 AM I 08/10/2018 Connect via Passcode Visit apps.thermofisher.com and enter the code: BN1NBE (expires in 59:57) This page will be closed once the code is accepted. -
Page 121: Figure 107 „Wifi Connection Error" Screen
Operation | Chapter 6 Displaying WiFi and Cloud Connectivity Connecting the device via one of the three methods (via mobile device, passcode, username) is only possible, if the device has successfully established a connection to the cloud. This is indicated by the cloud icon that appears in the top left corner of the main screen. -
Page 122: Firmware Update
| Operation Chapter 6 Firmware Update From time to time you will be informed about new software updates. Proceed as follows to update the firmware of your device: 1. Save two files to a USB memory stick: a. the update file -*.update b. -
Page 123: Factory Settings
Operation | Chapter 6 After the mode has been changed from “Open” to “Secure” by tapping the “Secure” radio button, the “Save” button turns blue to indicate that you may save your changes now. Thermo Fisher BSC Logout 11:42 AM | 08/10/2018 Admin Access Control Open... -
Page 124: Event Log
| Operation Chapter 6 Event Log Tapping the “Event Log” icon in the “Settings” screen takes you to the “Event Log” screen shown in Figure 110. The “Event Log” screen displays a complete and continuous list of events and alarms from the last 24 hours. For events > 24 hours the data log must be downloaded to a USB stick. - Page 125 Operation | Chapter 6 For each alarm the time activated and the time deactivated is recorded. Alarms include: inflow alarm low inflow alarm high downflow alarm low downflow alarm high window too low window too high ...
-
Page 126: Viewing The Event Log
| Operation Chapter 6 Viewing the Event Log Proceed as follows to view the event log: 1. Tap the “Event Log” icon on the Main Navigation Bar. The “Event Log” screen shown in Figure 111 appears. Thermo Fisher BSC Login 11:42 AM | 08/10/2018 Event Log Date/Time... -
Page 127: Exporting The Event Log
Operation | Chapter 6 The dropdown list is expanded, displaying the filtering options shown in Figure 112. Thermo Fisher BSC Login 11:42 AM | 08/10/2018 Event Log Date/Time Event View All Status 08/09/2018 UV Off 11:34 AM Log In/Log Out 08/09/2018 Alarms UV On... -
Page 128: Figure 113 "Export Log" Screen: Missing Usb Drive Alert
| Operation Chapter 6 Proceed as follows to export the event log: 1. Insert a USB drive into the USB port, which is located in a small bay next to the display window. 2. Tap the “Export Log” button in the “Event Log” screen. 3. -
Page 129: Figure 115 "Export Log" Screen: Export Completed
Operation | Chapter 6 5. When the export process has been completed, the final pop-up window shown in Figure 115 appears, anouncing that you may remove the USB drive now. Export log Export completed! Please remove the USB stick Figure 115 “Export log”... - Page 130 | Operation Chapter 6 50155215 Herasafe 2030i / Maxisafe 2030i...
-
Page 131: Chapter 7 Preparation
Preparation Hygiene Preparations for the Sample Chamber The sample chamber surfaces and the accessories required for the work process must be disinfected and cleaned in accordance with the hygiene guidelines set forth for the application. Preparing the Sample Chamber Installing the accessories: 1. -
Page 132: Response To Failure Messages
| Preparation Chapter 7 Response to Failure Messages Failure messages are displayed on the touchscreen display as outlined in the sections “Alarms” on page 65 and “Alerts” on page 68 . If one of these messages is displayed, contact the Technical Service immediately. To isolate the cause of the failure, the operating personnel must perform only the following tests and measures: Check to see if the exhaust air opening on top of the cabinet is blocked. -
Page 133: Figure 116 Sitting Posture
Preparation | Chapter 7 Sitting posture during work: Figure 116 Sitting Posture To prevent risks to health, a height-adjustable working chair with an adjustable seat back should be used during extended work periods at the safety cabinet. When the forearm rests on the armrest, is should be in an almost horizontal position. When the thigh is in a horizontal position, the angle between thigh and lower leg should exceed 90°. - Page 134 | Preparation Chapter 7 50155215 Herasafe 2030i / Maxisafe 2030i...
-
Page 135: Chapter 8 Shut-Down
Shut-down Interrupting an Operation To interrupt a work process, the fans can be switched off. 1. Remove all samples from the safety cabinet and store them properly. 2. Remove accessories from the sample chamber and clean and disinfect them. 3. Clean and disinfect the sample chamber surfaces, the workplate, and the drain pan. 4. - Page 136 | Shut-down Chapter 8 50155215 Herasafe 2030i / Maxisafe 2030i...
-
Page 137: Chapter 9 Cleaning And Decontamination
Cleaning and Decontamination Before cleaning and UV disinfection the covers of the UV lamps must be re- moved and afterwards installed. Decontamination Procedure Several procedures can be applied for decontaminating the safety cabinet. Which procedure is selected, depends on: the potential risk imminent in the agents, ... - Page 138 | Cleaning and Decontamination Chapter 9 Recommended disinfectants: Compatibility Chloride-containing disinfectants may damage some surfaces; use only chlo- ride-free disinfectants or a disinfectant with a low enough chloride content to have been proved harmless for stainless steel finishes! Disinfectants with an al- cohol content of more than 70 % may cause embrittlement of plastic compo- nents after extended exposure.
-
Page 139: Uv Disinfection After A Wipe/Spray Disinfection
Cleaning and Decontamination | Chapter 9 UV Disinfection after a Wipe/Spray Disinfection A UV disinfection can be performed either by using the optional integral UV lamps or by using a mobile UV device. The run time of the routine can be preset with the operating panel. Before disinfection remove the UV side covers and replace them afterwards. -
Page 140: Cleaning The Exterior Surfaces
| Cleaning and Decontamination Chapter 9 After the required reaction time, the formaldehyde should be neutralized by evaporating a 25 % ammonium solution (10 ml per cubic meter of sample chamber volume). NOTE After the neutralization reaction time with ammonia, carry out check measurements and ventilate. -
Page 141: Chapter 10 Maintenance
Maintenance Inspection The annual inspection comprises the following checks: Electrical safety in accordance with national regulations. Functional test of the device. Checking all components for possible damage. Checking the filter state. NOTE Perforated plate The Perforated plate at the blanket of the sample chamber serves for the protection of the downflow filter and prevents refluxing. -
Page 142: Sample Chamber Illumination
| Maintenance Chapter 10 Sample Chamber Illumination The tubes are installed in the front cover bezel. 1. Remove the bezel retaining screws and the bezel. 2. The tubes are retained by rotatable sockets. Rotate the tube carefully to the removal position and remove it from the socket. -
Page 143: Exchanging Smartports
Maintenance | Chapter 10 Exchanging SmartPorts Contamination! There is a risk of contamination for users and the product itself. In order to prevent contaminated particles escaping from the workspace, the unit must be switched on in order to exchange the SmartPorts. The SmartPorts are removed inwards into the workspace. - Page 144 | Maintenance Chapter 10 50155215 Herasafe 2030i / Maxisafe 2030i...
-
Page 145: Chapter 11 Disposal
Disposal Disposal Procedure Discarded cabinets or unit components contain reusable materials. All components with the exception of the HEPA filters can be disposed of after having been thoroughly decontaminated. The HEPA filters must be disposed of in accordance with the applicable national and state regulations for special solid waste. - Page 146 | Disposal Chapter 11 WEEE Conformity: This product is required to comply with the European Union‘s Waste Electrical & Electronic Equipment (WEEE) Directive 2012/19/EU. It is marked with the following symbol: Thermo Electron has contracted with one or more recycling/disposal companies in each EU Member State, and this product should be disposed of or recycled through them.
-
Page 147: Chapter 12 Technical Data
Technical Data Dimensions Herasafe 2030i / Maxisafe 2030i Exterior dimensions Width mm/in 1000/39.4 1300/51.2 1600/63.0 1900/74.8 Depth mm/in Herasafe 2030i 800/31.5 - Maxisafe 2030i 865/34.1 Height mm/in 1552/61.1 Interior dimensions Width mm/in 900/35.4 1200/47.2 1500/59.1 1800/70.9 Depth mm/in 627/24.7 Height mm/in 780/30.7 Front window... - Page 148 | Technical Data Chapter 12 Optional media connections in the interior - rear wall Herasafe 2030i / Maxisafe 2030i Diameter inch R 3/8 R 3/8 R 3/8 R 3/8 Outer distance left Connection 1 mm/in 401/15.8 501/19.7 900.1/35.4 1050/41.3 Connection 2 mm/in 301/11.8 401/15.8...
- Page 149 Technical Data | Chapter 12 Pressures Herasafe 2030i / Maxisafe 2030i Pressure media valves bar/psi max. 6/87 Volume, weights and loads Herasafe 2030i Volume Device volume 1.1/39 1.4/49 1.7/60 2.1/74 Floorpan I/cf 30/1 40/1.4 50/1.7 60/2.1 Weights Cabinet kg/lbs 170/375 200/441 230/507 280/617...
- Page 150 | Technical Data Chapter 12 Airflow system Herasafe 2030i / Maxisafe 2030i Air speeds Inflow 0.45/88.6 Downflow 0.32/63 Air volume 200 mm/8“ access opening Overall volume flow /h / cfm 910/536 1215/715 1520/894 1824/1074 Downflow volume flow /h / cfm 622/366 829/488 1037/610...
- Page 151 Technical Data | Chapter 12 Filter Herasafe 2030i / Maxisafe 2030i Type HEPA (H 14 acc. DIN EN 1822) Material Glass fiber fleece Separability in MPPS 99.995 Separability at 0.3 μm 99.999 particle size Downflow Width mm/in 915/36 1220/48 1525/60 1830/72 Depth mm/in...
- Page 152 | Technical Data Chapter 12 Ambient conditions Herasafe 2030i / Maxisafe 2030i Temperature Max. ambient tempera- °C / °F 40/104 ture during operation Min. ambient tempera- °C / °F 10/50 ture during operation Humidity Max. humidity/operation % h.r. Max. humidity/storage % h.r.
- Page 153 Technical Data | Chapter 12 Herasafe 2030i / Maxisafe 2030i Dongle Hardware interface Standard Frequency band Data rate Output power Security Max. humidity (opera- % h.r. tion) Max. humidity (storage) % h.r. Pollution degree 50155215 | 143 Herasafe 2030i / Maxisafe 2030i...
- Page 154 | Technical Data Chapter 12 50155215 Herasafe 2030i / Maxisafe 2030i...
-
Page 155: Chapter 13 Device Log
Device Log Device type: Part number: Serial number: Service number: Location: Operator's note: Work carried out Notes Date Signature | 145 Herasafe 2030i / Maxisafe 2030i 50155215... - Page 156 | Device Log Chapter 13 50155215 Herasafe 2030i / Maxisafe 2030i...
-
Page 157: Chapter 14 Certificate Of Decontamination
Certificate of Decontamination | 147 Herasafe 2030i / Maxisafe 2030i 50155215... - Page 158 | Certificate of Decontamination Chapter 14 50155215 Herasafe 2030i / Maxisafe 2030i...
-
Page 159: Appendix: City Time Zones
Appendix: City Time Zones Time Zone, Offset to UTC City Africa / 00:00 Abidjan, Ivory Coast Accra, Ghana Algiers, Algeria Bamako, Mali Banjul, Gambia Casablanca, Morocco Conakry, Guinea Dakar, Senegal Lome, Togo Monrovia, Liberia Nouakchott, Mauritania Ouagadougou, Burkina Faso Sao Tome and Principe Sierra Leone Africa / -01:00 Bissau, Guinea-Bissau... - Page 160 | Appendix: City Time Zones Chapter 15 Africa / +02:00 Blantyre, Malawi Bujumbura, Burundi Cairo, Egypt Gaborone, Botswana Harare, Zimbabwe Johannesburg, South Africa Juba, South Sudan Khartoum, Sudan Kigali, Rwanda Lubumbashi, Congo (DRC) Lusaka, Zambia Maputo, Mozambique Maseru, Lesotho Mbabane, Swaziland Tripoli, Libya Windhoek, Namibia Africa / +03:00...
- Page 161 Appendix: City Time Zones | Chapter 15 America / -03:00 Araguaina, Brazil Bahia, Brazil Belem, Brazil Buenos Aires, Argentina Catamarca, Argentina Cayenne, French Guiana Cordoba, Argentina Danmarkshavn, Greenland Fortaleza, Brazil Godthab, Greenland Jujuy, Argentina La Rioja, Argentina Maceio, Brazil Mendoza, Argentina Montevideo, Uruguay Paramaribo, Suriname Punta Arenas, Chile...
- Page 162 | Appendix: City Time Zones Chapter 15 Curacao, Curaçao Dominica, Dominica Glace Bay, Canada Goose Bay, Canada Grenada, Grenada Guadeloupe, Guadeloupe Guyana, Guyana Halifax, Canada Kralendijk, Caribbean Netherlands La Paz, Bolivia Lower Princes, Sint Maarten Manaus, Brazil Marigot, St. Martin Martinique, Martinique Miquelon, St.
- Page 163 Appendix: City Time Zones | Chapter 15 America / -05:00 Atikokan, Canada Bogota, Colombia Cayman, Cayman Islands Detroit, US Eirunepe, Brazil Grand Turk, Turks & Caicos Islands Guayaquil, Ecuador Havana, Cuba Indianapolis, US (Indiana) Marengo, US (Indiana) Tell City, US (Indiana) Vevay, US (Indiana) Vincennes, US (Indiana) Winamac, US (Indiana)
- Page 164 | Appendix: City Time Zones Chapter 15 America / -06:00 Belize, Belize Cancun, Mexico Chicago, US Chihuahua, Mexico Costa Rica, Costa Rica El Salvador, El Salvador Guatemala, Guatemala Knox, US (Indiana) Petersburg, US (Indiana) Monticello, US (Kentucky) Managua, Nicaragua Matamoros, Mexico Merida, Mexico Mexico City, Mexico Monterrey, Mexico...
- Page 165 Appendix: City Time Zones | Chapter 15 America / -08:00 Bahia Banderas, Mexico Dawson Creek, Canada Fort Nelson, Canada Hermosillo, Mexico Inuvik, Canada Juneau, US Los Angeles, US Mazatlan, Mexico Metlakatla, US Sitka, US Tijuana, Mexico Vancouver, Canada Whitehorse, Canada America / -09:00 Dawson, Canada Yakutat, US...
- Page 166 | Appendix: City Time Zones Chapter 15 Asia / +02:00 Amman, Jordan Beirut, Lebanon Damascus, Syria Famagusta, Cyprus Gaza, Palestine Hebron, Palestine Jerusalem, Israel Nicosia, Cyprus Asia / +03:00 Aden, Yemen Baghdad, Iraq Kuwait, Kuwait Riyadh, Saudi Arabia Asia / +03:50 Tehran, Iran Asia / +04:00 Bahrain, Bahrain...
- Page 167 Appendix: City Time Zones | Chapter 15 Asia / +06:00 Almaty, Kazakhstan Bishkek, Kyrgyzstan Dhaka, Bangladesh Dushanbe, Tajikistan Hovd, Mongolia Omsk, Russia Tashkent, Uzbekistan Urumqi, China Asia / +06:50 Yangon, Myanmar Asia / +07:00 Bangkok, Thailand Barnaul, Russia Choibalsan, Mongolia Jakarta, Indonesia Krasnoyarsk, Russia Novokuznetsk, Russia...
- Page 168 | Appendix: City Time Zones Chapter 15 Asia / +09:00 Chita, Russia Dili, East Timor Jayapura, Indonesia Khandyga, Russia Pyongyang, North Korea Seoul, South Korea Tokyo, Japan Ust-Nera, Russia Yakutsk, Russia Asia / +10:00 Vladivostok, Russia Asia / +11:00 Magadan, Russia Sakhalin, Russia Srednekolymsk, Russia Asia / +12:00...
- Page 169 Appendix: City Time Zones | Chapter 15 Australia / +10:00 Brisbane, Australia Currie, Australia Lindeman, Australia Lord Howe, Australia Melbourne, Australia Sydney, Australia Australia / +11:00 Hobart, Australia Europe / 00:00 Ceuta, Spain Europe / +01:00 Amsterdam, Netherlands Andorra, Andorra Belgrade, Serbia Berlin, Germany Bratislava, Slovakia...
- Page 170 | Appendix: City Time Zones Chapter 15 Skopje, North Macedonia Stockholm, Sweden Tirane, Albania Vaduz, Liechtenstein Vatican, Vatican City Vienna, Austria Warsaw, Poland Zagreb, Croatia Zurich, Switzerland Europe / +02:00 Athens, Greece Bucharest, Romania Helsinki, Finland Istanbul, Turkey Mariehamn, Iland Islands Sofia, Bulgaria Europe / +03:00 Chisinau, Moldova...
- Page 171 Appendix: City Time Zones | Chapter 15 Mauritius, Mauritius Réunion, Réunion Indian / +05:00 Chagos, British Indian Ocean Territory Kerguelen, French Southern Territories Maldives, Maldives Indian / +06:50 Cocos, Cocos (Keeling) Islands Indian / +07:00 Christmas, Christmas Island Pacific / -5:00 Galapagos, Ecuador Pacific / -6:00 Easter, Chile...
- Page 172 | Appendix: City Time Zones Chapter 15 Funafuti, Tuvalu Kosrae, Micronesia Majuro, Marshall Islands Tarawa, Kiribati Wake, U.S. Outlying Islands Wallis, Wallis & Futuna Pacific / +12:45 Chatham, New Zealand Pacific / +13:00 Tongatapu, Tonga Pacific / +14:00 Kiritimati, Kiribati 50155215 Herasafe 2030i / Maxisafe 2030i...
- Page 173 Appendix: City Time Zones | Chapter 15 50155215 | 163 Herasafe 2030i / Maxisafe 2030i...
Need help?
Do you have a question about the HERASAFE 2030i Series and is the answer not in the manual?
Questions and answers