
Related Manuals for Dahua D-PFS3110-8ET1GT1GF-96


Summary of Contents for Dahua D-PFS3110-8ET1GT1GF-96
- Page 1 Dahua Ethernet Switch (4&8-port Unmanaged Desktop Switch) Quick Start Guide V1.0.0...
-
Page 2: Foreword
Foreword General This manual introduces the installation, functions and operations of the 4&8-port unmanaged desktop switch (hereinafter referred to as "the Switch"). Read carefully before using the Switch, and keep the manual safe for future reference. Safety Instructions The following signal words might appear in the manual. Signal Words Meaning Indicates a high potential hazard which, if not avoided, will result in... - Page 3 might result in some differences appearing between the actual product and the manual. Please contact customer service for the latest program and supplementary documentation. ● There might be errors in the print or deviations in the description of the functions, operations and technical data.
-
Page 4: Important Safeguards And Warnings
Important Safeguards and Warnings This section introduces content covering the proper handling of the device, hazard prevention, and prevention of property damage. Read carefully before using the device, and comply with the guidelines when using it. Transportation Requirements Transport the device under allowed humidity and temperature conditions. Storage Requirements Store the device under allowed humidity and temperature conditions. - Page 5 Operation Requirements ● Do not disassemble the device without professional instruction. ● Operate the device within the rated range of power input and output. ● Make sure that the power supply is correct before use. ● Make sure the device is powered off before disassembling wires to avoid personal injury. ●...
-
Page 6: Table Of Contents
Table of Contents Foreword ........................................I Important Safeguards and Warnings ............................III 1 Overview ........................................1 1.1 Introduction ....................................1 1.2 Features ......................................1 2 Port and Indicator ....................................2 2.1 Front Panel ....................................2 2.2 Rear Panel ...................................... 4 3 Installation ....................................... 5 3.1 Preparation .................................... -
Page 7: Overview
1 Overview 1.1 Introduction The Switch is a layer-2 commercial switch. It has a high-performance switching engine and a large buffer memory to ensure smooth video stream transmission. With a full-metal and fanless design, the Switch features great heat dissipation capability on the shell surface, and is able to work in environments that range from –10 °C (+14 °F) to +55 °C (+131 °F). -
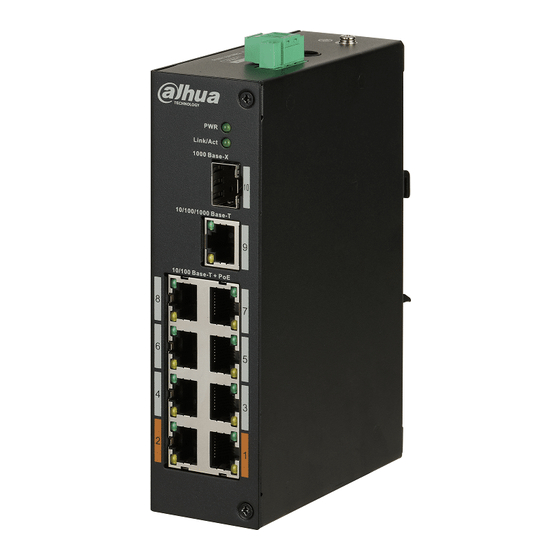
Page 8: Port And Indicator
2 Port and Indicator 2.1 Front Panel The following figure is for reference only, and might differ from the actual product. Figure 2-1 Front panel (without optical ports) Following are all the ports and indicators on the front panel of the 4&8-port unmanaged desktop switch (without optical ports), and might differ from the actual product. - Page 9 Description DIP switch. ● PD Alive: When terminal device crash is detected, power down and restart the terminal device. ● Extend Mode: Extends the maximum transmission distance to 250 m, but reduces average transmission speed to 10 Mbps. Another DIP switch. Select Default or Extend Mode by dialing the DIP switch.
-
Page 10: Rear Panel
Description DIP switch. ● PD Alive: When terminal device crash is detected, power down and restart the terminal device. ● Extend Mode: Extends the maximum transmission distance to 250 m, but reduces average transmission speed to 10 Mbps. 2.2 Rear Panel The following figure is for reference only, and might differ from the actual product. -
Page 11: Installation
3 Installation 3.1 Preparation ● Select an appropriate installation method. ● Install the Switch on a solid and flat surface. ● Leave around 10 cm of open space around the Switch for heat dissipation and to ensure good ventilation. 3.2 Desktop Mount The Switch supports desktop mount. -
Page 12: Wiring
4 Wiring 4.1 Connecting GND GND cables do not come with the package of select models. Purchase them as needed. Grounding the Switch can protect it against lightning and interference. The steps for connecting the GND are as follows: Step 1 Remove the ground screw from the Switch and pass the ground screw through the round hole of the OT terminal of the ground cable. - Page 13 The signal is transmitted through laser by optical fiber cable. The laser conforms to the requirements of Class 1 laser products. When the Switch is powered on, do not look directly at the optical port to avoid injury on eyes. ●...
-
Page 14: Connecting Ethernet Port
4.4 Connecting Ethernet Port The Ethernet port is a standard RJ-45 port. With its self-adaptation function, it can be automatically configured to full duplex/half-duplex operation mode. It supports MDI/MDI-X self-recognition of the cable, allowing you to use a cross-over cable or straight-through cable to connect the terminal device to the network device. -
Page 15: Cybersecurity Recommendations
Cybersecurity Recommendations Mandatory actions to be taken for basic device network security: Use Strong Passwords Please refer to the following suggestions to set passwords: The length should not be less than 8 characters. Include at least two types of characters; character types include upper and lower case ... - Page 16 Disable Unnecessary Services and Choose Secure Modes If not needed, it is recommended to turn off some services such as SNMP, SMTP, UPnP, etc., to reduce risks. If necessary, it is highly recommended that you use safe modes, including but not limited to the following services: SNMP: Choose SNMP v3, and set up strong encryption passwords and authentication ...
Need help?
Do you have a question about the D-PFS3110-8ET1GT1GF-96 and is the answer not in the manual?
Questions and answers