
Related Manuals for Shuttle Ultimate


Summary of Contents for Shuttle Ultimate
- Page 1 If you discover damaged or missing parts, please contact Shuttle Systems support@shuttlesystems.com | 1-800-334-5633 9am-5pm Pacific Time Page 1...
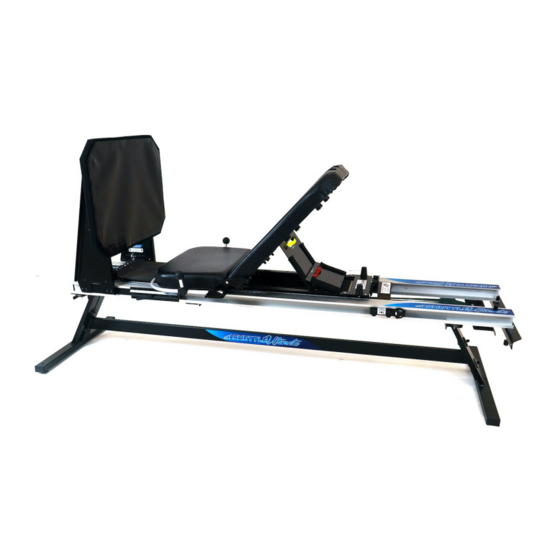
- Page 2 Assembly of the Shuttle Ultimate is easier with two people. Keep in mind that the following images pertain to just one of the two available Shuttle Ultimate models, your parts may appear slightly different than those in the included images but, the required steps remain the same.
- Page 3 ULTIMATE INSTALLATION The Shuttle Ultimate will come in three boxes 1. Carriage - Carriage 2. Ultimate Rail System - Ultimate Rails - Stand-End Support Bar - Stand-End A (Range of Motion Sticker) - Stand-End B (no sticker) - Towers - Tower Crossbar 3.
- Page 4 1. Prop one Stand-End and slide the bolts from the Support Bar into the vertical slot of the REQUIRED Stand End. The Shuttle Ultimate sticker on the Support Bar should be facing upward. Stand-Ends should lean in towards each other and complement the angle of the support.
- Page 5 STEP 2 ATTACHING ULTIMATE RAILS TO STAND ENDS ITEMS 1. Place Ultimate Rail system onto Stand-Ends, by allowing the protruding bolts to drop REQUIRED through openings on the Stand-End. Ultimate Rails should be oriented so that the end pictures on the left (foot-end) should fit over Stand-End B.
- Page 6 Tightly secure the nuts so that the Sliderbar is immobile. (Pic 3.2) KICKPLATE STRUCTURE 3. Insert Sliderbars into the end of the Ultimate Rails (over Stand-End B). To do this, rotate Sliderbar lever counterclockwise to loosen the metal plate from the fiberglass. Carefully ULTIMATE...
- Page 7 STEP 4 SLIDE CARRIAGE INTO ULTIMATE RAIL SYSTEM ITEMS 1. To insert the carriage, first remove the bumpers from the A-Side of the Ultimate Rail REQUIRED System. Use your fingers to rotate bumpers counterclockwise until they are removed. (Pic 4.1) CARRIAGE 2.
- Page 8 STEP 5 ATTACH KICKPLATE TO KICKPLATE STRUCTURE ITEMS 1. Remove metal plate and knobs from Kickplate. Push the Kickplate block through the REQUIRED vertical slot of the Kickplate Structure and reattach the plate and knobs to the other side. Tighten knobs by rotating clockwise on the threaded bolts. (Pic 5.1) KICKPLATE KICKPLATE STRUCTURE...
-
Page 9: Attaching Accessories
STEP 6 ATTACHING ACCESSORIES ITEMS 1. Insert Carriage Lockdown Slider. First, loosen the knob by turning counterclockwise so that REQUIRED the disk separates from the fiberglass. Then insert into the Rail System so that the sticker is in the upright position. Make sure that the fiberglass slides along the inside of the rail while CARRIAGE the disk and knob slide on the outside of the rail. - Page 10 Finally, you have one of the greatest machines on earth..Well, at least we'd like to think so - and many of our owners agree. Therefore, enjoy it! Leave us a review on our website! Please visit us at: www.ShuttleSystems.com 1-800-334-5633 Made in the Page 10...
Need help?
Do you have a question about the Ultimate and is the answer not in the manual?
Questions and answers