
Related Manuals for Shuttle MVP Elite Plus


Summary of Contents for Shuttle MVP Elite Plus
- Page 1 Assembly Guide for the Elite Plus If you discover damaged or missing parts, please contact Shuttle Systems support@shuttlesystems.com | 1-800-334-5633 9am-5pm Pacific Time Page 1...
- Page 2 Page 2...
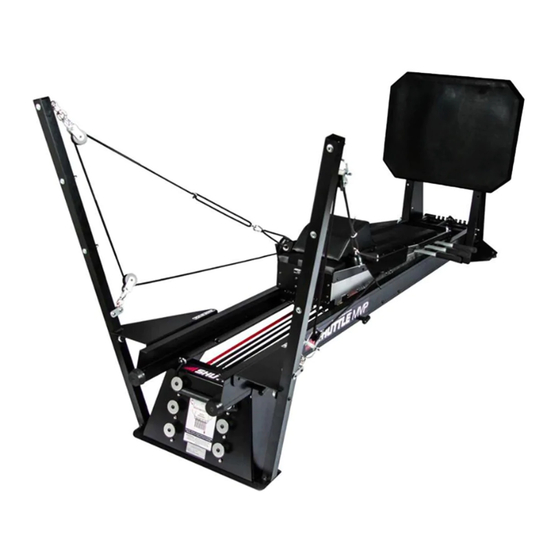
- Page 3 Assembly of the Shuttle MVP requires two people. Keep in mind that the following images pertain to just one of the three available Shuttle MVP models, your parts may appear slightly different than those in the included images but, the required steps remain the same.
- Page 4 MVP ASSEMBLY The MVP will come in four boxes. 1. Head-End Stand - Head-End Stand - Connector Plate - Parts Bags (1-7) - Assembly Instructions - Tower Wings - Towers Bag (Rope and Pulley System) - Accessories (only if ordered) 2.
- Page 5 STEP 1 ASSEMBLING THE MVP RAILS WITH THE CONNECTOR PLATE ITEMS 1. Arrange the MVP Rails parallel to each other on the floor, upright, hole patterns matching REQUIRED and labels facing outward. (Pic 1.1) 2. Insert the Connector Plate (sticker facing up) and align the holes of the plate with those MVP RAILS located midway along the Rails.
- Page 6 STEP 2 ATTACHING THE HEAD-END STAND & TOWER WINGS ITEMS 1. Set the assembled MVP Rails, right side up, atop the Carriage box, allowing the Head-End REQUIRED of the Rails to overhang the box at least 18”. (Pic 2.1) 2. Place the Head end of the MVP Rails to the inside of the Head-End Stand vertical tabs, and HEAD-END slide the Stand forward until the holes of each structure are aligned.
- Page 7 STEP 3 MOUNTING THE KICKPLATE STRUCTURE ITEMS 1. Remove the plywood attached to the bottom and back of the Kickplate Structure. Dispose REQUIRED of the plywood along with the nuts and bolts that held it together. 2. Position the Foot-End of the MVP Rails to the inside of the Kickplate Structure. Align the KICKPLATE holes and place the MVP Rail ends on the flange of the structure.
- Page 8 STEP 4 INSTALLING THE REBOUND STOP BLOCKS ITEMS 1. Remove the two plastic Rebound Stop Blocks from Parts Bag #4 and unscrew the lock REQUIRED nuts from the bolts. 2. With the bumper cones pointing towards the Head-End Stand, insert the bolts of the black REMAINING plastic Rebound Blocks into the MVP Rails and through the Kickplate Structure.
- Page 9 STEP 5 INSTALLING THE ELASTICORDS ITEMS 1. Remove the Elaticords from the box and place them on the floor between the MVP Rails, REQUIRED on top of the Connector Plate. (Pic 5.1) 2. Facing the Head-End Stand, insert the loop end of the red lanyard through the far right 3/4” ELASTICORDS hole, inserting the dumbbell shaped Lanyard Mounting Rod from Parts Bag #5 through the BOX...
-
Page 10: Installing The Handlebars
STEP 6 INSTALLING THE HANDLEBARS ITEMS 1. Turn the Carriage upside down. Cut the zip-ties to remove the 3, 30” Long Handlebars. Lift REQUIRED up on the Retainer Plate and slide the 3 Handlebars through a side hole of the Carriage, under the Plate, and out through the corresponding hole on the other side. - Page 11 STEP 7 INSERTING THE CARRIAGE ITEMS 1. While the Carriage is still overturned, grasp both sides of the Range of Motion (ROM) REQUIRED Control Rope to the center, pull them tight, letting the ROM Control Bar, Donut and Eyebolts extend over the plate between the wheels to rest on the floor. (Pic 7.1) PARTS BAG #7 2.
- Page 12 Page 12...
- Page 13 STEP 8 ATTACHING THE KICKPLATE BOARD ITEMS 1. The Kickplate Board is adjustable to three different heights. Once the desired position is REQUIRED determined, insert the four protruding bolts at the back of the Board into the desired corresponding holes in the Kickplate Structure. Secure with the Knurled Knobs. (Pic 8.1) KICKPLATE BOARD Page 13...
- Page 14 STEP 9 ATTACHING THE TOWERS ITEMS 1. Unwrap and remove hardware from the Towers, as well as loosening the bottom bolt on the REQUIRED Towers. 2. Place both Towers (one on each side) on the plastic blocks at the Head-End Stand. (Pic TOWERS 9.2) 3.
- Page 15 9.3 Page 15...
- Page 16 STEP 10 THE HEADREST ITEMS 1. Align the Velcro strips on the back of the Headrest with those on the Carriage. With the REQUIRED pillow toward the head-end of the Carriage, locate the desired position and press down and into place to ensure sufficient contact. (Pic 9.1) HEADREST Page 16...
- Page 17 STEP 11 THE BACKREST EXTENSION PAD ITEMS 1. The Backrest Extension Pad can either be used as an extension of the padded center on the REQUIRED Carriage (supports deep squats) or as an alternative, a low profile headrest (Pic 10.1). To use an Extension, fit into the space at the food- end of the Carriage.
- Page 18 Finally, you have one of the greatest machines on earth..Well, at least we'd like to think so - and many of our owners agree. Therefore, enjoy it! Leave us a review on our website! Please visit us at: www.ShuttleSystems.com 1-800-334-5633 Made in the Page 18...
- Page 19 I 5 YEAR LIMITED ORIGINAL EQUIPMENT WARRANTY REPLACEMENT PARTS SHUTTLE S STEMS . T , 18003345633. P : M , , , . ...
Need help?
Do you have a question about the MVP Elite Plus and is the answer not in the manual?
Questions and answers