Advertisement
Quick Links
Take the leg press to the patient
OWNER'S MANUAL
4201 Guide Meridian Suite 101A Bellingham, WA 98226
TOLL-FREE: (800)334-5633 | PHONE: (360)599-2833 | FAX:
(360)599-2171 INFO@SHUTTLESYSTEMS.COM |
WWW.SHUTTLESYSTEMS.COM
MADE IN U.S.A. | PATENT NO. 6,042,523 | MANUAL VERSION 2.0
Page 1
Advertisement

Related Manuals for Shuttle MiniPress


Summary of Contents for Shuttle MiniPress
- Page 1 Take the leg press to the patient OWNER’S MANUAL 4201 Guide Meridian Suite 101A Bellingham, WA 98226 TOLL-FREE: (800)334-5633 | PHONE: (360)599-2833 | FAX: (360)599-2171 INFO@SHUTTLESYSTEMS.COM | WWW.SHUTTLESYSTEMS.COM MADE IN U.S.A. | PATENT NO. 6,042,523 | MANUAL VERSION 2.0 Page 1...
- Page 2 Page 2...
- Page 3 TABLE OF CONTENTS I. SHUTTLE MINIPRESS INTRO II. UNDERSTANDING YOUR SHUTTLE MINIPRESS III. USING THE SHUTTLE MINIPRESS IV. EXERCISE PROTOCOLS Page 3...
- Page 4 Page 4...
- Page 5 A patient may use the MiniPress in bed, on the floor, sitting in a chair or wheelchair, or on a treatment table. In response to the need for a method of restoring and maintaining the range of motion for postoperative patients, CDC Shuttle Systems has developed the Shuttle MiniPress.
- Page 6 LIMITED ORIGINAL EQUIPMENT WARRANTY CDC Shuttle Systems makes every effort to assure that its’ products meet high quality and durability standards and warrants to the original retail consumer/purchaser of our products that each product be free from defects in workmanship and materials under normal and reasonable use and correct assembly (if assembled by consumer/purchaser), as follows.
- Page 7 Page 7...
- Page 8 For example, a patient will have greater flexion at the knee if they use the MiniPress while seated in a chair, or lying in a supine position in bed or sitting flexed at the hip on a treatment table. Use of a goniometer will ensure an accurate flexion angle measurement and documentation of improvement.
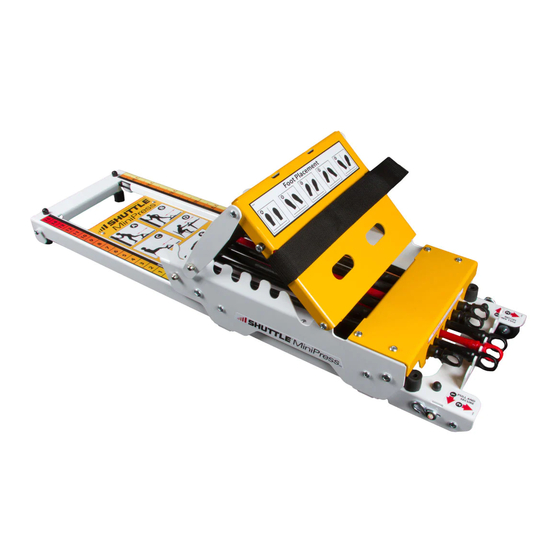
- Page 9 Distance Indicator Label Assists the user in measuring the stroke distance traveled. Distance is measured from the leading edge of the Carriage. The numbers indicate the distance of carriage movement in inches. Footplate Adjustment The Footplate is adjustable from 0 to 75 degrees from a horizontal line with the Carriage. Adjustment is accomplished by lifting the support bar on the back side of the Footplate frame and placing the bar into the appropriate slot.
- Page 10 Frame or on the Carriage while the machine is in use. Stabilizing the MiniPress Two black ropes with hooks are attached to each side of the MiniPress. When secured properly, these ropes keep the machine in place when the patient pushes the Footplate.
- Page 11 Stability from a treatment table or bed - The Stabilization Ropes may be held in the hand of the practitioner if they are not able to wrap around the legs of the table or bed. Stability from a tabletop (for Upper Body Exercise) - The rubber feet at the ends of the frame are placed against the edge of a tabletop.
- Page 12 Maintenance and Cleaning The MiniPress is easy to keep clean and requires only a limited amount of maintenance. Mild soap and water, or antibacterial wipes are safe cleaning products. Removing the Carriage - To remove the Carriage from the rails remove the two clips from one side of the carriage using a phillips head screwdriver.
- Page 13 To Lubricate Elasticords: 1. Engage one cord at a time and press carriage 10-12 inches exposing the Elasticord. 2. Apply a pea size portion of Shuttle Systems Silicone Gel to each Elasticord using latex gloves. Part #4011 - SILICONE GEL - 5.3 oz tube...
- Page 14 Page 14...
- Page 15 3. Keep fingers and objects outside the frame at all times while the MiniPress is in use. 4. When using the MiniPress with a patient sitting in a chair, the back of the chair must be up against the wall, or an immovable object, to prevent the chair from being overturned.
- Page 16 GENERAL MACHINE FUNCTIONS Elasticord Resistance The MiniPress is equipped with five black latex Elasticords, each with a starting load of 7 lbs, and one red Elasticord, with a starting load of 2 lbs. With all Elasticords engaged, the initial load is approximately 32 lbs.
- Page 17 IV. EXERCISE PROTOCOLS The MiniPress is a closed kinetic chain exercise device designed to initiate early lower extremity motion in a functional pattern. It allows the practitioner to introduce un-weighted range of motion or gradual resistance from very light to moderate, applied either unilaterally or bilaterally.
- Page 18 SEATED LOWER EXTREMITY PROTOCOLS REFER TO SEC. III PRIOR TO PROCEEDING QUAD STRENGTHENING 1. Orient the machine with the Adjustment Load Knobs facing the patient. 2. Stabilize the machine. 3. Set the Footplate to the appropriate angle for patient’s comfort. 4.
- Page 19 HAMSTRING STRENGTHENING (Sit to Stand) 1. Orient the machine with the Adjustment Load Knobs facing away from the patient. 2. Stabilize the machine. 3. Set the Footplate to the flat position. 4. Place the black Security Strap behind the heel(s). 5.
- Page 20 UNILATERAL LEG PRESS 1. Orient the machine with the Adjustment Load Knobs facing the patient. 2. Stabilize the machine. 3. Set the Footplate to the appropriate angle for the patient's comfort. 4. Secure the patient's foot to the Footplate using the Security Strap. 5.
- Page 21 5. The patient can start moving the Carriage by pushing the leg(s) away from the body and drawing them back in a controlled manner. If applicable, the uninjured leg may be used to propel the MiniPress to assist the injured leg. 6. Engage Elasticords based upon weight bearing ability.
- Page 22 Bilateral Variation I: Place a rubber ball between the knees. Medialis muscles are necessarily involved to keep the ball in place. The ball should not rotate if both limbs are pressing equally hard. Unilateral OR Bilateral Leg Press Variation I: Leg Press with Theraband (pulling laterally on one or both knees) Attach a Theraband from the patient's knee to a hard point to the right or left of the knee.
- Page 23 Unilateral OR Bilateral Leg Press Variation II: Leg Press with Dynadisc® on Footplate Place a DynaDisc® under the patient’s foot or feet. This will introduce neurological involvement with the patient’s ankle and knee. Leg Press Tip: To accurately determine the load during the entire stroke place a simple spring scale under the patient’s foot or feet.
- Page 24 KNEE FLEXION (Hamstring exercise with resistance) 1. Orient the machine with the Adjustment Load knobs facing away from the patient. 2. Secure the machine. 3. Set the Footplate to a flat position. 4. Secure the patient's foot (or feet) to the Footplate using the Security Strap over the foot. 5.
- Page 25 TOE LIFT (DORSIFLEXION) 1. Orient the machine with the Adjustment Load Knobs facing the patient. 2. Secure the machine. 3. Remove the Support Bar so the Footplate swings freely. 4. Secure the patient’s foot to the Footplate using the Security Strap over the foot. 5.
- Page 26 Do not stand on the MiniPress, or attempt to use it while standing on it. There are several exercises in which the MiniPress is used while standing; however, in these, the patient is always stabilized on the floor, not on the machine. We strongly suggest that the patient is firmly holding onto a railing, such as parallel bars, or supported by the therapist.
- Page 27 STANDING HIP ADDUCTION 1. Stabilize the machine. 2. Set the Footplate to a flat position. 3. Direct the patient to place their foot on the open surface of the Carriage directly before the Footplate so that the active leg is slightly to the side of the supporting leg. 4.
- Page 28 STANDING HIP EXTENSION 1. Stabilize the machine. 2. Set the Footplate to the appropriate angle for the patient's use. 3. Direct the patient to stand before the machine with the Adjustment Load Knobs facing the patient’s heels at a distance where the patient can perform a pushing exercise within the desired range of motion.
- Page 29 SUPINE PROTOCOLS REFER TO SEC. III PRIOR TO PROCEEDING When using the Shuttle MiniPress in a bed. Use foam roll or pillow to prop the end of the MiniPress. This will help prevent the Carriage from rubbing on the bed.
- Page 30 Load Adjustment Knobs on the same side as the active leg. A pad under the patient that brings the level of the patient to the level of the MiniPress is recommended. 4. The patient will place his/her foot on the open surface of the Carriage directly before the Footplate.
- Page 31 SUPINE QUAD EXTENSION 1. Orient the machine with the Load Adjustment Knobs facing the patient. 2. Stabilize the machine. 3. Set Footplate to the appropriate angle for the patients comfort. 4. With the patients leg fully extended in a supine position place a foam roll or pillow under the knee to act as a cushion.
- Page 32 UPPER EXTREMITY PROTOCOLS REFER TO SEC. III PRIOR TO PROCEEDING SEATED SHOULDER STABILIZATION (Bilateral or Unilateral) (protraction/retraction) Page 32...
- Page 33 1. Secure the MiniPress to a table edge using the white rubber pads over the edge of the table. 2. Orient the patient facing the Load Adjustment Knobs. 3. Stabilize the machine. 4. Set the Footplate to the appropriate angle for the patient's use.
- Page 34 SEATED LATERAL PRESS 90º to the Side Pivoting from the Waist 1. Secure the MiniPress to a table edge using the white rubber pads over the edge of the table. 2. Orient the patient facing perpendicular to the Load Adjustment Knobs. The patient would be looking to the right for a right arm press or to the left for a left arm press.
- Page 35 Keeping the spine straight, allow the elbow to bend, letting the carriage travel back to the resting position. SEATED ABDOMINAL EXERCISE 1. Secure the MiniPress to a table edge using the white rubber pads over the edge of the table. Sit the patient facing the Load Adjustment Knobs. 2. Stabilize the machine.
- Page 36 Variation: Add a stability ball between hands and Footplate. Page 36...
- Page 37 6. Monitor for range of motion, smoothness, alignment and stabilization. VARIATION: To increase the activation of the core muscles move the chair to the left or right of the MiniPress. This will require more rotational strength in the core muscles.
- Page 38 SEATED ROW 1. Secure the MiniPress over the edge of a table using the white rubber feet. Orient the patient with the Load Adjustment Knobs pointing away from them. 2. Stabilize the machine. 3. Set the Footplate to the flat position.
- Page 39 SEATED ROW USING BACK AND GLUTEUS 1. Secure the MiniPress over the edge of a table using the white rubber feet. Seat the patient with the Load Adjustment Knobs pointing the otherway. 2. Stabilize the machine. 3. Set the Footplate to the flat position.
Need help?
Do you have a question about the MiniPress and is the answer not in the manual?
Questions and answers