
Subscribe to Our Youtube Channel
Related Manuals for Audi Genuine Accessories 80A.071.128


Summary of Contents for Audi Genuine Accessories 80A.071.128
- Page 1 Service Installation instructions Bicycle rack For scope of delivery 80A.071.128 Audi Genuine Accessories® Edition 01 Service Department. Technical Information...
-
Page 2: Table Of Contents
................All rights reserved. No reproduction without prior agreement from publisher. Copyright © 2019 Audi AG, Ingolstadt Printed in Germany... -
Page 3: General Notes
Text with this symbol indicates the risk of damage to your vehicle. Note Text with this symbol contains additional information. AUDI AG shall not accept responsibility in the event of fail- ure to comply with these installation instructions. 1 General notes... -
Page 4: Safety Notes
Installation instructions - Bicycle rack Edition 01 Safety notes WARNING The procedures and safety notes detailed in these in- structions for the installation, handling and use of the bi- cycle rack must always be observed. ◆ Deviating from these instructions even slightly can cause the bicycle rack or the mounted bicycle to come loose. - Page 5 Installation instructions - Bicycle rack Edition 01 Calculating the roof load Carrier units approx. 7.0 kg (15.4 lbs) Bicycle rack 4.2 kg (9.3 lbs) Bicycle (max. 20 kg [44.1 lbs] x kg (lbs) per bicycle) Other roof loads x kg (lbs) ⇒...
- Page 6 Installation instructions - Bicycle rack Edition 01 Load — room to open boot lid Caution To prevent damage to the vehicle, make sure that you open the boot lid carefully when installing the bicycle rack. For vehicles featuring automatic boot lid operation, it is recom- ⇒...
- Page 7 WARNING Repairs or the replacement of parts must only be per- formed by a qualified workshop. It is recommended that genuine spare parts available from your Audi partner are used. Caution Do not enter a car wash with roof bars with/without add-on components installed.
-
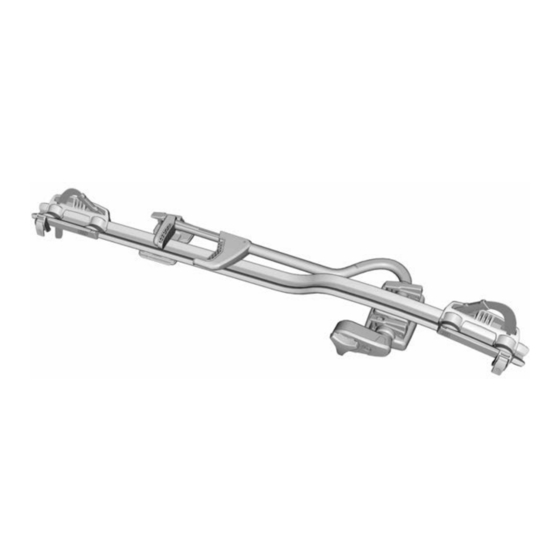
Page 8: Scope Of Delivery And Overview Of Components
Installation instructions - Bicycle rack Edition 01 Scope of delivery and overview of components Quantity Component Bicycle rack Keys Long T groove screw Short T groove screw Tensioning lever without lock Bolt with internal thread Tensioning belt Rim protector Contents of plastic bag Overview of components 1 - Wheel mount (2x) 2 - Fastener (1x) -
Page 9: Bicycle Rack Basic Installation
Installation instructions - Bicycle rack Edition 01 Bicycle rack basic installation WARNING With some vehicle models, the bicycle rack may only be installed facing towards the front of the vehicle. Please refer to the installation instructions for the roof bars in question —... - Page 10 Installation instructions - Bicycle rack Edition 01 – Push the tensioning belt -11- as far as it will go through the front wheel mount -1- from underneath (the smooth side of the tensioning belt should be facing the support bar). –...
-
Page 11: Installing/Removing The Bicycle Rack And Bicycle
Installation instructions - Bicycle rack Edition 01 Installing/removing the bicycle rack and bicycle Installing the bicycle rack on the roof bars Note The bicycle rack as supplied from the factory is designed for in- stallation on the right-hand side of the vehicle. To install the bi- cycle rack on the left-hand side of the vehicle, the bicycle rack ⇒... -
Page 12: Removing The Bicycle Rack From The Roof Bars
Installation instructions - Bicycle rack Edition 01 – Rotate the three tensioning levers clockwise through 10 to 12 turns -arrow a-. – Exert pressure -arrow c- to close the tensioning lever. Caution If you do not exert sufficient pressure when closing the tensioning lever, the bicycle rack will not be securely seat- ed and may work loose! ◆... - Page 13 Installation instructions - Bicycle rack Edition 01 Item Min. 22 mm; max. Min. 22 mm; max. 80 mm 100 mm Min. 22 mm; max. 80 mm Permissible frame sizes – Use the key -4- provided to open the lock on the rotary knob -8-.
- Page 14 Installation instructions - Bicycle rack Edition 01 – Insert the tensioning belt -11- in the tightener -5- and align it centrally. Caution Ensure that there is a gap between the tensioning belt -11- and the roof of the vehicle — risk of roof damage! –...
-
Page 15: Removing The Bicycle From The Bicycle Holder
Installation instructions - Bicycle rack Edition 01 Removing the bicycle from the bicycle holder – Open the tighteners -5- and then bend the tensioning belt -11- towards the rear and insert it in the tensioning belt hold- er -D- on the wheel mount -1-. –... -
Page 16: Additional Installation Work
The additional installation work requires technical skill and special tools. It is therefore recommend that the work be carried out by an Audi partner or a qualified workshop. Changing the installation direction to make it easier to secure the bicycle on the left-hand side of the vehicle ◆... -
Page 17: Maintenance Instructions
Installation instructions - Bicycle rack Edition 01 – Tighten the 5-mm hexagon screws -arrows- such that the clamping force is sufficient but the retainer can still be adjus- ted. Maintenance instructions WARNING Do not use any lubricants on the bolted connections. Failure to comply with these instructions may result in the bicycle rack becoming detached, causing injury to you or others and/or damage to property. - Page 18 MOI. 501-8439-01...
Need help?
Do you have a question about the Genuine Accessories 80A.071.128 and is the answer not in the manual?
Questions and answers