
Related Manuals for Audi Genuine Accessories 8T0.071.128


Summary of Contents for Audi Genuine Accessories 8T0.071.128
- Page 1 Service Einbauanleitung Fahrradhalter für Lieferumfang 8T0.071.128 Audi Original Zubehör Ausgabe 03.2011 Kundendienst. Technische Information...
-
Page 2: Table Of Contents
................Dieses Werk ist urheberrechtlich geschützt. Jede Verwertung ist ohne Zustimmung des Urhebers unzulässig. Copyright © 2011 Audi AG, Ingolstadt Printed in Germany... -
Page 3: Allgemeine Hinweise
Sicherheit und weisen Sie auf mögliche Unfall- und Verletzungsgefahren hin. Vorsicht! Texte mit diesem Symbol machen Sie auf mögliche Schäden an Ihrem Fahrzeug aufmerksam. Hinweis Texte mit diesem Symbol enthalten zusätzliche Informationen. Die Audi AG übernimmt keine Verantwortung bei Nichtbeachtung dieser Montageanleitung. 1 Allgemeine Hinweise... -
Page 4: Sicherheitshinweise
Einbauanleitung - Fahrradhalter Ausgabe 03.2011 Sicherheitshinweise ACHTUNG! Die in dieser Anleitung beschriebenen Arbeitsschritte und Sicherheitshinweise für die Montage, Handhabung und Nutzung des Fahrradhalters müssen unbedingt beachtet werden. ◆ Bereits geringste Abweichungen können zum Lösen des Fahrradhalters oder des montierten Fahrrads führen. ◆... - Page 5 Sonstige Dachlasten x kg (lbs.) ⇒ Fahrzeug-Betriebsanleitung ≤ max. Dachlast Hinweis Der Fahrradhalter ist für Grundträger mit System „AUDI T-Nut“ konzipiert. Seitenwindempfindlichkeit Durch den Fahrradhalter verändert sich das Fahrverhalten des Fahrzeugs. Die Seitenwindempfindlichkeit nimmt zu und das Kurven- bzw. Bremsverhalten verändert sich.
- Page 6 Grundträger und die Aufbauteile bei Nichtbenutzung vom Fahrzeug abgenommen werden. ACHTUNG! Reparaturen oder Austausch von Teilen durch einen Fachbetrieb durchführen lassen. Es wird empfohlen, die bei Ihrem Audi-Partner erhältlichen Original-Ersatzteile zu verwenden. Vorsicht! Nicht mit montiertem Grundträger mit/ohne Aufbauteilen in die Waschanlage fahren.
- Page 7 Einbauanleitung - Fahrradhalter Ausgabe 03.2011 Hinweis Durch Fahren mit dem Fahrradhalter können Windgeräusche entstehen. Hinweis ◆ Beachten Sie die jeweiligen gesetzlichen Bestimmungen für die Benutzung von Fahrradhaltern in anderen Ländern. ◆ Fahrradhalter bei Nichtbenutzung abbauen. ◆ Technische Änderungen vorbehalten. 2 Sicherheitshinweise...
-
Page 8: Lieferumfang Und Bauteilübersicht
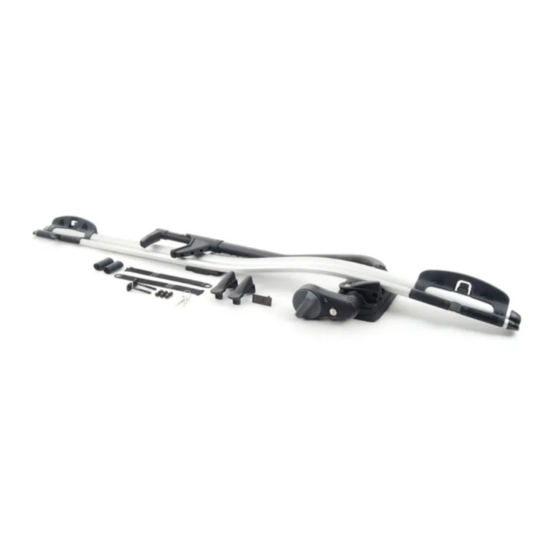
Einbauanleitung - Fahrradhalter Ausgabe 03.2011 Lieferumfang und Bauteilübersicht Menge Bauteil Fahrradhalter Schlüssel T-Nut-Schraube lang T-Nut-Schraube kurz Spannhebel ohne Schloss Bolzen mit Innengewinde Spannriemen Felgenschutz Inhalt Polybeutel Bauteilübersicht 1 - Radaufnahme (2x) 2 - Halteklammer (1x) 3 - Haltebügel (1x) 4 - Schlüssel (2x) 5 - Spannschloss (4x) 6 - Loslager (hinten) (1x) 7 - Trägerschiene (1x) 8 - Drehknopf (Schnell- Spann-Funktion) (1x) -
Page 9: Grundmontage Fahrradhalter
Einbauanleitung - Fahrradhalter Ausgabe 03.2011 Grundmontage Fahrradhalter ACHTUNG! Bei einigen Fahrzeug-Modellen darf der Fahrradhalter nur in Fahrtrichtung montiert werden, bitte beachten Sie hierzu die jeweilige Einbauanleitung des Grundträgers - Unfallgefahr! – Überprüfen Sie vor der Montage den Lieferumfang auf Vollständigkeit. –... - Page 10 Einbauanleitung - Fahrradhalter Ausgabe 03.2011 – Spannschloss -5- an der vorderen Radaufnahme auf der vom Drehknopf -8- abgewandten Seite gedrückt halten. Spannriemen -14- von unten bis zum Anschlag durch das Spannschloss -5- schieben (die glatte Seite des Spannriemens zeigt zur Trägerschiene). –...
-
Page 11: Montage/Demontage Fahrradhalter Und Fahrrad
Einbauanleitung - Fahrradhalter Ausgabe 03.2011 Montage/Demontage Fahrradhalter und Fahrrad Montage des Fahrradhalters auf dem Grundträger Hinweis Der Fahrradhalter ist werkseitig für den Verbau auf der rechten Fahrzeugseite vorbereitet. Falls der Verbau auf der linken Fahrzeugseite erfolgen soll, kann der Fahrradhalter geändert ⇒ ... -
Page 12: Demontage Des Fahrradhalters Vom Grundträger
Einbauanleitung - Fahrradhalter Ausgabe 03.2011 – Die drei Spannhebel 10 bis 12 Umdrehungen im Uhrzeigersinn -Pfeil a- drehen. – Schließen Sie durch Kraftaufwand -Pfeil c- die Spannhebel. Vorsicht! Lassen sich die Spannhebel ohne Kraftaufwand schließen, sitzt der Fahrradhalter locker und kann sich lösen! ●... - Page 13 Einbauanleitung - Fahrradhalter Ausgabe 03.2011 Zulässige Rahmengröße Pos. min. 22 mm; min. 22 mm; max. 80 mm max. 100 mm min. 22 mm; max. 80 mm – Mit dem beiliegenden Schlüssel -4- das Schloss am Drehknopf -8- öffnen. – Haltebügel -3- nach oben schwenken -Pfeil a-. –...
- Page 14 Einbauanleitung - Fahrradhalter Ausgabe 03.2011 – Spannriemen -14- in das Spannschloss -5- stecken und mittig ausrichten. Vorsicht! Auf Abstand zwischen Spannriemen -14- und Fahrzeugdach achten - Beschädigung des Fahrzeugdachs! – Spannriemen -14- auf beiden Seiten gleichmäßig festziehen. – Zweiten Spannriemen -14- analog montieren. –...
-
Page 15: Demontage Des Fahrrads Vom Fahrradhalter
Einbauanleitung - Fahrradhalter Ausgabe 03.2011 Demontage des Fahrrads vom Fahrradhalter – Spannschlösser -5- öffnen und Spannriemen -14- nach hinten biegen und in die Spannriemenhalterung -D- der Radaufnahme -1- stecken. – Mit dem beiliegenden Schlüssel -4- das Schloss am Drehknopf -8- öffnen. –... -
Page 16: Weitere Montagearbeiten
Einbauanleitung - Fahrradhalter Ausgabe 03.2011 Weitere Montagearbeiten Die weiteren Montagearbeiten erfordern handwerkliches Geschick und spezielle Werkzeuge. Deshalb wird empfohlen diese Arbeiten in einem Audi-Betrieb bzw. Fachbetrieb ausführen zu lassen. Montagerichtung ändern - zum einfacheren Befestigen des Fahrrads auf der linken Fahrzeugseite ●... -
Page 17: Montageprüfung Haltebügel
Einbauanleitung - Fahrradhalter Ausgabe 03.2011 ACHTUNG! Falls Sie keinen Drehmomentschlüssel haben sollten, bitte diese Schrauben in einer Fachwerkstatt entsprechend anziehen lassen - Unfallgefahr! – Loslager (hinten) -6- auf die Trägerschiene -7- schieben, die Bohrung -A-befindet sich auf der vom Drehknopf abgewandten Seite. - Page 18 Service Installation instructions Bicycle rack for scope of delivery 8T0.071.128 Audi Genuine Accessories® Edition 03.2011 Service Department. Technical Information...
- Page 19 ..............All rights reserved. No reproduction without prior agreement from publisher. Copyright © 2011 Audi AG, Ingolstadt Printed in Germany...
-
Page 20: General Notes
Text with this symbol indicates the risk of damage to your vehicle. Note Text with this symbol contains additional information. Audi AG shall not accept responsibility in the event of failure to comply with these assembly instructions. 1 General notes... -
Page 21: Safety Notes
Installation instructions - Bicycle rack Edition 03.2011 Safety notes WARNING The procedures and safety notes detailed in these instructions for the installation, handling and use of the bicycle rack must always be observed. ◆ Deviating from these instructions even slightly can cause the bicycle rack or the mounted bicycle to come loose. - Page 22 ≤ Max. roof load Note The bicycle rack is designed for use with roof bars featuring the „AUDI T groove“ system. Sensitivity to side winds Using the bicycle rack alters how the vehicle handles. The effect of side winds on the vehicle increases and turning and braking performance are affected.
- Page 23 WARNING Repairs or the replacement of parts must only be performed by a qualified workshop. It is recommended that genuine spare parts available from your Audi partner are used. Caution Do not enter a car wash with roof bars with/without add-on components installed.
- Page 24 Installation instructions - Bicycle rack Edition 03.2011 Note ◆ Observe the relevant statutory regulations for using bicycle racks in other countries. ◆ Remove the bicycle rack when it is not in use. ◆ We reserve the right to make technical changes. 2 Safety notes...
-
Page 25: Scope Of Delivery And Overview Of Components
Installation instructions - Bicycle rack Edition 03.2011 Scope of delivery and overview of components Quantity Component Bicycle rack Long T groove screw Short T groove screw Tensioning lever without lock Bolt with internal thread Tensioning belt Rim protector Contents of plastic bag overview of components 1 - Wheel mount (2x) 2 - Fastener (1x) -
Page 26: Bicycle Rack Basic Installation
Installation instructions - Bicycle rack Edition 03.2011 Bicycle rack basic installation WARNING With some vehicle models, the bicycle rack may only be installed facing towards the front of the vehicle. Please refer to the installation instructions for the roof bars in question —... - Page 27 Installation instructions - Bicycle rack Edition 03.2011 – Press the tightener -5- on the front wheel mount against the side angled away from the rotary knob -8-. Push the tensioning belt -14- as far as it will go through the tightener -5- from underneath (the smooth side of the tensioning belt should be facing the support bar).
-
Page 28: Installing/Removing The Bicycle Rack And Bicycle
Installation instructions - Bicycle rack Edition 03.2011 Installing/removing the bicycle rack and bicycle Installing the bicycle rack on the roof bars Note The bicycle rack as supplied from the factory is designed for installation on the right-hand side of the vehicle. The bicycle rack can be modified if installation on the left-hand side of the ⇒ ... -
Page 29: Removing The Bicycle Rack From The Roof Bars
Installation instructions - Bicycle rack Edition 03.2011 – Rotate the three tensioning levers clockwise through 10 to 12 turns -arrow a-. – Exert pressure -arrow c- to close the tensioning lever. Caution If you do not exert sufficient pressure when closing the tensioning lever, the bicycle rack will not be securely seated and may work loose! ●... - Page 30 Installation instructions - Bicycle rack Edition 03.2011 Permissible frame sizes Item Min. 22 mm; Min. 22 mm; max. 80 mm max. 100 mm Min. 22 mm; max. 80 mm – Use the key provided -4- to open the lock on the rotary knob -8-.
- Page 31 Installation instructions - Bicycle rack Edition 03.2011 – Insert the tensioning belt -14- in the tightener -5- and align it centrally. Caution Ensure that there is a gap between the tensioning belt -14- and the roof of the vehicle — risk of roof damage! –...
-
Page 32: Removing The Bicycle From The Bicycle Holder
Installation instructions - Bicycle rack Edition 03.2011 Removing the bicycle from the bicycle holder – Open the tighteners -5- and then bend the tensioning belt -14- towards the rear and insert it in the tensioning belt holder -D- on the wheel mount -1-. –... -
Page 33: Additional Installation Work
The additional installation work requires technical skill and special tools. It is therefore recommend that the work be carried out by an Audi partner or a qualified workshop. Changing the installation direction — to make it easier to secure the bicycle on the left-hand side of the vehicle ●... -
Page 34: Checking The Installation Of The Retainer
Installation instructions - Bicycle rack Edition 03.2011 – Push the movable bearing (rear) -6- onto the support bar -7-; the bore hole -A- is located on the side angled away from the rotary knob. WARNING The tighteners -5- on the wheel mounts -1- must be angled upwards.
Need help?
Do you have a question about the Genuine Accessories 8T0.071.128 and is the answer not in the manual?
Questions and answers