Table of Contents
Advertisement
Quick Links
Advertisement
Table of Contents

Related Manuals for Gasmate BQE303


Summary of Contents for Gasmate BQE303
- Page 1 DIGITAL ELECTRIC BBQ WITH CABINET TROLLEY Model No. BQE303 Important: Retain these instructions for future use. Gasmate ® is a registered trademark of: Sitro Group Australia Pty Ltd www.gasmate.com.au Aber Living Ltd, N.Z www.gasmate.co.nz 04478 08/22...
-
Page 2: Important Notes
IMPORTANT NOTES This electric BBQ is not intended for use by persons (including children) with reduced physical, sensory, or mental capabilities, or lack of experience and knowledge, unless they are under supervision or have been given instruction concerning the use of the electric BBQ by a person responsible for their safety. It is important that you read, understand, and follow these instructions very carefully. -
Page 3: Electric Shock Risk
IMPORTANT NOTES ELECTRIC SHOCK RISK DANGER • DO NOT immerse in or splash with water or liquid. • Always ensure that the electric BBQ is kept clean and free from dust. • The electric BBQ may not be operated near swimming pools or water connections. •... -
Page 4: Risk Of Burning Or Scalding
Both sides and upper part of the electric BBQ are designed for heat dissipation – it is normal for them to become hot. The bottom is for air intake. Holes and vents should not be blocked, otherwise there is a risk of fire. SPECIFICATIONS Model No BQE303 Rated Voltage 220-240V~ /50Hz Rated Power 2000-2400W... -
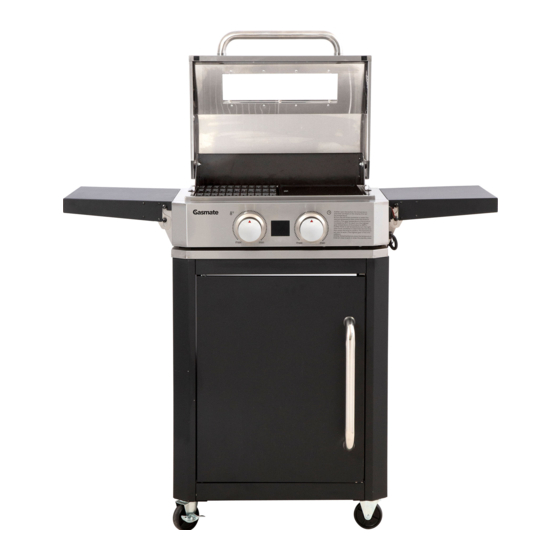
Page 5: Part Descriptions
PART DESCRIPTIONS Item Part name Item Part name Cover Plug Glass window Power cable Handle Main power switch Display Power button Timer knob Splatter plate Oil pan Reflective plate Frame post Element protection net brackets Casters Element protection net Side table Grill &... -
Page 6: Trolley Assembly
UNPACKING & ASSEMBLY INSTRUCTIONS NOTE: Remove any transit protection material and dispose of responsibly, especially from around the cooking element. Carefully remove the components of the electric BBQ and ensure you have all the parts as noted above. Do not connect to the power supply until the electric BBQ is fully assembled. TROLLEY ASSEMBLY Assemble the four frame uprights, bottom plate, and platen of the product. - Page 7 Install the side panels and rear panels to the trolley Attach the door handle to the door Install the front door – insert the lower shaft into the hole at the bottom, then press the upper shaft down and align the upper shaft with the top hole and release.
- Page 8 TROLLEY ASSEMBLY (CONTINUED) Install the 2pcs rear M6x10 round head screws in the hole at the bottom of the BBQ body. Only screw them in about ½ way at this stage. Align the bottom screw of the BBQ body with the holes in the top of the trolley, then insert it in place to make the body sit on the top of the trolley completely.
- Page 9 10. Attach the side table fixing brackets using M6x10 screws (3 each bracket) 11. Install the side tables to the side table fixing brackets and tighten the screws. Continued over the page...
- Page 10 TROLLEY ASSEMBLY (CONTINUED) 12. Install the reflector onto the support plate at the bottom of the product 13. Install the splatter plate to the inside of the BBQ. 14. Install the grill and plate on the top surface of the splatter plate.
-
Page 11: Preparation For Use
PREPARATION FOR USE • Before starting, make sure there is no strong source of heat nearby. • Avoid using the electric BBQ in areas where heat is concentrated or where no heat is allowed. • The bottom should have adequate ventilation and not be blocked. •... - Page 12 INSTRUCTION FOR USE Confirm that the electric BBQ is connected to the correct power supply in accordance with the product data plate. Press the main power switch on the right side of the electric BBQ to the ON (I) position to supply power to the electric BBQ.
- Page 13 PREHEATING The display shows the current temperature while the electric BBQ is working. When the preset temperature is reached, there will be an audio prompt. Note that the temperature display will have an error of ±20°C. The electric BBQ will reach the highest thermal efficiency after preheating.
-
Page 14: Exploded View
EXPLODED VIEW... - Page 15 ITEM PART NAME ITEM PART NAME Grill & Plate Lockable casters Splatter plate M4x10 cross round head screws Reflective plate Element protection net fixing bracket Side table fixing bracket Element protection net Side table Element protection material Oil pan Front door Trolley upper panel Door handle Rear panel...
- Page 16 For any queries or assistance call Customer Service (Australia Only) 1300 174 876 Hours of operation: Monday to Friday 8am - 5pm EST Do not return to place of purchase. Keep your purchase receipt, this will be required to make any claims under the 1 year warranty.