Table of Contents
Advertisement
Quick Links
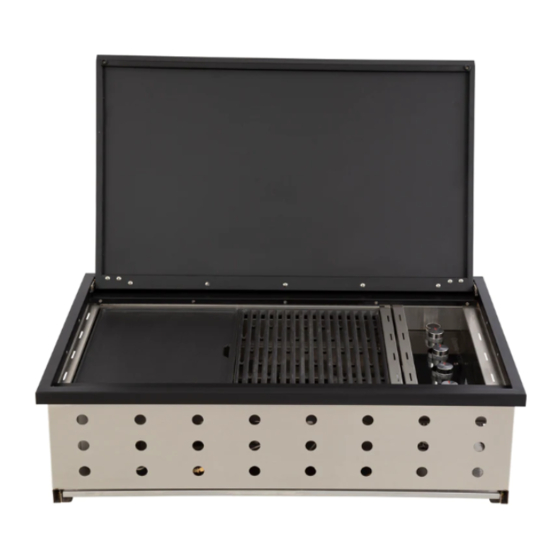
DROP IN 4 BURNER BBQ
Premium #304 grade stainless steel or Matt black finish
Flame Failure Device (FFD) for added safety
Electronic ignition
Satin enamel cast iron hot plate and grill
Convenient lid gives you extra bench space
when not in use
Stainless steel burners
Supplied fully assembled
Gas Certified to Australian Standards
Suitable for Natural Gas conversion
LCC27 REGULATOR SUPPLIED
(LPG OR ULPG MODELS ONLY)
This LCC27 Regulator can only be used with
the new safer industry standard LCC27 Gas
Cylinder Connection.
FOR OUTDOOR USE ONLY
WARNING:
Improper installation, adjustment, alteration, service or
maintenance can cause injury or property damage.
Read the instructions thoroughly before installing or
servicing this equipment.
WARNING! DO NOT USE AN ADAPTOR ON THE
CYLINDER CONNECTION
PHOENIX
Stainless Steel Model NO. BQ2047, BQ2047NG,
Black Model NO. BQ2047BL, BQ2047BLNG
Important: Retain these instructions for future use.
Gasmate® is a registered trademark of
Sitro Group Australia Pty Ltd www.gasmate.com.au
Aber Living, N.Z. www.gasmate.co.nz
FOR YOUR SAFETY
If you smell gas:
1. Shut off the gas to the appliance.
2. Extinguish any open flame.
3. If odour continues, immediately call
your gas supplier.
Do not store or use gasoline or other flammable vapour
and liquids in the vicinity of this or any other appliance.
04580 06/23
Advertisement
Table of Contents

Related Manuals for Gasmate PHOENIX BQ2047


Summary of Contents for Gasmate PHOENIX BQ2047
- Page 1 FOR YOUR SAFETY If you smell gas: WARNING: 1. Shut off the gas to the appliance. Improper installation, adjustment, alteration, service or 2. Extinguish any open flame. maintenance can cause injury or property damage. 3. If odour continues, immediately call Read the instructions thoroughly before installing or your gas supplier. servicing this equipment. Do not store or use gasoline or other flammable vapour WARNING! DO NOT USE AN ADAPTOR ON THE and liquids in the vicinity of this or any other appliance. CYLINDER CONNECTION Important: Retain these instructions for future use. Gasmate® is a registered trademark of 04580 06/23 Sitro Group Australia Pty Ltd www.gasmate.com.au Aber Living, N.Z. www.gasmate.co.nz...
-
Page 2: General Information
GENERAL INFORMATION materials and the gas cylinder clear of any heat source. When changing over from an empty gas cylinder to a IMPORTANT full one make sure this procedure is carried out in a well ventilated location, preferably outside, away from people Read these instruction carefully prior to use. and away from any sources of ignition; such as naked Familiarise yourself with the appliance before flames, pilot flames, electric heaters/equipment. connecting it to it’s gas container. Keep these instructions for future reference. Specifications Barbecue specifications can be found on the data label attached to the barbecue body. Hose If you smell gas connection thread at gas inlet is 1/4” - BSP. 1. Shut off gas to the barbecue at its Gas Cylinder Use & Safety source, if possible. 2. Extinguish any open flame. This is a low pressure barbecue and must only be used 3. Open hood. with the hose and regulator supplied. Your barbecue is designed for use with 9Kg propane gas cylinders certified 4. If odour continues immediately call your to AS 2469. gas supplier or fire department. The cylinder should be filled by a reputable gas supplier and visually inspected and re-qualified at each filling. - Page 3 before checking to ensure the burner tubes are fully seated over gas valve orifices. WARNING • Never lean over cooking surface when lighting. Failure to comply with these instructions could result • Never alter or modify the regulator or gas supply in a fire or explosion which could cause serious bodily assembly. injury, death or property damage. • Ensure the barbecue is set up on a level and stable CAUTION: Accessible parts may be very hot. surface. • Keep young children away. • Do not move the barbecue while in use or when hot. • DO NOT modify this barbecue. • Remove the drip tray before moving. • Do not move this barbecue during use. • The built-in barbecue cannot be installed with an • Turn off gas supply at the cylinder after use. overhead combustible surface. • Read instructions before using the barbecue. • The built-in barbecue can only be installed with an • Parts sealed by the manufacturer or their agent overhead surface or grease filter with a minimum of must not be manipulated by the user. 1200mm vertical clearance. • This barbecue is only to be used and stored • This barbecue must not be used indoors. outdoors.
-
Page 4: General Assembly
GENERAL ASSEMBLY IMPORTANT Connecting & Disconnecting to the Gas Source Familiarise yourself with the general information and • Do not smoke when attempting to ignite the safety guidelines located at the front of this manual. barbecue. DO NOT USE AN ADAPTOR ON THE CYLINDER • Never use volcanic rock, heat beads or other CONNECTION material. • Always use protective gloves when handling hot Check components. 1. The cylinder is filled. A sloshing sound will be heard • Note: If for some reason, ignitor fails to produce when shaken. a spark at the electrode, barbecue can be lit by a 2. The burner controls are in the ‘OFF’ position long barbecue match. With the cover removed, lift out the grill plate and light a burner with a match or Connecting lighter. Subsequent burners will crosslight. - Page 5 Burner Operation & Ignition System Check 1. Open the Lid of the barbecue before attempting to light the burners. LCC27 Cylinder Connection Device 2. Turn the control knobs clockwise to “OFF” position. 3. Connect the regulator to the gas bottle. Turn the gas LCC27 Regulator LCC27 Gas supply “ON” at the cylinder. Check with the use of & Hose Cylinder soapy water for any gas leakage between the bottle and the regulator. 4. Push down a control knob and keep pressing whilst turning anti-clockwise to the “HIGH” position (a clicking sound is heard). Continue to hold the control knob for 10 seconds (This is to ensure the Flame Failure Device to be engaged). Release then check the flame stays on. 5. If the burner still does not light, turn the control (Cylinder knob to ‘OFF’ wait 5 minutes and repeat the lighting Not Included) procedure.
-
Page 6: Care And Maintenance
CARE & MAINTENANCE CARE AND CLEANING OF STAINLESS STEEL Location of your Barbecue DO NOT use your barbecue in garages, porches, sheds, Stainless steel parts of this appliance are made from 304 breezeways, or other enclosed areas. Your barbecue is & 430 grade stainless steel. To preserve the appearance to be used OUTDOORS. The barbecue is not intended and corrosion resistance of the stainless steel material to be installed in or on recreational vehicles and/or boats regular cleaning is required. Although stainless steel and should not be placed under any surface that will burn. does not rust in the same manner as steel it can still Do not obstruct the flow of combustion and ventilation air exhibit ‘corrosion’ blemishes that look similar to rust and around the barbecue housing. detract from the appliances appearance. Unlike steel, Protect Children the corrosion of stainless steel is mostly confined to the surface and in most cases can be removed by cleaning, Keep children away from barbecue during use and until returning the surface to almost like new. barbecue has cooled after you have finished. Do not allow children to operate barbecue. The most common form of corrosion that affects stainless steel is what is known as ‘Tea Staining”. This Always ensure that no sporting or physical activities are shows up as brown spots on the surface, hence the carried out in close proximity to the barbecue during use confusion with rusting. This is most common in coastal and while still hot. -
Page 7: Cleaning The Burner
After cleaning applying a thin coating of ‘light oil’, for 6. Clean any blocked ports with a stiff wire such as an example baby oil, will also help protect the stainless steel open paper clip. surface from the elements. 7. Check burner for damage, due to normal wear and corrosion some holes may become enlarged. If any Stubborn Stains and Corrosion Spots large cracks or holes are found replace burner. Stubborn stains, discolouration, ‘Tea Staining’ can 8. Carefully refit burners, ensuring they are located on occur from insufficient cleaning, excessive spillage from the gas valve. cooking, severe environmental conditions and extreme 9. Replace clip at the end of burner. cooking conditions. 10. Replace grease tray and cooking grates. There are propriety stainless steel cleaners available that are designed for such instances. Read the instructions carefully before using. • Always rub or wipe in the direction of the surface grain or original polish lines. WARNING • Some stainless steel cleaners may damage painted or Beware of spiders and wasps. Burner tube should be plastic surfaces, read the directions carefully. inspected and cleaned periodically. To avoid any flare-ups, it is recommended that the Flash-Back drip tray be checked and emptied regularly. Contents Spiders and small insects occasionally spin webs or of the drip tray may be very hot during cooking. If make nests in the burner tubes during warehousing and... -
Page 8: Product Dimensions
PRODUCT DIMENSIONS 933mm 933mm 900mm 914mm (FRONT/REAR VIEW) 609mm 576mm (TOP VIEW) WARNING This drop-in BBQ is designed to sit flush with the bench. However, if you choose to install the BBQ on top 40mm FOOT HEIGHT ADJUSTMENT 545mm of the stone bench, you need to make sure the legs are (SIDE VIEW) supporting the BBQ. The appliance requires venting. When the BBQ is sitting flush with the bench, there is an approximate 2mm gap around the BBQ edge with the bench. This gap plays an important role of venting, therefore, it should not be sealed with silicon. If you choose, however, to seal the gap, a rectangular unimpeded opening of approx 750mm W x 10mm H in either the front or the rear should be incorporated within the cabinet. Please refer to diagram below as an example. BENCH CUT-OUT DIMENSIONS 936mm 916mm 612mm 580mm VENTING VENTING The cutout size, when sitting the BBQ... - Page 9 SPACER BRACKETS Two spacer brackets have been provided. They are essentially for customers who mount their BBQ into a different type of cavity / cabinetry, where (unlike the AlfrescoPlus BBQ module designed for the BBQ) there are no doors covering the front face of the BBQ - but just a cut out to access the drip tray (880mm x 50mm). In that set-up, the drip tray could protrude out from the BBQ but aligns up with the cabinet front. Those brackets essentially just push forward the drip tray, for that type of set-up / cabinetry. BENCH CUT-OUT DIMENSIONS 50mm 880mm 100mm From edge FAT TRAY CUT OUT Ø DIMENSIONS 100mm GAS HOSE CONNECTION CUT OUT UNDER BENCH CLEARANCE 150mm ALL AROUND SIDE WALLS OF BBQ FAT TRAY 2 x Drip Tray Spacer Brackets (Left & Right Side) SPACER BRACKET INSTALLATION DRIP TRAY BACK OF BBQ CLOSE UP INSTALLATION SPACER BRACKET DRIP TRAY STOPS CLOSE UP LOCATION INSTALLATION...
-
Page 10: Natural Gas Conversion
NATURAL GAS CONVERSION Conversion ONLY to be done by an authorised Overall Dimensions TO BE INSTALLED ONLY ON OR IN A NON- COMBUSTIBLE ENCLOSURE Length Width Height Note: Recommended clearances must be maintained. BQ2047 GAS PIPING BQ2047BL 1. This appliance is only to be installed by an authorised 933mm 609mm 265mm BQ2047NG person. BQ2047BLNG 2. Check with local and state plumbing and heating codes regarding sizing of the gas lines. -
Page 11: Safe Appliance Locations
SAFE APPLIANCE LOCATIONS Within a partial enclosure that includes an overhead cover and no more than two walls This appliance shall only be used in an above ground (see Example 2 & 3). open-air situation with natural ventilation, without Within a partial enclosure that includes an overhead stagnant areas, where gas leakage and products of cover and more than two walls, the following will apply: combustion are rapidly dispersed by wind and natural at least 25% of the total wall area is completely open, convection. and at least 30% of the remaining wall area is open and Any enclosure in which the appliance is used shall unrestricted (see Example 4 & 5). comply with the following: In the case of balconies, at least 20% of the total wall An enclosure with walls on all sides, but at least one area shall be and remain open and unrestricted. permanent opening at ground level and no overhead cover (see Example 1). DIAGRAMMATIC REPRESENTATIONS OF OUTDOOR AREAS The following figures are diagrammatic representations of outdoor areas. Rectangular areas have been used in these figures – the same principles apply to any other shaped area. - Page 12 For any queries or assistance call Customer Service (Australia Only) 1300 174 876 Hours of operation: Monday to Friday 8am - 5pm EST Do not return to place of purchase. Keep your purchase receipt, this will be required to make any claims under the 5 year warranty.
Need help?
Do you have a question about the PHOENIX BQ2047 and is the answer not in the manual?
Questions and answers