Table of Contents
Advertisement
Quick Links
GMG PRO
PROFESSIONAL SCRUBBING MACHINES
OPERATOR INTERFACE
CONFIGURATION MANUAL
ORIGINAL INSTRUCTIONS DOC. 10120027 - Ver. AA - 08-2022
The constructive elements and content of this manual, including the structure, text, diagrams, images and logo, are the exclusive property of FIMAP S.P.A..
They are protected, both collectively and individually, by the current regulations regarding intellectual property (including copyright laws), and cannot be either wholly or partially copied or imitated. Any
reproduction, reprocessing, distribution or dissemination is strictly prohibited.
Advertisement
Table of Contents

Related Manuals for Fimap GMG PRO


Summary of Contents for Fimap GMG PRO
- Page 1 ORIGINAL INSTRUCTIONS DOC. 10120027 - Ver. AA - 08-2022 The constructive elements and content of this manual, including the structure, text, diagrams, images and logo, are the exclusive property of FIMAP S.P.A.. They are protected, both collectively and individually, by the current regulations regarding intellectual property (including copyright laws), and cannot be either wholly or partially copied or imitated. Any...
-
Page 3: Table Of Contents
CONTENTS CONTENTS ..................3 SETTING MENU NAVIGATION DIAGRAM ........5 GUIDE TO USER INTERFACE CONFIGURATION ......8 NAVIGATION OF THE CONTROL DISPLAY MENU ......... 8 SETTINGS MENU ..................9 LANGUAGE SELECTION MENU ..............10 CHANGING THE DISPLAY LANGUAGE ..............10 BATTERY TYPE MENU ................... 11 CHANGING THE MACHINE POWER SUPPLY BATTERY TYPE ...... - Page 4 RESET DELAY MENU (BRUSHES SWEEP MOT) ..................39 SPEED REDUCTION MENU (BRUSHES SWEEP MOT) ................40 PRESSURE LEVEL MENU (BRUSHES SWEEP MOT) ................40 PRESSURE RANGE MENU (BRUSHES SWEEP MOT) ................41 PUMP SETS MENU (PARAMETERS) ................43 WATER MENU (PUMP SETS) ......................43 PUMP LEVEL MENU ( WATER PUMP) ......................
-
Page 5: Setting Menu Navigation Diagram
SETTING MENU NAVIGATION DIAGRAM “GUIDE TO USER INTERFACE CONFIGURATION” on page “LANGUAGE SELECTION “CHANGING THE DISPLAY MENU” on page 10 LANGUAGE” on page 10 “CHANGING THE MACHINE “BATTERY TYPE MENU” on POWER SUPPLY BATTERY page 11 TYPE” on page 11 “SETTINGS MENU”... - Page 6 “LANGUAGE SELECTION MENU (GENERAL MAIN)” on page 19 “DISPLAY TUNE MENU “MAIN MENU (GENERAL (GENERAL MAIN)” on page SETS)” on page 19 “DISPLAY BRIGHTNESS MENU (GENERAL MAIN)” on page 21 “BATTERY TYPE MENU (GENERAL BATTERY)” on page 22 “BATTERY MENU (GENERAL SETS)”...
- Page 7 “RESET DELAY MENU (BRUSHES BRUSH MOT)” on page 35 “SPEED REDUCTION MENU (BRUSHES BRUSH MOT)” on page 36 “BRUSH MOT MENU (GENERAL SETS)” on page “PRESSURE LEVEL MENU (BRUSHES BRUSH MOT)” on page 37 “PRESSURE RANGE MENU (BRUSHES BRUSH MOT)” on page 38 “BRUSHES SETS MENU (PARAMETERS)”...
-
Page 8: Guide To User Interface Configuration
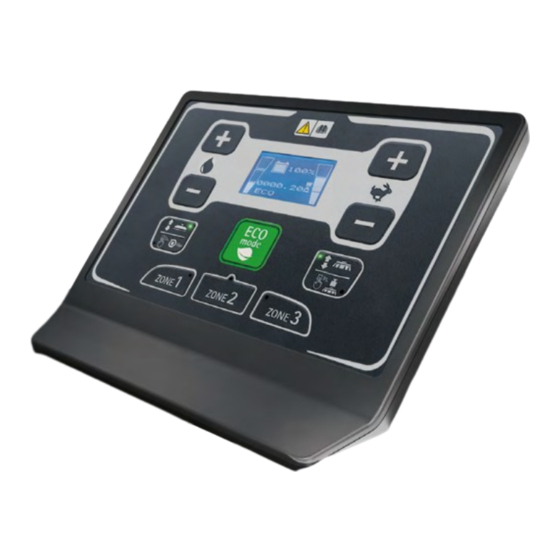
GUIDE TO USER INTERFACE CONFIGURATION NAVIGATION OF THE CONTROL DISPLAY MENU To navigate through the menus, use the buttons: Button for scrolling to the next parameter Button for scrolling to the next parameter Confirm button Button to increase the value selected by a unit Button to decrease the value selected by a unit Page 8... -
Page 9: Settings Menu
SETTINGS MENU Proceed as follows to view the “GENERAL MACHINE SETTINGS” menu: Sit on the driver’s seat. Press buttons (1) and (2) (Fig. 1) and keeping them pressed turn on the machine, turn the key (3) a quarter of a turn clockwise (Fig.2). After a few seconds the “GENERAL MACHINE SETTINGS”... -
Page 10: Language Selection Menu
LANGUAGE SELECTION MENU Proceed as follows to display the “LANGUAGE SELECTION” menu: Display the "GENERAL MACHINE SETTINGS" menu, see “SETTINGS MENU” on page From the "GENERAL MACHINE SETTINGS" menu, using the buttons (1) and (2) (Fig.1), select the screen dedicated to the "LANGUAGE SELECTION" menu (Fig.2). General Main Language selection:... -
Page 11: Battery Type Menu
English Italian French German Spanish N.B.: changing the language displays the text strings of the menu and alarms in the selected language. BATTERY TYPE MENU To see the “BATTERY TYPE” menu, proceed as follows: Display the "GENERAL MACHINE SETTINGS" menu, see “SETTINGS MENU”... -
Page 12: Chemical Percentage Menu
General Main Battery Type: 36Pb80 The following can be selected in the battery type selection menu: 36Pb60 36Gel80 36Gel60 36Custom 36PP 36LiPo 36Pb80 N.B.: the standard battery type selected is 36Pb80. CHEMICAL PERCENTAGE MENU Proceed as follows to view the “CHEMICAL PERCENTAGE” menu: Display the "GENERAL MACHINE SETTINGS"... -
Page 13: Changing The Percentage Of Chemical Product In The Detergent Solution
CHANGING THE PERCENTAGE OF CHEMICAL PRODUCT IN THE DETERGENT SOLUTION For the machines that have the automatic management system of the chemical product, the modification of the percentage of chemical product must be carried out as follows: Display the "GENERAL MACHINE SETTINGS" menu, see “SETTINGS MENU”... -
Page 14: Changing The Control Display Brightness
CHANGING THE CONTROL DISPLAY BRIGHTNESS To adjust the display contrast, proceed as follows: Display the "GENERAL MACHINE SETTINGS" menu, see “SETTINGS MENU” on page Visualise the “DISPLAY TUNE (GENERAL MAIN)” menu - see “DISPLAY TUNE MENU (GENERAL MAIN)” on page As soon as the “DISPLAY TUNE”... -
Page 15: Changing The Control Display Contrast
CHANGING THE CONTROL DISPLAY CONTRAST To adjust the display brightness, proceed as follows: Display the "GENERAL MACHINE SETTINGS" menu, see “SETTINGS MENU” on page Visualise the “DISPLAY BRIGHTNESS (GENERAL MAIN)” menu - see “DISPLAY BRIGHTNESS MENU (GENERAL MAIN)” on page As soon as the “DISPLAY BRIGHTNESS”... -
Page 16: Service Menu
SERVICE MENU Proceed as follows to view the “SERVICE” menu: Display the "GENERAL MACHINE SETTINGS" menu, see “SETTINGS MENU” on page Display the “PASSWORD ENTRY” screen (Fig.2). Select the password using buttons (1) and (2) (Fig.1) , and confirm the entered value (Fig.1) with button (3). N.B.: pressing the button (1) increases the value by one unit, while pressing the button (2) decreases the value (Fig.1). -
Page 17: Parameters Menu (Service)
PARAMETERS MENU (SERVICE) Proceed as follows to view the “PARAMETERS” menu: Display the "GENERAL MACHINE SETTINGS" menu, see “SETTINGS MENU” on page Display the “SERVICE” menu - see “PARAMETERS MENU (SERVICE)” on page Using buttons (1) and (2) (Fig.1) select the "PARAMETERS" screen (Fig.2) and press button (3) to confirm the display (Fig.1). -
Page 18: General Sets Menu (Parameters)
GENERAL SETS MENU (PARAMETERS) Proceed as follows to view the “GENERAL SETS” menu: Display the "GENERAL MACHINE SETTINGS" menu, see “DISPLAY BRIGHTNESS MENU (GENERAL MAIN)” on page Display the “SERVICE” menu - see “SERVICE MENU” on page Display the “PARAMETERS” menu - see “PARAMETERS MENU (SERVICE)”... -
Page 19: Main Menu (General Sets)
Used to manage the side brush - see “SIDE BRUSH MENU (GENERAL CONFIG)” on page Used to manage the machine anti-collision system - see “ANTI-COLLISION MENU (GENERAL CONFIG)” on page Used to activate or deactivate the HAZARD LIGHTS function - see “HAZARD LIGHTS MENU CONFIG (GENERAL CONFIG)”... -
Page 20: Display Tune Menu (General Main)
General Main Language selection: The following languages can be selected in the language menu: English Italian French German Spanish N.B.: changing the language displays the text strings of the menu and alarms in the selected language. DISPLAY TUNE MENU (GENERAL MAIN) To adjust the display contrast, proceed as follows: Display the "GENERAL MACHINE SETTINGS"... -
Page 21: Display Brightness Menu (General Main)
General Main Display tune: min:0 max:50 DISPLAY BRIGHTNESS MENU (GENERAL MAIN) To adjust the display brightness, proceed as follows: Display the "GENERAL MACHINE SETTINGS" menu, see “SETTINGS MENU” on page Display the “SERVICE” menu - see “SERVICE MENU” on page Display the “PARAMETERS”... -
Page 22: Battery Menu (General Sets)
BATTERY MENU (GENERAL SETS) Proceed as follows to view the “BATTERY” menu: Display the "GENERAL MACHINE SETTINGS" menu, see “SETTINGS MENU” on page Display the “SERVICE” menu - see “SERVICE MENU” on page Display the “PARAMETERS” menu - see “PARAMETERS MENU (SERVICE)” on page Display the “GENERAL SETS”... -
Page 23: Custom Level Menu (General Battery)
The following can be selected in the battery type selection menu: 36Pb60 36Gel80 36Gel60 36Custom 36PP 36LiPo 36Pb80 N.B.: the standard battery type selected is 36Pb80. CUSTOM LEVEL MENU (GENERAL BATTERY) Proceed as follows to change the type of custom battery discharge curve: Display the "GENERAL MACHINE SETTINGS"... -
Page 24: Hour Meter Menu (General Sets)
HOUR METER MENU (GENERAL SETS) Proceed as follows to view the “HOUR METER” menu: Display the "GENERAL MACHINE SETTINGS" menu, see “SETTINGS MENU” on page Display the “SERVICE” menu - see “SERVICE MENU” on page Display the “PARAMETERS” menu - see “PARAMETERS MENU (SERVICE)”... -
Page 25: Hmt Partial Reset Menu (General Hourmeter)
The following can be selected in the hour meter type selection menu: hour meter for the machine's starter key hour meter for the machine's traction motor hour meter for the machine's brush motor hour meter for the machine's suction motor N.B.: the type of standard hour meter selected is that relating to the traction of the machine (Tr). -
Page 26: Access Mode Menu (General Sets)
ACCESS MODE MENU (GENERAL SETS) Proceed as follows to view the “ACCESS MODE” menu: Display the "GENERAL MACHINE SETTINGS" menu, see “SETTINGS MENU” on page Display the “SERVICE” menu - see “SERVICE MENU” on page Display the “PARAMETERS” menu - see “PARAMETERS MENU (SERVICE)”... -
Page 27: Password 4 User Menu (General Access Mode)
N.B.: the CUSTOMER level password makes it possible to change the parameters for the machine functions. PASSWORD 4 USER MENU (GENERAL ACCESS MODE) To change the level 4 password (User), proceed as follows: Display the "GENERAL MACHINE SETTINGS" menu, see “SETTINGS MENU”... -
Page 28: Password Protection User Menu (General Accessmode)
General AccessMode Password 5 PIN: min:100 max:999 N.B.: the password set in the factory is 123, the new password must be between 100 and 999. PASSWORD PROTECTION USER MENU (GENERAL ACCESSMODE) Proceed as follows to activate or deactivate the USER level password, to access the functions in the “SETTINGS” menu: Display the "GENERAL MACHINE SETTINGS"... -
Page 29: Password Protection Pin Menu (General Accessmode)
PASSWORD PROTECTION PIN MENU (GENERAL ACCESSMODE) Proceed as follows to activate or deactivate the PIN level password request, to access machine use: Display the "GENERAL MACHINE SETTINGS" menu, see “SETTINGS MENU” on page Display the “SERVICE” menu - see “SERVICE MENU” on page Display the “PARAMETERS”... -
Page 30: Side Brush Menu (General Config)
General Config SIDE BRUSH MENU (GENERAL CONFIG) To manage the "SIDE BRUSH" function, carry out the following: Display the "GENERAL MACHINE SETTINGS" menu, see “SETTINGS MENU” on page Display the “SERVICE” menu - see “SERVICE MENU” on page Display the “PARAMETERS” menu - see “PARAMETERS MENU (SERVICE)”... -
Page 31: Hazard Lights Menu (General Config)
As soon as the “ANTI-COLLISION” screen (Fig.2) is displayed, select the anti-collision management function using buttons (3) and (4) (Fig.1). N.B.: the selected parameter will be visible in the text string (5) in the lower part of the screen (Fig.2). Confirm the selected hour meter by pressing the button (6) (Fig.1). -
Page 32: Manual Operation Enable Menu (General Config)
General Config Hazard lights: N.B.: By selecting “NO” the hazard lights function will not be active. In this way, both the headlights and the rear lights will be active while working, but will not blink. N.B.: By selecting “YES” the hazard lights function will be active. In this way, both the headlights and the rear lights will be active while working with a blinking light effect. -
Page 33: Zone Operation Enable Menu (General Config)
ZONE OPERATION ENABLE MENU (GENERAL CONFIG) To manage the side brush "ZONE OPERATION ENABLE" function, carry out the following: Display the "GENERAL MACHINE SETTINGS" menu, see “SETTINGS MENU” on page Display the “SERVICE” menu - see “SERVICE MENU” on page Display the “PARAMETERS”... -
Page 34: Brushes Sets Menu (Parameters)
BRUSHES SETS MENU (PARAMETERS) Proceed as follows to view the “BRUSHES SETS” menu: Display the "MACHINE BRUSHES SETTINGS" menu - see “SETTINGS MENU” on page Display the “SERVICE” menu - see “SERVICE MENU” on page Display the “PARAMETERS” menu - see “PARAMETERS MENU (SERVICE)”... -
Page 35: Brush Mot Menu (General Sets)
BRUSH MOT MENU (GENERAL SETS) Proceed as follows to view the “BRUSH MOT” menu: Display the "MACHINE BRUSHES SETTINGS" menu - see “SETTINGS MENU” on page Display the “SERVICE” menu - see “SERVICE MENU” on page Display the “PARAMETERS” menu - see “PARAMETERS MENU (SERVICE)”... -
Page 36: Speed Reduction Menu (Brushes Brush Mot)
N.B.: The “RESET DELAY” parameter represents the standby time before the actuator moves the scrubbing brush head into the “lifted off the floor” position. N.B.: The “RESET DELAY” parameter is expressed in seconds (s), the numerical value is between a minimum of 001 and a maximum of 300, the selectable increment is one unit. -
Page 37: Pressure Level Menu (Brushes Brush Mot)
PRESSURE LEVEL MENU (BRUSHES BRUSH MOT) Proceed as follows to change the “PRESSURE LEVEL” parameter in the brush motor menu: Display the "MACHINE BRUSHES SETTINGS" menu - see “SETTINGS MENU” on page Display the “SERVICE” menu - see “SERVICE MENU” on page Display the “PARAMETERS”... -
Page 38: Pressure Range Menu (Brushes Brush Mot)
PRESSURE RANGE MENU (BRUSHES BRUSH MOT) Proceed as follows to change the “PRESSURE RANGE” parameter in the brush motor menu: Display the "MACHINE BRUSHES SETTINGS" menu - see “SETTINGS MENU” on page Display the “SERVICE” menu - see “SERVICE MENU” on page Display the “PARAMETERS”... -
Page 39: Reset Delay Menu (Brushes Sweep Mot)
Brushes Sweep Mot RESET DELAY MENU (BRUSHES SWEEP MOT) Proceed as follows to change the “RESET DELAY” parameter in the brush motor menu: Display the "MACHINE BRUSHES SETTINGS" menu - see “SETTINGS MENU” on page Display the “SERVICE” menu - see “SERVICE MENU”... -
Page 40: Speed Reduction Menu (Brushes Sweep Mot)
SPEED REDUCTION MENU (BRUSHES SWEEP MOT) Proceed as follows to change the “SPEED REDUCTION” parameter in the brush motor menu: Display the "MACHINE BRUSHES SETTINGS" menu - see “SETTINGS MENU” on page Display the “SERVICE” menu - see “SERVICE MENU” on page Display the “PARAMETERS”... -
Page 41: Pressure Range Menu (Brushes Sweep Mot)
N.B.: the selected value will be visible in the text string (5) in the lower part of the screen (Fig.2). Confirm the selection by pressing the button (6) (Fig.1). Brushes Sweep Mot Pressure lev. 1: min:10 max:100 N.B.: the “PRESSURE LEVEL” parameter indicates the current absorbed by the sweeping brush head while working. - Page 42 Brushes Sweep Mot Pressure range: min:0 max:4.0 N.B.: the “PRESSURE RANGE” parameter represents the value of the maximum interval permitted for the current absorbed by the pressure level before the tripping of the ammeter resistance protection (while working). N.B.: The “PRESSURE RANGE” parameter is expressed in amperes (A), the numerical value is between a minimum of 0 and a maximum of 4.0, the selectable increment is five tenths of a unit.
-
Page 43: Pump Sets Menu (Parameters)
PUMP SETS MENU (PARAMETERS) Proceed as follows to view the “PUMP SETS” menu: Display the "MACHINE BRUSHES SETTINGS" menu - see “SETTINGS MENU” on page Display the “SERVICE” menu - see “SERVICE MENU” on page Display the “PARAMETERS” menu - see “PARAMETERS MENU (SERVICE)”... -
Page 44: Pump Level Menu ( Water Pump)
PUMP LEVEL MENU ( WATER PUMP) Proceed as follows to change the "PUMP LEVEL” parameter in the water menu: Display the "MACHINE BRUSHES SETTINGS" menu - see “SETTINGS MENU” on page Display the “SERVICE” menu - see “SERVICE MENU” on page Display the “PARAMETERS”... -
Page 45: Chemical Percentage Menu (Chemical Pump)
Pump Chemical N.B.: On the chemical menu screen it is possible to change the “CHEMICAL PERCENTAGE". parameter related to the quantity of chemical detergent delivered by the machine, for those programs where it is not possible to change the quantity manually. CHEMICAL PERCENTAGE MENU (CHEMICAL PUMP) Proceed as follows to change the "CHEMICAL PERCENTAGE”... -
Page 46: Vacuum Sets Menu (Parameters)
VACUUM SETS MENU (PARAMETERS) Proceed as follows to display the “VACUUM SETS” menu: Display the "MACHINE BRUSHES SETTINGS" menu - see “SETTINGS MENU” on page Display the “SERVICE” menu - see “SERVICE MENU” on page Display the “PARAMETERS” menu - see “PARAMETERS MENU (SERVICE)”... -
Page 47: Reset Delay Menu (Vacuum Vac. Mot)
RESET DELAY MENU (VACUUM VAC. MOT) Proceed as follows to change the “RESET DELAY” parameter in the brush motor menu: Display the "MACHINE BRUSHES SETTINGS" menu - see “SETTINGS MENU” on page Display the “SERVICE” menu - see “SERVICE MENU” on page Display the “PARAMETERS”... -
Page 48: Sweep Vac Motor Menu (Vacuum Sets)
N.B.: the selected value will be visible in the text string (5) in the lower part of the screen (Fig.2). Confirm the selection by pressing the button (6) (Fig.1). Vacuum Vac. motor Vacuum noise level 1: min:10 max:100 N.B.: the “VACUUM NOISE LEVEL” parameters represent the suction motors present in the machine vacuum system. -
Page 49: Vacuum Noise Level Menu (Vacuum Sweep Mot)
VACUUM NOISE LEVEL MENU (VACUUM SWEEP MOT) Proceed as follows to change the “VACUUM NOISE LEVEL” parameter in the water motor menu: Display the "MACHINE BRUSHES SETTINGS" menu - see “SETTINGS MENU” on page Display the “SERVICE” menu - see “SERVICE MENU”... -
Page 50: Optional Sets Menu (Parameters)
OPTIONAL SETS MENU (PARAMETERS) Proceed as follows to display the “OPTIONAL SETS” menu: Display the "MACHINE BRUSHES SETTINGS" menu - see “SETTINGS MENU” on page Display the “SERVICE” menu - see “SERVICE MENU” on page Display the “PARAMETERS” menu - see “PARAMETERS MENU (SERVICE)”... -
Page 51: Reset Delay Menu (Optional Opt. Brush)
RESET DELAY MENU (OPTIONAL OPT. BRUSH) Proceed as follows to change the “RESET DELAY” parameter in the brush motor menu: Display the "MACHINE BRUSHES SETTINGS" menu - see “SETTINGS MENU” on page Display the “SERVICE” menu - see “SERVICE MENU” on page Display the “PARAMETERS”... -
Page 52: Opt. Sweep Menu (Optional Sets)
OPT. SWEEP MENU (OPTIONAL SETS) To view the “OPT SWEEP” menu, proceed as follows: Display the "MACHINE BRUSHES SETTINGS" menu - see “SETTINGS MENU” on page Display the “SERVICE” menu - see “SERVICE MENU” on page Display the “PARAMETERS” menu - see “PARAMETERS MENU (SERVICE)”... - Page 53 N.B.: the “RESET DELAY” parameter indicates the time interval during which the side brushes remain in the working position before lifting off the floor. N.B.: The “RESET DELAY” parameter is expressed in seconds (s), the numerical value is between a minimum of 001 and a maximum of 300, the selectable increment is one unit.
-
Page 54: Actuator Sets Menu (Parameters)
ACTUATOR SETS MENU (PARAMETERS) <Proceed as follows to display the “ACTUATOR SETS” menu: Display the "MACHINE BRUSHES SETTINGS" menu - see “SETTINGS MENU” on page Display the “SERVICE” menu - see “SERVICE MENU” on page Display the “PARAMETERS” menu - see “PARAMETERS MENU (SERVICE)”... -
Page 55: Traction Reverse Delay Menu (Actuator Squeegee)
TRACTION REVERSE DELAY MENU (ACTUATOR SQUEEGEE) Proceed as follows to change the “TRACTION REVERSE DELAY” parameter in the brush motor menu: Display the "MACHINE BRUSHES SETTINGS" menu - see “SETTINGS MENU” on page Display the “SERVICE” menu - see “SERVICE MENU” on page Display the “PARAMETERS”... -
Page 56: Traction Sets Menu (Parameters)
TRACTION SETS MENU (PARAMETERS) <Proceed as follows to display the “TRACTION SETS” menu: Display the "MACHINE BRUSHES SETTINGS" menu - see “SETTINGS MENU” on page Display the “SERVICE” menu - see “SERVICE MENU” on page Display the “PARAMETERS” menu - see “PARAMETERS MENU (SERVICE)”... -
Page 57: Par. Change Menu (Traction Sets)
PAR. CHANGE MENU (TRACTION SETS) <Proceed as follows to display the “PAR. CHANGE” menu: Display the "MACHINE BRUSHES SETTINGS" menu - see “SETTINGS MENU” on page Display the “SERVICE” menu - see “SERVICE MENU” on page Display the “PARAMETERS” menu - see “PARAMETERS MENU (SERVICE)”... -
Page 58: Max Backward Speed Menu (Traction Par. Change)
N.B.: the “MAX SPEED FORWARD” parameter is the maximum speed the machine can reach during forward movement. N.B.: The “MAX SPEED FORWARD” parameter is expressed as a percentage (%) with respect to the maximum speed that can be reached in TRANSFER mode, the numerical value is between a minimum of 50 and a maximum of 100, the selectable increment is one unit. -
Page 59: Speed Sets Menu (Traction Sets)
SPEED SETS MENU (TRACTION SETS) <Proceed as follows to display the “SPEED SETS” menu: Display the "MACHINE BRUSHES SETTINGS" menu - see “SETTINGS MENU” on page Display the “SERVICE” menu - see “SERVICE MENU” on page Display the “PARAMETERS” menu - see “PARAMETERS MENU (SERVICE)”... -
Page 60: Speed Level Menu (Traction Speed Sets)
N.B.: The “MODE2 SPEED (WORK SPEED)” parameter is the maximum speed the machine can reach when working. N.B.: The “MODE2 SPEED (WORK SPEED)” parameter is expressed as a percentage (%) with respect to the MAX SPEED FORWARD, the numerical value is between a minimum of 10 and a maximum of 100, the selectable increment is one unit. -
Page 61: Hour Meter Menu (Service)
HOUR METER MENU (SERVICE) <Proceed as follows to display the “HOUR METER” menu: Display the "MACHINE BRUSHES SETTINGS" menu - see “SETTINGS MENU” on page Display the “SERVICE” menu - see “SERVICE MENU” on page Using buttons (1) and (2) (Fig.1) select the "HOUR METER" screen (Fig.2) and press button (3) to confirm the display (Fig.1). -
Page 62: Alarms Menu (Service)
ALARMS MENU (SERVICE) <Proceed as follows to display the “ALARMS” menu: Display the "MACHINE BRUSHES SETTINGS" menu - see “SETTINGS MENU” on page Display the “SERVICE” menu - see “SERVICE MENU” on page Using buttons (1) and (2) (Fig.1) select the "ALARMS" screen (Fig.2) and press button (3) to confirm the display (Fig.1). -
Page 63: Monitor Menu (Service)
MONITOR MENU (SERVICE) <Proceed as follows to display the “MONITOR” menu: Display the "MACHINE BRUSHES SETTINGS" menu - see “SETTINGS MENU” on page Display the “SERVICE” menu - see “SERVICE MENU” on page Using buttons (1) and (2) (Fig.1) select the "MONITOR" screen (Fig.2) and press button (3) to confirm the display (Fig.1). - Page 64 N.B.: after the selection to be displayed, it will be visible in the main screen instead of the hour meter (4). Page 64...
- Page 65 Page 65...
- Page 66 Page 66...
- Page 68 FIMAP S.p.A. Via Invalidi del Lavoro, 1 37059 S. Maria di Zevio (VR) Italy +39 045 6060491 - +39 045 6060440 service@fimap.com www.fimap.com...
Need help?
Do you have a question about the GMG PRO and is the answer not in the manual?
Questions and answers