Table of Contents
Advertisement
Quick Links
Advertisement
Table of Contents

Subscribe to Our Youtube Channel
Related Manuals for JMA MULTICODE

Summary of Contents for JMA MULTICODE
- Page 1 KEY CUTTING MACHINE MULTICODE www.jma.es...
- Page 2 KEY CUTTING MACHINE MULTICODE USER MANUAL...
-
Page 3: Table Of Contents
1.2 TRANSPORT AND PACKAGING ....................4 1.3 IDENTIFICATION LABEL ......................4 2.- INSTALLATION AND CHARACTERISTICS OF THE MACHINE ...........5 2.1 MAIN ELEMENTS OF THE MULTICODE ..................5 2.1.1 MULTICODE ..........................5 2.1.2 Tablet support and tablet ....................5 2.1.3 Power unit and power cable ..................7 2.2 INSTALLATION ........................9... -
Page 4: Presentation And General Aspects
1.- PRESENTATION AND GENERAL ASPECTS 1.1 GENERALITIES The MULTICODE duplicating machine has been designed taking into account current safety regulations in force in the E.E.C. Personal safety involved in the use of this type of machine is only attained with a well designed programme for per- sonal safety, like the implementation and following of the recommended suggestions as well as compliance with the safety regulations contemplated in this manual. -
Page 5: Installation And Characteristics Of The Machine
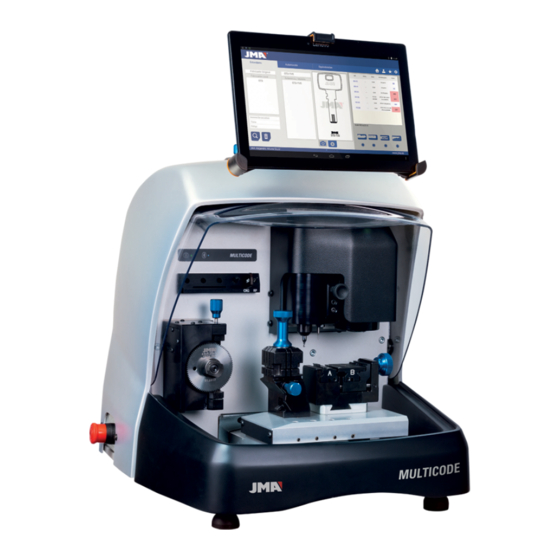
2.- INSTALLATION AND CHARACTERISTICS OF THE MACHINE 2.1 MAIN ELEMENTS OF THE MULTICODE 2.1.1 MULTICODE 2.1.2 TABLET SUPPORT AND TABLET The following components are separately packaged in the box of the machine: • Tablet support and tablet These two components should be installed on the machine as follows (Fig. 2):... - Page 6 Unthread the knobs (T1) located on the machine. (Fig. 3) Install the tablet support. Thread and tighten the knob to fix the tablet support on the top part of the machine. Introduce the tablet into the support. • Use and settings of the tablet support The tablet support has different settings: 1.
-
Page 7: Power Unit And Power Cable
2. Height setting of the tablet support (E) Turning knob (F) anticlockwise, adjusts the height of the tablet clamps. After adjustment, block knob (F) by turning it clockwise. FIG. 5 3. Turning the tablet support (E). Unblocking the clamp (F), you can turn the tablet support. After setting the posi- tion, block it again. - Page 8 Connect the MULTICODE to the power unit (X) and connect this latter to a power outlet using the power cable (X1). FIG. 8 Note: Connect the 24V DC 4 pin connector with the flat face looking downwards. FIG. 9...
-
Page 9: Installation
The machine is assembled, calibrated and controlled ready for use and does not need any assembly operations. In all cases, before the first start-up, the following controls should be made: • Connect the MULTICODE machine to adequate voltage power supply (220V 50Hz or 110V 50/60 Hz) using the su- pplied power unit (See section 2.1.3) •... -
Page 10: Family And Terminology Of Keys
It reads and/or decodes flat keys with standard coding and point/channel keys using a feeler with electronic contact. 2.4 FAMILY AND TERMINOLOGY OF KEYS The MULTICODE machine duplicates the following types of keys: • Flat (A) and vehicle (B) type keys. -
Page 11: Technical Data
2.5 TECHNICAL DATA The main technical data is shown below: Power supply 24V d.c-7.5 Amp.-180W Power unit: 100/240V a.c.- 50/60HZ-180W Cutter Prismatic (Flat keys) High speed steel. Turning speed 1100 rpm Cutter Cylindrical (Point/channel or groove keys) Hardened steel. Turning speed 7000 rpm Standard jaw (MP1) for flat keys With four sides Jaw for dimple/channel keys... -
Page 12: Accessories Box
2.6 ACCESSORIES BOX The MULTICODE machine is equipped with a box for accessories for maintenance and settings (Fig. 12). The acces- sories are as follows: Spanner 18mm Allen Key 2mm Allen Key 5mm Cutter blocking rod Allen Key 2.5mm Fuse: T6.3A 250V Ø4x30... -
Page 13: Jaws
3.- JAWS The machine consists of two jaws, one for machining flat keys and another for point and/or channel keys. The use of the two jaws for correct operation is detailed below. 3.1 JAW FOR FLAT KEYS 3.1.1 USE OF THE STANDARD JAW “MP1” The standard jaw “MP1”... - Page 14 • Key limit. After having chosen a side of the jaw, then you have to position the key lengthwise, to do that you have to take into account the limit of the key. Depending on the model of the key, there are two types of limit: 1.
-
Page 15: Jaw For Points And Channel Keys
Image of a jaw with the numbering of the slots to make the limits. (Fig. 16) Side 1: Limits 1, 2, 3. Side 2: Limits 1, 2. Side 3: Limits 1, 2. Side 4: Limits 1, 2. FIG. 16 All the necessary information about attaching the key from the JMAKeyPro software in the tablet will appear when the key code is introduced. -
Page 16: Type Of Limit
3.2.2 TYPE OF LIMIT Both point and channel keys can be introduced into the jaw, with neck limit or with point reference. The first (with C limit) have to be supported against the clamps while the others (point limit) have to be supported with reference in one of the channels (1-2-3), as indicated in the JMAKeyPro software. -
Page 17: Clamp Model
3.2.3 CLAMP MODEL The jaw has two standard clamps, a fixed one (A) and a mobile one (B). One of the important characteristics of the clamps is that they have two sides to attach different models of keys. Both the fixed clamp and the mobile one, have two sides, 1 and 2. -
Page 18: Adjustment Of Different Jaws
3.3 ADJUSTMENT OF DIFFERENT JAWS The machine has different areas (flat and safety) to adjust the jaws and take readings. 3.3.1 ADJUST THE JAWS, FLAT KEYS This can be used both for adjusting the cutter or the reader After adjustment, it can be used to take key readings. The following steps are for adjusting the cutter: 1) Place the CRG (T4) in the jaw MP1 on side 1.(Fig.21) FIG. -
Page 19: Adjust Safety Jaw
3) Go to the .SETTINGS menu, select settings→adjust zero-machines (flat key)→Reader. 4) Select the jaw and then press the reader adjustment button. To take readings of flat keys: 1. Place the flat key in the corresponding side of the jaw MP1. 2. - Page 20 3.3.2.2 FEELER 1P The 1P feeler is used to adjust the reader and to code the point or channel keys. To adjust the reader: 1) Remove the lever (T8) and let it drop to its position. 2) Position the RPC adjustment sheet in the clamp. 3) Go to the SETTINGS menu, select settings adjust zero-machines (safety key) Reader.
-
Page 21: Use Of The Tablet
4.- USE OF THE TABLET The tablet, USB/micro USB cable and power plug are separately packed inside the box of the machine. FIG. 27 4.1 CHARGING AND STARTING THE TABLET It may be necessary to charge the battery before using the tablet . Two ways to charge the battery: 1) Connecting the power supply (B1) of the tablet to 220V mains. - Page 22 2) Select “Language and text introduction”. 3) Select “Language”. 4) Move down the menu and select your language.
-
Page 23: Cleaning And Safety
5) To finish, press the circle. Note: For all the MULTICODE functions, follow that indicated in the JMAKeyPro software and in the manual. For all other indications, follow that indicated the quick guide of the tablet. 5.- CLEANING AND SAFETY We recommend following these guidelines for the cleaning: •... -
Page 24: Access To The Rear Part
6.1 ACCESS TO THE REAR PART To have access to the rear part, you should do the following: 1) Switch the machine off using the emergency stop and disconnect the cable from the power supply. 2) Remove the Tablet from the support. 3) Release 7 screws (T10) with a 3mm Allen key (Fig. -
Page 25: Clean Swarf Tray Area
6.3 CLEAN SWARF TRAY AREA To remove the swarf tray, do the following: 1) Remove the swarf box, pulling it outwards. 2) Remove the swarf, using the brush. 3) Re-introduce the tray taking it to the bottom following the two lines (T13) marked in black on the chassis (Fig. 30) FIG. -
Page 26: Replacement Cylindrical Cutter
FIG. 31 6.5 REPLACEMENT CYLINDRICAL CUTTER 1) Switch the machine off using the emergency stop and disconnect the cable from the power supply. 2) Raise the front plastic guard. 3) Unscrew the prisoner screw (T16) with a 3mm spanner (T17) and remove the cylindrical cutter (T18). Fig. 32 4) Replace the cutter, pushing upwards to the limit. -
Page 27: Waste Elimination
7.1 PACKAGING • Because the packaging of the MULTICODE machine is made from cardboard, it can be recycled as packaging. • As waste, it is classified as solid urban waste and therefore can only be deposited in special containers for cardboard. -
Page 28: Assembly Drawing
9.- ASSEMBLY DRAWING... -
Page 29: Software Operational Guide
10.- SOFTWARE OPERATIONAL GUIDE The JMAKeyPro software is used for the complete control of the Multicode machine. To access this software you only have to press the icon. After executing the program, we have the following main menu. 1) The program is divided into 3 different areas according to the type of search required. -
Page 30: Bluetooth Link
Tablet with a screen of 8” or more and with Android 4.4.2 “Kitkat” or later. In the case of changing the Tablet, and using another Tablet to control the Multicode, first you will have the couple the Tablet and the Multicode machine. - Page 31 After choosing the device we will see the message of “Coupling Device” on the screen, it is an automatic process, there is no need to introduce any code or password for coupling. After the coupling process has finalized “JMA Mul- ticode”...
-
Page 32: Change Of Language
10.2 CHANGE OF LANGUAGE The language can be changed in the “JMAKeyPro” program, to do that go to the settings section. Settings In settings, we choose the language in which we want the program to work and wait for the language to appear automatically. - Page 33 After pressing on the image a window appears on the screen with the 1:1 scale image of the key. This window has the peculiarity that the entire screen is no sensitive to the touches by the hand or the key, which allows us to position the physical key over the 1:1 scale image.
-
Page 34: Searches
10.4 SEARCHES 10.4.1 SEARCHES BY LOCK MANUFACTURER (STANDARD AREAS) This screen is the most versatile because it allows us to make different types of searches according to the criteria we choose. We are going to define the different types of searches we can perform. Blank key reference Lock manufacturer Lock system search... - Page 35 Case 2: Define a JMA key blank and see, which the series, related to that key is. When we enter or select a JMA key reference, the system makes an automatic search. The search is made by intro- ducing the name into the box corresponding to the JMA blank key reference, as we type the letters, the system will filter the possible manufacturers with those letters.
- Page 36 Case 4: Directly search for a file we want to use for machining. This search for the series that contain the exact file we have introduced in the file search box. In the search by lock system, we should press the search button (F) to make the search and later press the erase button (D) to make any other search with another word.
-
Page 37: Search By Automation, By Type, By Brand, Model And Year (Automation Area)
10.4.2 SEARCH BY AUTOMATION, BY TYPE, BY BRAND, MODEL AND YEAR (AUTOMATION AREA) This search allows us to know the JMA key model used by an automation vehicle model (Car, Truck or Motorbike), in many cases the client can come with the original key of the vehicle and identifying the profile can be a difficult task, we can simply see which JMA key model is compatible with that model of automobile by the year of construction of that model. -
Page 38: Search For Keys By Equivalents With Another Manufacturer (Equivalents Area)
This section of the program allows us to introduce references of keys that are not JMA references and will tell us the JMA equivalent and on the other hand it will give tell us if the key can be cut or not in the Multicode. -
Page 39: Cutting Information (File)
Once the program is connected to the Multicode in the JMAKeyPro program, we have access to see the technical information for cutting the key. If there is no link with the Multicode machine, this information is not accessible. We can differentiate the files into two families, according to the attaching area and the cutting tool to be used, therefore,... - Page 40 On one hand we have the information part (I) related to the key, the name of the file, the information of the cutting of the key in profile. On the other hand, we have the code introduced, in this case 15000 and the biting related to this code 32248. On another hand, we have essential information (J) about the cutter, feeler and jaw for this key, initially they are the standards already set in the machine.
- Page 41 Height Control: Normal or Self-adjust cutting The Multicode machine is already adjusted, and does not need to obtain a height reference each time that a toothed key is machined. As the reference of the key is given by its blade and this is already calibrated, usually a...
- Page 42 2) Height for machining: Theoretical or Read Height As commented in the previous section, once a key has been read we have the values of the previously read keys. The program allows us to cut the key with the theoretical “original” values marked by the manufacturer or to the contrary cut the key with the read height values, with the error that this involves, but in old locks that are already vitiated, this could be the best option.
-
Page 43: Point Key File
10.5.2 POINT KEY FILE Following the compatibility with the Avantcode machine and the Xcode, the Multicode machine has the same names of files. That is why the files of the point and channel keys in “P”, 1P, 2P ... - Page 44 Once we have entered into the file we can see the data of the key In this case we have a key with 3 axes on face A/C and another axis on the lateral Face B/D. Biting Box On one hand we have the information part (I) related to the key, the name of the file, series, the blank key that in this case is ORIGINAL.
- Page 45 The limit is referenced by the red line drawn on the representation of the cut of the key. That way, in this example it indicates Limit 0 and in the neck of the key. In the cases limit 1 or 2 the point of the key, and using the point limit plate in the channels of face 1 of the jaw MP1.
-
Page 46: Channel / Slot Key File
The standard cutters supplied with the Multicode are as follows: CUTTER 1F => Base = 2.5 mm Angle 0º (Straight cutter for channel keys for automation). - Page 47 We are going to see the file of each key in the following drawing. In the case of the TP00FI-16P key (channel) we have searched for DE11056 and in the case of the key TP00FO-24P (channel) we have searched for code 2500. Biting Box On one hand we have the information part (I) related to the key, the name of the file, series, the blank key that in this case is TP00FI-16P and TP00FO-24P.
-
Page 48: Jaw Settings
10.6 JAW SETTINGS The Multicode machine is equipped with an electronic contact in the two tools, either the horizontal tool to cut toothed keys, either the vertical tool to cut point and channel keys are isolated and have an electronic sensor that detects collision or contact with the key or the jaw. -
Page 49: Adjust Toothed Jaw
10.6.1 ADJUST FLAT KEY JAW In the jaw adjustment menus we select the jaw (S) we want to adjust. In this case, we select flat keys adjustment (flat key). Adjustment of the toothed jaw is very simple, take the tool CRG and place it in face 1 of the jaw we are going to use (See Chapter 3.3.1 for placement of CRG in the jaw). -
Page 50: Update Firmware
10.7 UPDATE FIRMWARE The Firmware updating process is automatic, because when the program starts and connects to the Multicode it checks the version of the same and if it is not adequate it jumps to the updating window. Access to this same window can be obtained through “JMAKeyPro” Adjustments and clicking on the part of updating. - Page 51 This is normal and the process will take from 5 to 10 minutes, until the diode becomes steady green, at that moment the Multicode is prepared to enter the...
-
Page 52: Diagnostics
9.- Reset to Factory settings. Resets to all factory settings. This option is protected with a password, and we re- commend only doing it with the help of the JMA technical service. 10.- Motor V. Starts turning the vertical axle (point and channel keys).
Need help?
Do you have a question about the MULTICODE and is the answer not in the manual?
Questions and answers