LXE HX3 User Manual
Microsoft windows ce 5.0 equipped
Hide thumbs
Also See for HX3:
- Programming manual (238 pages) ,
- Reference manual (246 pages) ,
- User manual (32 pages)

Related Manuals for LXE HX3


Summary of Contents for LXE HX3
- Page 1 HX3 User’s Guide ® ® (Microsoft Windows CE 5.0 Equipped) Copyright © 2008 by LXE Inc. All Rights Reserved E-EQ-HX3OGWW-C...
-
Page 2: Revision Notice
Wavelink®, the Wavelink logo and tagline, Wavelink Studio™, Avalanche Management Console™, Mobile Manager™, and Mobile Manager Enterprise™ are trademarks of Wavelink Corporation, Kirkland. The Bluetooth® word mark and logos are owned by the Bluetooth SIG, Inc. and any use of such marks by LXE, Inc. is under license. -
Page 3: Table Of Contents
Hip Flip...19 UICK TART Getting Started ... 21 Pre-requisites ...21 Quick Start ...21 Wearable Device Assembly...22 Voice Case Assembly...22 Hip Flip ...23 Ring Scanner Strap...24 Connecting the Battery and Ring Scanner ... 25 E-EQ-HX3OGWW-C Table of Contents HX3 User’s Guide... - Page 4 Left and Right Battery Charging LED ...37 HX2 Multi-Charger... 38 Charging Pocket LED...38 Charger/Analyzer LEDs ...39 PPENDIX 5 Key Keypad ... 41 PPENDIX EGULATORY Approvals/Standards ... 44 Revision History... 48 HX3 User’s Guide OTICES AND AFETY NFORMATION Table of Contents E-EQ-HX3OGWW-C...
- Page 5 Figure 26 Laser Scan Beam on Linear Barcode...31 Figure 27 Imager Bracketed Crosshair Target on 2D Barcode ...32 Figure 28 Scan Status LED ...32 Figure 29 Connect ActiveSync Cable to HX3 Cradle Connector ...35 Figure 30 Desktop Cradle ...36 Figure 31 Multi-Charger ...38 Figure 32 Multi-Charger Control Panel ...39...
- Page 6 Table of Contents HX3 User’s Guide E-EQ-HX3OGWW-C...
-
Page 7: Introduction
Overview The LXE® HX3 is a small, lightweight mobile computer designed specifically for voice applications. The HX3 is designed to be worn in a pouch with a headset and an optional ring barcode scanner. The primary data inputs are the headset and an optional ring scanner. The HX3 is voice ready. -
Page 8: Ring Scanner Warnings And Labels
HX2 Cradle Reference Guide – contains user, technical and troubleshooting information for the cradle. Note: The HX3 uses the same batteries and cradles as the HX2. Ring Scanner Warnings and Labels • Do not look into the ring scanner/imager aperture. -
Page 9: Important Battery Information
15 minutes. If the backup battery is fully discharged, the HX3 will reset as soon as it is docked in a powered cradle or connected to a fully charged tethered battery. A reset will cause loss of data and custom programs in RAM. -
Page 10: Environmental Specifications
-4°F to 158°F (-20°C to 60°C) [non-condensing] IEC 60529 compliant to IP54 5% to 90% non-condensing at 104°F (40°C) WiFi, CCX, LXE-delivered/certified access points 32.8 feet (10 meters) Direct line of sight only. -4°F to 120°F (-20°C to 50°C) [non-condensing] -4°F to 160°F (-20°C to 70°C) [non-condensing]... -
Page 11: Document Conventions
LXE ServicePass website. Contact your LXE representative to obtain the LXE Manuals CD. You can also get help from LXE by calling the telephone numbers listed on the LXE Manuals CD, in the file titled Contacting LXE. This information is also available on the LXE website. -
Page 12: Manuals
LXE Security Primer • CE API Programmers Guide • Ring Scanner Programming Guide Contact your LXE representative for user and reference guide availability and subsequent updates. Accessories Power Standard Battery, Lithium Ion Extended Battery, Lithium Ion 6 slot battery charger with universal power supply. Includes analyzing capabilities on one slot. - Page 13 2D Imager Ring (long cable with quick disconnect adapter cable) Replacement Finger Straps for Ring Scanners and Imagers, Pack of 20 LXE Bluetooth module with laser ring scanner, battery, two hand/wrist straps (large and small) LXE Bluetooth module with 1D/2D imager ring scanner, battery,...
- Page 14 Replacement foam ear piece cover for 501 and 502 headsets, 50 pack Replacement leatherette ear piece cover for 501 and 502 headsets, 10 pack Replacement leatherette ear piece cover for 501 and 502 headsets, 50 pack HX3 User’s Guide Getting Help 8800A051POWERCORD 8800A301ACPS 8800A302DCPS 8800A052DCPWRCABLE...
-
Page 15: Components
Voice Case Please contact your System Administrator for assistance with HX3 accessories. Note: New batteries must be charged prior to use. The backup battery is continually recharged by the tethered battery. E-EQ-HX3OGWW-C Components HipFlip and Belt Figure 2 HX3 Components... -
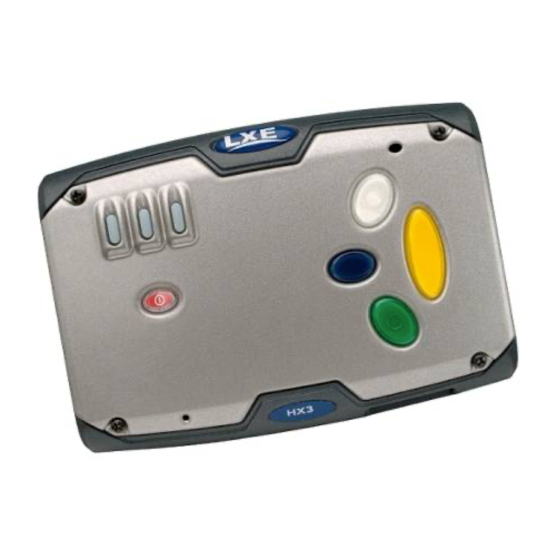
Page 16: Front
Front HX3 User’s Guide Figure 3 HX3 Front Power Button Wireless LED Bluetooth LED System Status LED Blue Modifier Key Internal Speaker Yellow Key White and Green Keys Internal Microphone Front E-EQ-HX3OGWW-C... -
Page 17: Back
Back Back Note: Before connecting cables to the back, make sure the LXE logo on the HX3 is uppermost or the left arm / right arm directions won’t work. Left Arm Use Right Arm Use E-EQ-HX3OGWW-C Figure 4 Back Ring Scanner Tether cable channel... -
Page 18: Connectors
Connector 1 See Cables. Cradle Connection Connector 3 is at the base of the HX3. It connects to the Cradle. When the HX3 is in a powered cradle, the HX3 receives external power through the Cradle connector. Connector 3 See the 2 Cradle Reference Guide for instruction. -
Page 19: Tethered Ring Scanner / Imager
Press the HX3 end of the extension cable into either left or right connector on the back of the HX3. The retaining clip will snap into place and secure the cable connection. Place the cable in the cable groove. -
Page 20: Figure 9 Ring Scanner Cable
Tuck the cable under the belt, but leave a small loop where it goes under the belt. • Do not wear the cable on the front of your body. It may get in your way or get caught on protruding objects. HX3 User’s Guide Tethered Ring Scanner / Imager Figure 9 Ring Scanner Cable E-EQ-HX3OGWW-C... -
Page 21: Figure 10 Ring Scanner Hook And Loop Strap
Tethered Ring Scanner / Imager E-EQ-HX3OGWW-C Figure 10 Ring Scanner Hook and Loop Strap Figure 11 Ring Scanner/Imager Apertures Imager – Illumination LEDs Beam Aperture Imager – Clear Glass Lens Laser Scanner – Red Glass Lens HX3 User’s Guide... -
Page 22: Cables
Cables Cables Figure 12 Cable – Audio, Battery and Connector Figure 13 Cable – Laser Ring Scanner and Extension Cable Figure 14 Cable – Imager Ring Scanner and Extension Cable HX3 User’s Guide E-EQ-HX3OGWW-C... -
Page 23: Li-Ion Battery
The Standard battery is much thinner than the Extended battery. Note: The HX3 uses the same batteries, cradle and charger as the HX2. Each battery will fit in the battery sleeve on the hip flip and the voice case. Note: Do not allow water or chemical cleaning agents of any kind to come in contact with the battery charging contacts or the battery cable connector;... -
Page 24: Mounting Bracket Clips
Remove the HX3 from the mount assembly by pushing down on either mounting clip, or both, until the HX3 mounting bracket disconnects. Or you can disconnect one side, then lift the HX3 up at a 45 degree angle until the other side disconnects. Lift the HX3 up and away from the mount assembly. -
Page 25: Mounting Devices
Mounting Devices Voice Case Assembly There are two optional voice cases for the HX3. One design has a partially open front, allowing easy access to the HX3 keypad. The second case design has a clear window covering the keypad. The voice case is a sturdy, lightweight covering for the HX3, tethered battery, and voice accessories. - Page 26 Mounting Devices HX3 User’s Guide E-EQ-HX3OGWW-C...
-
Page 27: Quick Start
The sequence of steps in Getting Started/Pre-requisites must also be completed when the HX3 returns from a Cold Boot and when a new OS version is loaded. The wireless client, flash card, virtual keyboard and scanner parameters may also need to be reset after a cold reset. -
Page 28: Wearable Device Assembly
Wearable Device Assembly Voice Case Assembly There are two optional voice cases for the HX3. One design has a partially open front, allowing easy access to the HX3 keypad. The second case design has a clear window covering the keypad. -
Page 29: Hip Flip
2. Attach the battery cable, ring scanner and audio device to the HX3. 3. Slip the HX3 into the voice case. Be sure the screen and keypad are visible through either the opening (voice case without clear window) or through the clear window (voice case with window). -
Page 30: Ring Scanner Strap
The ring scanner has a built-in quick disconnect designed for occasional safety hazards and is not intended for daily removal of the ring scanner from the hand. Note: Do not touch, push against or brace your finger on the scan aperture at any time. HX3 User’s Guide Getting Started E-EQ-HX3OGWW-C... -
Page 31: Connecting The Battery And Ring Scanner
When the tethers are disconnected, any dust or moisture that adheres to the tether connector can potentially cause damage upon cable connection. Follow the numbers in the following tables to connect the battery and ring scanner to the HX3. Note: Before connecting cables to the back, make sure the LXE logo on the HX3 is uppermost or the following left/right directions won’t work. -
Page 32: Connecting The Audio Cable And A Headset
Connecting the Audio Cable and a Headset Note: The audio option draws power from the tethered battery. The HX3 internal speaker and internal microphone are disabled when a headset and microphone is connected. The headset consists of an earpiece, a microphone and an attached cable. The headset attaches to the audio cable which attaches to the HX3. -
Page 33: Tapping The Power Key
The Power key is an oval key located below the LEDs. When a battery is connected to the HX3 for the first time press the Power key. The mobile device begins the startup process. The Status LED is solid green. Wait until the LED begins blinking green to indicate the HX3 has successfully booted into the OS. -
Page 34: Cold Boot
Required mappable keys will need to be configured. For example, there is no Start, Control, Shift, Alt or Del key (or their equivalent) available using the default keypad setting. Optional software and LXE application parameters will need to be set up by the System Administrator. -
Page 35: Using The Keypad
The Blue key does not auto-repeat. The default timeout for any pressed key in any mode is 1 second. The HX3 keypad is designed so keys can be identified by sight or touch. The keypad contains the following keys: •... -
Page 36: System Status Leds
Indicates . . . The HX3 is booting. Green - Steady Green - Blinking The HX3 is On and attached to either a battery with a good charge or to an external power source such as a cradle. Red - Steady Main Battery Low. -
Page 37: Entering Data
Keypad Entry Because the HX3 is designed for voice applications, the keypad is limited. When the HX3 is connected via ActiveSync to a PC running LXEConnect, the PC’s keyboard may be used for input. -
Page 38: 2D Imager
Move the ring scanner towards or away from the barcode until a response is emitted by the HX3 (1 beep, 2 beeps, a WAV file, etc) or the bracketed crosshair times out and disappears. -
Page 39: Bluetooth Devices
Bluetooth printers and scanners. Note: The Bluetooth icon is only going to be visible when the HX3 is connected via ActiveSync to a PC running LXEConnect. The Bluetooth taskbar Icon state and Bluetooth LED states change as Bluetooth devices are discovered, pair, connect, and disconnect. -
Page 40: Setting The Audio Speaker Volume
The internal speaker is located on the front of the device to the right of the LXE logo. The audio volume can be adjusted to a comfortable level for the listener. Operational “beeps” are emitted from the speaker. -
Page 41: Optional Equipment
Figure 29 Connect ActiveSync Cable to HX3 Cradle Connector Insert the HX3 cable end into the cradle connector on the bottom of the HX3 until a click is heard. Insert the USB-A end in a USB port on a desktop/laptop computer. -
Page 42: Hx2 Docking/Charging Cradle
Using an external power supply the cradle recharges Standard batteries in approximately 4 hours (8 hours for the Extended battery). The HX3 does not need to be docked during a spare battery charging process. See Accessories. Remove the voice case before placing the HX3 in the cradle. The HX3 cannot be docked in a cradle while it is mounted in a hip flip. -
Page 43: Cradle Leds
Green Amber Flashing Refer to the HX2 Cradle Reference Guide for instruction in setting up the cradle, inserting the battery packs, interpreting the LEDs, connecting cables and using the cradle for powering the HX3 and communication. E-EQ-HX3OGWW-C It means …. -
Page 44: Hx2 Multi-Charger
HX2 Multi-Charger Note: The HX3 uses the same batteries and Multi-Charger as the LXE HX2. The LXE HX2 Multi-Charger is designed to simultaneously charge up to six Rechargeable Lithium Ion Batteries at a time, in any combination of Standard or Extended batteries. The Standard batteries require less than four hours and the Extended batteries require less than 8 hours. -
Page 45: Charger/Analyzer Leds
Charge/Analyze Pocket. E-EQ-HX3OGWW-C Between 90% Between 80% and 100% and 90 % When all LEDs are off, the battery capacity is less than 50%. Figure 32 Multi-Charger Control Panel Between 70% Between 50% and 80% and 70% HX3 User’s Guide... - Page 46 HX2 Multi-Charger HX3 User’s Guide E-EQ-HX3OGWW-C...
-
Page 47: Appendixa Key Maps
5 Key Keypad The HX3 keypad is designed for use with voice applications. Because of the limited design, the HX3 should be connected via ActiveSync to a PC running LXEConnect when a full keyboard is needed (for example, during system configuration). - Page 48 5 Key Keypad HX3 User’s Guide E-EQ-HX3OGWW-C...
-
Page 49: Appendixb Regulatory Notices And Safety Information
Connect the equipment into an outlet on a circuit different from that to which the receiver is connected. • Consult the dealer or an experienced radio/TV technician for help. Warning: Changes or modifications to this device not expressly approved by LXE, Inc., could void the user’s authority to operate this equipment. Industry Canada: This Class B digital apparatus meets all requirements of the Canadian Interference Causing Equipment Regulations. -
Page 50: Approvals/Standards
Information to User A label on the exterior of the device should resemble one of the labels shown below (the label contains the LXE part number of the installed radio card). The labels shown below and affixed to the device, identify where the device may be used and where its use is restricted. - Page 51 Industry Canada Specific Absorption Rate (SAR) limits. Highest reported SAR for the HX3 is .641W/kg on body. Any accessories not provided by LXE should not be used with this device. This device must not be co-located or operating in conjunction with any other antenna or transmitter.
-
Page 52: Laser Light Safety Statement
Este producto usa luz de láser. Las etiquetas se proveen en la máquina exploradora. Por favor, lea detenidamente la explicación para las precauciones. (ES) Waarschuwing: Dit product gebruikt laserlicht. Een van de volgende labels is op de scanner aangebracht. Lees a.u.b. de waarschuwing onder Oppassen. (NL) HX3 User’s Guide E-EQ-HX3OGWW-C... - Page 53 Regulatory Notices Aþaðýdaki etiketlerden bir tanesi tarayýcýnýn üstünde saðlanýr. Lütfen Dikkat ifadesini okuyun. (TR) (KR) (CN) E-EQ-HX3OGWW-C (JP) Legend: Chinese-CN; Danish-DK; Dutch-NL; English-US; Finnish- FI; French-FR; German-DE; Greek-GR; Italian-IT; Japanese-JP; Korean-KR; Norwegian-NO; Portuguese-PT; Spanish-ES; Swedish-SE; Turkish-TR HX3 User’s Guide (GR)
-
Page 54: Revision History
Appendix B Regulatory Notices and Safety Information Revision C: Sept 2008 Section Appendix B Regulatory Notices and Safety Information HX3 User’s Guide Explanation Revised accessories listing. Added Revision History. Explanation Update approvals for 802.11 a/b/g radio. Remove Summit Declaration of Compliance for consistency. -
Page 55: Index
Hardware Reset ...27 Help ...5 Hints Key Maps ...41 Important Battery Information...3 Key Maps...41 LEDs Multi-Charger ...38 Li-ion battery ...17 Lithium Ion battery warning...3 LXE Manuals CD ...5 Microphone on headset...26 Mounting brackets ...18 Multi-Charger Features...38 Multifunction cables ...16 HX3 User’s Guide... - Page 56 Prerequisites...21 Quick Start Instructions ...21 Regulatory Notices ...43 Related Manuals ...2 Resume Mode, How To...27 Risk of explosion HX3 User’s Guide Battery...3 Safety Information...43 Scanner aperture cleaning...34 Scanner status, LED ...32 Scanning and data entry...31 Soft case... See Voice Case Suspend Mode, How To ...27...
Need help?
Do you have a question about the HX3 and is the answer not in the manual?
Questions and answers