LXE MX2 User Manual
Hide thumbs
Also See for MX2:
- User manual (38 pages) ,
- Reference manual (140 pages) ,
- User manual (10 pages)
Table of Contents
Advertisement
Quick Links
Download this manual
See also:
Reference Manual
MX2 User's Guide
IMPORTANT NOTICE
LXE's MX2 is obsolete.
This electronic manual has been made available as a courtesy to LXE's MX2
customers. Please contact your LXE customer support representative for
assistance and mobile device replacement.
Copyright © June, 2006 by LXE Inc.
All Rights Reserved
E-EQ-MX2OGWW-K-ARC
Advertisement
Table of Contents

Subscribe to Our Youtube Channel
Related Manuals for LXE MX2


Summary of Contents for LXE MX2
- Page 1 MX2 User’s Guide IMPORTANT NOTICE LXE’s MX2 is obsolete. This electronic manual has been made available as a courtesy to LXE's MX2 customers. Please contact your LXE customer support representative for assistance and mobile device replacement. Copyright © June, 2006 by LXE Inc.
-
Page 2: Revision Notice
While reasonable efforts have been made in the preparation of this publication to assure its accuracy, LXE assumes no liability resulting from any errors or omissions in this publication, or from the use of the information contained herein. Further, LXE Incorporated, reserves the right to revise this publication and to make changes to it from time to time without any obligation to notify any person or organization of such revision or changes. -
Page 3: Table Of Contents
Main Battery ..........................5 Backup Battery .........................5 How To Insert/Replace Battery ....................6 Replacing Battery in MX2 with Handle ...................7 Charging the MX2 Batteries in A Dock..............8 Serial Communication in the Dock................8 Operation ........................9 Quick Start ..........................9 Power Up ..........................9 “Please Wait”... - Page 4 Selecting Alpha Characters in Press and Wait Mode..............20 Programmable Keys ......................21 48-key Keypad........................22 Key Maps ..........................22 Repeating Keystrokes......................23 DOS Key Functions Not Available on the MX2..............23 Keypad Input Modes ......................24 Display ........................25 Cleaning the Display and Scan Aperture................25 Displayed Icons and Input Modes ..................25 Panning the Display........................27...
- Page 5 Table of Contents Illustrations Figure 1 The MX2 Hand Held Computer, Front View..................1 Figure 2 The MX2 Hand Held Computer, Rear View ..................1 Figure 3 The MX2 38-key Keypad ........................3 Figure 4 The MX2 48-key Keypads ........................3 Figure 5 Battery Pack Compartment........................6 Figure 6 (Handle) Battery Pack Compartment.....................7...
- Page 6 Table of Contents MX2 User’s Guide E-EQ-MX2OGWW-K-ARC...
-
Page 7: Mx2 Hand Held Computer
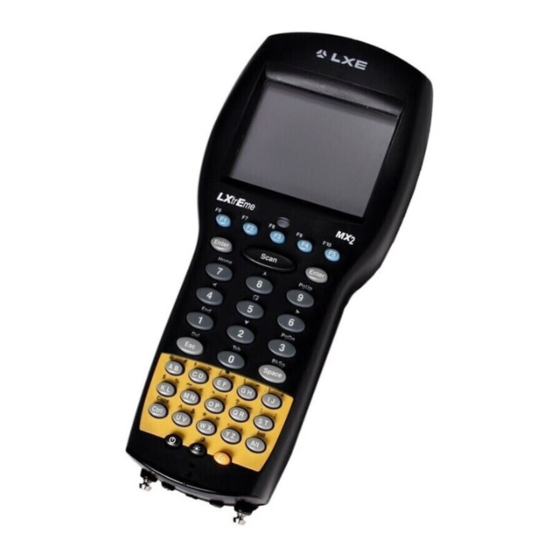
This guide provides operating information for the MX2 ROM-DOS hand held computer. The MX2 is a portable, ROM-DOS based computer capable of wireless data communications and is powered by a rechargeable Nickel-Metal Hydride (NiMH) battery pack and a lithium backup battery. -
Page 8: Features
One infrared port that communicates with a powered dock and supports IR portable printers. • The MX2 is available as a batch unit (no RF), or as a 2.4GHz RF unit. It can be configured with or without a standard range laser scanner. •... -
Page 9: Keypads
Introduction Keypads The MX2 is available with either a 38-key or 48-key keypad. In addition, the 48-key keypad offers a TN5250 overlay, designed to allow the user to enter terminal emulator commands when running LXE’s IBM TN5250 Terminal Emulation (TE) program. -
Page 10: Document Conventions
Keyword that indicates an imminent hazardous situation which, if not DANGER avoided, will result in death or serious injury. AC Power Adapter is only intended for use in a 25ºC (77ºF) maximum ambient temperature environment. MX2 User’s Guide E-EQ-MX2OGWW-K-ARC... -
Page 11: Batteries
When the main battery has lost most of its charge, an icon of an “empty” battery appears at the top right corner of the screen. The MX2 also may be programmed to emit a beep at intervals when the battery is low. When you see the empty-battery icon or hear the warning beeps, you should turn the unit off and recharge or replace the batteries as soon as possible. -
Page 12: How To Insert/Replace Battery
Be sure to turn the unit off before removing the battery. If you don’t, you may lose all data in memory. 1. Turn the MX2 off. 2. Detach the elastic handstrap by releasing its hook from the connection near the base. -
Page 13: Replacing Battery In Mx2 With Handle
Batteries Replacing Battery in MX2 with Handle Note: The unit will not function unless the battery compartment cover is in place and securely latched. Dials Battery Compartment Cover NiMH Battery Pack Figure 6 (Handle) Battery Pack Compartment The main battery pack is located in a compartment on the back of the unit. To insert or replace the... -
Page 14: Charging The Mx2 Batteries In A Dock
Place the MX2 in the dock, with the keypad facing front (on the same side of the dock as the dock indicators). Leave the main battery in the MX2 when placing it in the docking station to recharge the batteries. -
Page 15: Operation
2. Insert NiMH battery. Replace the battery cover and turn the compartment dial clockwise to lock. 3. Turn the MX2 on by pressing the Power key. A battery icon is displayed at the top right corner of the display when the MX2 is running with a charged battery. -
Page 16: Auto-Shutoff
In the extremely rare situation where none of the rebooting methods is successful, you can use a reset mechanism that is located below the keypad. Insert one end of a paperclip into the small hole beneath the keypad and press gently but firmly. This will cause the MX2 to begin a cold boot. MX2 User’s Guide... -
Page 17: Laser Scanner
• Do not stare directly into the laser beam. • Do not remove the laser caution labels from the MX2. Caution: Laser radiation when open. Please read the caution labels. Use of controls, adjustments or performance of procedures other than those specified herein may result in hazardous radiation exposure. -
Page 18: Using The Laser Scanner
Figure 12 Scan LED Figure 13 Scan Button on MX2 38-key Keypad The MX2 unit has one scan button – a large key in the middle of the keyboard labeled Scan. This key cannot be reprogrammed. Figure 14 Scan Trigger on Handle With the optional handle installed on the MX2, pressing the trigger activates the scanner and functions the same as the Scan button. -
Page 19: 48-Key Keypad
Laser Scanner 48-key Keypad The MX2 unit with the 48-key keypad does not have a scan button. Instead this unit relies on the trigger on the handle. Figure 15 Scan Trigger on Handle Pressing the trigger activates the scanner and functions the same as a Scan button. -
Page 20: How To
To use the laser, aim the top of the unit at a barcode and press the Scan key or press the trigger, if a handle is installed. • A red light emitting diode (LED) directly below the display indicates when the MX2 is scanning. •... -
Page 21: Unsuccessful Scan
Use a clean, damp, lint-free cloth. Do not scrub optical surfaces. If possible, clean only those areas which are soiled. Lint/particulates can be removed with clean, filtered canned air. E-EQ-MX2OGWW-K-ARC MX2 User’s Guide... -
Page 22: Keypad
11 Reset 12 Fn Button 13 Alt / Intl Button Figure 17 38-key Keypad Key Maps The MX2 with 38-key keypad does not use the following keys normally found on a computer keyboard: Open/Closed Parentheses Scroll Lock Pause/Break Print Screen/SysReq... -
Page 23: Repeating Keystrokes
Keypad The MX2 with 38-key keypad has a few keys that are not found on a standard computer keyboard. These keys are shown in the following table: Default Use Power key. Turn the unit on and off. Lamp key. Turns the backlight on and off in the display. -
Page 24: Keypad Input Modes
Keypad Keypad Input Modes Important When a key is pressed on the MX2 keypad, the result of the keypress depends on the current input mode. • Type 1 input mode remains in effect after each keypress until discontinued by user. -
Page 25: Key Combinations For International Characters
Terminal Emulations The international characters shown above are supported in DOS mode only. LXE’s terminal emulation applications (ANSI Plus, TN3270/-E and TN5250) do not support these particular international characters. Use the terminal emulation application configuration utilities to create international characters for use when running terminal emulation applications on the MX2. -
Page 26: Double Action Key Mode
Keypad Double Action Key Mode The MX2 with 38-key keypad has 38 keys. There are two additional modes of operation (see previous section titled “Keypad Input Modes”) which affect how alpha keys and the punctuation characters above the alpha keys are accessed. -
Page 27: Programmable Keys
For example, to assign the left Enter key to Caps, press Alt+Fn, the Left Enter key, release and the press Ctrl. The MX2 automatically translates the Ctrl keypress into the Caps key. The reprogrammed key retains the new value assignment when the unit is powered on and off. -
Page 28: 48-Key Keypad
The features discussed in this section apply to both the standard and TN5250 overlay 48-key keypads. Key Maps The MX2 with 48-key keypad does not use the following keys normally found on a computer keyboard: Open and Closed Curly Braces... -
Page 29: Repeating Keystrokes
Keypad The MX2 with 48-key keypad has a few keys that are not found on a standard computer keyboard. These keys are shown in the following table: Default Use Power key. Turn the unit on and off. Backlight key. Turns the backlight on and off in the display. -
Page 30: Keypad Input Modes
Keypad Keypad Input Modes Important When a key is pressed on the MX2 keypad, the result of the keypress depends on the current input mode. • Type 1 input mode remains in effect after each keypress until discontinued by user. -
Page 31: Display
Normal mode. Outputs the letter (lowercase), number or function on the key. Low battery warning, may be accompanied by a series of beeps. Turn off the MX2 and recharge or replace the batteries as soon as possible. Main and backup batteries are full. - Page 32 Caps input mode. Provides Caps Lock, Left shift and right shift functions. Outputs uppercase character on the key. Press Caps key again to remove icon from screen. Programming Enter key function to left or right indicates which Enter key is being programmed. (38-key keypad only) MX2 User’s Guide E-EQ-MX2OGWW-K-ARC...
-
Page 33: Panning The Display
(if applicable). For example, once the [FN-S] combination is entered, the FN state is no longer active (but panning mode is), so pressing the “A” key to exit panning mode will result in an “a” being displayed. E-EQ-MX2OGWW-K-ARC MX2 User’s Guide... -
Page 34: Adjusting The Contrast
Figure 25 Adjust Contrast, 48-key Keypad Contrast will adjust the contrast between text and the display background. The Contrast Down key decreases the contrast of the display. The Contrast Down key increases the contrast of the display. MX2 User’s Guide E-EQ-MX2OGWW-K-ARC... -
Page 35: Using The Backlight
Display Using the Backlight Instructions for changing the Backlight Auto-Off Timeout are located in Appendix C in the MX2 Reference Guide. 38-key Keypad Figure 26 Toggle Display Backlight with the Lamp Key, 38-key Keypad The [Lamp] key is located in the middle of the bottom row of the 38-key keypad and is used to turn the backlight on and off. -
Page 36: The Ir Serial Port
RS-232 serial mode, the IR port is used to transmit RS-232 level data out the IR port. The third pin along the bottom of the MX2 is used to receive RS-232 level data while in the dock. When transferring files using the IR port, flow control must be the same on both sides of the transmission (specifically, with Zmodem: both must use Xon/Xoff). -
Page 37: Getting Help
ServicePass website only. You can get help from LXE by calling the telephone numbers listed on the LXE Manuals CD, in the file titled “Contacting LXE.” This information is also available on the LXE website. -
Page 38: Accessories
Added updated “Getting Help” and “Manuals.” Updated “Accessories” to 2005 availability. Revision H – July 2004 Batteries : Added recommendation to store MX2 for extended period with a fully charged battery pack installed. Manuals and Accessories : Updated “Accessories” to July 2004 availability. - Page 39 "Contacting LXE". Add section titled "Getting Help." Appendix A – Key Maps : Remove PrintScn and SysReq from key mapping as they are not supported on the MX2. Appendix B – Regulatory Notices and Safety Information : New. Appendix contains Document of Compliance's for PCMCIA radios, translations of laser and battery warnings, etc.
- Page 40 Manuals and Accessories MX2 User’s Guide E-EQ-MX2OGWW-K-ARC...
-
Page 41: Appendixa Key Maps
38-key Keypad Keypress Sequences for Batch Units First press this key To get this key Then press this key DblStk Ctrl Contrast See “Adjusting the Contrast” earlier in this manual. Volume MX2 Config Program Shift Ctrl Ctrl Ctrl Scan Scan Enter Enter... - Page 42 First press this key To get this key Then press this key DblStk Ctrl Page Up Page Down NumLock (Toggle) CapsLock (Toggle) Ctrl Right Shift Left Shift Right Alt Left Alt Right Ctrl Left Ctrl Ctrl ScrollLock MX2 User’s Guide E-EQ-MX2OGWW-K-ARC...
- Page 43 38-Key Keypad First press this key To get this key Then press this key DblStk Ctrl 1 (alpha) 2 (alpha) 3 (alpha) 4 (alpha) 5 (alpha) E-EQ-MX2OGWW-K-ARC MX2 User’s Guide...
- Page 44 + (numeric) / (numeric) * (numeric) Home (numeric) End (numeric) PgDn (numeric) PgUp (numeric) Lt Arrow (numeric) Rt Arrow (numeric) Up Arrow (numeric) Dn Arrow (numeric) Insert (numeric) Del (numeric) < > : (colon) ; (semicolon) MX2 User’s Guide E-EQ-MX2OGWW-K-ARC...
- Page 45 38-Key Keypad First press this key To get this key Then press this key DblStk Ctrl - (minus sign) _ (underscore) , (comma) ‘ (apostrophe) ~ (tilde) “ & * (asterisk) E-EQ-MX2OGWW-K-ARC MX2 User’s Guide...
-
Page 46: 48-Key Keypad
48-Key Keypad Keypress Sequences for Batch Units First press this key To get this key Then press this key Shift Ctrl Contrast Up Contrast Up Contrast Down Contrast Down Volume MX2 Config Program Shift Shift Ctrl Ctrl Scan Scan Enter Enter Escape International... - Page 47 Left Shift Right Alt Left Alt Right Ctrl Left Ctrl Ctrl ScrollLock Equivalent CapsLock function is provided via the Fn Shift keypress. The Shift key provides the functionality of both the right and left shift key. E-EQ-MX2OGWW-K-ARC MX2 User’s Guide...
- Page 48 48-Key Keypad First press this key To get this key Then press this key Shift Ctrl 1 (alpha) 2 (alpha) 3 (alpha) MX2 User’s Guide E-EQ-MX2OGWW-K-ARC...
- Page 49 + (numeric) / (numeric) * (numeric) Home (numeric) End (numeric) PgDn (numeric) PgUp (numeric) Lt Arrow (numeric) Rt Arrow (numeric) Up Arrow (numeric) Dn Arrow (numeric) Insert (numeric) Del (numeric) < > : (colon) ; (semicolon) E-EQ-MX2OGWW-K-ARC MX2 User’s Guide...
- Page 50 48-Key Keypad First press this key To get this key Then press this key Shift Ctrl - (minus sign) _ (underscore) , (comma) ‘ (apostrophe) ~ (tilde) “ & * (asterisk) MX2 User’s Guide E-EQ-MX2OGWW-K-ARC...
-
Page 51: Ibm Tn5250 Terminal Emulator Keypad
This keypad is designed to allow the user to enter terminal emulator commands when running LXE’s IBM TN5250 Terminal Emulation (TE) programs. When running this program on the MX2, please refer to the following terminal emulation reference guide on the LXE Manuals CD for equivalent keys and keypress sequences: •... - Page 52 48-Key Keypad MX2 User’s Guide E-EQ-MX2OGWW-K-ARC...
-
Page 53: Appendixb Regulatory Notices And Safety Information
Operation of this equipment in a residential area is likely to cause harmful interference in which case the user will be required to correct the interference at his own expense. Warning: Changes or modifications to this device not expressly approved by LXE, Inc., could void the user’s authority to operate this equipment. -
Page 54: Approvals
A label on the exterior of the device should resemble one of the labels shown below (the label contains the LXE part number of the installed radio card). The labels shown below and affixed to the device, identify where the device may be used and where its use is restricted. Use of a device is prohibited in countries not listed below or otherwise identified by the label. -
Page 55: Regulatory Notices And Safety Information
Safety of information technology equipment, including electrical business equipment + Amendments A1..A4 We, LXE Inc., declare that the equipment specified above complies with all Essential Health and Safety Requirements of the above Directives and Standards, as amended. Signed: Place: LXE Inc., Norcross GA USA... - Page 56 Safety of information technology equipment, including electrical business equipment + Amendments A1..A4 We, LXE Inc., declare that the equipment specified above complies with all Essential Health and Safety Requirements of the above Directives and Standards, as amended. Signed: Place: LXE Inc., Norcross GA USA R.
- Page 57 EN 60950-2: 1992 + A1..A4 Safety of information technology equipment, including electrical business equipment We, LXE Inc., declare that the equipment specified above complies with all Essential Health and Safety Requirements of the above Directives and Standards, as amended. Place LXE Inc., Norcross GA USA...
- Page 58 With regard to the use of external antennas The LXE 6726 can be equipped with external antennas. The antennas listed have been evaluated with the LXE 6726 pursuant to ETSI EN 300 328, and therefore meet the definition of ‘dedicated antenna’ per ERC/REC 70-03 Appendix 1 Table 3; thus the requirement set forth in ERC/REC 70-03 , Annex 3 are met by the LXE model 6726 transceiver.
- Page 59 EN60950-1: 2001 business equipment The product carries the CE Mark: We, LXE Inc., declare that the equipment specified above complies with all Essential Health and Safety Requirements of the above Directives and Standards, as amended. Date of issue: June 18, 2003 Cyril A.
- Page 60 With regard to the use of external antennas The LXE 6816 can be equipped with external antennas. The antennas listed have been assessed with the LXE 6816 pursuant to EN 300 328, and therefore meet the definition of ‘dedicated antenna’. The table below lists the maximum output power setting for the radio module in order to result in a total EIRP of 100mW or less.
-
Page 61: Laser Light Safety Statement
Este producto usa luz de láser. Las etiquetas se proveen en la máquina exploradora. Por favor, lea detenidamente la explicación para las precauciones. (ES) Waarschuwing: Dit product gebruikt laserlicht. Een van de volgende labels is op de scanner aangebracht. Lees a.u.b. de waarschuwing onder Oppassen. (NL)\ E-EQ-MX2OGWW-K-ARC MX2 User’s Guide... - Page 62 Aþaðýdaki etiketlerden bir tanesi tarayýcýnýn üstünde saðlanýr. Lütfen Dikkat ifadesini okuyun. (TR) (GR) (JP) (KR) Legend: Chinese-CN; Danish-DK; Dutch-NL; English-US; Finnish- FI; French-FR; German-DE; Greek-GR; Italian-IT; Japanese-JP; Korean-KR; Norwegian-NO; Portuguese-PT; Spanish-ES; Swedish-SE; Turkish-TR (CN) Class 2 Laser Labels MX2 User’s Guide E-EQ-MX2OGWW-K-ARC...
- Page 63 Regulatory Notices and Safety Information Class 3A Laser Labels E-EQ-MX2OGWW-K-ARC MX2 User’s Guide...
-
Page 64: Lithium Battery Safety Statement
Pila de litio adentro. Peligro de explosión si la pila se reemplaza incorrectamente. Reemplace solamente con el mismo tipo o equivalente recomendado por el fabricante. (ES) Oppassen: Bevat Lithium-batterij. Incorrrecte plaatsing van batterij kan leiden tot explosiegevaar. Alleen vervangen door hetzelfde of door fabrikant aanbevolen gelijkwaardig type. (NL) MX2 User’s Guide E-EQ-MX2OGWW-K-ARC... - Page 65 Regulatory Notices and Safety Information Lithium Battery Safety Statement (KR) (GR) (CN) (JP) Dikkat: İçinde lityum bataryası bulunur. (TR) Legend: Chinese Italian Danish Japanese Dutch Korean English Norwegian Finnish Portuguese French Spanish German Swedish Greek Turkish E-EQ-MX2OGWW-K-ARC MX2 User’s Guide...
- Page 66 Regulatory Notices and Safety Information MX2 User’s Guide E-EQ-MX2OGWW-K-ARC...
-
Page 67: Index
Full battery icon............25 Backup ..............5 Function mode icon ..........26 Charge..............8 Main ..............5 Battery, replace............6 Battery, Replace MX2 with handle ..........7 Getting Help ............31 Getting Started............9 Caps / Type 1.............18, 24 Caps input mode icon ..........26 handle ..............12 Caution, Backup Battery..........5 handstrap hook ............6, 7... - Page 68 (NiMH) ........5 Troubleshooting Normal /Type 1..........18, 24 Unsuccessful scan ..........15 Turn on display backlight........29 Operating Temperatures ..........2 use the laser .............14 Pan the Display............27 Panning..............27 warning beeps............5 PCMCIA interface.............2 plastic ribbon ............6, 7 Power key ............17, 23 MX2 User’s Guide E-EQ-MX2OGWW-K-ARC...
Need help?
Do you have a question about the MX2 and is the answer not in the manual?
Questions and answers