Table of Contents
Advertisement
Quick Links
Download this manual
See also:
User Manual
Advertisement
Table of Contents

Subscribe to Our Youtube Channel
Related Manuals for LXE HX1


Summary of Contents for LXE HX1
- Page 1 HX1 Reference Guide Copyright © October 2007 by LXE Inc. All Rights Reserved E-EQ-HX1RG-B...
- Page 2 Notice: LXE Inc. reserves the right to make improvements or changes in the products described in this manual at any time without notice. While reasonable efforts have been made in the preparation of this document to assure its accuracy, LXE assumes no liability resulting from any errors or omissions in this document, or from the use of the information contained herein.
-
Page 3: Revision Notice
Chapter 4 – Wireless Network Configuration Note: A complete revision history is included in Appendix A, “Technical Specifications”. Revision Notice HX1 Reference Guide Explanation Revised “Components” section to reflect new Summit label. Revised “Components” section to reflect new Summit label. Updated chapter for EAP-FAST. -
Page 5: Table Of Contents
Top View ...7 End View ...7 Bottom View...8 System Hardware... 9 About Lithium-Ion Batteries... 9 Powering On the HX1 ... 9 Suspend /Resume Button ... 10 Power LED ...10 Entering Data... 10 External Connectors ... 11 25 pin RS-232 Connector for Headset...11 Pinout ...11... - Page 6 Owner ...29 Password ...30 PC Connection ...31 Power ...32 Battery ...32 Schemes...32 Regional Settings ...33 Remove Programs...33 System...34 General ...34 Memory ...35 Device Name ...35 Copyrights ...35 Volume and Sounds...36 Volume ...36 Sounds ...36 HX1 Reference Guide Table of Contents E-EQ-HX1RG-B...
- Page 7 EAP-TLS ...77 Cisco Icon Missing ...82 Certificates ... 83 Root Certificates ...83 Generating a Root CA Certificate for the HX1...83 Installing a Root CA Certificate on theHX1 ...86 User Certificates ...88 Method #1: No HX1 Access to Certificate Server...88 E-EQ-HX1RG-B...
- Page 8 Generating a User Certificate for the HX1 ... 88 Installing a User Certificate on the HX1 (WPA-TLS Only)... 93 Method #2: HX1 Has Access to Certificate Server...97 HAPTER ROUBLESHOOTING Introduction ... 99 Problem with one User ... 99 Problem with Multiple Users ... 100 Problems with RF Connection ...
- Page 9 Figure 4-42 Wireless Network Properties, EAP-TLS...78 Figure 4-43 Authentication Settings ...78 Figure 4-44 Select User Certificate...79 Figure 4-45 Authentication Settings, Certificate Selected ...79 Figure 4-46 Advanced Wireless Settings...80 Figure 4-47 User Logon...80 Figure 4-48 Authenticated to Network ...81 E-EQ-HX1RG-B HX1 Reference Guide...
- Page 10 Figure 4-69 Browsing to Certificate Location ...94 Figure 4-70 Certificate Listing...94 Figure 4-71 Private Key Not Present ...95 Figure 4-72 Browsing to Private Key Location ...95 Figure 4-73 Private Key Present ...96 Figure 4-74 Certificate Enrollment ...97 HX1 Reference Guide Table of Contents E-EQ-HX1RG-B...
-
Page 11: Chapter 1 Introduction
Use this guide as you would any other source book -- reading portions to learn about the HX1, and then referring to it when you need more information about a particular subject. -
Page 12: Document Conventions
Note: Caution WARNING DANGER HX1 Reference Guide All caps are used to represent disk directories, file names, and application names. Rather than use the phrase "choose the Save command from the File menu", this manual uses the convention "choose File|Save". -
Page 13: Quick Start
Use this guide as you would any other source book -- reading portions to learn about the HX1, and then referring to it when you need more information about a particular subject. This guide takes you through installation and operation of the LXE HX1. -
Page 14: Manuals And Accessories
Manuals and Accessories Manuals The following manuals are available on the LXE Manuals CD: • HX1 Multi-Charger User’s Guide • HX1 Reference Guide • Contacting LXE • LXE Technical Glossary Accessories The table below lists the available HX1 accessories. •... - Page 15 Yoke, Replacement for Single Band Headset Foam, Freezer Block Headset, Single and Dual Band Replacement Microphone Foam, Wind Screen, 10 pack Replacement Microphone Foam, Wind Screen, 50 pack Replacement Headset Foam, Ear Cover, 10 pack Replacement Headset Foam, Ear Cover, 50 pack HX1 Reference Guide...
- Page 16 Manuals and Accessories HX1 Reference Guide E-EQ-HX1RG-B...
-
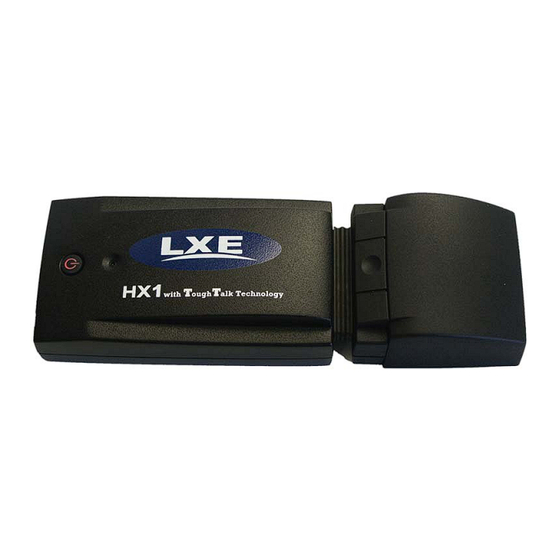
Page 17: Chapter 2 Physical Description And Layout
Chapter 2 Physical Description and Layout Components Top View End View E-EQ-HX1RG-B Figure 2-1 HX1 Components 1. Antenna Connector 2. RS-232 Connector, 9 pin 3. RS-232 Connector, 25 pin Figure 2-2 HX1 Connectors 1. Suspend/Resume Button with Power 2. Reset Button 3. -
Page 18: Bottom View
Bottom View Labels that identify the HX1 are located on the bottom of the unit. Please refer to these labels for information on a particular unit, such as the MAC address of the radio card installed. When initially configuring an HX1, the MAC address may be covered by “Use Summit Client Utility”... -
Page 19: System Hardware
The HX1 has three power modes: • On – The HX1 is on and all functions are available. The On state is indicated by the Power LED being lit. The HX1 enters the On state when a battery pack is inserted or when the Suspend/Resume button is pressed to wake the HX1 from Suspend mode. -
Page 20: Suspend /Resume Button
Suspend /Resume Button The Suspend /Resume button can be used to suspend or resume the HX1. It can also be used to reset the HX1. • When the HX1 is on, pressing and releasing the Suspend / Resume button places the HX1 in Suspend mode. -
Page 21: External Connectors
External Connectors 25 pin RS-232 Connector for Headset The HX1 has a female “D” connector to attach the lower audio cable. The headset adapter cable has a corresponding 25 pin male connector on one end. The other end of the headset cable provides for attaching the user’s choice of headset. -
Page 22: Pin Rs-232 Connector For Configuration
For more information on ActiveSync, please see Chapter 3, “System Configuration”. Pinout Antenna Connector The HX1 has an antenna connector. The antenna element is connected to an antenna cable. The other end of the antenna cable attaches to the HX1 antenna connector. HX1 Reference Guide... -
Page 23: The Hx1 Battery Pack
10 hours of usage in a typical environment. The HX1 MultiCharger The HX1 MultiCharger is used to charge up to four HX1 battery packs simultaneously. Batteries should also be recalibrated once a month. The HX1 MultiCharger also performs the recalibration cycle. - Page 24 The HX1 Battery Pack HX1 Reference Guide E-EQ-HX1RG-B...
-
Page 25: Chapter 3 System Configuration
Chapter 3 System Configuration Introduction The HX1 is configured via an ActiveSync connection since the HX1 does not have a keyboard or display. Once the HX1 is connected to a PC via ActiveSync, the ActiveSync Remote Display utility is used on the PC to view the HX1 configuration options. -
Page 26: Desktop
Desktop The HX1 Desktop appearance is similar to that of a desktop PC running Windows 2000 or XP. Since the HX1 has no monitor, the HX1 desktop is only visible using an ActiveSync connection and ActiveSync Remote Display. At a minimum, it has the following icons that can be double tapped with the stylus to access My Computer, Internet Explorer, and the Recycle Bin. -
Page 27: Desktop Icons
The HX1 desktop contains both standard and specialized icons. Some of the specialized icons are discussed below. SetServerIP The SetServerIP icon on the HX1 desktop is used to set the IP address of the server when using the HX1 with a Voxware server. Please refer to Voxware’s documentation for more information. SaveCiscoSettings Use the SaveCiscoSettings icon to save the Cisco radio settings after making changes in the Cisco Aironet Configuration Utility (ACU). -
Page 28: Software Configuration
Control Panel has fewer options. MAC Address The MAC address of the radio card installed in the HX1 is listed on a sticker affixed to the bottom of the HX1. The MAC address can also be viewed on the Status tab of the Cisco ACU or Summit SCU. -
Page 29: Establishing An Activesync Connection
2. Connect the configuration cable to the HX1 and the PC. Note: Do not attach the cable to the HX1 until the Power LED is flashing green. 3. When the Windows New hardware Wizard appears on the PC, follow the on-screen instructions. -
Page 30: Step 2: Install Microsoft Activesync
When the ActiveSync installation is completed, you may attach the configuration cable. Attach the 9 pin D connector to the HX1. Attach the USB connector to a USB port on your PC. An ActiveSync connection is automatically established. When prompted, select “No” to the Set Up a Partnership”... -
Page 31: Ending An Activesync Connection
If the HX1 has just been powered on, please wait until the power LED is flashing green before connecting the USB cable to the PC. If the cable is plugged in before the HX1 is ready, unplug the USB cable from the PC then reconnect. -
Page 32: Step 3: Install Mobile Power Toys Software
Follow the on screen installation instructions. Step 4: Preparing for Configuration To configure the HX1, turn the unit on. When the Power LED is flashing green, connect the USB connector on the configuration cable to the HX1 and the PC. -
Page 33: Error Messages
If any of the following error messages occur during while the Remote Display application is loading, click “OK” to dismiss the error message. The application will continue to load and operate properly. Figure 3-6 ActiveSync Remote Display Error Messages E-EQ-HX1RG-B HX1 Reference Guide... -
Page 34: Control Panel Options
Start | Settings | Control Panel | Certificates Manage digital certificates used for secure communication. Lists the Stored certificates trusted by the HX1 user. These values may change based on the type of radio security resident in the client, access point or the host system. -
Page 35: Date/Time
OK box or the Apply button to save the changes. The changes take effect immediately. IMPORTANT: The HX1 does not automatically preserve time after a reboot or if the battery pack goes dead. • The SaveTime icon on the desktop can be to save the current time and apply this time and date to the HX1 after reboot. -
Page 36: Display
OK box to save the changes. The changes take effect immediately. The default is Windows Standard. Note: All schemes are displayed in shades of gray. Backlight The HX1 does not have a display backlight. Changes on this tab have no effect on the HX1. HX1 Reference Guide Windows CE Disable Windows Standard... -
Page 37: Input Panel
There is no change from general desktop PC Keyboard Properties options. Adjust the settings and click the OK box to save the changes. The changes take effect immediately. Note: Because the HX1 relies on the PC’s keyboard for input, this option has little effect on the HX1. E-EQ-HX1RG-B... -
Page 38: Mouse
Start | Settings | Control Panel | Mouse Set the double-click sensitivity for stylus taps on the touch screen. Note: Because the HX1 relies on the PC’s mouse for input, this option has little effect on the HX1. Network and Dial-up Connections... -
Page 39: Owner
Control Panel Options Owner Access: Start | Settings | Control Panel | Owner Icon Set HX1 owner details. Factory Default Settings Identification Notes There is no change from general desktop PC Owner Properties display. Enter the information and click the OK box to save the changes. The changes take effect immediately. -
Page 40: Password
Password Access: Start | Settings | Control Panel | Password Icon Set HX1 access/power up password properties. Factory Default Settings Password Note: Once a password is assigned, the Owner and Password Control Panel options require the password to be entered before the Control Panel option can be accessed. If you forget the password, it cannot be restored without performing a cold boot on the unit (which erases all memory). -
Page 41: Pc Connection
Control Panel Options PC Connection Access: Start | Settings | Control Panel | PC Connection Control the connection between the HX1 and a nearby desktop/laptop computer. Factory Default Settings Allow Connection Connect Using Tap the Change button to adjust the settings and click the OK button to save the changes. The changes take effect immediately. -
Page 42: Power
System Idle Suspend Battery Displays the remaining power in the HX1 battery pack. There is no backup battery in the HX1. Schemes Power management options should always be set to Never. The HX1 operates only on battery power and does not support an AC Power connection. -
Page 43: Regional Settings
Follow the prompts on the screen to uninstall user-installed only programs. The change takes effect immediately. E-EQ-HX1RG-B English (United States) 123,456,789.00 / -123,456,789.00 neg $123,456,789.00 pos / ($123,456,789.00) neg h:mm:ss tt (tt=AM or PM) M/d/yy short / dddd,MMMM,dd,yyyy long HX1 Reference Guide... -
Page 44: System
Memory sizes given do not include memory used up by the operating system. Hence, a system with 64 MB may only report 35 MB memory, since 29 MB is used up by the Windows CE operating system. This is actual DRAM memory. HX1 Reference Guide Near left XVOX ADS XVOX Figure 3-17 System –... -
Page 45: Memory
Move the slider to allocate more memory for programs or storage. If there isn’t enough space for a file, increase the amount of storage memory. If the HX1 is running slowly, try increasing the amount of program memory. Adjust the settings and click the OK box to save the changes. The changes take effect immediately. -
Page 46: Volume And Sounds
The sounds for events and applications play through the headset when enabled. They are disabled by default. Sounds Use this option to change the sound scheme or create a custom scheme. HX1 Reference Guide Disabled Disabled Disabled Middle of Bar Windows CE Defaul! Figure 3-20 Volume &... -
Page 47: Chapter 4 Wireless Network Configuration
Please refer to Chapter 3, “System Configuration” for instructions. The HX1 may have a label identifying the radio card installed. If a label like the one below is attached to the HX1, the unit contains a Summit radio and the Summit Configuration Utility must be used to configure the wireless settings. -
Page 48: Summit Radio
The WZC utility has an icon in the toolbar that looks like networked computers with a red X through them, indicating that Wireless Zero Config application is enabled but the connection is inactive at this time (the HX1 is not connected to a network). •... -
Page 49: Main Tab
Select ThirdPartyConfig in the Active Config drop down list as the active profile. Warmboot the HX1. The Summit Client Utility passes control to Wireless Zero Config and the WZC Wireless Information control panel. Using the options in the Wireless Zero Config panels, setup radio and security settings. -
Page 50: Admin Login
Access additional troubleshooting features on the Diags tab. After Admin login, the use can also: • Create, edit, rename and delete profiles on the Config tab • Edit global parameters on the Global Setting tabs HX1 Reference Guide Figure 4-4 Admin Password Entry Summit Radio E-EQ-HX1RG-B... -
Page 51: Config Tab
A string of 1 to 32 alphanumeric characters, name of the Config or Profile Default: Default SSID A string of up to 32 alphanumeric characters, the Service Set Identifier (SSID) of the WLAN to which the radio connects Default: Blank E-EQ-HX1RG-B Figure 4-5 SCU – Config Tab HX1 Reference Guide... - Page 52 Set the Auth Type radio parameter is set to “Open” for all configurations unless using LEAP (not WPA) and the AP is configured for network EAP only. In this case, set the Auth Type radio parameter to “LEAP”. HX1 Reference Guide Summit Radio E-EQ-HX1RG-B...
- Page 53 – The settings for Auth Type, EAP Type and Encryption depend on the security type chosen. determine the proper settings for the security type implemented on the wireless LAN. E-EQ-HX1RG-B Please refer to “Summit Wireless Security”, later in this chapter, to HX1 Reference Guide...
-
Page 54: Status Tab
After completing radio configuration, it is a good idea to review this screen to verify the radio has associated (no encryption, WEP) or authenticated (LEAP, any WPA), as indicated above. HX1 Reference Guide Figure 4-6 SCU – Status Tab Summit Radio... -
Page 55: Diags Tab
Diagnostic Output box. If a fixed IP address has been assigned to the radio, this is also noted in the Diagnostic Output box. Note that the current IP address is displayed above this button. E-EQ-HX1RG-B Figure 4-7 SCU – Diags Tab HX1 Reference Guide... -
Page 56: Global Settings Tab
Main only = Main antenna only Aux only = Aux antenna only On = Use diversity Default: Preamble Type of radio preamble or header for packets. Options: Auto, Short, Long Default: Auto HX1 Reference Guide Figure 4-8 SCU – Global Settings Tab Summit Radio E-EQ-HX1RG-B... - Page 57 If the packet size exceeds the specified number of bytes set in the Request to Send (RTS) threshold, an RTS is sent before sending the packet. A low RTS threshold setting can be useful in areas where many client devices are associating with the Access Point. Options: 0 to 2347 Default: 2347 E-EQ-HX1RG-B HX1 Reference Guide...
- Page 58 A valid directory path, of up to 64 characters, where WPA Certificate Authority and User Certificates are stored on the mobile device. LXE suggests ensuring the directory path currently exists before assigning the path in this parameter. See sections titled “Root Certificates” and “User Certificates”...
- Page 59 Use of Cisco Compatible Extensions (CCX) radio management and AP specified maximum transmit power features. Options: On, Off Default: Use of Wi-Fi Multimedia extensions. Options: On, Off Default: Tray Icon Determines if the Summit icon is displayed in the system tray. Options: On, Off Default: E-EQ-HX1RG-B HX1 Reference Guide...
-
Page 60: Summit Wireless Security
• On the Main tab, click the Admin Login button and enter the password. • LXE recommends editing the default profile with the parameters for your network. Select the Default profile from the pull down menu. • Make any desired parameter changes as described in the applicable following section determined by network security type and click the Commit button to save the changes. -
Page 61: No Security
Once configured, click the Commit button. Ensure the correct Active Config is selected on the Main tab and warmboot. The SCU Main tab shows the device is associated after the radio connects to the network. E-EQ-HX1RG-B Figure 4-10 No Security HX1 Reference Guide... -
Page 62: Wep
Once configured, click the Commit button. Ensure the correct Active Config is selected on the Main tab and warmboot. The SCU Main tab shows the device is associated after the radio connects to the network. HX1 Reference Guide Figure 4-11 WEP Encryption Figure 4-12 WEP Keys... -
Page 63: Leap Without Wpa Authentication
If the Cisco/CCX certified AP is configured for open authentication, set the Auth Type radio parameter to “Open”. If the AP is configured for network EAP only, set the Auth Type radio parameter to “LEAP”. Figure 4-13 LEAP Configuration HX1 Reference Guide... -
Page 64: Figure 4-14 Leap Credentials
Once configured, click the Commit button. Ensure the correct Active Config is selected on the Main tab and warmboot. The SCU Main tab shows the device is associated after the radio connects to the network. HX1 Reference Guide Figure 4-14 LEAP Credentials Summit Radio... -
Page 65: Peap/Mschap
Enter the Domain\Username (if the Doman is required), otherwise enter the Username. Enter the password. Leave the CA Certificate File Name blank for now. Click OK then click Commit. Ensure the correct Active Config is selected on the Main tab. E-EQ-HX1RG-B Figure 4-15 PEAP/MSCHAP Figure 4-16 PEAP/MSCHAP Credentials HX1 Reference Guide... -
Page 66: Figure 4-17 Peap/Mschap Certificate Filename
The device should be authenticating the server certificate and using PEAP/MSCHAP for the user authentication. Note: The date must be properly set on the device to authenticate a certificate. HX1 Reference Guide Figure 4-17 PEAP/MSCHAP Certificate Filename Summit Radio E-EQ-HX1RG-B... -
Page 67: Peap/Gtc
Once successfully authenticated, copy the CA certificate into the \System directory of the device. Once the file is in the \System directory, enter the file name in the CA Certificate Filename text box. E-EQ-HX1RG-B Figure 5-18 PEAP/GTC Figure 5-19 PEAP/GTC Credentials HX1 Reference Guide... -
Page 68: Figure 5-20 Peap/Gtc Certificate Filename
The device should be authenticating the server certificate and using PEAP/GTC for the user authentication. Note: The date must be properly set on the device to authenticate a certificate. HX1 Reference Guide Figure 5-20 PEAP/GTC Certificate Filename Summit Radio E-EQ-HX1RG-B... -
Page 69: Wpa/Leap
Click OK then click Commit. Ensure the correct Active Config is selected on the Main tab and warmboot. The SCU Main tab shows the device is associated after the radio connects to the network. E-EQ-HX1RG-B Figure 4-21 WPA/LEAP Figure 4-22 WPA/LEAP Credentials HX1 Reference Guide... -
Page 70: Eap-Fast
RADIUS server. The RADIUS server must have auto provisioning enabled to send the PAC provisioning credentials to the client device. Please refer to the “LXE Security Primer” for more information on the RADIUS server configuration. - Page 71 The SCU Main tab shows the device is associated after the radio connects to the network. Note: Once authenticated, there is a file stored in the \System directory with the PAC credentials. If the username is changed, that file must be deleted. The filename is autoP.00.pac. E-EQ-HX1RG-B HX1 Reference Guide...
-
Page 72: Wpa Psk
Once configured, click the Commit button. Ensure the correct Active Config is selected on the Main tab and warmboot. The SCU Main tab shows the device is associated after the radio connects to the network. HX1 Reference Guide Figure 4-25 WPA/PSK Encryption Figure 4-26 PSK Entry... -
Page 73: Cisco Radio
Cisco Radio Cisco Radio If the HX1 contains a Cisco radio, the radio can be configured by clicking on the Cisco Radio Configuration Utility or using the Microsoft Wireless Zero Config Utility. Please refer to the chart below for supported security types, the utility used for that security type and the required... -
Page 74: Profiles Tab
Offline Channel Scan Please refer to the “No Security”, “WEP”, “WPA” or “WPA (LEAP)” section later in this chapter for more details on profile property entries. HX1 Reference Guide Figure 4-27 Cisco ACU, Profiles Tab Figure 4-28 Cisco ACU, Profiles Properties... -
Page 75: Saving Cisco Settings
The success message is displayed. The HX1 should be rebooted after any radio configuration changes have been made and the Success box is displayed. After any changes are made in the Cisco Configuration Utility, you must click on the SaveCiscoSettings icon on the desktop. -
Page 76: Cisco Acu And The Wzc Utility
When the WZC utility is used to configure the radio (for example, when using PEAP or EAP- TLS), select <External Settings> for the active profile. After <External Settings> is selected, a message appears instructing the user to restart the HX1. IMPORTANT: Before restarting the HX1, click OK to dismiss the message box and click the SaveCiscoSettings icon on the desktop. -
Page 77: Microsoft Wireless Zero Config (Wzc) Utility
“Cisco ACU and the WZC Utility” earlier in this chapter. • Disabled – This option must be selected to use no security, WEP, LEAP and LEAP (WPA). Use the Cisco ACU to configure security. E-EQ-HX1RG-B Figure 4-32 Enable / Disable the WZC Utility HX1 Reference Guide... -
Page 78: Security Options
If all entries are correct, the ACU Profiles tab shows “350 Series Radio is Associated”. After any changes are made in the Cisco Configuration Utility, you must click on the SaveCisco icon on the desktop. The HX1 should be rebooted after the changes have been saved. -
Page 79: Wep
If all entries are correct, the ACU Profiles tab shows “350 Series Radio is Associated”. After any changes are made in the Cisco Configuration Utility, you must click on the SaveCisco icon on the desktop. The HX1 should be rebooted after the changes have been saved. -
Page 80: Leap
If all entries are correct, the ACU Profiles tab shows “350 Series Radio is Associated”. After any changes are made in the Cisco Configuration Utility, you must click on the SaveCisco icon on the desktop. The HX1 should be rebooted after the changes have been saved. -
Page 81: Leap (Wpa)
If all entries are correct, the ACU Profiles tab shows “350 Series Radio is Associated”. After any changes are made in the Cisco Configuration Utility, you must click on the SaveCisco icon on the desktop. The HX1 should be rebooted after the changes have been saved. -
Page 82: Peap
Certificate from CA server (see “Certificates” later in this chapter). PEAP uses a Root CA certificate. Make sure the date and time are correctly set on the HX1. Import the Root CA certificate into the Trusted Authorities list. Please see “Certificates” later in this chapter for information on generating, copying and importing the certificate. -
Page 83: Figure 4-35 Wireless Network Properties, Peap
OK to dismiss the Authentication Settings screen. Click OK to dismiss the Wireless Network Properties screen. Click the Advanced button to bring up the Advanced Wireless Settings. E-EQ-HX1RG-B Figure 4-35 Wireless Network Properties, PEAP Figure 4-36 Authentication Settings HX1 Reference Guide... -
Page 84: Figure 4-37 Advanced Wireless Settings
The network added should be displayed in the Preferred Networks box. Click OK to dismiss the Advanced Wireless Setting screen. If not automatically connected, select the desired network and click the Connect button. HX1 Reference Guide Figure 4-37 Advanced Wireless Settings Cisco Radio... -
Page 85: Figure 4-38 Network Credentials
Be sure the Save password box is checked. This allows the HX1 to connect automatically when rebooted. Click OK to submit the network credentials. Authentication occurs. If DHCP is enabled, once the IP address is received, the HX1 is now connected to the network. E-EQ-HX1RG-B Figure 4-38 Network Credentials Figure 4-39 Authenticated to Network... - Page 86 Click OK to exit the WZC utility. Click the SaveCiscoSettings icon on the desktop. Click the SaveTime icon on the desktop. This utility saves the current time and sets the HX1 to that time at bootup. Reboot the HX1. HX1 Reference Guide...
-
Page 87: Eap-Tls
Certificates from CA server (see “Certificates” later in this chapter). EAP-TLS uses both a Root CA certificate and a User certificate. Make sure the date and time are correctly set on the HX1. Import the Root CA certificate into the Trusted Authorities list. Import the User certificate and Private Key into the My Certificates list (alternatively, enroll.exe may be used instead of the... -
Page 88: Figure 4-42 Wireless Network Properties, Eap-Tls
Next, click on the Properties button. The Authentication Properties screen is displayed. Make sure the Validate Server box is checked and click the Select.. button. HX1 Reference Guide Figure 4-42 Wireless Network Properties, EAP-TLS Figure 4-43 Authentication Settings Cisco Radio... -
Page 89: Figure 4-44 Select User Certificate
The certificate selected is displayed on the Authentication Settings screen. Figure 4-45 Authentication Settings, Certificate Selected Click OK to dismiss the Authentication Settings screen. Click OK to dismiss the Wireless Network Settings screen. E-EQ-HX1RG-B Figure 4-44 Select User Certificate HX1 Reference Guide... -
Page 90: Figure 4-46 Advanced Wireless Settings
Enter the user credentials if prompted. EAP-TLS does not require a password, just the User Name and Domain. Click OK to submit the credentials. Authentication occurs. HX1 Reference Guide Figure 4-46 Advanced Wireless Settings Figure 4-47 User Logon Cisco Radio... -
Page 91: Figure 4-48 Authenticated To Network
Cisco Radio If DHCP is enabled, once the IP address is received, the HX1 is now connected to the network. Click OK to exit the WZC utility. Click the SaveCiscoSettings icon on the desktop. Click the SaveTime icon on the desktop. This utility saves the current time and sets the HX1 to that time at bootup. -
Page 92: Cisco Icon Missing
5. To save Cisco settings using this method, browse back to the Flash folder and double click on the Voxware folder. 6. Double click on the SaveCiscoSettings icon. Note: The Success window does not appear when using this method the save the Cisco settings. HX1 Reference Guide Cisco Radio E-EQ-HX1RG-B... -
Page 93: Certificates
PEAP requires a Root CA certificate • EAP-TLS requires a Root CA certificate and a User certificate. The date and time must be properly set on the HX1 when working with certificates. Please verify the date and time before importing certificates. Root Certificates Generating a Root CA Certificate for the HX1 Please refer to the “LXE Security Primer”... -
Page 94: Figure 4-51 Certificate Services Welcome Screen
Click the Download a CA certificate, certificate chain or CRL link. Make sure the correct root CA certificate is selected in the list box. Click the DER button. HX1 Reference Guide Figure 4-51 Certificate Services Welcome Screen Figure 4-52 Download CA Certificate Screen... -
Page 95: Figure 4-53 Download Ca Certificate Screen
To download the CA certificate, click on the Download CA certificate link. Click the Save button and save the certificate. Make sure to keep track of the name and location of the certificate. E-EQ-HX1RG-B Figure 4-53 Download CA Certificate Screen HX1 Reference Guide... -
Page 96: Installing A Root Ca Certificate On Thehx1
Installing a Root CA Certificate on theHX1 Copy the certificate file to the HX1. Import the certificate by navigating to Start | Control Panel | Certificates. Click the “Import” button. Make sure “From a File” is selected and click OK. -
Page 97: Figure 4-56 Browsing To Certificate Location
OK. Click Yes to import the certificate. Once the certificate is installed, return to the proper authentication section, earlier in this manual. E-EQ-HX1RG-B Figure 4-56 Browsing to Certificate Location Figure 4-57 Certificate Import Confirmation HX1 Reference Guide... -
Page 98: User Certificates
User Certificates There are two methods that can be used to request and install the User certificate on the HX1. If the HX1 is not connected via ActiveSync to a PC on the same network as the certificate server, use Method #1. -
Page 99: Figure 4-59 Certificate Services Welcome Screen
Click on the advanced certificate request link. Click on the Create and submit a request to this CA link. E-EQ-HX1RG-B Figure 4-59 Certificate Services Welcome Screen Figure 4-60 Request a Certificate Screen Figure 4-61 Advanced Certificate Request Screen HX1 Reference Guide... -
Page 100: Figure 4-62 Advanced Certificate Details
HX1USER.PVK. The certificate file created later in this process must be given the same name, for example, HX1USER.CER. DO NOT check to use strong private key protection. Make any other desired changes and click the “Submit” button. HX1 Reference Guide Figure 4-62 Advanced Certificate Details Certificates E-EQ-HX1RG-B... -
Page 101: Figure 4-63 Script Warnings
When prompted for the private key password: • Click “None” if you do not wish to use a password, or • Enter and confirm your desired password then click “OK”. E-EQ-HX1RG-B Figure 4-63 Script Warnings Figure 4-64 Script Warnings HX1 Reference Guide... -
Page 102: Figure 4-65 Certificate Issued
Be sure use the same name for the certificate file as was used for the private key file. For example, it the private key was saved as HX1USER.PVK then the certificate file created must be given the same name, for example, HX1USER.CER. HX1 Reference Guide Figure 4-65 Certificate Issued Figure 4-66 Download Security Warning Certificates... -
Page 103: Installing A User Certificate On The Hx1 (Wpa-Tls Only)
Installing a User Certificate on the HX1 (WPA- TLS Only) Copy the certificate and private key files to the HX1. Import the certificate by navigating to Start | Control Panel | Certificates. Select “My Certificates” from the pull down list. -
Page 104: Figure 4-69 Browsing To Certificate Location
The certificate is now shown in the list. With the certificate you just imported highlighted, click View. From the Field pull down menu, select “Private Key. HX1 Reference Guide Figure 4-69 Browsing to Certificate Location Figure 4-70 Certificate Listing Certificates... -
Page 105: Figure 4-71 Private Key Not Present
Type pull down list to “Private Keys”, select the certificate desired and click OK. Enter the password for the certificate if appropriate. E-EQ-HX1RG-B Figure 4-71 Private Key Not Present Figure 4-72 Browsing to Private Key Location HX1 Reference Guide... -
Page 106: Figure 4-73 Private Key Present
Make sure the certificate and private key file have the same name, for example HX1user.cer for the certificate and HX1user.pvk for the private key file. If the file names are not the same, rename the private key file and import it again. HX1 Reference Guide Figure 4-73 Private Key Present Certificates... -
Page 107: Method #2: Hx1 Has Access To Certificate Server
This method requires the HX1 have access to the Certificate server (via an ActiveSync connection to a PC on the same network as the server). If the HX1 does not have access, please user Method Select Start | Run and browse to the \Windows folder. Select the enroll.exe file and click OK to run. - Page 108 Certificates HX1 Reference Guide E-EQ-HX1RG-B...
-
Page 109: Chapter 5 Troubleshooting
Chapter 5 Troubleshooting Introduction The HX1 is a specialized RF computer. This section assumes the reader is familiar with RF networks and components. Troubleshooting focuses on the HX1 units. The problem may also be caused by your voice application. IPlease review the documentation provided with that application for troubleshooting help. -
Page 110: Problem With Multiple Users
User is prompted for login credentials when using LEAP or LEAP (WPA) – Cancel the dialog box and enter the correct user name, password and domain (if required) in the profile properties. They are not saved when entered in the login prompt screen. HX1 Reference Guide Problem with Multiple Users E-EQ-HX1RG-B... -
Page 111: Appendixa Technical Specifications
-13°F to 122°F (-25°C to 50°C) [non- condensing] -40°F to 122°F (-40°C to 50°C) [non- condensing] IP 64 per IEC529, section 13.4 and 14.2.4 5 to 95% non-condensing +/-4 kV contact, +/-8 kV air Comments Via Configuration Cable Contains Status LED HX1 Reference Guide... -
Page 112: Summit Cf 2.4Ghz Radio Specifications
2.4 - 2.4897 GHz IEEE 802.11b 802.11g DSSS OFDM 1, 2, 5.5, 6, 9, 11, 12, 18, 24, 36, 48, 54 Mbps 64 mW (18dBm) 11 US, 13 Europe, 13 Japan see HX1 Environmental Specs see HX1 Environmental Specs Novell, TCP/IP, Ethernet, ODI PCMCIA 2.0, Type II slot 2.4 - 2.4835 GHz IEEE 802.11b DS SS... -
Page 113: Revision History
Revision History Revision History Revision A, Initial Release: December 2006 Revision B: February 2007 Section Chapter 4 – Wireless Network Configuration E-EQ-HX1RG-B Explanation Updated chapter for EAP-FAST. HX1 Reference Guide... - Page 114 Revision History HX1 Reference Guide E-EQ-HX1RG-B...
-
Page 115: Index
Transmit ...46 Document Conventions ...2 Environmental Specifications...101 External Connectors, Specs ...101 Factory Default Settings Date/Time ...25 Display ...26 Input Panel ...27 Keyboard...27 Owner...29 Password ...30 PC Connection ...31 Regional Settings ...33 System...34 Features ...1 General ...34 Getting Started...3 HX1 Reference Guide... - Page 116 On/Off Switch ...101 Operating Temperature...101 Owner Identification ...29 Notes ...29 Password...30 PEAP/GTC Summit Radio ...57 HX1 Reference Guide PEAP/MSCHAP Summit Radio ...55 Physical Specification...101 Power LED ...7, 10 Power Modes ...9 Power On...9 Power Switch, Specs ...101 Quick Start Instructions...3 Radio MAC Address ...8...
- Page 117 Index User Certificates Generating...88 Installing on HX1...93 Virtual Keyboard ...27 E-EQ-HX1RG-B WEP...69 Summit Radio ...52 When to use this guide ...1 Windows version...34 Supported Authentications...37 Summit Radio...38 WPA/LEAP Summit Radio ...59, 60 WPA-PSK Summit Radio ...62 HX1 Reference Guide...
- Page 118 Index HX1 Reference Guide E-EQ-HX1RG-B...
Need help?
Do you have a question about the HX1 and is the answer not in the manual?
Questions and answers