Table of Contents
Advertisement
Quick Links
Download this manual
See also:
User Manual
Advertisement
Table of Contents

Related Manuals for LXE Marathon


Summary of Contents for LXE Marathon
- Page 1 Marathon™ Reference Guide Microsoft® Windows® XP® Operating System WORX Handheld Computer E-EQ-MARATHONRG-A Copyright © 2011 by LXE®, Inc., An EMS Technologies Company. All Rights Reserved.
- Page 2 Summit Data Communications, Inc. Summit Data Communications, the Summit logo, and “The Pinnacle of Performance” are trademarks of Summit Data Communications, Inc. The Bluetooth® word mark and logos are owned by the Bluetooth SIG, Inc. and any use of such marks by LXE, Inc. is under license.
-
Page 3: Table Of Contents
Barcode Data Entry Magnetic Card Data Entry Touch Screen Data Entry Hardware Hardware Configuration Processor, Memory and Storage Display Audio Wireless Communication Power Management Power Input / Battery Backup Battery Power Button Reset Button E-EQ-MARATHONRG-A [ i ] Marathon™ Reference Guide... - Page 4 Drive C Folder Structure Software Loaded on Drive C Control Panel LXE System Info Display Power Options TruePrint Wi-Fi Bluetooth LXE 8650 Bluetooth Ring Scanner/Imager Devices Tab Options Tab Bluetooth Icon COM Ports Tab E-EQ-MARATHONRG-A [ ii ] Marathon™ Reference Guide...
- Page 5 How to: Use Stored Credentials How to: Use Sign On Screen How to: Use Windows Username and Password Windows Certificate Store vs. Certs Path User Certificates Root CA Certificates Configuring the Profile No Security LEAP PEAP/MSCHAP PEAP/GTC E-EQ-MARATHONRG-A [ iii ] Marathon™ Reference Guide...
- Page 6 Replacing the Main Battery Barcode Readers 2D Imager Magnetic Stripe Reader Marathon Recovery DVD Marathon Recovery Solution Startup Wizard walk-through Loading an Operating System on the Marathon KeyMaps Technical Specifications Physical Specifications Environmental Specifications Display Specifications AC/DC Adapter Auxiliary Batteries (Optional)
-
Page 7: Introduction
Available add on modules include a magnetic stripe card reader and a 2D imager. The Marathon provides the power and functionality of a desktop computer in a portable unit. The desktop dock, much like a docking port for a conventional laptop, provides provisions for an external monitor and USB connections for devices such as a USB keyboard and mouse. -
Page 8: Quick Start
Power button to turn the Marathon on. Note: Installation instructions for attaching a carrying strap, connecting a power cable and placing the Marathon in a powered desktop dock or vehicle dock are in the Marathon User Guide. E-EQ-MARATHONRG-A [ 2 ] Marathon™ Reference Guide... -
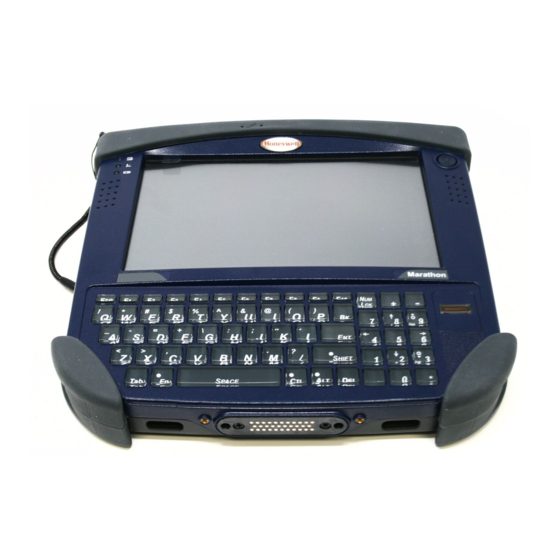
Page 9: Components
Components Components Front View Marathon Components, Front Position Function Status Indicators Speakers Touch Screen / Display Microphone Power Button Biometric Mouse E-EQ-MARATHONRG-A [ 3 ] Marathon™ Reference Guide... -
Page 10: Rear View
Magnetic Stripe Card Reader Add-on Cover Camera Barcode Imager Add-on Cover Tethered Stylus External Battery Connector Cover Internal Battery / SIM Card Cover Handstrap Connection Auxiliary battery is not installed in image shown above. E-EQ-MARATHONRG-A [ 4 ] Marathon™ Reference Guide... -
Page 11: Bottom View
External Antenna Connections (for use in vehicle mount dock) Docking Connector (for use in desktop and vehicle mount docks) Right Side View The components are on the right edge of the Marathon when viewed from the front. Marathon Components, Right Position Function USB Port Cover... -
Page 12: Left Side View
Left Side View Left Side View The components are on the left edge of the Marathon when viewed from the front. Marathon Components, Left Position Function Power/Audio Port Cover Audio Jack Power Connector E-EQ-MARATHONRG-A [ 6 ] Marathon™ Reference Guide... -
Page 13: Led Indicators
Indicates the storage drive status: Flashes green when drive is accessed Indicates the wireless status: Solid blue when Marathon is On, does not blink when connection/re-connection occurs. Indicates the battery status: Off when battery is fully charged. Solid green when battery is discharged... -
Page 14: Using A Stylus
Tray. From the menu that pops up, tap Right Button to enable the mouse icon. When this option is enabled, a checkmark is displayed in the menu. Biometric Mouse can be used instead of the touch screen. A stylus replacement kit is available. E-EQ-MARATHONRG-A [ 8 ] Marathon™ Reference Guide... -
Page 15: Marathon Configuration Options
Tap Start | Control Panel | Bluetooth Devices (Classic view) Tap Start | Control Panel | Printers and Other Hardware | Bluetooth Devices (Category view) Restart/Shutdown Use the Windows interface to restart or shut down the Marathon. Tap Start | Shut Down | Restart Tap Start | Shut Down | Shut down Calibrate Touch Screen To calibrate the touch screen, tap Start | Programs | PenMount Universal Driver | Utility | PenMount Control Panel. -
Page 16: Data Entry
Data Entry Data Entry You can enter data into the Marathon through several different methods. Manual data entry methods include the keyboard and touch screen. Automated data entry methods include the imager module, a wireless Bluetooth scanner, a tethered USB scanner and the magnetic card reader module. -
Page 17: Hardware
An Intel ® controller is provided for the display. The controller is capable of supporting a second display when the Marathon is docked in a desktop dock with an external display attached to the VGA port on the dock. -
Page 18: Power Input / Battery
Marathon. The main battery remains concealed in the Marathon while charging. The main battery will also recharge when the Marathon is docked in a powered desktop dock or vehicle dock. With an installed fully charged auxiliary battery, Marathon battery life is increased to 6 or 10 hours based on the auxiliary battery selected. -
Page 19: Power Button
Power Button Power Button The power (on/off) button is a push button located on the upper right corner of the Marathon. If the Marathon is Off, pressing the power button turns the Marathon On. If the Marathon is On, Windows determines the results of a power button press based on user configuration. For example, the... -
Page 20: External Connectors
Antenna Connectors The antenna connectors are located on the bottom of the Marathon. The antenna connectors are for external GPS and WWAN antennas. The external antennas connect to the Marathon vehicle dock. No antenna connects directly to these ports on the Marathon. -
Page 21: Keyboard
N once and N stays ON, press it again and it turns OFF. Sticky Key Indicators Amber backlight indicates sticky key is active. UM LCK Blue backlight indicates sticky key is active. HIFT, E-EQ-MARATHONRG-A [ 15 ] Marathon™ Reference Guide... -
Page 22: Biometric Mouse
Windows logon can be performed with a fingerprint scan as opposed to the traditional user name and password. You must create a Windows user account with a password, then shutdown and restart the Marathon before you can add fin- gerprint security to that user account. After rebooting, create fingerprint security, then shutdown and restart the Mar- athon to save the password in the registry. -
Page 23: Touch Screen
Calibrating the Touch screen Although the Marathon touch screen is installed and calibrated before the Marathon leaves LXE, users may make adjustments to the calibration. To calibrate the touch screen, select Start | Programs | PenMount Universal Driver | Utility | PenMount Control Panel. -
Page 24: The Display
The Display The Display The Marathon display is capable of supporting WVGA graphics modes (800x480). The display covering is designed to resist stains. The touch screen allows signature capture and touch input. A display optimized for outdoor viewing is available. -
Page 25: Software
Introduction Like any personal computer, there are many aspects to the setup and configuration of the Marathon. Much of the setup and configuration of the Marathon is dependent upon the optional features (both hardware and software) installed on the computer. -
Page 26: Drive C Folder Structure
Microsoft Windows device drivers, please refer to commercially available Windows guides. Radio Software The Marathon is delivered with the radio software installed. Because the Marathon uses a Microsoft Windows operating system, the radio installation includes Windows device drivers. -
Page 27: Control Panel
This is a standard Microsoft Windows control panel applet. On the Settings tab, two displays are supported. By default, display #1 is the Marathon's built in WVGA display. Display #2 is an external display connected to the VGA port on the Marathon desktop dock. -
Page 28: Power Options
Power Options Power Options Power schemes can be configured that will be in effect when the Marathon is attached to an external power supply or docked in a powered dock as well as when running on battery power. On the Power Meter tab, battery #1 refers to the main battery concealed inside the Marathon case. Battery #2 is an optional auxiliary battery that connects to the back of the Marathon. -
Page 29: Bluetooth
Use the Bluetooth Device Wizard in the Microsoft Windows Control Panel to discover and manage the Bluetooth scanner connection. Do not use the ComponentSoft wedge software (provided with the LXE 8650 series Bluetooth Ring Scanners) on the Marathon. Devices Tab The Devices tab displays any previously discovered Bluetooth devices. - Page 30 Add Bluetooth Device Wizard The wizard cannot be started until the checkbox indicating the device is set up and ready to be found is checked. If any Bluetooth devices are discovered, they are displayed. E-EQ-MARATHONRG-A [ 24 ] Marathon™ Reference Guide...
- Page 31 Devices Tab Discovered Bluetooth Devices Select the desired Bluetooth device and click Next. Select the appropriate passkey option. The Bluetooth device is ready to use. E-EQ-MARATHONRG-A [ 25 ] Marathon™ Reference Guide...
-
Page 32: Options Tab
Show Bluetooth Devices Send a File Receive a File Join a Personal Area Network Open Bluetooth Settings Remove Bluetooth Icon More information can be found using Help and Support on the Windows Start menu. E-EQ-MARATHONRG-A [ 26 ] Marathon™ Reference Guide... -
Page 33: Com Ports Tab
Bluetooth COM Ports Tab This tab displays the COM ports used by Bluetooth devices, such as the Bluetooth printer illustrated. More information can be found using Help and Support on the Windows Start menu. E-EQ-MARATHONRG-A [ 27 ] Marathon™ Reference Guide... -
Page 34: Hardware Tab
Hardware Tab Hardware Tab Bluetooth Hardware Tab This tab hardware information for Bluetooth. More information can be found using Help and Support on the Windows Start menu. E-EQ-MARATHONRG-A [ 28 ] Marathon™ Reference Guide... -
Page 35: Network Configuration
Configuration. Ethernet Connector A wired Ethernet connection is only available when the Marathon is docked in a desktop dock. Please see the Marathon Dock Reference Guide for more information. For more information on configuring the Microsoft Windows network settings, please refer to Help and Support on the Windows Start menu or commercially available Windows networking literature. -
Page 36: Wireless Network Configuration For Lxe Devices
EAP-FAST Important Notes It is important that all dates are correct on the Marathon and host computers when using any type of certificate. Certificates are date sensitive and if the date is not correct authentication will fail. Verify and adjust the date using the Date and Time control panel. -
Page 37: Summit Client Utility
The Summit Client Utility (SCU) help may also be accessed by selecting Start | Help and tapping the Summit Client Utility link. The SCU does not have to be accessed to view the help information using this option. E-EQ-MARATHONRG-A [ 31 ] Marathon™ Reference Guide... -
Page 38: Summit Tray Icon
The signal strength for the currently associated/authenticated Access Point is -71 dBm to -90 dBm The signal strength for the currently associated/authenticated Access Point is -51 dBm to -70 dBm The signal strength for the currently associated/authenticated Access Point is greater than -50 dBm E-EQ-MARATHONRG-A [ 32 ] Marathon™ Reference Guide... -
Page 39: Wireless Zero Config Utility
You can use either the Wireless Zero Configuration Utility or the Summit Client Utility (SCU) to connect to your net- work. LXE recommends using the Summit Client Utility to connect to your network. The Wireless Zero Configuration Utility cannot control the complete set of security features of the radio. -
Page 40: Main Tab
When the profile named “ThirdPartyConfig” is chosen as the active profile, the Summit Client Utility passes control to Windows Zero Config for configuration of all client and security settings for the network module. E-EQ-MARATHONRG-A [ 34 ] Marathon™ Reference Guide... -
Page 41: Admin Login
After Admin Login, the end-user can also: Create, edit, rename and delete profiles on the Profile tab. Edit global parameters on the Global tab. Enable/disable the Summit tray icon in the taskbar. E-EQ-MARATHONRG-A [ 35 ] Marathon™ Reference Guide... -
Page 42: Profile Tab
Login), use the Profile tab to manage profiles. When not logged in as an Admin, the parameters can be viewed, and cannot be changed. The buttons on this tab are dimmed if the user is not logged in as Admin. The Profile tab was previously labeled Config. E-EQ-MARATHONRG-A [ 36 ] Marathon™ Reference Guide... -
Page 43: Buttons
Note: Unsaved Changes – The SCU will display a reminder if the Commit button is not clicked before an attempt is made to close or browse away from this tab. Important – The settings for Auth Type, EAP Type and Encryption depend on the security type chosen. E-EQ-MARATHONRG-A [ 37 ] Marathon™ Reference Guide... -
Page 44: Profile Parameters
G rates only (6, 9, 12, 18, 24, 36, 48 and 54 Mbps) BG optimized or BG subset (1, 2, 5.5, 6, 11, 24, 36 and 54 Mbps) A rates only (6, 9, 12, 18, 24, 36, 48 and 54 Mbps) E-EQ-MARATHONRG-A [ 38 ] Marathon™ Reference Guide... - Page 45 It is important the Radio Mode parameter correspond to the AP to which the device is to connect. For example, if this parameter is set to G rates only, the Marathon may only connect to APs set for G rates and not those set for B and G rates.
-
Page 46: Status Tab
There are no user entries on this screen. Note: After completing radio configuration, it is a good idea to review this screen to verify the radio has associated (no encryption, WEP) or authenticated (LEAP, any WPA), as indicated above. E-EQ-MARATHONRG-A [ 40 ] Marathon™ Reference Guide... -
Page 47: Diags Tab
Save To… – Use this save the results of the diagnostics to a text file. Use the explorer window to specify the name and location for the diagnostic file. The text file can viewed using an application such as WordPad. E-EQ-MARATHONRG-A [ 41 ] Marathon™ Reference Guide... -
Page 48: Global Tab
Hide Passwords Admin Password SUMMIT (or blank) Auth Timeout 8 seconds Certs Path C:\Program Files\Summit\certs Ping Payload 32 bytes Ping Timeout 5000 ms Ping Delay ms 1000 ms Login Options Use SCU credentials E-EQ-MARATHONRG-A [ 42 ] Marathon™ Reference Guide... -
Page 49: Custom Parameter Option
Custom Parameter Option LXE does not support the parameter Custom option. The parameter value is displayed as “Custom” when the operating system registry has been edited to set the Summit parameter to a value that is not available from the parameter’s drop down list. -
Page 50: Global Parameters
Aggressive scanning works with standard scanning (set through Roam Trigger, Roam Delta and Scan Roam Period). Aggressive scanning should be set to On unless there is significant co-channel interference due to overlapping APs on the same channel. Options are: On, Off E-EQ-MARATHONRG-A [ 44 ] Marathon™ Reference Guide... - Page 51 802.11X authentication, including interaction with the ACS server. If the active profile is using WPA2 CCKM, the global PMK Caching setting is ignored and the client attempts to use CCKM. Options are: Standard, OPMK E-EQ-MARATHONRG-A [ 45 ] Marathon™ Reference Guide...
- Page 52 A valid folder path, of up to 64 characters, where WPA Certificate Authority and User Certificates are stored on the mobile device when not using the Windows certifcates store. LXE suggests ensuring the Windows folder path currently exists before assigning the path in this parameter. See Certificates for instructions on obtaining CA and User Certificates.
- Page 53 Options are: Any number between 0 and 30000 ms. Login Use SCU or Windows login credentials. More info. Options Note: Tap the Commit button to save changes. If this panel is closed before tapping the Commit button, changes are not saved! E-EQ-MARATHONRG-A [ 47 ] Marathon™ Reference Guide...
-
Page 54: Logon Options
If either option is enabled, the credentials entered here take precedence over any credentials entered on the Profile tab. To use either option, select Logon Options from the Property list which activates the Logon Options button. Logon Options - Global Tab Click the Logon Options button. PreLogon Options E-EQ-MARATHONRG-A [ 48 ] Marathon™ Reference Guide... -
Page 55: Single Signon
Select the desired certificate and click Select. You are returned to the Credentials screen. If using the Certs Path option: Leave the Use MS store box unchecked. Enter the certificate filename in the CA Cert text box. Click OK then click Commit. E-EQ-MARATHONRG-A [ 49 ] Marathon™ Reference Guide... -
Page 56: Sign-On Vs. Stored Credentials
The Username and Password are left blank on the Credentials screen. When the device attempts to connect to the net- work, a sign on screen is displayed. The user must enter the Username and Password at that time to authenticate. When using Summit with the Marathon, there is an option on the Global tab use the Windows user name and password to log on instead of any username and password stored in the profile. -
Page 57: How To: Use Sign On Screen
Reconnect button on the Diags Tab is clicked or the profile is modified and the Commit button is clicked. How to: Use Windows Username and Password Please see Logon Options for information. E-EQ-MARATHONRG-A [ 51 ] Marathon™ Reference Guide... -
Page 58: Windows Certificate Store Vs. Certs Path
Windows Certificate Store vs. Certs Path Note: It is important that all dates are correct on the Marathon and host computers when using any type of certificate. Certificates are date sensitive and if the date is not correct authentication will fail. - Page 59 7. Select the desired certificate and click the Select button to return the selected certificate to the CA Cert textbox. 8. Click OK to exit the Credentials screen and then Commit to save the profile changes. E-EQ-MARATHONRG-A [ 53 ] Marathon™ Reference Guide...
-
Page 60: Configuring The Profile
Admin Login button and enter the password. LXE recommends editing the default profile with the parameters for your network. Select the Default profile from the pull down menu. Make any desired parameter changes as described in the applicable following section determined by network security type and click the Commit button to save the changes. -
Page 61: Wep
Once configured, click the Commit button. Ensure the correct Active Profile is selected on the Main tab. The SCU Main tab shows the device is associated after the radio connects to the network. E-EQ-MARATHONRG-A [ 55 ] Marathon™ Reference Guide... -
Page 62: Leap
If the Cisco/CCX certified AP is configured for open authentication, set the Auth Type radio parameter to Open. If the AP is configured for network EAP only, set the Auth Type radio parameter to LEAP. LEAP Profile Configuration Sign-On vs. Stored Credentials for information on entering credentials. E-EQ-MARATHONRG-A [ 56 ] Marathon™ Reference Guide... - Page 63 Click OK then click the Commit button. Ensure the correct Active Profile is selected on the Main tab. The SCU Main tab shows the device is associated after the radio connects to the network. E-EQ-MARATHONRG-A [ 57 ] Marathon™ Reference Guide...
-
Page 64: Peap/Mschap
No entries except the CA Certificate Filename are necessary for Sign-On Credentials as the user will be prompted for the User Name and Password when connecting to the network. For Stored Credentials, User, Password and the CA Certificate Filename must be entered. Enter these items as directed below. PEAP/MSCHAP Credentials E-EQ-MARATHONRG-A [ 58 ] Marathon™ Reference Guide... - Page 65 Ensure the correct Active Profile is selected on the Main tab. The SCU Main tab shows the device is associated after the radio connects to the network. Note: The date must be properly set on the device to authenticate a certificate. E-EQ-MARATHONRG-A [ 59 ] Marathon™ Reference Guide...
-
Page 66: Peap/Gtc
No entries except the CA Certificate Filename are necessary for Sign-On Credentials as the user will be prompted for the User Name and Password when connecting to the network. Enter these items as directed below. PEAP/GTC Credentials Enter the Domain\Username (if the Domain is required), otherwise enter the Username. E-EQ-MARATHONRG-A [ 60 ] Marathon™ Reference Guide... - Page 67 Ensure the correct Active Profile is selected on the Main tab. The SCU Main tab shows the device is associated after the radio connects to the network. Note: The date must be properly set on the device to authenticate a certificate. E-EQ-MARATHONRG-A [ 61 ] Marathon™ Reference Guide...
-
Page 68: Wpa/Leap
If the Cisco/CCX certified AP is configured for open authentication, set the Auth Type radio parameter to Open. If the AP is configured for network EAP only, set the Auth Type radio parameter to LEAP. WPA/LEAP Profile Configuration E-EQ-MARATHONRG-A [ 62 ] Marathon™ Reference Guide... - Page 69 Click OK then click the Commit button. Ensure the correct Active Profile is selected on the Main tab The SCU Main tab shows the device is associated after the radio connects to the network. E-EQ-MARATHONRG-A [ 63 ] Marathon™ Reference Guide...
-
Page 70: Eap-Fast
RADIUS server must have auto provisioning enabled to send the PAC provisioning credentials to the Marathon. EAP-FAST Profile Configuration For automatic PAC provisioning, once a username/password is authenticated, the PAC information is stored on the Marathon. The same username/password must be used to authenticate each time. See the note below for more details. - Page 71 Note: When using Automatic PAC Provisioning, once authenticated, there is a file stored in the \System folder with the PAC credentials. If the username is changed, that file must be deleted. The filename is autoP.00.pac. E-EQ-MARATHONRG-A [ 65 ] Marathon™ Reference Guide...
-
Page 72: Eap-Tls
User Name when connecting to the network. For Stored Credentials, User and the CA Certificate Filename must be entered. Enter these items as directed below. EAP-TLS Credentials E-EQ-MARATHONRG-A [ 66 ] Marathon™ Reference Guide... - Page 73 Leave the Use MS store box unchecked. Enter the certificate filename in the CA Cert textbox. Click OK then click Commit. The Marathon should be authenticating the server certificate and using EAP-TLS for the user authentication. Ensure the correct Active Profile is selected on the Main tab.
-
Page 74: Wpa Psk
Once configured, click the Commit button. Ensure the correct Active Profile is selected on the Main tab. The SCU Main tab shows the device is associated after the radio connects to the network. E-EQ-MARATHONRG-A [ 68 ] Marathon™ Reference Guide... -
Page 75: Certificates
Note: Please refer to the LXE Security Primer to prepare the Authentication Server and Access Point for communication. Note: It is important that all dates are correct on the Marathon and host computers when using any type of certificate. Certificates are date sensitive and if the date is not correct authentication will fail. - Page 76 Generating a Root CA Certificate Certificate Services Welcome Screen Click the Download a CA certificate, certificate chain or CRL link. Make sure the correct root CA certificate is selected in the list box. E-EQ-MARATHONRG-A [ 70 ] Marathon™ Reference Guide...
- Page 77 Generating a Root CA Certificate Download CA Certificate Screen E-EQ-MARATHONRG-A [ 71 ] Marathon™ Reference Guide...
- Page 78 To download the CA certificate, click on the Download CA certificate link. Download CA Certificate Screen Click the Save button and save the certificate. Make sure to keep track of the name and location of the certificate. Install the certificate on the Marathon. E-EQ-MARATHONRG-A [ 72 ] Marathon™ Reference Guide...
-
Page 79: Installing A Root Ca Certificate
Note: This section is only if the Windows certificate store is used. If the certificate store is not used, copy the certificate to the C:\Program Files\Summit\certs folder or other path specified in the Summit Certs global parameter. Copy the certificate file to the Marathon. The certificate file has a .CER extension. Locate the file and double click on it. Certificate Information Click the Install Certificate button. -
Page 80: Generating A User Certificate
Generating a User Certificate Generating a User Certificate The easiest way to get the user certificate is to use the browser on the Marathon or a PC to navigate to the Certificate Authority. To request the user certificate, open a browser to http://<CA IP address>/certsrv. - Page 81 Generating a User Certificate Certificate Services Welcome Screen Click the Request a certificate link. Request a Certificate Screen Click on the User Certificate link. E-EQ-MARATHONRG-A [ 75 ] Marathon™ Reference Guide...
- Page 82 Install the user certificate on the requesting computer by clicking the Install this certificate link. If the requesting computer is the Marathon, then the process is finished. otherwise, export the certificate as described below. E-EQ-MARATHONRG-A [ 76 ] Marathon™ Reference Guide...
-
Page 83: Exporting A User Certificate
Make sure the Personal tab is selected. Highlight the certificate and click the Export button. The Certificate Export Wizard is started Select Yes, export the private key and click Next. Uncheck Enable strong protection and check Next. The certificate type must be PKCS #12 (.PFX). E-EQ-MARATHONRG-A [ 77 ] Marathon™ Reference Guide... - Page 84 The certificate is saved with a .PFX extension. Click Finish. and OK to close the Successful Export message. Locate the User Certificate in the specified location. Copy to the Marathon. Install the User certificate. E-EQ-MARATHONRG-A [ 78 ] Marathon™ Reference Guide...
-
Page 85: Installing A User Certificate
After generating exporting the user certificate, copy it from the PC to the Marathon. Copy the certificate to a location on the Marathon. Locate the certificate file (it has a .PFX extension) and double click on it. The certificate import wizard starts. -
Page 86: Using Peripherals / Accessories
Put the screws and cover aside in a safe place. 4. Line up the charging pins on the auxiliary battery with the charging pins in the Marathon auxiliary battery connector bay. 5. Connect the auxiliary battery to the Marathon using the captive screws in the auxiliary battery. - Page 87 The Marathon is ready for use. Remove the auxiliary battery from the Marathon when preparing to recharge the auxiliary battery in a powered desktop dock or in a Marathon multi-charger. Up to four auxiliary batteries can be charged simultaneously in the battery multi-charger.
-
Page 88: Install A Sim Card
Turn the Marathon off. Place the Marathon face down on a stable surface. 1. Remove the 4 mounting screws securing the battery cover to the Marathon and remove the battery cover. Put the screws aside in a safe place. 2. Lift the battery using the pull strap and move it aside. Do not disconnect the battery. -
Page 89: Replacing The Main Battery
4. Lift the battery using the pull strap. 5. Hold the battery out of the way and carefully separate the Marathon plug (on the right) from the plug cabled to the main battery. Do not bend the pins. - Page 90 7. Lower the connected battery into the battery well using the pull strap. 8. Replace the battery cover, securing it with the original 4 screws. Connect the Marathon to an external power source. The main battery will be fully charged in 2 hours. The Marathon is ready for use.
-
Page 91: Barcode Readers
Barcode Readers The Marathon can use the following external barcode readers: An add-on barcode reader imager accessory is available for the Marathon. It can be configured by scan- ning the barcodes in the Marathon Barcode Programming Guide. Tethered scanners (LXE 8500 series tethered to a serial port on the vehicle dock) are configured by scanning the engine-specific barcodes in the scanner manufacturer's programming guide. -
Page 92: 2D Imager
2D Imager 2D Imager The optional 2D Imager (barcode decoder) is attached to the top right hand area of the Marathon (when the display is visible). When present, the 2D Imager uses COM2. When Freefloat LinqOne is installed, and the user wishes to decode a barcode using the 2D imager, the NumLock key must be highlighted. -
Page 93: Magnetic Stripe Reader
LXE to get the latest updates before performing the processes that follow. The ‘Recovery Solution 2’, also known as RS2, is a method to restore the software on your Marathon to the same state it had when it was shipped from the factory. When RS2 is used on your Marathon, it destroys any information on your hard disk so please make sure that any information on the hard disk that needs to be preserved is backed up before using RS2. -
Page 94: Startup
BIOS of your Marathon. 4. When the Marathon boots from the USB DVD player the BIOS asks you to press a key in order to continue to boot from the RS2 media. Please press a key when prompted to boot from the RS2. -
Page 95: Wizard Walk-Through
5. The last screen of the Wizard shows the result of the RS2 process. When prompted click Finish to close the Wizard. Next press any key to shutdown the Marathon. Please remove the RS2 media when the Marathon has been shutdown to avoid booting up the Marathon into RS2 again. -
Page 96: Keymaps
Shift Back space Up arrow (cursor up) Num Lck OFF Down arrow (cursor down) Num Lck OFF Right arrow (cursor right) Num Lck OFF Left arrow ( cursor left) Num Lck OFF Delete E-EQ-MARATHONRG-A [ 90 ] Marathon™ Reference Guide... - Page 97 KeyMaps To get this key/function Press these keys in this order... Shift Shift Shift Shift Shift E-EQ-MARATHONRG-A [ 91 ] Marathon™ Reference Guide...
- Page 98 Num Lck ON Num Lck ON Num Lck ON Num Lck ON Num Lck ON Num Lck ON Num Lck ON Num Lck ON Num Lck ON . (period) Num Lock ON . (period) E-EQ-MARATHONRG-A [ 92 ] Marathon™ Reference Guide...
- Page 99 = (equal sign) I (letter i) & * (asterisk) Num Lck ON or OFF " (double quote) < > : (colon) + (plus sign) Num Lck ON or OFF (plus sign) + _ (underscore) E-EQ-MARATHONRG-A [ 93 ] Marathon™ Reference Guide...
-
Page 100: Technical Specifications
Depth: 1.3 in (33 mm) Note: Dimensions are without add-on modules or auxiliary battery Main Battery Rechargeable 2200mAh Lithium Ion Smart Battery Pack CMOS Camera Module Supports OpenGL 1.2 and DirectX. Manage using Microsoft APIs. E-EQ-MARATHONRG-A [ 94 ] Marathon™ Reference Guide... -
Page 101: Environmental Specifications
Environmental Specifications Environmental Specifications The Marathon will withstand the following environmental characteristics and has been tested in accordance with applicable sections of MIL-STD-810E. Feature Specification -20°C to +48°C (-4°F to +118°F) Note: Without auxiliary battery. Operating Temperature Note: With auxiliary battery, the operating temperature is limited to -20°C to +45°C (-4°F to +113°F). -
Page 102: Auxiliary Batteries (Optional)
Rechargeable 9 - Cell (3S3P) Lithium Ion Smart Battery Pack 5640mAh @ 11.1V, 63WHr Over Charge Protection, Over Discharge Protection, Over Current and Output Short Protection, Over Temperature Pro- tection. 500 charge/discharge life cycle. E-EQ-MARATHONRG-A [ 96 ] Marathon™ Reference Guide... -
Page 103: Pinouts
Pinouts Pinouts USB Connector USB Port Signal Description +5V USB Power USB2N_A USD D – USB2P_A USB D + DGND USB Power Return E-EQ-MARATHONRG-A [ 97 ] Marathon™ Reference Guide... -
Page 104: Docking Connector
DC_HSYNC_VGA DC_DATA_VGA DC_CLK_VGA DC_RED_VGA DC_BLUE_VGA DC_GREEN_VGA DSR# RTS# DTR# CTS# USB_N DCD# DK_DOCKING_ LOCK_EN# B8 DK_EC_GPIO2_ RESET# C8 USB_P VA+IN VA+IN DK_DOCKING_3/5V_ POK A10 VA+IN B10 GND C10 VA+IN A11 VA-IN C11 VA-IN E-EQ-MARATHONRG-A [ 98 ] Marathon™ Reference Guide... -
Page 105: Revision History
Revision History Revision History Revision / Date Location / Change A / Apr 2011 Initial Release E-EQ-MARATHONRG-A [ 99 ] Marathon™ Reference Guide... -
Page 106: Index
Installing the SIM Card Camera Certificates Root CA Join a Personal Area Networ User Cleaning the Display COM2 keyboard COM3 KeyMaps Components Configuration Options Configuring the Profile LEAP (without WPA) Connect Bluetooth Devices E-EQ-MARATHONRG-A [ 100 ] Marathon™ Reference Guide... - Page 107 Replacing the Main Battery Reset button Restart Windows Certificate Store vs. Certs Path Revision History Wireless Zero Config Root CA Certificates WPA-PSK Generating Summit Radio Installing on Marathon WPA/LEAP Summit Radio 62, 64 Screen Calibration Points E-EQ-MARATHONRG-A [ 101 ] Marathon™ Reference Guide...
- Page 108 Federal Communication Commission Interference Statement This equipment has been tested and found to comply with the limits for a Class B digital device, pursuant to Part 15 of the FCC Rules. These limits are designed to provide reasonable protection against harmful interference in a residential installation. This equipment generates, uses and can radiate radio frequency energy and, if not installed and used in accordance with the instructions, may cause harmful interference to radio communications.
- Page 109 IMPORTANT NOTE: IC Radiation Exposure Statement This EUT is compliance with SAR for general population/uncontrolled exposure limits in IC RSS-102 and had been tested in accordance with the measurement methods and procedures specified in IEEE 1528. This Class [B] digital apparatus complies with Canadian ICES-003. Cet appareil numérique de la classe [B] est conforme à...
Need help?
Do you have a question about the Marathon and is the answer not in the manual?
Questions and answers