LXE HX2 User Manual
Microsoft windows ce 5.0 equipped
Hide thumbs
Also See for HX2:
- Programming manual (238 pages) ,
- Reference manual (308 pages) ,
- User manual (52 pages)

Subscribe to Our Youtube Channel
Related Manuals for LXE HX2


Summary of Contents for LXE HX2
- Page 1 HX2 User’s Guide ® ® (Microsoft Windows CE 5.0 Equipped) Copyright © 2008 by LXE Inc. All Rights Reserved E-EQ-HX2OGWW-D...
-
Page 2: Revision Notice
Enterprise™ are trademarks of Wavelink Corporation, Kirkland. The Bluetooth® word mark and logos are owned by the Bluetooth SIG, Inc. and any use of such marks by LXE, Inc. is under license. PowerScan® is a registered trademark of Datalogic Scanning, Inc., located in Eugene, OR. -
Page 3: Table Of Contents
Low Profile Armband ...18 UICK TART Getting Started ... 19 Prerequisites...19 HX2 Quick Start ...19 HX2 Mobile Device – Quick Start Troubleshooting...20 Wearable Device Assembly ...20 Armband...20 Hip Flip ...21 Ring Scanner Strap...21 Connecting the Battery and Ring Scanner... 22 Ring Scanner on the Left Hand...22... - Page 4 HX2 Rubber Boot Assembly ... 41 Protective Film for the Screen Display ... 41 HX2 Voice Case Assembly... 42 Removing/Replacing the Armband Straps... 43 Connecting the ActiveSync Cable to the HX2... 44 HX2 Docking/Charging Cradle... 45 Cradle LEDs...46 Cradle PWR LED...46 B1 and B2 LED...46...
- Page 5 Table of Contents Dual Alpha Keypad...53 Triple Tap Keypad ...57 PPENDIX EGULATORY OTICES AND HX2 Approvals/Standards... 63 Revision History... 65 NDEX E-EQ-HX2OGWW-D AFETY NFORMATION HX2 User’s Guide...
- Page 6 Figure 11 Cable – Audio, Battery and HX2 Connector ...14 Figure 12 Cable – Laser Ring Scanner and HX2 Connector...14 Figure 13 Cable – Imager Ring Scanner and HX2 Connector ...14 Figure 14 HX2 Standard and HX2 Extended Battery ...15 Figure 15 Mounting Brackets...16...
-
Page 7: Introduction
The adaptable armbands can be worn close to the elbow or near the wrist. The primary data inputs are a keypad or a ring scanner. The HX2 is voice ready. Voice can also be used as an input with 3 feedback generated by the mobile device and delivered through an internal speaker or audio headset. -
Page 8: Environmental Specifications
Related Manuals This guide takes you through an introduction to and operation of the HX2. Ring Scanner Programming Guide – contains programming barcodes used when setting up HX2 ring barcode reader engines. HX2 Reference Guide – contains technical information and advanced instruction. -
Page 9: Ring Scanner Warnings And Labels
Momentary exposure to a Class 2 laser is not known to be harmful. Figure 1 Ring Scanner Caution Label – Class 2 Laser Scanner E-EQ-HX2OGWW-D Figure 2 HX2 Product Label HX2 User’s Guide... -
Page 10: Important Battery Information
HX2 backup battery will last for up to 15 minutes. If the backup battery is fully discharged, the HX2 will reset as soon as it is docked in a powered cradle, and the Power button is pressed, or connected to a fully charged tethered battery. -
Page 11: Document Conventions
LXE ServicePass website. Contact your LXE representative to obtain the LXE Manuals CD. You can also get help from LXE by calling the telephone numbers listed on the LXE Manuals CD, in the file titled Contacting LXE. This information is also available on the LXE website. -
Page 12: Accessories
Accessories Note: Items with a Green letter R in the second column are ROHS-compliant. Please contact your LXE representative when ordering ROHS-compliant items as the part number may have changed. Items without the letter R may have received ROHS-compliance after this guide was published. E designator means the accessory is RoHS Exempt. - Page 13 Getting Help Mobile Bluetooth Barcode Readers LXE Bluetooth Ring Scanner module with laser ring scanner, battery, two hand/wrist straps (large and small) LXE Bluetooth Ring Scanner module with 1D/2D imager ring scanner, battery, two hand/wrist straps (large and small) Li-Ion Spare Battery for LXE Bluetooth Ring Scanner...
- Page 14 Power Cable: Connects DC Power Supply to Forklift Cradle Forklift Rugged Scanner Holder with RAM mount (all metal with cloth padding) Cables USB ActiveSync Cable (Type A to HX2 cradle connector) Battery Cable Battery Cable with Audio Battery Extension Cable Cable Connector Plug...
-
Page 15: Components
The figures on the next few pages assume a fully charged tethered battery is in the battery sleeve (on an armband or hip flip) and positioned at the top of the figure. Please contact your System Administrator for assistance with HX2 accessories. Note: New batteries must be charged prior to use. -
Page 16: Front
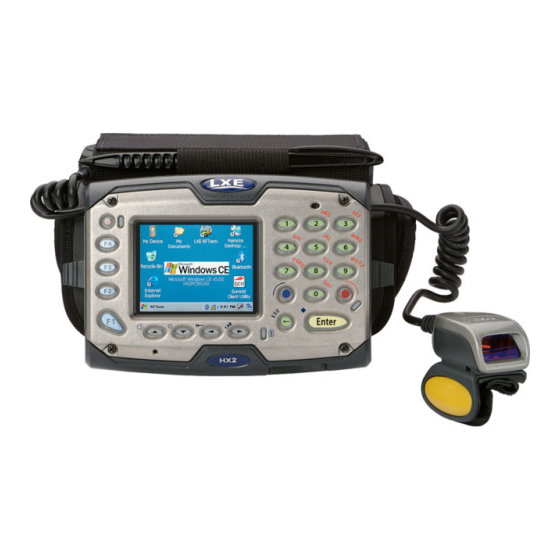
Keypad On / Off Button System Status LED Microphone Bluetooth LED Alpha Mode LED not used with the Dual Alpha Keypad and the Triple Tap Keypad. HX2 User’s Guide Figure 3 Front Speaker Green Button Alpha Mode LED Orange Button... -
Page 17: Back
Tethered Battery Cable channel Cradle Connector Tethered Battery Cable channel Retaining Clip for Tethered Battery Connector Battery Cable connector Ring Scanner cable connector Retaining Clip for Ring Scanner Tether Connector Ring Scanner Tether Cable channel Cradle Connector HX2 User’s Guide... -
Page 18: Connectors
See Cables. Cradle Connection Connector 3 is at the base of the HX2. It connects to the Cradle. When the HX2 is in a powered cradle, the HX2 receives external power through the Cradle connector. USB Keyboard or USB Mouse input is received through the Cradle connector when the HX2 is in a cradle. -
Page 19: Tethered Ring Scanner / Imager
Tethered Ring Scanner / Imager Tethered Ring Scanner / Imager E-EQ-HX2OGWW-D Figure 7 Laser Ring Scanner Figure 8 Imager Ring Scanner Laser /Imager Scan Aperture Scan-in-Progress LED HX2 Connector Scan button (Trigger) Figure 9 Ring Scanner and Ring Imager HX2 User’s Guide... -
Page 20: Cables
Figure 10 Cable – Battery and HX2 Connector Figure 11 Cable – Audio, Battery and HX2 Connector Figure 12 Cable – Laser Ring Scanner and HX2 Connector Figure 13 Cable – Imager Ring Scanner and HX2 Connector HX2 User’s Guide... -
Page 21: Li-Ion Battery
Li-Ion Battery Li-Ion Battery Main battery charging is handled exclusively by the HX2 Multi-Charger/analyzer and the battery charger integrated into a powered HX2 cradle. The Standard battery is much thinner than the Extended battery. Each battery will fit in the battery sleeve on an armband, hip flip and the voice case. -
Page 22: Mounting Bracket Clips
Remove the HX2 from the mount assembly by pushing down on either mounting clip, or both, until the HX2 mounting bracket disconnects. Or you can disconnect one side, then lift the HX2 up at a 45 degree angle until the other side disconnects. Lift the HX2 up and away from the mount assembly. -
Page 23: Mounting Devices
Put this side of the strap on the inside, against the arm Put this side of the strap on the outside Armband – Top View 1 HX2 Mounting Bracket 2 Bracket Clips 3 Battery Sleeve 4 Stylus Holder 5 Arm Strap Brackets Armband –... -
Page 24: Hip Flip
There is very little change to armband straps, assembly and mounting instructions when using the Low Profile Armband. HX2 User’s Guide Figure 19 Hip Flip and Belt HX2 Mounting Bracket on Hip Flip Mounting Bracket Clips A Belt inside the Belt Loop Brace (Adjustable) -
Page 25: Quick Start
The sequence of steps in Getting Started/Prerequisites must also be completed when the HX2 returns from a Cold Boot and when a new OS version is loaded. The wireless client, flash card, virtual keyboard and scanner parameters may also need to be reset after a cold reset. -
Page 26: Hx2 Mobile Device - Quick Start Troubleshooting
• Slide the battery into the battery sleeve on the armband. • Snap all tethered devices to the connectors at the back of the HX2. See Connecting the Battery and Ring Scanner and Connecting the Audio Cable and a Headset. -
Page 27: Hip Flip
Connecting the Battery and Ring Scanner and Connecting the Audio Cable and a Headset. • Snap the HX2 into the hip flip mounting bracket. See Mounting Bracket Clips. • Attach the battery cable to the battery. • Put the hip flip on. -
Page 28: Connecting The Battery And Ring Scanner
Retaining Clip, then pinch and pull the cable connector (not the cable!) straight up and away from the HX2. Do not use a metal object, or extreme force, to remove the cable connector from the HX2. Re-connect cables and reassemble the HX2 body-worn components. -
Page 29: Connecting The Audio Cable And A Headset
2. Snap the battery plug into the battery cable connector at the top of the battery. 3. Press the battery/audio connector into either left or right connector on the back of the HX2. The retaining clip will snap into place and secure the cable connection. Place the cable in the cable groove. -
Page 30: Tapping The Power Key
The Power key is a round button located above the F4 key. When a battery is connected to the HX2 for the first time press the Power key. The mobile device begins the startup process. Wait until the Windows CE desktop appears. -
Page 31: Power Key Functions
Wireless Client configuration will need to be completed by the System Administrator. Required mappable keys will need to be configured. For example, there is no Alt or Del key (or their equivalent) available using the HX2 Alpha Mode 3 Tap keypad. Optional software Administrator. -
Page 32: Hx2 Keypads
The Alpha and Blue keys do not auto-repeat. • When using a sequence of keys that require an alphabet key, first press the Alpha key to force Alpha mode on the numeric keys. See Alpha Modifier Key in the HX2 Reference Guide. -
Page 33: Using The Dual Alpha Keypad
Keypad Icons and the Dual Alpha Keypad When the HX2 has a Dual Alpha keypad, a modifier key icon is displayed in the taskbar. The icon looks like a small cube. The sides of the icon change color when a modifier key is pressed. -
Page 34: Using The Triple Tap Keypad
Keypad Icons and the Triple Tap Keypad When the HX2 has a Triple Tap keypad, a modifier key icon is displayed in the taskbar. The icon looks like a small cube. The sides of the icon change color when a modifier key is pressed. -
Page 35: System Status Leds
Display turned off when timer expires. This will help to conserve battery power. Tap the screen or press any key (except the Power button) to turn the display on again. The HX2 is not in Suspend Mode. Red – Steady Main Battery Low. -
Page 36: Entering Data
Stylus Data Entry Note: This section is directed to the HX2 daily user. The assumption is that the mobile device has been configured and the touch screen calibrated by the System Administrator prior to releasing the HX2 for daily use. The touch screen should be calibrated before initial use. -
Page 37: Ring Scanner Data Entry
Move the ring scanner towards or away from the barcode until a response is emitted by the HX2 (1 beep, 2 beeps, a WAV file, etc) or the bracketed crosshair times out and disappears. -
Page 38: Scan Status Led
Following a barcode scan and read the Scan Status LED turns green for two seconds and the HX2 may beep, indicating a successful scan. If the scan was unsuccessful, the Scan Status LED turns off and a different beep sequence is heard. -
Page 39: Input Panel / Virtual Keyboard
3. Tap the data entry area on the display when you want to enter data using the Input Panel. When finished entering data, tap the Keyboard icon in the Taskbar. Select Hide Input Panel. E-EQ-HX2OGWW-D Figure 31 Input Panel / Virtual Keyboard HX2 User’s Guide... -
Page 40: Bluetooth Devices
See HX2 Reference Guide for more Bluetooth information. Mobile Bluetooth Accessories Using the Bluetooth Barcode reader, scan the (Lnk) pairing barcode located on the HX2 to pair the mobile barcode reader with the HX2. See Bluetooth Devices in the Quick Start section for details. -
Page 41: Entering The Applock Activation Key
The touch screen must be enabled. A checkmark indicates applications currently active or available for Launching by the user. When Keyboard is selected, the HX2 default input method (Input Panel, Transcriber, or custom input method) is activated. Using a Stylus Tap When the mobile device enters end-user mode, a Switchpad icon (it looks like three tiny windows one above the other) is displayed in the taskbar. -
Page 42: Setting The Power Schemes Timers
Setting the Power Schemes Timers Note: Refer to the section titled Power Modes in the HX2 Reference Guide for information relating to the power states of the mobile device. Select | Settings | Control Panel | Power | Schemes tab. Change the parameter values and tap OK to save the changes. -
Page 43: Setting The Audio Speaker Volume
As the volume scrollbar is moved between Loud and Soft, the computer will emit a tone each time the volume increases or decreases in decibel range. E-EQ-HX2OGWW-D Figure 34 Volume & Sounds Properties HX2 User’s Guide... -
Page 44: Adjusting The Display Backlight Timer
OK to save the changes. The first option affects the display when the HX2 is running on battery power only. The second option affects the display when the HX2 is running on external power (e.g. docked in a powered cradle). -
Page 45: Turning The Keypad Backlight On Or Off
Select | Settings | Control Panel | Display | Keypad Note: Alpha tab in the Keypad control panel is not available when the HX2 has a Dual Alpha or Triple Tap keypad. Alpha Mode 3 Tap Keypad Tap the Off radio button when the keypad backlight is to remain Off regardless of the OS event in process. - Page 46 Cleaning the Glass Display/Ring Scanner Aperture HX2 User’s Guide E-EQ-HX2OGWW-D...
-
Page 47: Optional Equipment
Remove the rubber boot when placing the HX2 in a voice case. The rubber boot slips over the front edges and halfway down the sides of the HX2, leaving the touch screen, keypad, LXE logo and the HX2 logo visible. -
Page 48: Hx2 Voice Case Assembly
1. Slide the belt through the belt loop on the voice case. Do not put the belt on yet. 2. Attach the battery cable, ring scanner and audio device to the HX2. 3. Slip the HX2 into the voice case. Be sure the screen and keypad are visible through the clear window of the voice case. -
Page 49: Removing/Replacing The Armband Straps
Removing/Replacing the Armband Straps Removing/Replacing the Armband Straps Note: Remove the HX2 and any of its tethered devices from the Armband before removing and replacing the armband straps. The armband is a lightweight, sturdy mounting platform for the HX2. There are two armband straps. -
Page 50: Connecting The Activesync Cable To The Hx2
Figure 41 Connect ActiveSync Cable to HX2 Cradle Connector Insert the HX2 cable end into the cradle connector on the bottom of the HX2 until a click is heard. Insert the USB-A end in a USB port on a desktop/laptop computer. -
Page 51: Hx2 Docking/Charging Cradle
Using an external power supply the HX2 cradle recharges Standard batteries in approximately 4 hours (8 hours for the Extended battery). The HX2 does not need to be docked during a spare battery charging process. See Accessories. -
Page 52: Cradle Leds
HX2 is not properly seated in charging bay and/or if this is the first time the HX2 has been inserted, the HX2 is properly seated and has not been powered On. HX2 is On, is properly seated in the charging bay and is receiving external power through the cradle. -
Page 53: Hx2 Multi-Charger
HX2 Multi-Charger HX2 Multi-Charger The LXE HX2 Multi-Charger is designed to simultaneously charge up to six HX2 Rechargeable Lithium Ion Batteries at a time, in any combination of Standard or Extended batteries. The Standard batteries require less than four hours and the Extended batteries require less than 8 hours. -
Page 54: Charger/Analyzer Leds
Capacity Analyze Progress LED Status Refer to the HX2 Multi-Charger User’s Guide for instruction in setting up the charger, inserting the battery packs into the charging bays, interpreting the LEDs and using the Charge/Analyze Pocket. HX2 User’s Guide Between 90%... -
Page 55: Appendixa Key Maps
Please contact your System Administrator for assistance with User Configured (Mapped) Keys. E-EQ-HX2OGWW-D Appendix A Key Maps First Press This Key Blue Alpha Then Press This Key Power Up Arrow Down Arrow Blue Alpha Enter Only Available when Mapped Only Available when Mapped HX2 User’s Guide... - Page 56 Right Arrow (Cursor Right) Left Arrow (Cursor Left) F20 through F24 Please contact your System Administrator for assistance with User Configured (Mapped) Keys. See Using the 23 Key Keypad for explanation. HX2 User’s Guide First Press This Key Blue Alpha Alpha...
- Page 57 Alpha times 2 Alpha times 2 Alpha times 2 Alpha times 2 Alpha times 2 Alpha times 2 Alpha times 2 Alpha times 2 Alpha times 2 Alpha times 2 Alpha times 2 7777 Alpha times 2 HX2 User’s Guide...
- Page 58 . (period) * (asterisk) - (dash or minus sign) < > _ (underscore) + (plus sign) “ ‘ & HX2 User’s Guide First Press This Key Then Press This Key Blue Alpha Alpha times 2 Alpha times 2 Alpha times 2...
-
Page 59: Dual Alpha Keypad
Up Arrow Down Arrow Up Arrow Down Arrow Ctrl Ctrl Green Orange Blue CTRL + ESC Shift -- (alpha is the default setting) BKSP (Backspace) Enter Backspace Up Arrow Down Arrow Down Arrow Up Arrow BKSP (Backspace) HX2 User’s Guide... - Page 60 To Get This Dual Alpha Keypad Function Green HX2 User’s Guide First press these keys . . . Orange Blue Shift 23 Key Keypad Then press this key Up Arrow Up Arrow BKSP BKSP Down Arrow Down Arrow E-EQ-HX2OGWW-D...
- Page 61 ` (accent) ; (semicolon) = (equal sign) & * (asterisk) “ (double quote) E-EQ-HX2OGWW-D First press these keys . . . Orange Blue Shift Then press this key Up Arrow Up Arrow BKSP BKSP Down Arrow Down Arrow HX2 User’s Guide...
- Page 62 To Get This Dual Alpha Keypad Function Green | (broken bar) ~ (tilde) < > : (colon) + (plus sign) _ (underscore) HX2 User’s Guide First press these keys . . . Orange Blue Shift 23 Key Keypad Then press this key E-EQ-HX2OGWW-D...
-
Page 63: Triple Tap Keypad
Then press this key Power/Suspend Up Arrow Down Arrow Up Arrow Down Arrow Ctrl Ctrl Green Orange Blue CTRL + ESC Shift -- (alpha is the default setting) BKSP (Backspace) Enter Backspace Up Arrow Down Arrow Down Arrow Up Arrow HX2 User’s Guide... - Page 64 To Get This Triple Tap Keypad Function Green Page Up Page Down HX2 User’s Guide First press these keys . . . Orange Blue Shift 23 Key Keypad Then press this key BKSP (Backspace) 7777 9999 E-EQ-HX2OGWW-D...
- Page 65 . (period) * (asterisk) - (dash or minus sign) ‘ (single quote) E-EQ-HX2OGWW-D First press these keys . . . Orange Blue Shift Then press this key 7777 9999 2222 3333 4444 5555 6666 77777 8888 99999 HX2 User’s Guide...
- Page 66 * (asterisk) “ (double quote) | (broken bar) ~ (tilde) < > : (colon) + (plus sign) _ (underscore) HX2 User’s Guide First press these keys . . . Orange Blue Shift 23 Key Keypad Then press this key E-EQ-HX2OGWW-D...
-
Page 67: Appendixb Regulatory Notices And Safety Information
Li-Ion Battery When disposing of the HX2 main battery, the following precautions should be observed: The battery should be disposed of promptly. The battery should not be disassembled or crushed. The battery should not be heated above 212°F (100°C) or incinerated. - Page 68 Information to User A label on the exterior of the device should resemble one of the labels shown below (the label contains the LXE part number of the installed radio card). The labels shown below and affixed to the device, identify where the device may be used and where its use is restricted.
-
Page 69: Hx2 Approvals/Standards
Industry Canada Specific Absorption Rate (SAR) limits. Highest reported SAR for the HX2 is .641W/kg on body. Any accessories not provided by LXE should not be used with this device. This device must not be co-located or operating in conjunction with any other antenna or transmitter. -
Page 70: Laser Light Safety Statement
Oppassen. (NL) Aþaðýdaki etiketlerden bir tanesi tarayýcýnýn üstünde saðlanýr. Lütfen Dikkat ifadesini okuyun. (TR) (KR) (CN) HX2 User’s Guide Appendix B Regulatory Notices and Safety Information Legend: Chinese-CN; Danish-DK; Dutch-NL; English-US; Finnish- FI; French-FR; German-DE; Greek-GR; Italian-IT; Japanese-JP; Korean-KR; Norwegian-NO; Portuguese-PT;... -
Page 71: Revision History
Trigger Assembly 20 pack to Accessories. Added Bluetooth mobile barcode readers to Accessories. • Quick Start -- Replaced Using the 23 Key Keypad with HX2 Keypads. Added Adjusting the Display Brightness. • Appendix A – Key Maps -- Added Alpha Mode 3 Tap Keypad, Dual Alpha Keypad and Triple Tap Keypad keymaps. - Page 72 Appendix B Regulatory Notices and Safety Information HX2 User’s Guide E-EQ-HX2OGWW-D...
-
Page 73: Index
Display and scanner aperture cleaning ...39 Display backlight timer ...38, 39 Display Brightness...38 Dual Alpha key maps ...53 Dual Alpha keypad ...27 End user switching Touch ...35 Entering Data...30 Features ...1 Forms entry...30 Getting Started...19 Glossary...5 Hardware Reset ...25 Help ...5 HX2 User’s Guide... - Page 74 Hints Key Maps ...49 Keypads ...26, 27, 28 Hip Flip...18 HX2 key maps ...49 HX2 Quick Start ...19 Icons Bluetooth...34 Important Battery Information...4 Input panel virtual keyboard ...33 Keymaps Alpha Mode 3 Tap ...49 Dual Alpha ...53 Triple tap...57 Keypad and entering data ...30 Keypad and Input Panel keys ...26...
- Page 75 Index Warnings and Labels Ring Scanner...3 Warmboot ...25 E-EQ-HX2OGWW-D HX2 User’s Guide...
- Page 76 Index HX2 User’s Guide E-EQ-HX2OGWW-D...
Need help?
Do you have a question about the HX2 and is the answer not in the manual?
Questions and answers