Table of Contents
Advertisement
Quick Links
Advertisement
Table of Contents
Troubleshooting

Subscribe to Our Youtube Channel
Related Manuals for Biotek 405 LS

Summary of Contents for Biotek 405 LS
- Page 1 Microplate Washer ™ Operator’s Manual...
- Page 3 405™ Microplate Washer LS Operator's Manual BioTek Instruments, Inc. January 2013 © January 2013 Part Number 1171030 Revision B...
-
Page 4: Notices
BioTek Instruments, Inc. Changes made to the information in this document will be incorporated in new editions of the publication. No responsibility is assumed by BioTek for the use or reliability of software or equipment that is not supplied by BioTek or its affiliated dealers. -
Page 5: Table Of Contents
Optional Accessories Physical Specifications Performance Specifications BioTek's Customer Resource Center Installation Unpack and Inspect the Instrument Remove the Shipping Hardware Setting Up the 405 LS Install the Microplate Carrier Connect the Vacuum Pump, Tubes, and Bottles Waste System BioTek Instruments, Inc. - Page 6 | 405 LS Operator's Manual Install the Vacuum Line Filter Install the Fluid Supply System Final Check Attach the Mist Shield Install Software/Connect to Computer Connect to Host Computer Connect to Power Define Instrument Settings LHC Users Only Standard Vacuum Pump Users...
- Page 7 Change the Plate Clearance Setting (Keypad) Adjust Utility Run the Adjust Utility (Using the Keypad) Plate Types and Processing Patterns Plate Types Table About Wash Processing Patterns Maintenance Overview Recommended Maintenance Schedule Daily Maintenance Overnight/Multi-Day Maintenance AutoPrime BioTek Instruments, Inc.
- Page 8 | 405 LS Operator's Manual AutoPrime for Overnight-Weekend Maintenance Turn on AutoPrime for the Washer Removing Protein Residuals and Fungi Growth AutoClean the Washer Quick Clean (Keypad Only) Create an AutoClean protocol Periodic Maintenance Clean the Bottles Clean the Plate Carrier...
- Page 9 Evacuation Efficiency Test (192) Evacuation Diagnostic Test (192) Vacuum Filtration Evacuation Efficiency Test Qualify the Verify™ Technology Sensor Troubleshooting Troubleshooting General Operation Troubleshooting Washer Problems Communication Errors Error Codes System Error Codes 405 LS-LHC Software Error Codes Index ......................BioTek Instruments, Inc.
-
Page 10: Contact Information
| 405 LS Operator's Manual Contact Information ® BioTek Instruments, Inc. Highland Park, P.O. Box 998 Winooski, Vermont 05404-0998 USA Customer Service and Sales Internet: www.biotek.com Phone: 888-451-5171 (toll free in the U.S.) 802-655-4740 (outside the U.S.) Fax: 802-655-7941 E-Mail: customercare@biotek.com... -
Page 11: Document Conventions
Rev Date Changes 5/2012 First issue 1/2013 Added content about BioTek's Verify™ Technology, including the Plate Detection sensor and new shipping hardware. Added instructions for running the Verify test, analyzing its test results, maintaining the device, replacing the test plate and qualifying the device. Note: the vacuum filtration plate carrier was modified to accommodate the Verify device. -
Page 12: Quality Control
888/451-5171 or 802/655-4740. Repackaging and Shipping If you need to ship the instrument to BioTek for service or repair, contact BioTek for a Return Materials Authorization (RMA) number and use the original packing materials. Other forms of commercially available packaging are not recommended and can void the warranty. -
Page 13: Hazards And Precautions
Warning! Ultrasonic Energy. Ultrasonic energy is present in the ultrasonic cleaner reservoir (if equipped) when AUTOCLEAN/Quick Clean programs are running. Avoid putting your fingers in the bath. Ultrasonic energy can be destructive to human tissue. Warning! Software Quality Control. The operator must follow the BioTek Instruments, Inc. -
Page 14: Precautions
Keep hands/fingers clear of these areas when the instrument is operating. Precautions The following precautions are provided to help avoid damage to the instrument: Caution: Service. The instrument should be serviced by BioTek authorized service personnel. Only qualified technical personnel should perform troubleshooting and service procedures on internal components. - Page 15 BioStack Microplate Stacker.) Although the waste sensor port on the back of the 405 LS is the same type as the 24-VDC power connector on the back of the BioStack, if an external 24-VDC power supply is plugged into the 405 LS’s port, it will permanently damage internal components.
-
Page 16: Ce Mark
| 405 LS Operator's Manual Caution: Electromagnetic Compatibility. Do not use this device in close proximity to sources of strong electromagnetic radiation (e.g., unshielded intentional RF sources), because these may interfere with the proper operation. CE Mark Based on the testing described below and information contained herein, this instrument bears the CE mark. -
Page 17: Directive 2006/95/Ec Low Voltage (Safety)
In order to maintain compliance with FCC regulations shielded cables must be used with this equipment. Operation with non-approved equipment or BioTek Instruments, Inc. -
Page 18: Canadian Department Of Communications Class A Xvi
| 405 LS Operator's Manual unshielded cables is likely to result in interference to radio and television reception. Canadian Department of Communications Class A This digital apparatus does not exceed Class A limits for radio emissions from digital apparatus set out in the Radio Interference Regulations of the Canadian Department of Communications. -
Page 19: Safety Symbols
Separate collection for electrical and Dispositif médical de diagnostic in electronic equipment vitro Les équipements électriques et Medizinisches In-Vitro-Diagnostikum électroniques font l’objet d’une Dispositivo médico de diagnóstico in collecte sélective vitro Getrennte Sammlung von Elektro- Dispositivo medico diagnostico in und Elektronikgeräten BioTek Instruments, Inc. - Page 20 | 405 LS Operator's Manual vitro Recogida selectiva de aparatos eléctricos y electrónicos Raccolta separata delle apparecchiature elettriche ed elettroniche Consult instructions for use Consulter la notice d’emploi Gebrauchsanweisung beachten Consultar las instrucciones de uso Consultare le istruzioni per uso...
-
Page 21: Introduction
Thank you for purchasing the 405™ Microplate Washer LS. This chapter describes the instrument's features and specifications and includes important contact information. Introducing the 405™ Microplate Washer LS BioStack Compatibility Package Contents Optional Accessories Physical Specifications Performance Specifications BioTek's Customer Resource Center... -
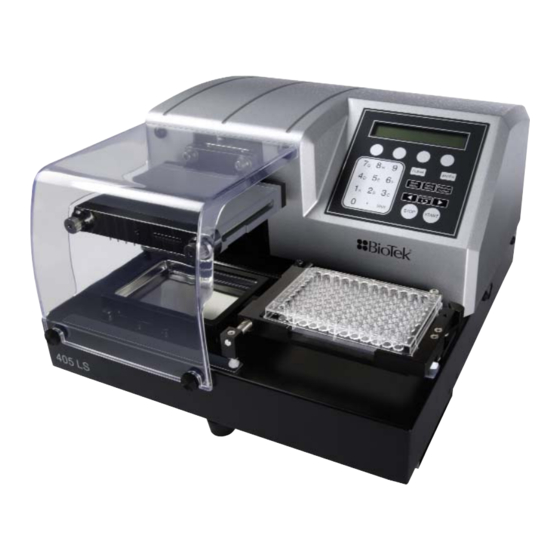
Page 22: Introducing The 405™ Microplate Washer Ls
2 | Chapter 1: Introduction Introducing the 405™ Microplate Washer LS Let's get started by identifying the main components of the 405 LS microplate washer: Component Description Washer manifold 96- or 192-tube devices to aspirate and dispense fluid. Priming trough and... -
Page 23: Instrument Models
*The special vacuum filtration carrier must be installed to perform filtration assays. Instrument Models A label on the side of the 405 LS identifies its model. BioTek distinguishes the variations between instrument models using this letter scheme: “Standard” model to wash 96-well microplates. It has one manifold with 96 sets of dispense and aspirate tubes. - Page 24 4 | Chapter 1: Introduction If you have purchased the BioStack to operate with the 405 LS, refer to the BioStack Operator’s Manual for instructions on configuring the 405 LS to run with the BioStack. To help you get started:...
-
Page 25: Package Contents
Package Contents | 5 Package Contents Part numbers and package contents are subject to change and vary according to instrument model. Please contact BioTek Customer Care if you have any questions. Description Power cord (part numbers vary by country of use) Varies USB cable (USB Virtual COM Port Driver Software &... -
Page 26: Waste And Dispense System Accessories
6 | Chapter 1: Introduction Waste and Dispense System Accessories Part Description Number Standard Vacuum Pump Systems: 1170530 Complete Dispense/Waste System 115V/230V, 4L Bottles, including: 7100746 Waste: 4L bottles (2, one with sensor) 1170529 Dispense: 4L bottles with filters (2) 7100746 Complete Waste System 115V/230V, 4L Bottles, including: 7100543... -
Page 27: Optional Accessories
3) Direct Drain Waste System: use restricted to 96-tube single manifold models (i.e. 405 LS). Optional Accessories Part numbers and package contents are subject to change and vary according to instrument model. Please contact BioTek Customer Care if you have any questions. General Instrument Accessories Description... - Page 28 8 | Chapter 1: Introduction Description Liquid Handling Control™ Software LHC2 BioStack™ Microplate Stacker and integration kit Biostack Installation-Operational-Performance Qualification (IQ- 1170543 OQ-PQ) package Magnetic Bead Assay Accessories Accessory Magnets: 384-well Flat Magnet 7103017 384-well Ring Magnet 7102215 96-well Flat Magnet 7103016 96-well Ring Magnet 7102216...
-
Page 29: Physical Specifications
Hardware & Environmental User Interface 2-line x 24 character LCD screen, 26 alphanumeric soft keys Power Supply The instrument uses two internal power supplies: 24-volt 60 watt and 48-volt 60 watt. These supplies are compatible with 100-240 V~; 50- BioTek Instruments, Inc. -
Page 30: Performance Specifications
10 | Chapter 1: Introduction Hardware & Environmental 60 Hz. ≤ 5.0 A, used for vacuum pump Accessory Outlet Dimensions 14 x 17 x 10 inches (36 cm x 43 cm x 25 cm) (W x D x H) Weight (≤) 32 lb (14.5 kg)/36 lb with Buffer Switching (16.3 kg) Operating 10°... - Page 31 The Verify level sensor measurement shall have a repeatability standard σ deviation of <0.14 mm (9.0 µL for 8X8 square well plate), measurement σ where the applies to a relative volume measurement, i.e. measurement the delta between two volumes. BioTek Instruments, Inc.
-
Page 32: Biotek's Customer Resource Center
12 | Chapter 1: Introduction BioTek's Customer Resource Center BioTek's Customer Resource Center (CRC) continues our tradition of superior service and support. After an easy registration process, you can access lots of useful information about your BioTek microplate instrumentation and software. On... -
Page 33: Installation
Chapter 2 Installation This chapter provides detailed installation instructions. Unpack and Inspect the Instrument Remove the Shipping Hardware Setting Up the 405 LS Install Software/Connect to Computer Connect to Power Define Instrument Settings Verify Performance Repacking the 405 Washer... -
Page 34: Unpack And Inspect The Instrument
Failure to remove and reinstall the shipping bracket may void your warranty. Keep in mind that you must reinstall the shipping hardware and use the original shipping material if it is necessary to return the instrument to BioTek for service or repair. 405™ Microplate Washer LS... - Page 35 For direct drain, an intermediate collection bottle is attached to the washer using the same studs as the shipping bracket. See the Direct Drain Kit instructions. 405 LS with Verify™ Technology "Q" Models "Q" Models have three shipping...
- Page 36 16 | Chapter 2: Installation 1. Use the 9/64” hex wrench to unscrew the cap screws and remove the bracket on the side of the wash manifold that holds the Verify sensor in place. 2. Remove the large bracket in front holding the wash manifold: Remove the three screws.
- Page 37 7. Store the brackets: mount them on the back panel on the studs provided. Beginning with the longest (3rd) bracket, layer the brackets on top of each other, and use the longest screws to secure them in place. BioTek Instruments, Inc.
-
Page 38: Setting Up The 405 Ls
2. Put the two carrier rail guides onto the transport rail. The tab should sit in the slot. Connect the Vacuum Pump, Tubes, and Bottles For optimal operation of the 405 LS, all tubing, cables, and fittings for the fluid supply and waste systems must be properly connected. This image illustrates 405™ Microplate Washer LS... -
Page 39: Waste System
Accessory Outlet on the back of the instrument. This allows the 405 LS to regulate the pump, turning it on and off as specified by the protocol. When using a standard pump (rather than the high flow pump), set the instrument’s... - Page 40 20 | Chapter 2: Installation Waste System Three lengths of tubing are shipped with the waste module: Tubing: Connects: Short tube with yellow and green bands The two waste bottles to each other Long tube with green bands on both ends Bottle without sensor to vacuum port Long tube with yellow and orange bands Bottle with waste sensor to the vacuum...
-
Page 41: Install The Vacuum Line Filter
This will help optimize performance. 8. Make sure the waste bottle’s caps are well sealed. BioTek strongly recommends installing the vacuum line filter to protect your vacuum pump. Install the Vacuum Line Filter The optional vacuum line filter (PN 48294) can be installed halfway between the last waste bottle (overflow bottle) and the vacuum pump. -
Page 42: Install The Fluid Supply System
22 | Chapter 2: Installation Install the Fluid Supply System Prepare the supply bottles and tubing: 1. Remove the Quick Release Connector from its bag inside the supply bottle and connect it to the raw supply tubing provided. You may need to cut the tubing to the desired length. - Page 43 Setting Up the 405 LS | 23 Make sure you hear the connector click! Attach the labels provided with the washer to identify the buffer bottles. Note: To avoid spilling fluid when refilling bottles or changing reagents, first release the Quick Connector from the bottle cap, use a paper towel to sop up the few drops in the cap.
-
Page 44: Final Check
24 | Chapter 2: Installation Without Buffer Switching (1 Buffer) 1. Place the supply bottle(s) on the same horizontal plane as the instrument. 2. Connect one the tubes to the Dispense port. Fluid In Final Check Verify that the tubing was not crimped during installation. Ensure that there are no loose fittings or cable connections. -
Page 45: Install Software/Connect To Computer
Technical Note: Only one of the two communication ports (COM port) on the instrument can be used at a time. They cannot be used simultaneously. You can use USB to connect the 405 LS to the computer or the RS232 serial port to BioTek Instruments, Inc. -
Page 46: Connect To Power
Warning! Electrical Grounding. Never use a two-prong plug adapter to connect primary power to the 405 LS. Use of a two-prong adapter disconnects the utility ground, creating a severe shock hazard. Always connect the system power cord directly to a three-prong receptacle with a functional ground. -
Page 47: Standard Vacuum Pump Users
New Protocol Create a protocol template Click the button or select File>New 2. Click . Select the 405 LS and define its Name Port Settings 3. Optionally, select the , fill in the text fields, and add any steps that Plate Type you want all new protocols to include. - Page 48 28 | Chapter 2: Installation Define startup behavior: 8. After completing the steps above, select the tab. Startup Options 9. Select the button for New Protocol 10. Click to save your new preferences. 405™ Microplate Washer LS...
-
Page 49: Verify Performance
Before using the 405 LS for the first time, verify that it is operating properly. When using the LHC, make sure the 405 LS is connected to the PC and both are powered When running standalone, turn on the 405 LS. -
Page 50: Verify The Washer
4. When finished, close the program. Run the Verify Test ("Q" Models Only) If your 405 LS is equipped with BioTek's Verify™ Technology, run the test: Important! Before running the test: Make sure the 405 LS is primed and ready to run: Fully prime the tubing/system, e.g. - Page 51 Verify Results Do not discard the Verify Test Plate. Reuse it for as long as possible. Replacement Procedure for Verify Test Plate on page 134 if it is damaged. Contact BioTek TAC if any of the tests fail. BioTek Instruments, Inc.
-
Page 52: Repacking The 405 Washer
Repacking the 405 Washer Prior to sending your instrument to us for repair, log into the Customer Resource Center (www.biotek.com) to submit a Service Request for a Return Material Authorization (RMA). Your instrument's serial number is needed to process an RMA. - Page 53 Obtain an RMA number: Contact BioTek TAC to obtain a Return Materials Authorization number, Write "RMA" on the shipping box in large, clear letters, And, include the RMA number in the shipping address label: BioTek Instruments, Inc.
- Page 54 34 | Chapter 2: Installation Step 2 After completing Step 1, installing the shipping hardware: Put the washer in the plastic bag. Seat the washer in the foam base in the inner box and slide it forward, pushing the manifold into the foam pockets.
- Page 55 Put the corner blocks on the inner shipping box and put it in the outer shipping box. Tape the box closed. In large letters, write "RMA" on the outer box and attach the shipping address label, including your assigned RMA number. BioTek Instruments, Inc.
- Page 56 36 | Chapter 2: Installation 405™ Microplate Washer LS...
-
Page 57: Operation
Chapter 3 Operation This chapter provides instructions for controlling the 405 LS. Basic Operation Optimize Performance Predefined Protocols Listing Predefined Sample Protocols Introducing the 405 LS Keypad Using LHC to Control the 405™ Washer LHC Protocols LHC Protocols Explained Target Instrument Settings Verify Performance Configure Verify™... -
Page 58: Basic Operation
Basic Operation Two ways to control the 405 LS You can control the 405 LS using its built-in keypad or with BioTek's Liquid Handling Control™ (LHC) software. To use the LHC to control the instrument, it must be attached to and communicating with your personal computer (PC), and its main menu must be displayed. -
Page 59: Optimize Performance
See 405 Recommendations for Priming the Washer below Best Practices Fill the supply bottles with sufficient fluid. Never run the 405 LS without the fluid filter installed (on the end of the tubing inside the supply bottle). Note: To avoid spilling fluid when refilling bottles or changing reagents, first release the Quick Connector from the bottle cap, use a paper towel to sop up the few drops in the cap. -
Page 60: Optimize Protocols To Improve Evacuation
This is recommended before running a protocol to correct fluid loss due to evaporation. Dead Volume BioTek's recommended prime volumes are based on purity testing and measured dead volumes. Generally, priming with three times the dead volume assures purity. -
Page 61: Running Predefined Protocols
Optimize Performance | 41 Running Predefined Protocols BioTek provides numerous predefined protocols for maintaining the instrument in top condition and for qualifying its performance. Review the Predefined Protocols on page 43 To run a defined protocol: Keypad 1. At the main menu, press... - Page 62 The LHC stores the COM port value in the protocol file. With the 405 LS connected to and communicating with the host computer (i.e. make sure the instrument is turned on and not busy):...
-
Page 63: Predefined Protocols Listing
Simple prime routine; defined for Buffer valve A only. For LHC only. PRIME_ALL_ Consecutively primes each of the Buffer Switching valves beginning BUFFRS with D. Designed for use in the annual instrument verification test of the Buffer Switching module. BioTek Instruments, Inc. -
Page 64: Predefined Sample Protocols
44 | Chapter 3: Operation QC (Quality Control) Protocols Manifold-Specific QC_96_DISP_TEST Dispense precision test protocol for 96-tube manifold. QC_96_EVAC_TEST Evacuation efficiency test protocol for 96-tube manifold. QC_192_DISP_TEST Dispense precision test protocol for 192-tube manifold. QC_192_EVAC_TEST Evacuation efficiency test protocol for 192-tube manifold. QC_96_VAC30_ Vacuum filtration evacuation efficiency test for 96-well filter plates TEST... - Page 65 Biomagnetic separation wash protocols designed for optimal bead MAG_plate_96 recovery in 96-well round- or flat-bottomed plates and 384-well plates when using BioTek's Flat magnets. Begins by soaking the plate for 1 minute to let the beads settle at the bottom of the wells, then performs a W-Luminex_ 2 cycle wash with 30 second soaks between cycles.
-
Page 66: Introducing The 405 Ls Keypad
46 | Chapter 3: Operation Introducing the 405 LS Keypad The keypad on the 405™ Microplate Washer LS features 26-keys and a 2 x 24- character LCD. The main menu is shown below. Starting at the top of the keypad, note the main menu and the . -
Page 67: Quick Wash (Keypad Only)
Introducing the 405 LS Keypad | 47 – leads to the protocol creation and editing mode: DEFINE Create or Edit a Protocol on next page – to run system tests, the Adjust Utility, and to define AutoPrime UTILS parameters. : press this key to access the instrument’s general settings and the Setup Menu settings for the BioStack. -
Page 68: Quick Prime (Keypad Only)
48 | Chapter 3: Operation If Quick Wash is too limited to satisfy your assay requirements, use the LHC or the keypad to define a wash protocol. All wash parameters can be defined during protocol creation, including those designed for special assays. Quick Prime (Keypad only) Priming removes air bubbles from the tubing, ensuring optimal performance. -
Page 69: How To Name A Protocol (Keypad Only)
Introducing the 405 LS Keypad | 49 How to name a protocol protocols to select one. Then, you (Keypad only) on the facing can edit the name and plate type, page if desired. Press Enter to proceed. Define or modify the plate type using the Previous and Next buttons to scroll through the supported Plate Types (if applicable). -
Page 70: Define The Plate Type And Plate Map (Or Partial Plate)
50 | Chapter 3: Operation Define the Plate Type and Plate Map (or Partial Plate) Washing and dispensing to a part of the plate is limited by the foot print of the hardware. When washing 384-well plates, you can choose the sectors to be processed or skipped. -
Page 71: How To Shake The Plate
Introducing the 405 LS Keypad | 51 3. Press the key to toggle between filling the column or not. When the Options image of the column is filled it will be dispensed to. Conversely, when the column image is blank or unfilled, the column will not be dispensed to. -
Page 72: How To Enter Negative Numbers (Keypad Only)
52 | Chapter 3: Operation Shaking and soaking the plate is also an option when defining a Wash step. How to enter negative numbers (Keypad only) Some protocol parameters, like Horizontal Dispense Position (X-axis), require inputting a negative number to improve performance. To enter a negative value: 1. - Page 73 Introducing the 405 LS Keypad | 53 1. Select at the main menu. DEFINE 2. Select DELETE 3. Use the key or enter the protocol number to select it. Options 4. Select to delete the protocol. BioTek Instruments, Inc.
-
Page 74: Using Lhc To Control The 405™ Washer
54 | Chapter 3: Operation Using LHC to Control the 405™ Washer BioTek's Liquid Handling Control (LHC) software offers another way to design protocols and control the instrument. The washer must be attached to and communicating with your personal computer (PC) for the LHC to function. -
Page 75: Communications Port
Make sure the 405 LS is connected to the computer, turned on, and not busy. Learn more About COM Ports in the LHC Installation Guide or select Help>Help Topics. -
Page 76: Lhc Protocols
Power Users: If you create protocols for multiple instruments or for other LHC users, read this more detailed description of how the 405 LS validates a protocol to be run on a specific instrument. Recommended: Before changing a predefined protocol, select File>Save As and give it a unique name. -
Page 77: Lhc Protocols Explained
LHC Protocols Explained | 57 LHC Protocols Explained Prerequisite This discussion about 405 LS protocols will be easier to follow if you are already familiar with the LHC. Read "Understanding the LHC" in the Help. Protocol Files In addition to the "Protocol Steps" (the actions you tell the 405 LS to perform to process plates), each protocol file contains "Instrument Settings."... -
Page 78: Target Instrument Settings
One vs. Multiple Instruments If you are running only one instrument, always "Get the actual settings" to identify the exact configuration of your 405 LS to ensure it can successfully perform the wash protocols. If you are managing multiple BioTek instruments (or one instrument with multiple configurations): you can create and save a "settings file"... -
Page 79: How To Define A Protocol (Lhc Only)
Get settings from: Instrument: BioTek configures and tests the 405 LS at the factory before shipping it. If you have not changed the instrument's onboard settings, you can safely click the actual settings now link to upload the correct settings from the instrument. -
Page 80: How To Use The Adjust Utility- Lhc
60 | Chapter 3: Operation Select the Plate Type and assign a unique Protocol Name Limit the name to 16 alpha-numeric characters if you want to run the instrument using the keypad only, i.e. disconnected from the computer.. Click a button in the Add Step area. - Page 81 Offset 8. Repeat the process for each axis, as necessary, starting at step 6. 9. Jot down the values so you can enter them when defining the protocol Offset step. 10. Click to end the session. BioTek Instruments, Inc.
-
Page 82: Upload-Download Protocols (Lhc Only)
62 | Chapter 3: Operation Upload-Download Protocols (LHC Only) The LHC lets you transfer protocols from your computer to your instrument and back again. Limitation: Protocols must contain only instrument-supported action steps to qualify for download. That is, the protocol cannot contain any of the LHC provided steps like Delay and Loop (buttons in the left column of the box in the Add Step... - Page 83 For cell-based assays, use 96-tube & rate 1 or 2 for gentle washing with the 96- 192-tube tube manifold only. For normal manifolds dispensing, the range is 3-11, 3 is slowest and 11 is fastest. BioTek Instruments, Inc.
- Page 84 64 | Chapter 3: Operation Keypad Default Option Description/Values range name values Volume: µL/well dispensed range: µL/well: 96-tube manifold: 50-3000 96= 300 384= 100 192-tube manifold: 25-3000 Buffer: Buffer bottle selection. A-D Positioning: X- and Y- horizontal axes, Z- height Z = 121 for (vertical) axis can be adjusted to improve 96-well plate...
- Page 85 But, the plate carrier is moved home when the total duration of the shake and/or soak exceeds 1 minute. The vacuum pump is turned off in this scenario. Moving the plate home prevents contaminating it with drops from the manifold. BioTek Instruments, Inc.
-
Page 86: Shake/Soak Step Parameters
66 | Chapter 3: Operation Keypad Default Option Description/Values range name values Pre-dispense To wet or condition the manifold tubes between between cycles, which is only needed cycles after a long soak. Same parameters as regular pre-dispense. POST Post wash When all cycles are completed. -
Page 87: Pre-Dispense
Use the Pre-dispense feature to quickly prime the tubes or tips between runs. When a Pre-dispense is enabled, the 405 LS moves the plate to the home position to allow the manifold to dispense into the priming trough. -
Page 88: Washer Flow Rates
68 | Chapter 3: Operation In a Wash step, select the Show Wash Options link and fill the Pre- dispense checkbox. Washer Flow Rates The default setting for flow rates is 7, in the middle of the range for standard tubing rates 3-11, 3 is the slowest, 11 is the fastest. -
Page 89: How To Define A Final Aspiration Step
Aspirate Definition step. link to define the parameters to suit your assay. 2. Select and select OPTS>POST or modify the Final Aspirate step by pressing Enter 3. Define or modify the parameters to suit your assay. BioTek Instruments, Inc. -
Page 90: Add A Secondary Aspiration To A Wash Cycle
70 | Chapter 3: Operation Add a secondary aspiration to a wash cycle When too much residual is left in the wells during a wash cycle, you can add a secondary aspiration to reduce it. Secondary aspiration can be performed immediately after each aspiration in a wash cycle and/or after the final aspiration step. - Page 91 Horizontal Y-axis The front-to-back carrier position (or Y axis) to align Position the microplate with the manifold tubes during a dispense. The range depends on the model. Delay start of until dispensing this volume. 3000 µL max Vacuum BioTek Instruments, Inc.
-
Page 92: Verify Performance
Tools>Instrument Utilities>Verify Manifold>Run a New Test BioTek's Verify™ Technology quickly detects clogged aspirate or dispense tubes. Important! Before running the test: Make sure the 405 LS is primed and ready to run: Fully prime the tubing/system, e.g. run Rinse. If necessary, empty waste vessel and tighten waste bottle cap. -
Page 93: Handling The Verify Test Plate
Utilities on page 79 Handling the Verify Test Plate The Verify Test Plate ships in its own special box. The plate is labeled with the serial number of the 405 LS that has been calibrated for its use. BioTek Instruments, Inc. - Page 94 74 | Chapter 3: Operation Well A1 is opposite the chamfered or beveled edges. The plate is labeled with the washer's serial number. When the plate is on the carrier in the proper orientation, the "Front" label is visible. Verify Test Plate Important guidelines: Always put the plate on the carrier with well A1 in the back, left corner of the carrier.
-
Page 95: Verify™ Technology Flowchart Diagram
Clean the Manifold: begin with AutoClean/Quick See AutoClean the Clean and rerun. If test fails again, remove the Washer on page 125 manifold to clean it more thoroughly. If the test fails after the manifold has been cleaned, BioTek Instruments, Inc. -
Page 96: About Verify™ Technology
About Verify™ Technology BioTek's Verify™ Technology uses an ultrasonic liquid-level sensor to quickly test aspirate and dispense performance. In less than 5 minutes, the Verify routine will give you supreme confidence that assay plates will be washed according to your specifications or it will identify any clogged manifold tubes that need cleaning. - Page 97 : All wells are evacuated at the fastest travel rate (6CW). Aspirate 11. Shake plate to distribute fluid in the plate and improve the meniscus. : Level sensor scans plate to measure aspirate rate: ≥0.4 mL/sec is Scan expected. Generate Test 5 results. BioTek Instruments, Inc.
-
Page 98: Sensitivity: Verify Sensor Vs. Absorbance Reader
78 | Chapter 3: Operation Sensitivity: Verify Sensor vs. Absorbance Reader While the 405 LS's Verify™ ultrasonic level sensor is a reliable tool for quickly determining the current state of the wash manifold, it has greater measurement variability than a typical absorbance reader. -
Page 99: Configure Verify™ Technology Utilities
Depending on frequency of use, the Verify Test Plate will occasionally need to be replaced due to wear or damage. When you receive a replacement plate from BioTek, perform this procedure to update the washer's calibration data to match the new plate. - Page 100 80 | Chapter 3: Operation Advanced Settings Do not change the slope or offset values unless specifically instructed to do so by BioTek. Note: Instructions in the Replacement Procedure for the Verify Test Plate recommend changing these values. 405™ Microplate Washer LS...
-
Page 101: Operating With The Biostack
LS, here is some important information about running it: LHC Control: LHC users: connect both the BioStack and the 405 LS to the computer and control them with the LHC. Design protocols that integrate BioStack controls with 405 LS steps. LHC protocols must contain a BioStack loop. -
Page 102: Biostack Alignment Utility
1 or 2 plates. Verify At the start of the day, power up the BioStack first, and then the 405 LS. BIOSTACK2WR: Lift the BioStack’s gripper before turning it on. Robotics integrators: CAD drawings of the physical dimensions of the 405 LS are available upon request. - Page 103 Begin by pressing to enable the alignment and step up and down buttons. Home When the gripper appears to be correctly positioned, Save (the) Position and proceed with the procedure. Verify Press the previous button to exit the screen. BioTek Instruments, Inc.
-
Page 104: Cell Wash
The 405 LS is equipped with a low-flow fluid path that provides a "cell wash" alternative for cell-based assays. -
Page 105: Cell Wash Strategies
See Cell Wash Strategies below CW+ Dispense Manifold As a result of BioTek's continuous improvement effort for liquid handlers, the washer dispense manifold has evolved. The dispense tubes of the improved manifold ensure fluid hits higher on the walls of the well, minimizing damage to the cells. - Page 106 86 | Chapter 3: Operation Repositioning the dispense and aspirate tubes helps minimize turbulence in the wells, preserving more cells. Using a standard 96-well Corning Costar plate, best results were achieved with these values: Dispense Step Settings: Z - height = 120 steps X - horizontal position = -45 Y - horizontal position = 0 Aspirate Step Settings:...
- Page 107 Optimal cell wash performance is achieved with BioTek's special CW+ Dispense Manifold. "CW+ Dispense Manifold" is engraved on the top of these newer manifolds to make them easy to recognize.
- Page 108 For cell wash assays, specify at least 10 µL/well. For small dispense volumes, BioTek recommends setting the vacuum-on volume to equal your dispense volume. Refer also to application notes on the BioTek web site for more information (www.biotek.com).
-
Page 109: Biomagnetic Separation - Magnetic Bead Assays
[pinching of hands and skin] can result if magnets are not handled correctly. Maintain distance between two or more magnets. Take advantage of the sample magnetic-bead protocols shipped onboard the 405 LS. Copy W-Luminex_Mag_Flat_96, for example, and modify the parameters to suit your assay requirements. -
Page 110: Perform Magnetic Bead Assays
90 | Chapter 3: Operation Flat magnet: place in the plate carrier so the text on the side of the magnet is readable; Ring magnet: place in the plate carrier with the small round magnets visible, facing upwards. Realign the BioStack with the Magnet Installed Using the magnet increases the effective height of the carrier surface (generally by at least 1 mm). -
Page 111: Flat Magnets
Magnetic beads are pulled to the center, across the well in flat-bottom plates and to the button in round-bottom plates. Increasing the aspirate height to increase the amount of residual in the well may improve performance. BioTek Instruments, Inc. -
Page 112: Ring Magnets
92 | Chapter 3: Operation Aspirate Settings: Adjust the Y Position to align the aspirate tubes near the well walls, if available. Increase the Aspirate Height (Z axis), leaving more residual volume in the wells. 384-well Flat Magnet PN 7103017 The magnetic force (approx. -
Page 113: Magnet Height Offset
Determine Magnet Height Offset below For the best results, measure the height of the plate you are using with the magnet. BioTek has determined that Nunc flat bottom plates are about 3 mm taller than a similar Corning plate, for example. -
Page 114: Manifold Stop Screw Adjustment Kit
Manifold Stop Screw Adjustment Kit For Magnetic Bead Assays and 384-Well PCR Plate Processing To successfully perform these assays, 405 LS Select and HT models may need to adjust the height of the manifold stop screw. The adjustment kit, PN 1170011, is shipped with instruments with a dual manifold. - Page 115 Two wrenches - 5/16" and 3/8" Remove the carrier to perform most of these steps but always perform the measurement steps with the plate carrier installed correctly on the 405 LS. 1. In the carrier's empty hole, insert the taller stop screw...
- Page 116 96 | Chapter 3: Operation 3. Hold the jig level on top of the microplate and raise or lower the stop screw so its head touches the bottom of the notch. 4. Set the jig aside. Using your fingers, hold the stop screw in place and screw the bottom nut down until it touches the microplate...
-
Page 117: Vacuum Filtration For Filter Plate Assays
For the best results, take a few moments to learn how to Control the Vacuum Level on page 104. Take advantage of the sample vacuum filtration protocols shipped onboard the 405 LS. Copy W-Luminex_Vac_96, for example, and modify the parameters to suit your assay requirements. -
Page 118: Install The Side Bracket
Generally, bead assays prefer low pressure and DNA separation assays prefer higher pressure. The best performance in tests at BioTek were seen when the pressure was set to 2.5 inHg. Install the side bracket... -
Page 119: Set Up The Vacuum Filtration Module
Waste Bottle Cap Module Dual tubing connected by Luer Intermediate Smallest nipple with long fitting, approx. 15”/38.1 cm Waste Out interior tube Long single tube, approx. 15”/ Intermediate Nipple without a tube inside 38.1 cm Vacuum Supply the bottle BioTek Instruments, Inc. - Page 120 100 | Chapter 3: Operation Control Tubing Waste Bottle Cap Module Short single tube, approx. Intermediate Nipple with the wide, split- 12”/30.48 cm Waste In tube extension in the bottle Two other quite distinct tubing sets are used in subsequent steps. 1.
-
Page 121: Enable Vacuum Filtration
Connect the supplied cable from the round port labeled To Filtration Valve on the control module to the corresponding port on Control Vacuum Filtration Control the back of the instrument. Enable Vacuum Filtration 405 LS Keypad 1. Select 1. Press Tools>Instrument Setup Menu. Utilities>Washer Select >ADVANC>VACFIL 2. - Page 122 102 | Chapter 3: Operation LHC: Keypad: and specify the vacuum duration, vacuum. Time Optionally, do the same for the Final Aspirate 6. Select and add OPTS>MIDCYC duration to follow each Shake dispense to suspend the beads before applying the vacuum. 7.
-
Page 123: Install Vacuum Filtration Plate Carrier
Note: Make sure Vacuum Filtration is "enabled" to select the special plate carrier: Setup Menu> >ADVANC>VACFIL Important: Always set the carrier selection to match the installed hardware, regardless of the type of plate processing you are doing. You can perform a regular wash (non-filter plates) using the vacuum filtration carrier. BioTek Instruments, Inc. -
Page 124: Control The Vacuum Level
104 | Chapter 3: Operation Control the Vacuum Level Vent plugs stored on side of carrier Change the vent plug to control the vacuum level The vacuum filtration plate carrier has a vent and ships with four vent plugs to vary the vacuum levels: Plug Vent Diameter... -
Page 125: Washer Settings
Washer Settings Touch screen: Instrument>Options LHC users: Tools>Instrument Utilities>Washer Manifold Selection After physically changing the manifold, tell the 405 LS which manifold is installed: 96-tube: single manifold for 96-well plates only or dual manifolds to process 96- and 384-well plates. - Page 126 106 | Chapter 3: Operation When performing magnetic bead assays/biomagnetic separation, this offset setting is a real time saver. It increases the height or Z-axis for all processing options to accommodate the increased height of the plate when the magnet is installed. This setting eliminates the need to modify individual protocol parameters to adjust the dispense and aspirate heights and enables Quick Wash (without adjustments) when the magnet is used.
-
Page 127: Change The Washer Manifold Setting (Keypad)
Washer Settings | 107 BioTek recommends keeping the detection systems activated. Exceptions: Deactivate the Waste sensor when using BioTek's Direct Drain Waste System. When vacuum filtration assays need to be performed at very low vacuum levels, e.g. no plug, but the washer displays an error, deactivate the sensor: LHC - "Filter Vacuum" or Keypad - "Vac Fil". -
Page 128: Change The Plate Clearance Setting (Keypad)
108 | Chapter 3: Operation 1. Press (button in center of keypad). Setup Menu 2. Select and then CARR 3. Select the currently installed carrier by pressing its Soft-key: STD - Standard (Magnet Ready) carrier VAC - Vacuum filtration carrier. Change the Plate Clearance Setting (Keypad) The Plate Clearance setting adds the specified (input) value to the travel height for the selected... -
Page 129: Run The Adjust Utility (Using The Keypad)
Washer choose ASPIR (aspiration) or DISP (dispense) depending on which tubes you are measuring offsets for; 6. At the AXIS screen, choose an axis, Z, X or Y. The top line of the display indicates which axis is active, and the offset position of that axis: BioTek Instruments, Inc. -
Page 130: Plate Types And Processing Patterns
Depending on the type of hardware installed on the instrument, e.g. manifold type, the 405 LS can process several plate types. The default parameters for wash and dispense steps represent the optimal positioning of the hardware for the plate type. -
Page 131: Plate Types Table
When using a 96-tube manifold to process a 96-well plate, all wells are processed simultaneously. To process 384-well plates, a processing pattern is needed, which also provides the ability to process the plate partially. Some portions of the plate BioTek Instruments, Inc. - Page 132 112 | Chapter 3: Operation can be left untouched or panels can be defined, i.e. multiple assays can be run on the same plate. The processing pattern is determined by the hardware's footprint. 96-tube wash pattern for 384-well plate To process a partial plate, you must select the sector or sectors you want to process: Keypad users see: Define the Plate Type and Plate Map or Partial Plate on page 50 for instructions.
- Page 133 Keypad users see: Define the Plate Type and Plate Map or Partial Plate on page 50 for instructions. Checkmarks show the sectors to be processed. Numbers show potential sectors that are currently unselected and will not be washed. The 192-tube manifold processes the plate in two sectors. BioTek Instruments, Inc.
- Page 134 114 | Chapter 3: Operation 405™ Microplate Washer LS...
-
Page 135: Maintenance
Chapter 4 Maintenance Properly maintaining the 405 LS is the key to reliable performance. Overview Recommended Maintenance Schedule Daily Maintenance Overnight/Multi-Day Maintenance AutoPrime AutoPrime for Overnight-Weekend Maintenance Turn on AutoPrime for the Washer Removing Protein Residuals and Fungi Growth AutoClean the Washer... - Page 136 116 | Chapter 4: Maintenance Storing the Instrument Replace Components Remove/Change Wash Manifold Replace the Vacuum Pump Fuse Vacuum Filtration Carrier: Replace the Gasket 405™ Microplate Washer LS...
-
Page 137: Overview
The frequency of conducting these tasks must be based on the risk and performance factors of your assays. Develop a maintenance schedule for your 405 LS based on the characteristics of the fluids used and the activity level. Here are some guidelines for each component: Washer When using fluids prone to dry and harden quickly, the washer’s dispense and... - Page 138 118 | Chapter 4: Maintenance numerous water purification methods, including MilliQ™. A minimum water purity of 2mOhm is expected. 405™ Microplate Washer LS...
-
Page 139: Recommended Maintenance Schedule
Clean exterior surfaces and mist shield ü ü Clean fluid inlet filter ü ü Clean vacuum filtration system ü ü Clean the Verify™ level sensor Decontaminate ü ü Decontaminate external surfaces ü ü Run W-DECONTAMINATE ü Decontaminate vacuum filtration system BioTek Instruments, Inc. - Page 140 120 | Chapter 4: Maintenance Frequency Before Tasks Daily Overnight/ Weekly Periodic/ storage/ Multi-Day Monthly shipment Prepare for Storage or Shipment ü Run W-LONG_SHUTDOWN Replace/Repair Components Replace the Verify Test Plate As Needed 405™ Microplate Washer LS...
-
Page 141: Daily Maintenance
Overnight/multi-day maintenance involves flushing all solutions out of the instrument, and then periodically rinsing and soaking the tubes to keep them moist. Here are three recommendations for accomplishing the task. Employ the method that best suits your work flow: BioTek Instruments, Inc. -
Page 142: Autoprime
122 | Chapter 4: Maintenance Overnight Loop To keep the wash manifolds in a wetted condition, you can run these predefined protocols to soak the tubes for several hours at a time: OVERNIGHT_LOOP: requires the washer to remain turned on. RINSE_AND_SOAK: alternatively, run this protocol and turn off the instrument after the soak begins. -
Page 143: Autoprime For Overnight-Weekend Maintenance
: enter the downtime interval that will trigger an AutoPrime Interval AutoPrime. 4. Select the to use if you have Buffer Switching installed. Buffer 5. Set the The default values are 40 mL at flow rate 9. Volume Rate. BioTek Instruments, Inc. -
Page 144: Removing Protein Residuals And Fungi Growth
Daily Practice with buffer or deionized water: If the 405 LS will be idle between plates for longer than 45 minutes, flush the proteins: 1. Fill a supply bottle with deionized water. Connect the bottle to the washer. -
Page 145: Autoclean The Washer
Learn About AutoClean on next page Some models of the 405 LS feature BioTek's Ultrasonic Advantage™ for easy and thorough cleaning of the wash manifold. Instruments with AutoClean capability are easily identified by the stainless steel priming reservoir built into the instrument's base, under the wash manifold. -
Page 146: Quick Clean (Keypad Only)
1. Connect a bottle with detergent or an appropriate solution for your assay. The 405 LS primes the system with 300 mL/305 mL for CW models and fills the trough with 93 mL for the sonicator. Buffer Switching models: specify the ) valve it is connected to;... -
Page 147: Create An Autoclean Protocol
Buffer Switching is installed. : enter the duration, up to 4 hours. Input the time in minutes Duration when using the keypad; hours and minutes when using LHC. 5. Click to add a cleaning step to the protocol. BioTek Instruments, Inc. -
Page 148: Periodic Maintenance
Do not immerse the instrument, spray it with liquid, or use a ”wet” cloth on it. Do not allow the cleaning solution to run into the interior of the instrument. (If this happens, contact the BioTek TAC.) Do not expose any part of the instrument to the recommended diluted sodium hypochlorite solution (bleach) for more than 20 minutes. -
Page 149: Clean The Plate Carrier
Use a damp cloth to wipe up any spills, especially if the fluid is prone to dry and harden quickly. If necessary, flush it out with warm water by holding it under a running faucet for a few seconds. BioTek Instruments, Inc. -
Page 150: Clean The Exterior Surfaces And Mist Shield
130 | Chapter 4: Maintenance Clean the exterior surfaces and mist shield 1. Turn off the instrument and disconnect the power cable. 2. Moisten a lint-free disposable towel with water, or with water and mild detergent. Do not soak the cloth 3. -
Page 151: Remove And Clean The Washer Manifold
DO NOT AUTOCLAVE the manifold! 1. Run the system "dry” to remove any fluid: remove the supply tubing from the fluid or connect an empty supply bottle to the 405 LS and run a prime protocol, e.g. , until the tubing is empty. - Page 152 132 | Chapter 4: Maintenance 3. Carefully remove the manifold(s) and end plates. 4. Using a soft-bristled brush, thoroughly clean the outside surfaces. 5. Clean inside each tube with the appropriate stylus (aspirate/dispense). Flush hot water through the cross channels to wash away debris.
-
Page 153: Maintaining The Vacuum Filtration System
Vacuum Filtration Carrier: Replace the Gasket on page 146 (as needed) Maintain the Verify™ Technology Components To keep 405 LS's with Verify™ Technology, "Q" models, performing as expected: Keep the Verify Test Plate clean. Remove any salt deposits or other contaminants. -
Page 154: Replacement Procedure For Verify Test Plate
Replacement Procedure for Verify Test Plate Before it leaves the factory, BioTek calibrates the 405 LS to use a specific Verify Test Plate. That test plate is labeled with 405 LS's serial number. When a replacement plate is needed, follow these instructions to recalibrate the 405 LS for the new plate. - Page 155 Sensor Calibration box) link. and press Start The 405 LS will perform the first part of the Verify process. 3. At the first pausing message, weigh the plate and record the Aspirate Weight ) value. BioTek Instruments, Inc.
- Page 156 Technology Advanced 2. Click the settings link. Advanced 2. See the Volume Coefficients 9. Run the routine and confirm passing results. Verify Manifold Important: Write the 405 LS's serial number on the Verify Test Plate label. 405™ Microplate Washer LS...
-
Page 157: Volume Coefficients - Slope And Offset
Verify Test Plate. These volume coefficients have been gravimetrically determined and set for your washer-test plate combination. Important: Do not change these values unless specifically instructed to do so by BioTek, as when replacing the test plate, for example. -
Page 158: Decontamination
Centers for Disease Control and Prevention (CDC). Neither BioTek nor the CDC assumes any liability for the adequacy of these solutions and methods. Each laboratory must ensure that decontamination procedures are adequate for the biohazards they handle. -
Page 159: Decontaminate Exterior Surfaces
Wipe the keypad (do not soak). Wipe again with a clean cloth moistened with deionized or distilled water. Dry immediately with a clean, dry cloth. Remove the mist shield if it is attached. Wipe the inside and outside surfaces of the mist shield. BioTek Instruments, Inc. -
Page 160: Decontaminate Tubing And Manifold
140 | Chapter 4: Maintenance Wipe the plate carrier, top surface of the instrument’s base, supply bottles and tubing, and all exposed surfaces of the instrument. 4. Wait 20 minutes. Moisten a cloth with DI or distilled water. Wipe the inside and outside surfaces of the mist shield. Wipe the plate carrier, top surface of the instrument’s base, supply bottles, tubing, bottle covers and all exposed surfaces of the instrument that have been cleaned with the bleach solution or alcohol. -
Page 161: Alternate Decontamination Procedure For Tubing And Manifold
4. Prepare an aqueous solution of 0.5% sodium hypochlorite (bleach). As an alternative, 70% isopropyl alcohol (or ethanol) may be used if the effects of bleach are a concern. Isopropyl alcohol is not recommended for removing proteins (such as bovine serum albumin). BioTek Instruments, Inc. -
Page 162: Decontaminate The Vacuum Filtration System
142 | Chapter 4: Maintenance 5. Soak the tubing and manifold in the bleach or alcohol solution. 6. Wait 20 minutes. Rinse the tubing and manifold with DI or distilled water. 7. Use a clean, dry cloth to dry all wet surfaces of the tubes and manifold. 8. -
Page 163: Long Shutdown Procedure (Prepare For Storage Or Shipment)
Vacuum Filtration Carrier: Replace the Gasket on page 146 Long Shutdown Procedure (Prepare for Storage or Shipment) Before the 405 LS is shipped or stored, the entire system should be rinsed and soaked with disinfectant and then purged of all fluid. Perform these steps when leaving the instrument unused for a long period of time. -
Page 164: Storing The Instrument
Important: Allow the instrument to reach room temperature before use after storage. Replace Components Some components of the 405 LS must be replaced periodically to maintain specified performance levels. Replace the Vacuum Pump Fuse on the facing page Clean the Fluid Inlet Filter on page 130 Vacuum Filtration Carrier: Replace the Gasket on page 146 405™... -
Page 165: Remove/Change Wash Manifold
Soft-key: Single or Dual 96-tubeor 192-tube Manifold Selection manifold. 3. Click Send Replace the Vacuum Pump Fuse Spare fuses (PN 46055) are shipped with the instrument in case the pump blows a fuse. Tools: Screwdriver To change the fuse: BioTek Instruments, Inc. -
Page 166: Vacuum Filtration Carrier: Replace The Gasket
Vacuum Filtration Carrier: Replace the Gasket If you observe damage to the vacuum filtration carrier’s gasket, you must order a replacement part from BioTek, and follow these instructions to replace it. Tools: Philips head screwdriver 1. Remove the carrier from the instrument and put on a level work surface. -
Page 167: Qualification
Chapter 5 Qualification This chapter provides instructions for periodically testing the instrument to verify that it meets performance specifications. Qualification Overview Qualification Schedule System Self-Test, Verify Information Sensor Test: Fluid, Waste, Plate Detection Ultrasonic Cleaner Test Liquid Testing the 405™ Microplate Washer LS Washer Liquid Tests Vacuum Filtration Evacuation Efficiency Test Qualify the Verify™... -
Page 168: Qualification Overview
148 | Chapter 5: Qualification Qualification Overview Instrument verification for the 405 LS involves three activities: qualification of installation and setup, qualification of routine capability, and qualification of long- term stability. These activities are called Installation Qualification (IQ) Operational Qualification , and Performance Qualification , respectively. -
Page 169: Qualification Schedule | 149
Qualification Schedule The following schedule defines the factory-recommended intervals for verification tests for an instrument used two to five days a week. The schedule assumes that the 405 LS is properly maintained as outlined in the Recommended Maintenance Schedule on page 119 Note: An instrument qualification package (PN 1170543) is available for purchase. -
Page 170: Record Basecode
If the test fails, an error code displays. If this happens, find the error code in the 405 LS Operator’s Manual to determine its cause. If the problem is something you can fix, turn off the instrument, fix the problem, and then turn the instrument back on and re-run the test. -
Page 171: Ultrasonic Cleaner Test
(Non- Buffer Switching models can press STOP when prompted for a rinse bottle and quit the program.) If the ultrasonic cleaner does not operate as described above, contact BioTek for assistance. BioTek Instruments, Inc. -
Page 172: Liquid Testing The 405™ Microplate Washer Ls
152 | Chapter 5: Qualification Liquid Testing the 405™ Microplate Washer LS Which Tests to Perform? We recommend that you perform these routine tests before first use (after the IQ) and then monthly: Washer Dispense Precision Test. Precision tests measure the variability of volumes dispensed from tube to tube across the manifold. -
Page 173: Important Recommendations For All Liquid Tests
Plate Reading If you are using one of BioTek’s keypad-based readers, such as the ELx800 or ELx808, ensure that the reader is not running in Rapid mode. To check the setting, select and cycle through the options until UTIL à... -
Page 174: Washer Liquid Tests
OD of all wells on the plate. It is assumed that 1 mg = 1 µL of fluid for this calculation. Predefined Test Protocols Several 405 LS protocols are shipped onboard the instrument and with the and installed on your computer during LHC installation. 405™ Microplate Washer LS... -
Page 175: Washer Qualification Test Materials
The files are stored in the LHC's default file location. Unless you have changed the file location: Click the button and locate the 405 LS folder. Choose the 1Buffer or Open 4Buffer folder to match your instrument's Buffer Switching capability. - Page 176 156 | Chapter 5: Qualification Microplate Type Liquid Tests Flat-bottom 384-well plates, Corning Evacuation Efficiency Test (192) Costar or equivalent Dispense Precision Test (192) Annual Buffer Switching Test 96-well 0.45 µm filter plate, Vacuum Filtration Evacuation Efficiency Millipore MSHVN4550 96 or Test (Use the plate size most equivalent commonly used in your lab)
-
Page 177: Dispense Precision Test
FD&C #1 blue dye. of BioTek Blue Test Dye*. * BioTek Solution #2 10X Concentrate Blue Test Dye 125 mL (PN 7773001) contains 5 grams per liter FD&C Blue #1, 0.1% Tween 20 in deionized water and 0.01% Sodium Azide as a preservative. -
Page 178: Evacuation Efficiency Test
158 | Chapter 5: Qualification 2. Fill a supply bottle with 1200 mL of Solution #3; Buffer Switching units use buffer valve A. 3. Run again to prime the washer with the solution. W-DAY_RINSE 4. Place a new 96-well microplate on the balance and zero the balance. 5. -
Page 179: Evacuation Diagnostic Test
If the test fails a second time: Perform the Evacuation Diagnostic Test. Evacuation Diagnostic Test Conduct this test if the standard Evacuation Efficiency Test fails twice. This test will confirm which aspirate tube(s) may be clogged, or if the plate’s alignment or position is the problem. BioTek Instruments, Inc. -
Page 180: Buffer Switching Dispense Test
If the problem appears to be related to a particular region, edge, or corner of the plate, review the alignment and flatness of the plate on the carrier. Please do not adjust the carrier adjustment screws! Contact BioTek if you suspect an alignment problem, contact BioTek TAC. ... - Page 181 30.72 grams ± 10% (between 27.65 g and 33.79 g) for 192-Tube test. If the weight falls above this range, the valve may be defective. Contact BioTek. If the weight falls below this range, the valve may be contaminated with fungi or proteins and must be cleaned using an appropriate enzyme, alcohol, or a diluted bleach solution, depending on the contaminant.
-
Page 182: Evacuation Efficiency Test
162 | Chapter 5: Qualification fluid lines and manifold. 2. Fill a supply bottle with 1440 mL of ; Buffer Switching units use Solution #4 buffer valve A. 3. Run again to prime the washer with the solution. W-DAY_RINSE 4. Place a new 384-well microplate on the balance and zero the balance. 5. -
Page 183: Evacuation Diagnostic Test
If the test fails a second time: Perform the Evacuation Diagnostic Test (192). Evacuation Diagnostic Test (192) Conduct this test if the standard Evacuation Efficiency Test fails twice. This test will confirm which aspirate tube(s) may be clogged, or if the plate’s BioTek Instruments, Inc. - Page 184 If the problem appears to be related to a particular region, edge, or corner of the plate, review the alignment and flatness of the plate on the carrier. Please do not adjust the carrier adjustment screws! Contact BioTek if you suspect an alignment problem, contact BioTek TAC. ...
-
Page 185: Vacuum Filtration Evacuation Efficiency Test
Vacuum Filtration Evacuation Efficiency Test | 165 Vacuum Filtration Evacuation Efficiency Test This test is designed for the 405 LS with the Vacuum Filtration accessory. Install the vacuum filtration plate carrier to perform the test. Make sure the instrument setting for Plate Carrier is set correctly. - Page 186 A new, defect-free filter plate was used. The vacuum filtration plate carrier’s gasket is clean and has not been damaged by previous use or mishandling. Correct these conditions and rerun the test or contact BioTek TAC for assistance. 405™ Microplate Washer LS...
-
Page 187: Qualify The Verify™ Technology Sensor
Otherwise, open the Excel spreadsheet provided on the 405 LS Operator's Manual CD in preparation for recording and calculating test results. Run Verify Test Plate Alignment: To make sure the 405 LS is correctly calibrated for the Verify Test Plate: 1. Select Tools>Instrument Utilities>Verify Manifold>Configure Utilities 2. - Page 188 If you have Gen5, the reading results will be reported later in the Power Export. 5. Put the Verify Test Plate back on the 405 LS's carrier and select in the pausing message to continue. 6. At the second pause, weigh the plate again and record the Dispense Weight value.
- Page 189 Is the Verify sensor's collimator clean and properly installed? (Clean the Verify™ Level Sensor on page 133). Have the plate carrier feet been adjusted? Contact BioTek TAC for recalibration service. Take corrective action if possible and rerun the test. If it fails again, contact BioTek TAC for guidance. BioTek Instruments, Inc.
- Page 190 170 | Chapter 5: Qualification 405™ Microplate Washer LS...
- Page 191 (sum of all wells ÷ number of wells) % Coefficient of Variation: ((Standard Deviation ÷ Mean OD) x 100) q Pass q Fail % CV <= 3.0? Date: Test Performed By: 405 LS Qualification Procedures © 2012, BioTek® Instruments, Inc.
- Page 192 Residual Factor (Mean OD ÷ Mean Residual Weight): Calculate the Residual Weight for each well: well OD ÷ Residual Factor Every Residual Weight per well <= 0.002 g? q Yes q No Date: Test Performed By: 405 LS Qualification Procedures © 2012, BioTek® Instruments, Inc.
- Page 193 Valve A grams q Pass q Fail q Pass q Fail Valve B grams Valve C grams q Pass q Fail Valve D grams q Pass q Fail Date: Test Performed By: 405 LS Qualification Procedures © 2012, BioTek® Instruments, Inc.
- Page 194 (sum of all wells ÷ number of wells) % Coefficient of Variation: ((Standard Deviation ÷ Mean OD) x 100) q Pass q Fail % CV <= 4.0? Date: Test Performed By: 405 LS Qualification Procedures © 2012, BioTek® Instruments, Inc.
- Page 195 Residual Factor (Mean OD ÷ Mean Residual Weight): Calculate the Residual Weight for each well: well OD ÷ Residual Factor Every Residual Weight per well <= 0.002 g? q Yes q No Date: Test Performed By: 405 LS Qualification Procedures © 2012, BioTek® Instruments, Inc.
- Page 196 Valve A grams q Pass q Fail Valve B grams q Pass q Fail q Pass q Fail Valve C grams Valve D grams q Pass q Fail Date: Test Performed By: 405 LS Qualification Procedures © 2012, BioTek® Instruments, Inc.
- Page 197 Test Results Verification that wells are consistent in appearance: c Pass c Fail Residual Weight: c Pass Residual Weight: <= 1.2 g c Fail Date: Performed By: If required, Reviewed/Approved By: 405 LS Qualification Procedures © 2012, BioTek® Instruments, Inc.
- Page 198 Test Results c Pass Verification that wells are consistent in appearance: c Fail Residual Weight: grams Residual Weight: <= 4.0 g c Pass c Fail Date: Performed By: If required, Reviewed/Approved By: 405 LS Qualification Procedures © 2012, BioTek® Instruments, Inc.
-
Page 199: Troubleshooting
Chapter 7 Troubleshooting This chapter provides guidelines for error recovery and troubleshooting performance problems. Troubleshooting General Operation Troubleshooting... -
Page 200: Troubleshooting
They cannot be used simultaneously. You can use USB to connect the 405 LS to the computer or the RS232 serial port to connect to a BioStack or similar robotic device. But you cannot use both ports simultaneously, i.e. - Page 201 Troubleshooting | 181 disconnect the BioStack from the 405 LS and change the Instrument Setting for the BioStack: Press Setup Menu> BIOSTK> CONF>MANUAL BioTek Instruments, Inc.
-
Page 202: General Operation Troubleshooting
Reseat microplate in carrier or strips in holder. seated or strips not Make sure the carrier is clean. level. Try a different microplate or strip holder. If the problem is unresolved, the carrier may have to be realigned. Contact BioTek TAC. 405™ Microplate Washer LS... -
Page 203: Washer Problems
With the vacuum pump on, remove the vacuum pump tubing from the back of the instrument. Put your finger over the port; if there is no vacuum, contact BioTek TAC. BioTek Instruments, Inc. - Page 204 ® water buffer. Tween Some wells Insufficient BioTek offers a high-flow pump for assays using only left full. vacuum. water for the wash fluid. Contact BioTek for more information. Protocol settings Optimize protocols to improve evacuation on page 40 not optimized.
- Page 205 Insufficient suction, Perform Washer Maintenance; If the problem clogged tubing, or faulty persists, contact BioTek TAC. valve. Plate Dispense height too high. Lower the dispense height (Z-axis position) in the overfills The aspirate tubes are too protocol.
- Page 206 When the program begins, you should be able to hear the vacuum pump turn on. If it is not turning on, contact BioTek TAC. If the vacuum pump turns on, remove the vacuum tubing from the back of the instrument and put your finger over the port.
- Page 207 Use a slower Aspiration Travel Rate. Uneven (not level) Make sure the surface the washer sits on is surface. perfectly level. Fluid leaking from Defective tubing Contact BioTek TAC. underneath the connector or inlet instrument. tubing. Leaking valve. Contact BioTek TAC.
-
Page 208: Communication Errors
Possible Problem What To Do Cause Y-axis. Uneven Plate carrier Replace plate carrier: contact BioTek TAC for assistance. performance. leveling feet Note: "Q" model washers with Verify™ Technology must damaged. recalibrate the Verify test plate after installing the new carrier. - Page 209 When the computer (PC) won't communicate with the instrument: . All BioTek instruments perform a self-test when Run the system self-test turned on. The 405 LS will not communicate if it fails an internal system test. An error message will be displayed when a test fails. to the...
- Page 210 190 | Chapter 7: Troubleshooting 405™ Microplate Washer LS...
-
Page 211: Error Codes
Appendix A Error Codes A listing of potential error codes and possible solutions for resolving them. System Error Codes 405 LS-LHC Software Error Codes... -
Page 212: Dispense Precision Test
Fix these kinds of errors and restart your instrument to give it an opportunity to clear the error code. for assistance. Contact BioTek Technical Assistance Center (TAC) Code Message What to do... - Page 213 System Error Codes | 193 Code Message What to do Wash head motor didn’t find Service Only. autocal jig optical sensor Contact BioTek TAC. transition. Carrier X motor interlock safety Service Only. switch open Contact BioTek TAC. Carrier Y motor interlock safety Service Only.
- Page 214 194 | Chapter A: Error Codes Code Message What to do Configuration parameter out of Service Only. range Contact BioTek TAC. 1001 Bootcode powerup checksum Contact BioTek TAC. test failed 1002 Unknown error in bootcode Contact BioTek TAC. 1003 Bootcode page program error Contact BioTek TAC.
- Page 215 The Magnet Adapter offset (MAGHT) is too high, the "in use" value is missing, or a more serious software problem exists. Make sure setting is valid, and if so, contact BioTek TAC. 1404 Plate type restricted This instrument model or the requested device does not support the selected plate type.
- Page 216 Code Message What to do 1415 AutoPrime value out of range Contact BioTek TAC. 1500 No buffer fluid detected at the Fluid detection errors. Make sure the supply start of a wash protocol bottle is full and properly connected, the tubing is not kinked, blocked, etc., and the...
- Page 217 The protocol may have been created for a connected different instrument, according to the instrument's basecode it is not compatible 1515 Cell Wash hardware not with this instrument. Contact BioTek TAC. installed 1516 Vacuum filtration start or end Vacuum pressure is detected in the error intermediate waste bottle before or after the run.
- Page 218 198 | Chapter A: Error Codes Code Message What to do 1738- Level sensor functional errors Take action to correct the error, if possible. Otherwise, contact BioTek TAC for 173A assistance. 2400 Parameter limit exceeded Contact BioTek TAC. 4000 Program locked so operation Contact BioTek TAC.
- Page 219 System Error Codes | 199 Code Message What to do 810A No request running when Contact BioTek TAC. response request issued 810C Response for outstanding Contact BioTek TAC. request not ready yet 810D To communicate with the LHC, The LHC can only talk to the instrument the instrument must be at its when its main menu is displayed.
-
Page 220: 405 Ls-Lhc Software Error Codes
Quick Fix: Instrument Settings instrument’s hardware configuration and then, modify the protocol to fix any invalid parameters. With the 405 LS connected to and communicating with your computer and its main menu displayed on the keypad: 1. Click the link in the main view. - Page 221 405 LS-LHC Software Error Codes | 201 Error Description Help Code 6009 The 96-tube singe wash manifold can only be used with 96-well plates 6010 The data is invalid or out-of-range. Service Only. Contact BioTek TAC. 6011 This step type cannot be Review the limitations to transferring downloaded.
- Page 222 6051 Invalid message object USB or serial. 6052 Invalid message body size Try running a different protocol. If error reoccurs, contact BioTek TAC. 6053 Serial message timeout 6054 Port handle error 6055 Read timeout value is invalid.
- Page 223 405 LS-LHC Software Error Codes | 203 Error Description Help Code 6056 Unauthorized to open the COM port Make sure the COM port setting is correct and the cable is properly connected. 6057 Out-of-range parameter for the open Restart the instrument. If error reoccurs, port function.
- Page 224 204 | Chapter A: Error Codes Error Description Help Code 6088 Invalid Shake/Soak options selected Service Only. Contact BioTek TAC. 6089 Invalid Shake Intensity selected These codes indicate an unexpected 6090 Invalid Washer buffer selected software error that cannot be fixed 6091 Invalid Washer Aspirate Delay value without BioTek support.
- Page 225 This document contains information on warnings, hazards, and precautions that may apply to the BioTek product(s) you have purchased. BioTek provides this appendix to ensure that you have the information you need to safely operate our products. If you have any questions, please contact BioTek directly or your local BioTek representative.
- Page 226 Les valeurs de mesure peuvent être affectées par des particules étrangères (comme la poussière) dans le puits de la microplaque. Un espace de travail propre est nécessaire pour assurer des lectures précises. Liquid Handling: Strict adherence to instrument maintenance and qualification procedures is required to ensure accurate dispense volumes and risk-free operation.
- Page 227 Attention! Lubrifiants. Pour les instruments avec un rail exposé pour support de plaques ou sans porte d'accès à l’intérieur de la plaque, ne pas appliquer de lubrifiants pour microplaques ou piste de support de microplaques. Un lubrifiant sur le mécanisme de support ou des composants dans le compartiment transporteur peut attirer la poussière et d'autres particules qui peuvent obstruer la voie de transport et l'instrument peut être amené...
- Page 228 Warning! Pinch Hazard. Some areas of this instrument, its components, and/or accessories can present pinch hazards when the instrument is operating. The module is marked with one of the symbols shown here. Keep hands/fingers clear of these areas when the instrument is operating. Attention! Pincement.
- Page 229 Manipulations des liquides: Attention! Energie ultrasonique. L'énergie ultrasonique est présente dans le réservoir nettoyeur à ultrasons (le cas échéant) lorsque les programmes en cours d'exécution sont AUTOCLEAN. Évitez de mettre vos doigts dans le bain. L'énergie ultrasonique, dans cette application, peut être gravement dangereux pour la peau. ELx405: Warning! Direct Drain Waste.
- Page 230 Caution: Service. The instrument should be serviced by BioTek authorized personnel. Only qualified technical personnel should perform service procedures on internal components. Attention: Service. L'appareil doit être réparé par un personnel autorisé BioTek. Seul le personnel technique qualifié doit effectuer les procédures d'entretien des composants internes.
- Page 231 à l'appareil. ELx405: Utilisation des tampons de lavage contenant de l'acide acétique est limitée aux instruments avec les vannes Teflon ® PN 68098. Contactez BioTek pour plus d'informations et avant d'utiliser d'autres produits chimiques douteux.
- Page 232 Caution: Bovine Serum Albumin. Solutions containing proteins, such as bovine serum albumin (BSA), will compromise the instrument’s performance over time unless a strict maintenance protocol is adhered to. See Maintenance procedures regarding BSA. Attention: Sérum albumine bovine. Solutions contenant des protéines, comme l'albumine sérique bovine (BSA), va compromettre les performances de l'instrument au fil du temps, sauf si un protocole de maintenance stricte est respectée.
- Page 233 Delay after Dispense Average Residual Volume Delay Aspiration Delay/pause processing Dispense Basic operation To specific columns BioStack Dispense Pattern How to configure/operate Dispense Precision BioTek's Customer Resource Center 12 Dispense Precision and Accuracy Test BioTek's Ultrasonic Advantage For 96-tube Bottles Clean filter...
- Page 234 206 | E Dispense Precision Test Name a protocol For 192-tube Shake the plate Dispense to certain wells Humidity limits Keypad control Distilled water ix,117,128 Download protocols Incubate a plate at room tem- 51,66 perature Instrument Settings 56-57 Empty priming trough Defining Enter negative numbers Instrument Utilities...
- Page 235 Plate Type Returning the instrument Defining 47,50 Robotics integrators supported Port link 42,55,57 Power Supply Self-test Power users Sensors Pre-Dispense serial port 25,82,180 Prevent fluid loss during wash Service Functions Prime Shake intensity tips Shake the plate BioTek Instruments, Inc.
- Page 236 208 | T Shake/Soak parameters Vacuum Filtration 129,133 Shipping QC test preparation for Vacuum Filtration Carrier Prepare for decontaminate Size and weight replace gasket Soak 51,60,67 Vacuum on based on volume Soak step Valve module Soak, steep the plate contents installation Sonicator 3,125-126...
- Page 237 Windows Common Applications Data Folder| 209 Folder Windows® 7 Windows® Vista Windows® XP Worksheet Test results BioTek Instruments, Inc.
- Page 238 ...
- Page 239 Thermoplastic elastomer Fluid pump check valves Santoprene® Silicone Inlet tubing, outlet tubing, o-rings, vacuum filtration carrier gasket, vacuum filtration module tubing Outlet valve, CW inlet valve, vacuum filtration Ultem (polyetherimide) module valves Outlet valve, CW inlet valve Viton BioTek Instruments, Inc.
- Page 240 A ND D A ND ND This ratings information was obtained from several reputable sources and our own experience at BioTek, but your experience may differ due to variations in concentration, temperature, and other factors. Consult the reagent/solvent manufacturer before use to verify its compatibility with instrument components.
Need help?
Do you have a question about the 405 LS and is the answer not in the manual?
Questions and answers